Use dynamic inventories to scale your automation.
The Scenario
In Ansible and the Ansible Automation Platform, as you know, everything starts with an inventory. There are several methods how inventories can be created. Starting from simple static definitions over importing inventory files to dynamic and smart inventories.
In real life it’s very common to deal with external dynamic inventory sources (think cloud, CMDB, containers, …). In this chapter we’ll introduce you to building dynamic inventories using custom inventory scripts. Another great feature of the Ansible Automation Platform to deal with inventories is the Constructed Inventory feature, which you’ll learn more about in the next chapter.
Dynamic Inventories
Automation execution includes built-in support for syncing dynamic inventories from cloud sources such as Amazon AWS, Google Compute Engine, and others.
-
Inventory plugins are the newer way to generate custom inventories and must be written in Python, but inventory scripts still work.
-
If the source you want to query is not covered by an existing inventory plugin, you can create your own script or plugin.
In this chapter you’ll get started with custom dynamic inventory scripts. Among all the available programming languages we have chosen one of the most accessible and known: Bash! Yes!
| Don’t get this wrong… we’ve chosen to use Bash to make it as simple as possible to show the concepts behind dynamic and custom inventories. Our recommendation in real life remains to use Python to write your dynamic inventory plugins (not scripts!), and benefit from libraries, documentation and examples written in the same language. And actually you should even place the inventory plugin in a collection and execute it from an Execution Environment loaded into the provided by private automation hub. But this approach would have been too involved for this lab, so here you are: Bash! |
The Inventory Source
First you need an inventory source. In real life this would be your cloud provider, your CMDB, or what not. For the sake of this lab we put a simple file into a GitLab repository.
Go to your terminal (how to access a terminal is described here) and use curl to query your "external inventory source":
curl https://MYGITEAHOST.apps.ocpvdev01.rhdp.net/MYGITEAUSER/playbooks-adv-controller/raw/branch/main/constructed-inventory/inventory_listThis should give you the following output:
{
    "dyngroup":{
        "hosts":[
            "cloud1.cloud.example.com",
            "cloud2.cloud.example.com",
            "CLOUD3.cloud.example.com"
        ],
        "vars":{
            "var1": true
        }
    },
    "all":{
        "hosts":[
            "cloud4.prod.cloud.example.com",
            "cloud5.prod.cloud.example.com",
            "cloud6.dev.cloud.example.com",
            "cloud7.dev.cloud.example.com"
        ]
    },
    "_meta":{
        "hostvars":{
            "cloud1.cloud.example.com":{
                "type":"web",
                "architecture":"x86_64"
            },
            "cloud2.cloud.example.com":{
                "type":"database",
                "architecture":"arm"
            },
            "cloud3.cloud.example.com":{
                "type":"database",
                "architecture":"x86_64"
            },
            "cloud4.prod.cloud.example.com":{
                "type":"web",
                "architecture":"arm"
            },
            "cloud5.prod.cloud.example.com":{
                "type":"web",
                "architecture":"x86_64"
            },
            "cloud6.dev.cloud.example.com":{
                "type":"web",
                "architecture":"arm"
            },
            "cloud7.dev.cloud.example.com":{
                "type":"web",
                "architecture":"x86_64"
            }
        }
    }
}
Well, this is handy, the output is already presented as JSON, as expected by Ansible… ;-)
| Okay, seriously, in real life your plugin would likely get some information from your source system, format it as JSON and return the data to the automation execution. |
The Custom Inventory Script
An inventory script (and plugins, too) has to follow some conventions. It must accept the --list and --host <hostname> arguments. When it is called with --list, the script must output JSON-encoded data containing all groups and hosts to be automated. When called with --host <hostname> it must return an JSON-formatted hash or dictionary of host variables (can be empty) for the specified host.
As looping over all hosts and calling the script with --host can be pretty slow, it is possible to return a top level element called _meta with all host variables together with the output of --list in one run. And this is what we’ll do. So this is our custom inventory script:
#!/bin/bash

if [ "$1" == "--list" ] ; then
    curl -sS https://MYGITEAHOST.apps.ocpvdev01.rhdp.net/MYGITEAUSER/playbooks-adv-controller/raw/branch/main/constructed-inventory/inventory_list
elif [ "$1" == "--host" ]; then
    echo '{"_meta": {"hostvars": {}}}'
else
    echo "{ }"
fi
What it basically does is to return the data collected by curl when called with --list and as the data includes _meta information about the host variables Ansible will not call it again with --host. The curl command is of course the place where your plugin would get data by whatever means, format it as proper JSON and return it (-sS makes curl silent, except for error messages).
But before we integrate the custom inventory plugin into our automation execution, it’s a good idea to test it on the command line:
-
Bring up your terminal (for the VS Code Server terminal log in with password
MYCTLPASSWORD). -
Create the file
/home/MYSSHUSER/dyninv.shwith the content of the Bash script shown above.
Create the script in /home/MYSSHUSER/.
|
-
Make the script executable:
chmod +x /home/MYSSHUSER/dyninv.sh -
Run it:
/home/MYSSHUSER/dyninv.sh --list
This should give you the same output as above.
As simple as it gets, right? More information can be found on how to develop dynamic inventories.
So, now you have a source of a (slightly static) dynamic inventory (talk about an oxymoron…) and a script to fetch and pass it to the automation execution.
Integrate into Ansible Automation Platform
In Ansible Tower up to version 3.8, you could create inventory scripts directly in the web UI. Since automation controller 4.0 (aka AAP 2.0) the only way to get inventory scripts into Automation Execution is by putting the script into a source control repository.
For this lab the inventory script was already created in the git repository you have configured as a Project earlier, so you can use this as-is.
Access your AAP UI from the AAP tab in Showroom, or open https://MYCTLHOST.apps.ocpvdev01.rhdp.net in a browser tab. Log in as MYCTLUSER with password MYCTLPASSWORD
You can directly proceed to adding the dynamic inventory and pointing it to the inventory script.
-
In the AAP web UI, open .
-
To create a new inventory, open the ⊕ Create inventory drop-down and click Create inventory.
-
Fill in the fields:
-
Name:
Cloud inventory -
Organization:
Default
-
-
Click Create inventory.
-
Open the Sources tab and click ⊕ Create source.
-
Fill in the fields:
-
Name:
Cloud inventory Script -
Source:
Sourced from a Project -
Project:
Lab Project Repo -
Inventory file:
constructed-inventory/inventory-script -
Enable Update on launch
-
Cache timeout (seconds):
300
-
-
Click Create source.
-
Return to the Sources tab of the Cloud inventory.
-
Start the inventory update using the circular arrows icon.
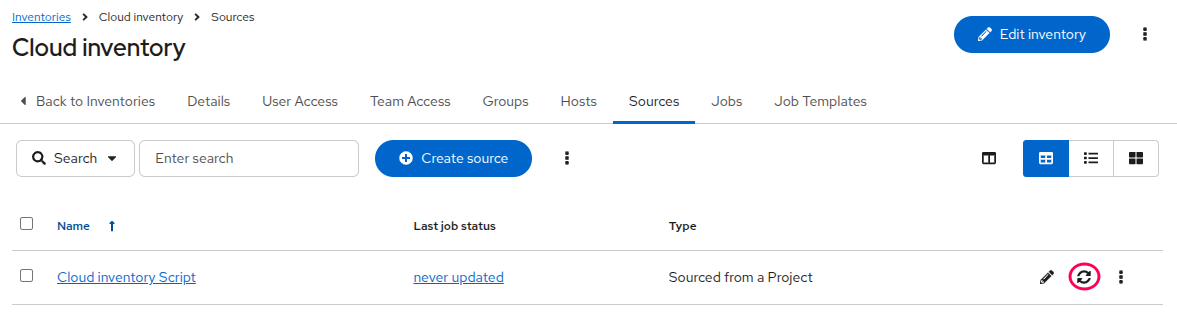
Open to watch the initial sync; Type is Inventory sync.
After the inventory sync has finished, open and review the new hosts added to the Cloud inventory. You should see hosts matching the JSON output above.