Secure the Automation Supply Chain
Project signing allows users to sign content like playbooks, inventories, etc that live in a project (backed by a version control repository) and configure automation controller to verify whether or not that content has been changed form the signed versions. This way users can make sure the supply chain remains untampered, from the source repository to running an automation job.
The best way to understand how this works is, as most times, to give it a try. Read on!
The Setup
In your lab environment you’ll find an instance of the Gitea Git service. A git repository with Ansible content has been cloned to it already (it’s actually the repository holding supporting Playbooks for this lab).
You will clone this repository locally to your bastion host and then see how automation controller can be used to check for signed content.
Prepare Repository
Access Gitea
Open the Gitea tab in Showroom, or go to https://MYGITEAHOST.apps.ocpvdev01.rhdp.net in your browser.
Sign in to Gitea as user MYGITEAUSER with the password MYGITEAPASSWORD.
Look around, to the right in the UI you’ll see a list of repositories, click the MYGITEAUSER/playbooks-adv-controller link. This will take you to the repository.
Clone the repository
Switch to your terminal (how to access a terminal is described here) for the next tasks.
Next, you need the repository from Gitea in your home directory on the bastion host. As you have already cloned this repo in the first chapter it should already exist. To check, in your terminal run ls -l ~, which should output something like:
$ ls -l ~

total 4
drwxr-xr-x. 5 MYSSHUSER users 4096 Apr 24 13:10 playbooks-adv-controller
If you don’t have the git repository, run the following commands:
cd
git clone https://MYGITEAHOST.apps.ocpvdev01.rhdp.net/MYGITEAUSER/playbooks-adv-controller.git
cd playbooks-adv-controller
You have to configure git locally, run:
git config --global user.name "Your Name"
git config --global user.email you@example.com
Sign Repository Content
By now we have a local git repository with some Ansible content, nothing special yet. Now we’ll sign the repository content.
We will create a GnuPG key pair to sign our project locally. Asymmetrical keys are used to validate the integrity of a project’s content. The private key from the key pair is used at the point of signing and a public key is used to verify that the content has not been manipulated in any way. The public key will be used in automation controller to verify signatures later on.
Prepare GPG
First we have to create the keys we’ll use with GPG. Create the file /home/MYSSHUSER/gpg.txt using your favorite editor with the following content:
%echo Generating a basic OpenPGP key
Key-Type: default
Key-Length: 4096
Subkey-Type: default
Subkey-Length: default
Name-Real: VerySecure
Name-Comment: with no passphrase
Name-Email: student@localhost
Expire-Date: 0
%no-ask-passphrase
%no-protection
# Do a commit here, so that we can later print "done" :-)
%commit
%echo done
Think of this file as the instructions given to the GnuPG library on the system about the type of key pair we want to create. This creates a key pair without a passphrase (of course, normally you would want to have a passphrase for your private GPG key).
Now create a GPG key pair using the gpg.txt file. Run the following commands in the Terminal window to create the key pair.
The first command will create the key pair using the gpg.txt file:
gpg --batch --gen-key ~/gpg.txt| It can take a few moments for this command to complete! |
The next command will export the public key to a file called signing_demo.asc. This is a more conventional method of sharing public keys.
gpg --output ~/signing_demo.asc --armor --exportCheck the content of the exported public key using the below command.
cat ~/signing_demo.ascWe will use the content of this file in the next steps, when we setup the verification of projects in automation controller.
And finally, run the below command to list the gpg keys that exist on the system, this should have only one (valid) key pair, the one just created.
gpg --list-keysIn summary, your session should have looked roughly as follows:
$ gpg --batch --gen-key ~/gpg.txt
gpg: directory '/home/lab-user/.gnupg' created
gpg: keybox '/home/lab-user/.gnupg/pubring.kbx' created
gpg: Generating a basic OpenPGP key
gpg: /home/lab-user/.gnupg/trustdb.gpg: trustdb created
gpg: key 0514AB0752B89B58 marked as ultimately trusted
gpg: directory '/home/lab-user/.gnupg/openpgp-revocs.d' created
gpg: revocation certificate stored as '/home/lab-user/.gnupg/openpgp-revocs.d/D34F31920EFEF5B9D1B898430514AB0752B89B58.rev'
gpg: done
$ gpg --output ~/signing_demo.asc --armor --export
$ cat ~/signing_demo.asc
-----BEGIN PGP PUBLIC KEY BLOCK-----

mQINBGgI8KEBEADSdpKXifZnBN3huHTKR8mbHFuPcEKn/CHFHIa5EDy0dPbyjj8j
[... MANY LINES WITH LETTERS AND NUMBERS IN BASE64 FORMAT ...]
=byJd
-----END PGP PUBLIC KEY BLOCK-----
$ gpg --list-keys
gpg: checking the trustdb
gpg: marginals needed: 3  completes needed: 1  trust model: pgp
gpg: depth: 0  valid:   1  signed:   0  trust: 0-, 0q, 0n, 0m, 0f, 1u
/home/lab-user/.gnupg/pubring.kbx
---------------------------------
pub   rsa4096 2025-04-23 [SC]
      D34F31920EFEF5B9D1B898430514AB0752B89B58
uid           [ultimate] VerySecure (with no passphrase) <student@localhost>
sub   rsa3072 2025-04-23 [E]
Configure ansible-sign and sign playbooks
Now that we have prepared the signing keys let’s sign our playbooks-adv-controller repository using the ansible-sign tool. First install the tool itself:
sudo dnf install ansible-sign -yThe first step toward signing content is to create a file that tells ansible-sign which files to protect. This file should be called MANIFEST.in and reside in the project root directory. So go ahead and create the file /home/MYSSHUSER/playbooks-adv-controller/MANIFEST.in using your favorite editor with the following content:
recursive-exclude .git *
recursive-exclude .vscode *
recursive-exclude constructed-inventory *
recursive-exclude inventory *
exclude .ansible-lint
exclude .gitignore
include *.yml
In this case we just include every file in the repository root that matches *.yml and exclude everything else. In the next step we will finally sign the files listed in the MANIFEST.in file.
ansible-sign project gpg-sign /home/MYSSHUSER/playbooks-adv-controllerThe above command tells the ansible-sign tool to gpg-sign the playbooks-adv-controller project locally.
Once you run the command, you will see that the GPG signing was successful and you can confirm that by looking at the new files that were created by ansible-sign:
head -n-0 /home/MYSSHUSER/playbooks-adv-controller/.ansible-sign/sha256sum.*ansible-sign created a file with the checksums of the files listed in MANIFEST.in and another file with the signature of this file.
head -n-0 is a trick to output the content of multiple files separated by their names as header between arrows.
|
Again, in summary, your session should have looked roughly as follows:
$ sudo dnf install ansible-sign -y
Updating Subscription Management repositories.
[... MANY MORE LINES ...]
Installed:
  ansible-sign-0.1.1-2.el9ap.noarch  python3.11-distlib-0.3.8-1.el9ap.noarch  python3.11-gnupg-0.5.2-1.el9ap.noarch

Complete!
$ vi /home/lab-user/playbooks-adv-controller/MANIFEST.in
$ ansible-sign project gpg-sign /home/lab-user/playbooks-adv-controller
[OK   ] GPG signing successful!
[NOTE ] Checksum manifest: /home/lab-user/playbooks-adv-controller/.ansible-sign/sha256sum.txt
[NOTE ] GPG summary: signature created
$ head -n-0 /home/lab-user/playbooks-adv-controller/.ansible-sign/sha256sum.*
==> /home/lab-user/playbooks-adv-controller/.ansible-sign/sha256sum.txt <==
ca20222e12c10ae22ca8d8a410b7f7a6c9a6ddb306d8eba6238f65c93b08755f  MANIFEST.in
e4a5116483454410a19e2f35513215ecdab7fc742b4e1cf17b7bf358e92f3856  apache_install.yml
a021bf2567835899cfa632aa4bbc7ecc38b1ab79944368a7c51ee5fac67aaf10  cis.yml
feac3c5b76139bd6756148759485c8b9904514c22d1ef18b486ea8c693fb101c  configure-controller.yml
d3de70bf5cdad22044041d96d3650b7ea390cb8393d758b828e343289fd67e7f  repo-sign-git.yml
a3a48477a2fc4e013f704ec2fec94d9a05c7abb45f0977619bf38552bb2c99cb  simple_git.yml
2a4e7e0658b43c65a057fe7ea11648c38fa46a4357c93e60717f96e4b4453bfe  stig-config.yml
0cb51c2c244549558a98ca03431652e0132107b002857eaff4417462604764dd  stig-packages.yml

==> /home/lab-user/playbooks-adv-controller/.ansible-sign/sha256sum.txt.sig <==
-----BEGIN PGP SIGNATURE-----

iQIzBAABCAAdFiEE008xkg7+9bnRuJhDBRSrB1K4m1gFAmgI8lIACgkQBRSrB1K4
[... MANY LINES WITH LETTERS AND NUMBERS IN BASE64 FORMAT ...]
=iFhm
-----END PGP SIGNATURE-----
Push content to Gitea
To make the repository available as a Project to automation controller, the new files must be pushed from our local git repository to the Gitea repository. Add the new files for git staging:
cd ~/playbooks-adv-controller
git add .ansible-sign/ MANIFEST.in
git status
Git tells you that there are changes to be committed. Commit the changes:
git commit -m "Adding signatures for project"Push the new files to your git repository server:
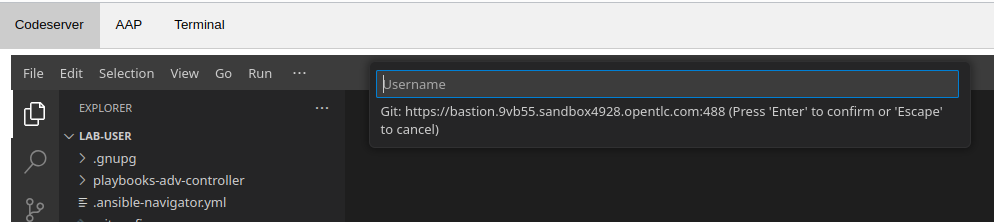
git pushVS Code Server will open a small dialog at the top of the window asking for username and password, or git in the terminal will ask for the same information.
In both cases, enter MYGITEAUSER and MYGITEAPASSWORD.
Setup Automation Execution
Now, we have to configure our automation execution to use and verify our signed content.
Access your AAP UI from the AAP tab in Showroom, or open https://MYCTLHOST.apps.ocpvdev01.rhdp.net in a browser tab. Log in as MYCTLUSER with password MYCTLPASSWORD
Create Credential with signing public key
The first step is to create a new Credential with the public key file that we exported already.
In the Terminal run:
cat ~/signing_demo.ascCopy all of its contents including -----BEGIN PGP PUBLIC KEY BLOCK----- and -----END PGP PUBLIC KEY BLOCK-----.
In the web UI, open .
-
Click ⊕ Create credential.
-
Set:
-
Name:
ansible-sign-cred -
Organization:
Default -
Credential Type:
GPG Public Key
-
-
Paste the full public key from the clipboard into the text field.
-
Click Create credential.
This will add the public key as a Credential in your automation controller.
Create Project with signed content
To configure the Gitea repository as a project you need an SCM credential. In :
-
Click ⊕ Create credential.
-
Set:
-
Name:
gitea-cred -
Organization:
Default -
Credential Type:
Source Control -
Username:
MYGITEAUSER -
Password:
MYGITEAPASSWORD
-
-
Click Create credential.
Create the project in :
-
Click ⊕ Create project.
-
Set:
-
Name:
Signed Project -
Organization:
Default -
Source Control Type:
Git -
Content Signature Validation Credential:
ansible-sign-cred -
Source Control URL:
https://MYGITEAHOST.apps.ocpvdev01.rhdp.net/MYGITEAUSER/playbooks-adv-controller.git -
Source Control Credential:
gitea-cred
-
-
Click Create project.
The important part of the Project configuration is Content Signature Validation Credential, this tells automation controller to use the GPG key in the credentials to verify the repository.
Check if signatures were verified in controller
Let’s check if the signatures were verified during the initial project sync when you clicked Create project.
Open and select the most recent project sync job for Signed Project. If the job succeeded, signature verification succeeded. You can also scroll the job output to find these tasks:
PLAY [Perform project signature/checksum verification] *************************Above tasks indicate that the signature verification was successful.
Check with tampered Content
The last step in this lab is to check, if automation controller picks up if the content has been changed without re-signing it, indicating somebody has tampered with the content.
Open the file /home/MYSSHUSER/playbooks-adv-controller/apache_install.yml in your terminal and change something, like set enabled: false.
Push the new version to the git repository:
cd ~/playbooks-adv-controller
git add apache_install.yml
git commit -m "Changing file"
git push
VS Code Server will open a small dialog at the top of the window asking for username and password, or git in the terminal will ask for the same information.
In both cases, enter MYGITEAUSER respectively MYGITEAPASSWORD.
If this change was legit, you would have re-signed the repository content. Since we didn’t sign it automation controller should recognize the signature of the file is not valid anymore and fail the repository sync. Give it a try:
-
In the web UI, open and start a sync of Signed Project using the circular arrow icon.
-
Check the result in .
The sync job should fail and the output should clearly indicate why:
TASK [Verify project content using GPG signature] ******************************
ok: [localhost]

TASK [Verify project content against checksum manifest] ************************

fatal: [localhost]: FAILED! => {"changed": false, "msg": "Checksum mismatch: apache_install.yml"}
We changed a signed file and skipped signing it again to see the result in automation execution. The verification failed and the output shows which files were not signed in the Project.
Conclusion
Software supply chain security is a very important topic, specially in the context of recent hacks were attackers managed to inject malware into well known and widely used software projects. With the described capabilities of the Red Hat Ansible Automation Platform, you can also create a complete chain of trust for your automation code. When you run mission critical automation, you also have to ensure you only execute trusted, certified and verified automation code.