1-4: Ansible Network Resource Modules
Ansible network resource modules simplify and standardize how you manage different network devices. Network devices separate configuration into sections (such as interfaces and VLANs) that apply to a network service. Resource modules provide a consistent experience across different network devices, meaning you get an identical experience across multiple vendors. For example the VLANs module will work identically for the following modules:
-
arista.eos.eos_vlans -
cisco.ios.ios_vlans -
cisco.nxos.nxos_vlans -
cisco.iosxr.iosxr_vlans -
junipernetworks.junos.junos_vlans
Configuring VLANs on network devices is an extremely common task, and mis-configurations can cause headaches and outages. VLAN configurations also tend to be identical across multiple network switches resulting in a perfect use case for automation.
Learning objectives
By the end of this module, you will be able to:
-
Configure VLANs on Arista EOS using Ansible resource modules
-
Build an Ansible Playbook using the
arista.eos.eos_vlansmodule -
Understand the
state: mergedparameter for applying configuration -
Understand the
state: gatheredparameter for reading configuration -
Verify idempotency of resource module operations
Step 1: Verify VLAN configuration
-
Login to an Arista switch and verify the current VLAN configuration.
-
From the VS Code terminal, you can
ssh rtr2and typeenable
$ ssh rtr2
Last login: Wed Sep  1 13:44:55 2021 from 44.192.105.112
rtr2>enable-
Use the command
show vlanto examine the VLAN configuration:
rtr2#show vlan
VLAN  Name                             Status    Ports
----- -------------------------------- --------- -------------------------------
1 default active-
Use the
show run | s vlanto examine the VLAN running-configuration on the Arista device:
rtr2#show run | s vlan
rtr2#
As you can see in the output above there is no VLAN configuration outside of the default VLAN 1 (which is not assigned any ports).
Step 2: Create the Ansible Playbook
-
Create a new file in Visual Studio Code named
resource.yml
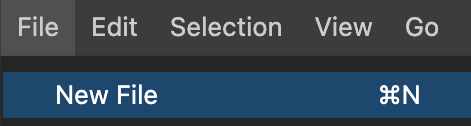
-
Copy the following Ansible Playbook into your
resource.yml
---
- name: Configure VLANs
  hosts: arista
  gather_facts: false

  tasks:

    - name: Use vlans resource module
      arista.eos.eos_vlans:
        state: merged
        config:
          - name: desktops
            vlan_id: 20
          - name: servers
            vlan_id: 30
          - name: printers
            vlan_id: 40
          - name: DMZ
            vlan_id: 50
Step 3: Examine the Ansible Playbook
-
First lets examine the first four lines:
---
- name: Configure VLANs
  hosts: arista
gather_facts: false-
The
---designates this is a YAML file which is what we write playbooks in. -
nameis the description of what this playbook does. -
hosts: aristawill execute this playbook only on the Arista network devices. -
gather_facts: falsewill disable fact gathering for this play, by default this is turned on. -
For the second part we have one task that uses the
arista.eos.eos_vlans
  tasks:

    - name: Use vlans resource module
      arista.eos.eos_vlans:
        state: merged
        config:
          - name: desktops
            vlan_id: 20
          - name: servers
            vlan_id: 30
          - name: printers
            vlan_id: 40
          - name: DMZ
vlan_id: 50-
name:— just like the play, each task has a description for that particular task -
state: merged— This is the default behavior of resource modules. This will simply enforce that the supplied configuration exists on the network device. There are actually seven parameters possible for resource modules:-
merged
-
replaced
-
overridden
-
deleted
-
rendered
-
gathered
-
parsed
Only two of these parameters will be covered in this exercise.
-
-
config:— this is the supplied VLAN configuration. It is a list of dictionaries. The most important takeaway is that if the module was changed fromarista.eos.vlanstojunipernetworks.junos.vlansit would work identically. This allows network engineers to focus on the network (e.g. VLAN configuration) versus the vendor syntax and implementation.
Step 4: Execute the Ansible Playbook
-
Execute the playbook using the
ansible-navigator run. Since there is just one task we can use the--mode stdout
ansible-navigator run resource.yml --mode stdout-
The output will look similar to the following:
$ ansible-navigator run resource.yml --mode stdout

PLAY [configure VLANs] *********************************************************

TASK [use vlans resource module] ***********************************************
changed: [rtr4]
changed: [rtr2]

PLAY RECAP *********************************************************************
rtr2                       : ok=1    changed=1    unreachable=0    failed=0    skipped=0    rescued=0    ignored=0
rtr4 : ok=1 changed=1 unreachable=0 failed=0 skipped=0 rescued=0 ignored=0-
Re-running the playbook will demonstrate the concept of idempotency
$ ansible-navigator run resource.yml --mode stdout

PLAY [configure VLANs] *********************************************************

TASK [use vlans resource module] ***********************************************
ok: [rtr2]
ok: [rtr4]

PLAY RECAP *********************************************************************
rtr2                       : ok=1    changed=0    unreachable=0    failed=0    skipped=0    rescued=0    ignored=0
rtr4 : ok=1 changed=0 unreachable=0 failed=0 skipped=0 rescued=0 ignored=0-
As you can see in the output, everything will return
ok=1indicating that no changes were taken place.
Step 5: Verify VLAN configuration
-
Login to an Arista switch and verify the current VLAN configuration.
-
From the VS Code terminal, you can
ssh rtr2and typeenable
$ ssh rtr2
Last login: Wed Sep  1 13:44:55 2021 from 44.192.105.112
rtr2>enable-
Use the command
show vlanto examine the VLAN configuration:
rtr2#show vlan
VLAN  Name                             Status    Ports
----- -------------------------------- --------- -------------------------------
1     default                          active
20    desktops                         active
30    servers                          active
40    printers                         active
50 DMZ active-
Use the
show run | s vlanto examine the VLAN running-configuration on the Arista device:
rtr2#sh run | s vlan
vlan 20
   name desktops
!
vlan 30
   name servers
!
vlan 40
   name printers
!
vlan 50
   name DMZ
As you can see, the resource module configured the Arista EOS network device with the supplied configuration. There are now five total VLANs (including the default VLAN 1).
Step 6: Use the gathered parameter
-
Create a new playbook named
gathered.yml
---
- name: Configure VLANs
  hosts: arista
  gather_facts: false

  tasks:

    - name: Use vlans resource module
      arista.eos.eos_vlans:
        state: gathered
      register: vlan_config

    - name: Copy vlan_config to file
      ansible.builtin.copy:
        content: "{{ vlan_config | to_nice_yaml }}"
        dest: "{{ playbook_dir }}/{{ inventory_hostname }}_vlan.yml"
mode: "644"-
The first task is identical except the
state: mergedhas been switched togathered, theconfigis no longer needed since we are reading in the configuration (versus applying it to the network device), and we are using theregisterto save the output from the module into a variable namedvlan_config -
The second task is copying the
vlan_configvariable to a flat-file. The double curly brackets denotes that this is a variable. -
The
| to_nice_yamlis a filter, that will transform the JSON output (default) to YAML. -
The
playbook_dirandinventory_hostnameare special variables also referred to as magic variables. Theplaybook_dirsimply means the directory we executed the playbook from, and theinventory_hostnameis the name of the device in our inventory. This means the file will be saved as~/network-workshop/rtr2_vlan.ymland~/network-workshop/rtr4_vlan.ymlfor the two Arista devices.
Step 7: Execute the gathered playbook
-
Execute the playbook using the
ansible-navigator run.
ansible-navigator run gathered.yml --mode stdout-
The output will look similar to the following:
$ ansible-navigator run gathered.yml --mode stdout

PLAY [Configure VLANs] *********************************************************

TASK [Use vlans resource module] ***********************************************
ok: [rtr4]
ok: [rtr2]

TASK [Copy vlan_config to file] ************************************************
changed: [rtr2]
changed: [rtr4]

PLAY RECAP *********************************************************************
rtr2                       : ok=2    changed=1    unreachable=0    failed=0    skipped=0    rescued=0    ignored=0
rtr4                       : ok=2    changed=1    unreachable=0    failed=0    skipped=0    rescued=0    ignored=0
Step 8: Examine the files
-
Open the newly created files that
gatheredthe VLAN configuration from the Arista network devices. -
The two files were saved to
~/network-workshop/rtr2_vlan.ymland~/network-workshop/rtr4_vlan.ymlfor the two Arista devices.
Module summary
In this module, you learned how to:
-
Use Ansible Network Resource Modules to configure VLANs on Arista EOS devices
-
Resource modules have a simple data structure that can be transformed to the network device syntax — in this case the VLAN dictionary is transformed into the Arista EOS network device syntax
-
Resource modules are idempotent, and can be configured to check device state
-
Resource modules are bi-directional, meaning that they can gather facts for that specific resource, as well as apply configuration. Even if you are not using resource modules to configure network devices, there is a lot of value for checking resource states
-
The bi-directional behavior also allows brown-field networks (existing networks) to quickly turn their running-configuration into structured data, allowing network engineers to get automation up and running more quickly