Module 2 Lab 1: Content - Creating Automation for Windows
In this lab we will develop a custom Ansible collection to manage a Windows server in our lab that will represent an example enterprise environment. We will build the content a piece at a time until the full collection is ready to be deployed. The server will be configured to run a custom website, have chocolatey software manager installed, and Filebeat installed and configured.
Learning Objectives
After completing this module, you will be able to:
-
Connect and check connectivity to Windows servers from AAP
-
Use
ansible.windowsandmicrosoft.iiscollections -
Ensure prerequisites are installed
-
Install and use Chocolatey (A Windows package manager)
-
Install and configure Filebeat (a lightweight data shipper)
-
Test initial content against Windows server
Prerequisites
-
Access to OpenShift Dev Spaces
-
Automation Controller and Automation Hub
-
Windows managed host
1: Managing Windows Hosts
Ansible can use a variety of connectivity options to connect to Windows. In this lab, a Windows 2019 Server has been configured using psrp to connect. See the Ansible documentation for full details.
1.1: Validate Connectivity to Windows host
The Windows server has been configured as a host in an inventory called super-lab. Verify in AAP:
-
Launch the Ansible Automation Platform web interface and login using the credentials from the Environment Details page.
-
From the navigation menu on the left, expand Automation Execution and click on Infrastructure.
-
Under Infrastructure select Inventories which should contain an inventory called super-lab
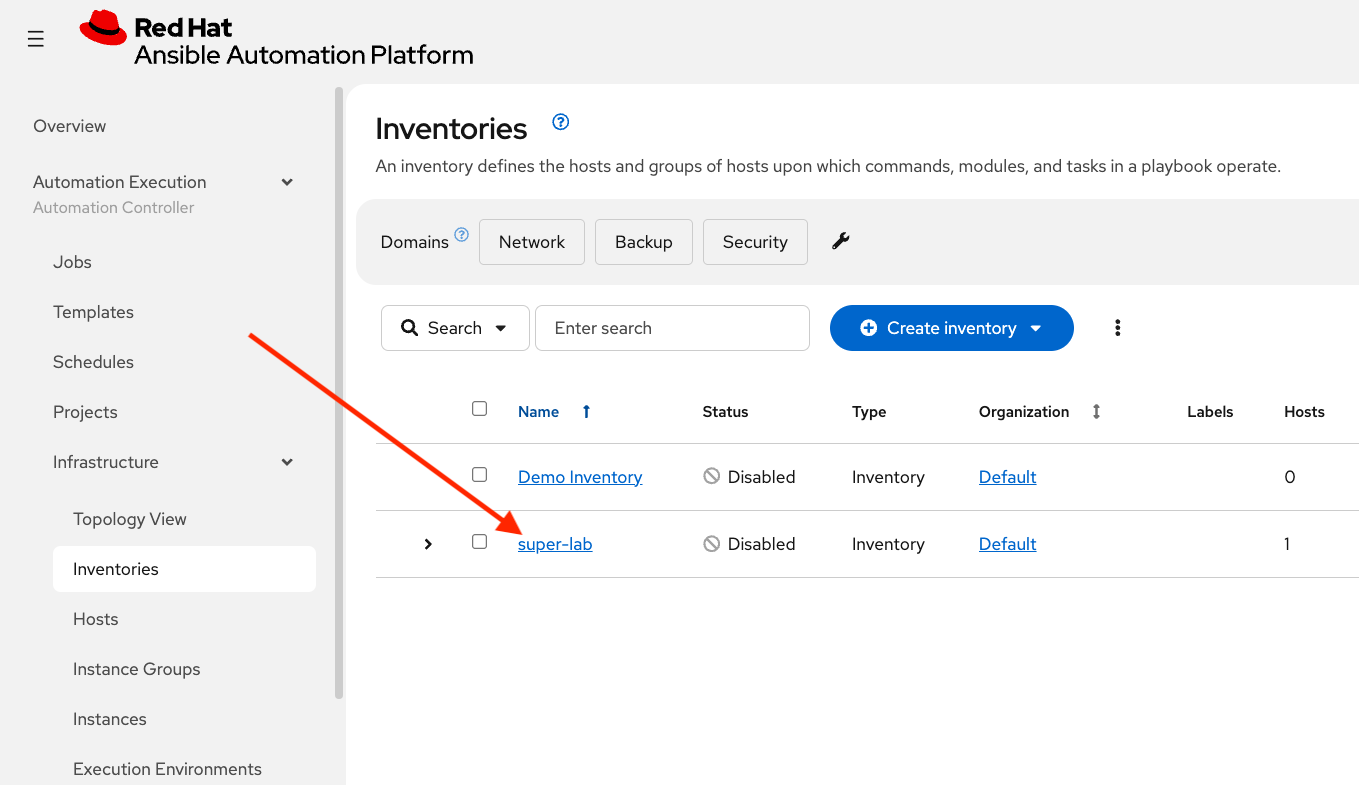
-
Select super-lab
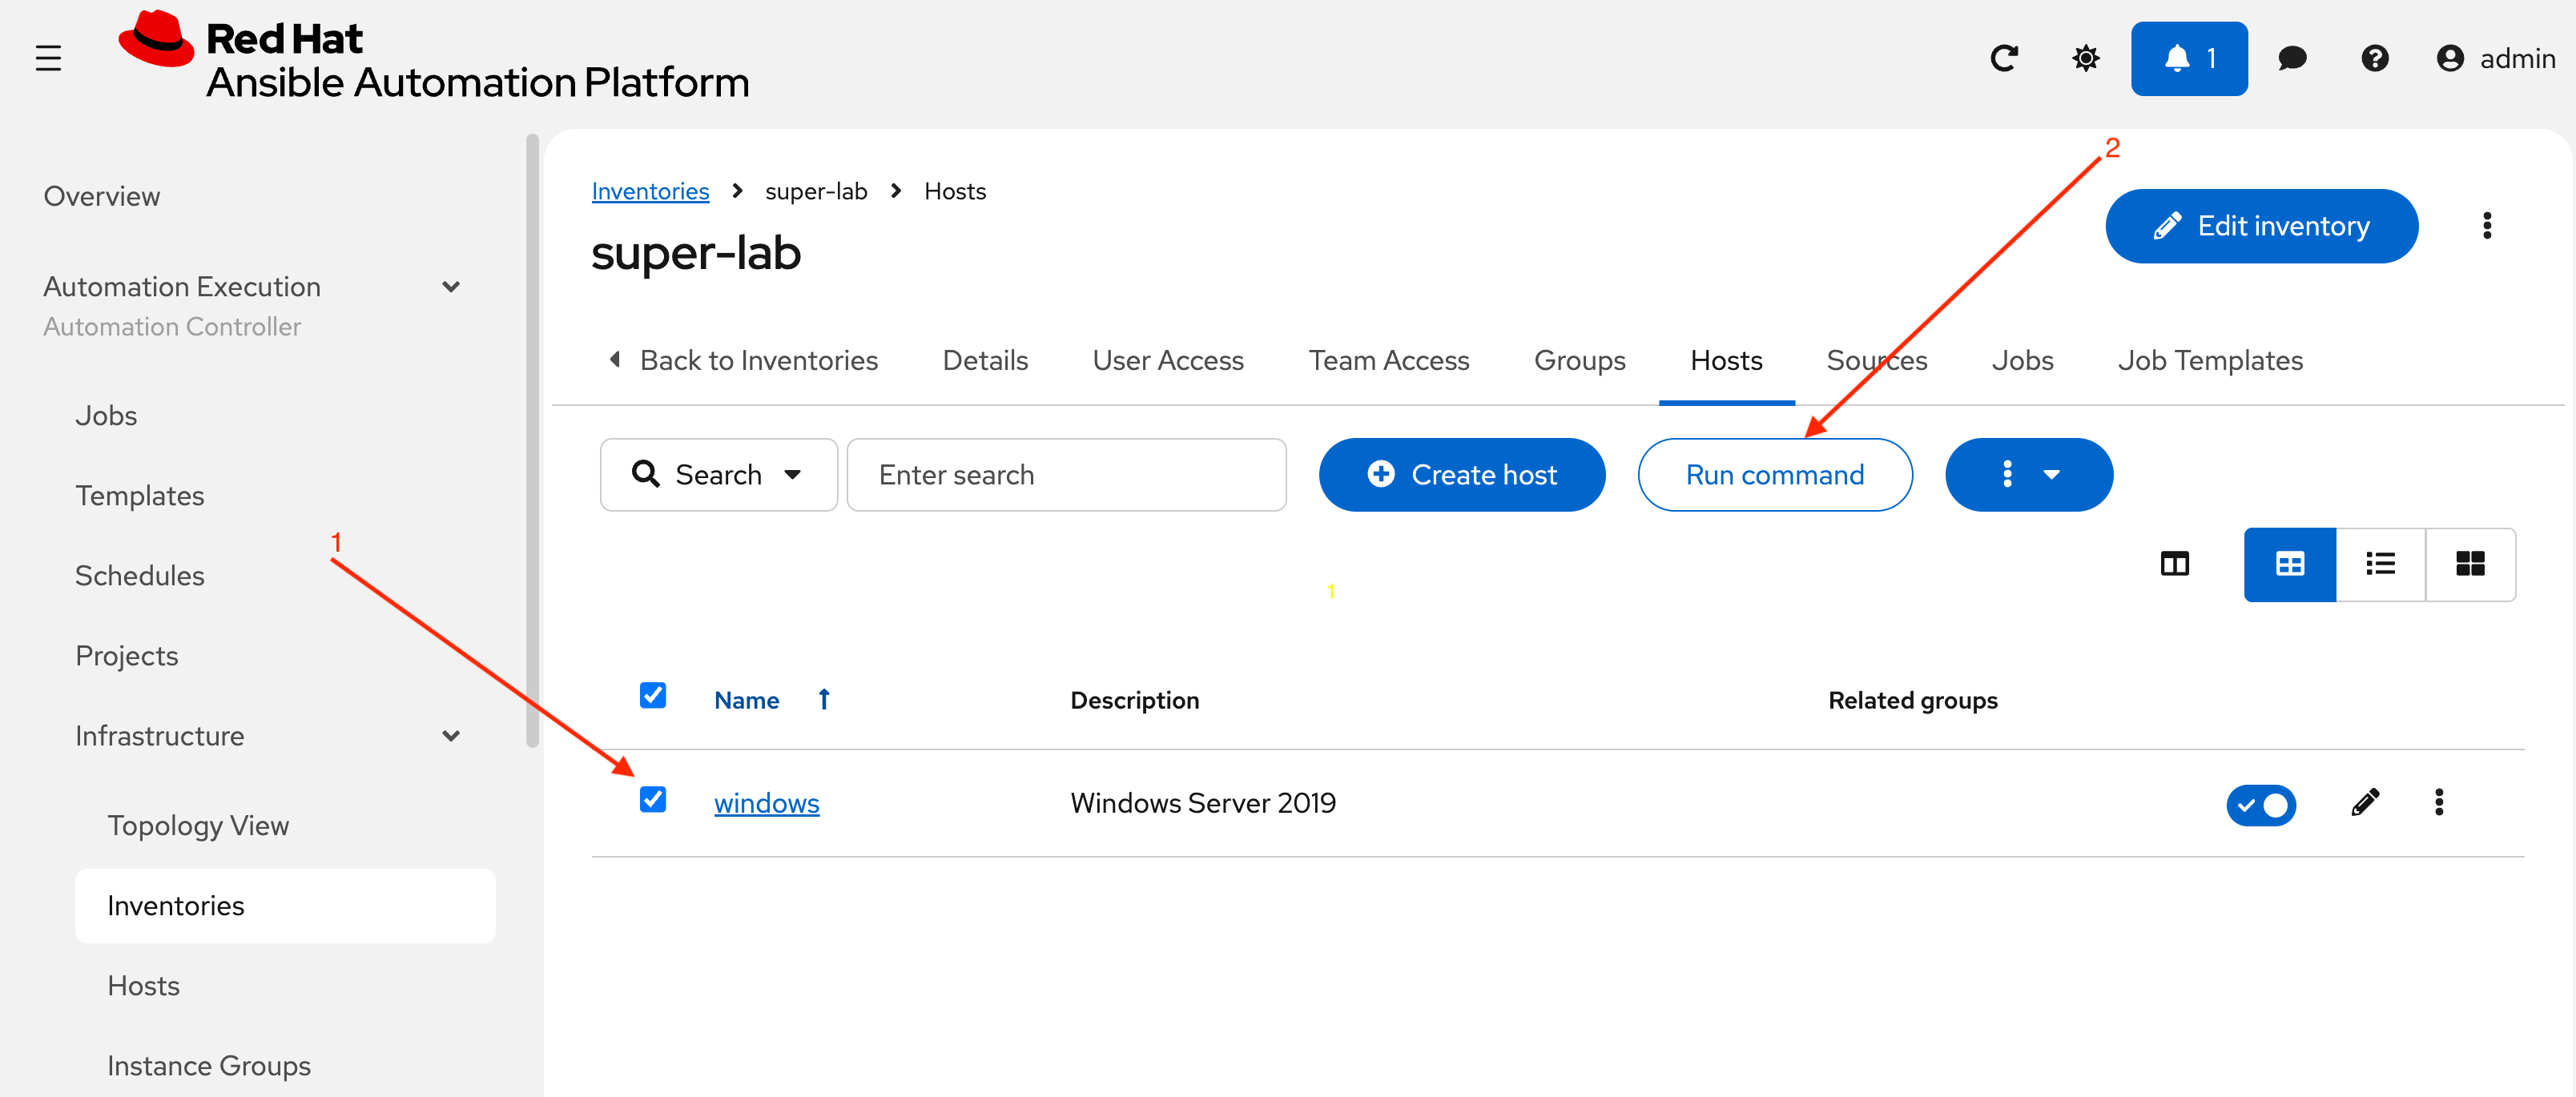
-
Select Hosts in the top menu
-
A host called windows will be displayed
-
Select the checkbox in front of windows and choose Run command in the top middle of the screen
-
For Module choose win_ping from the drop-down then Next
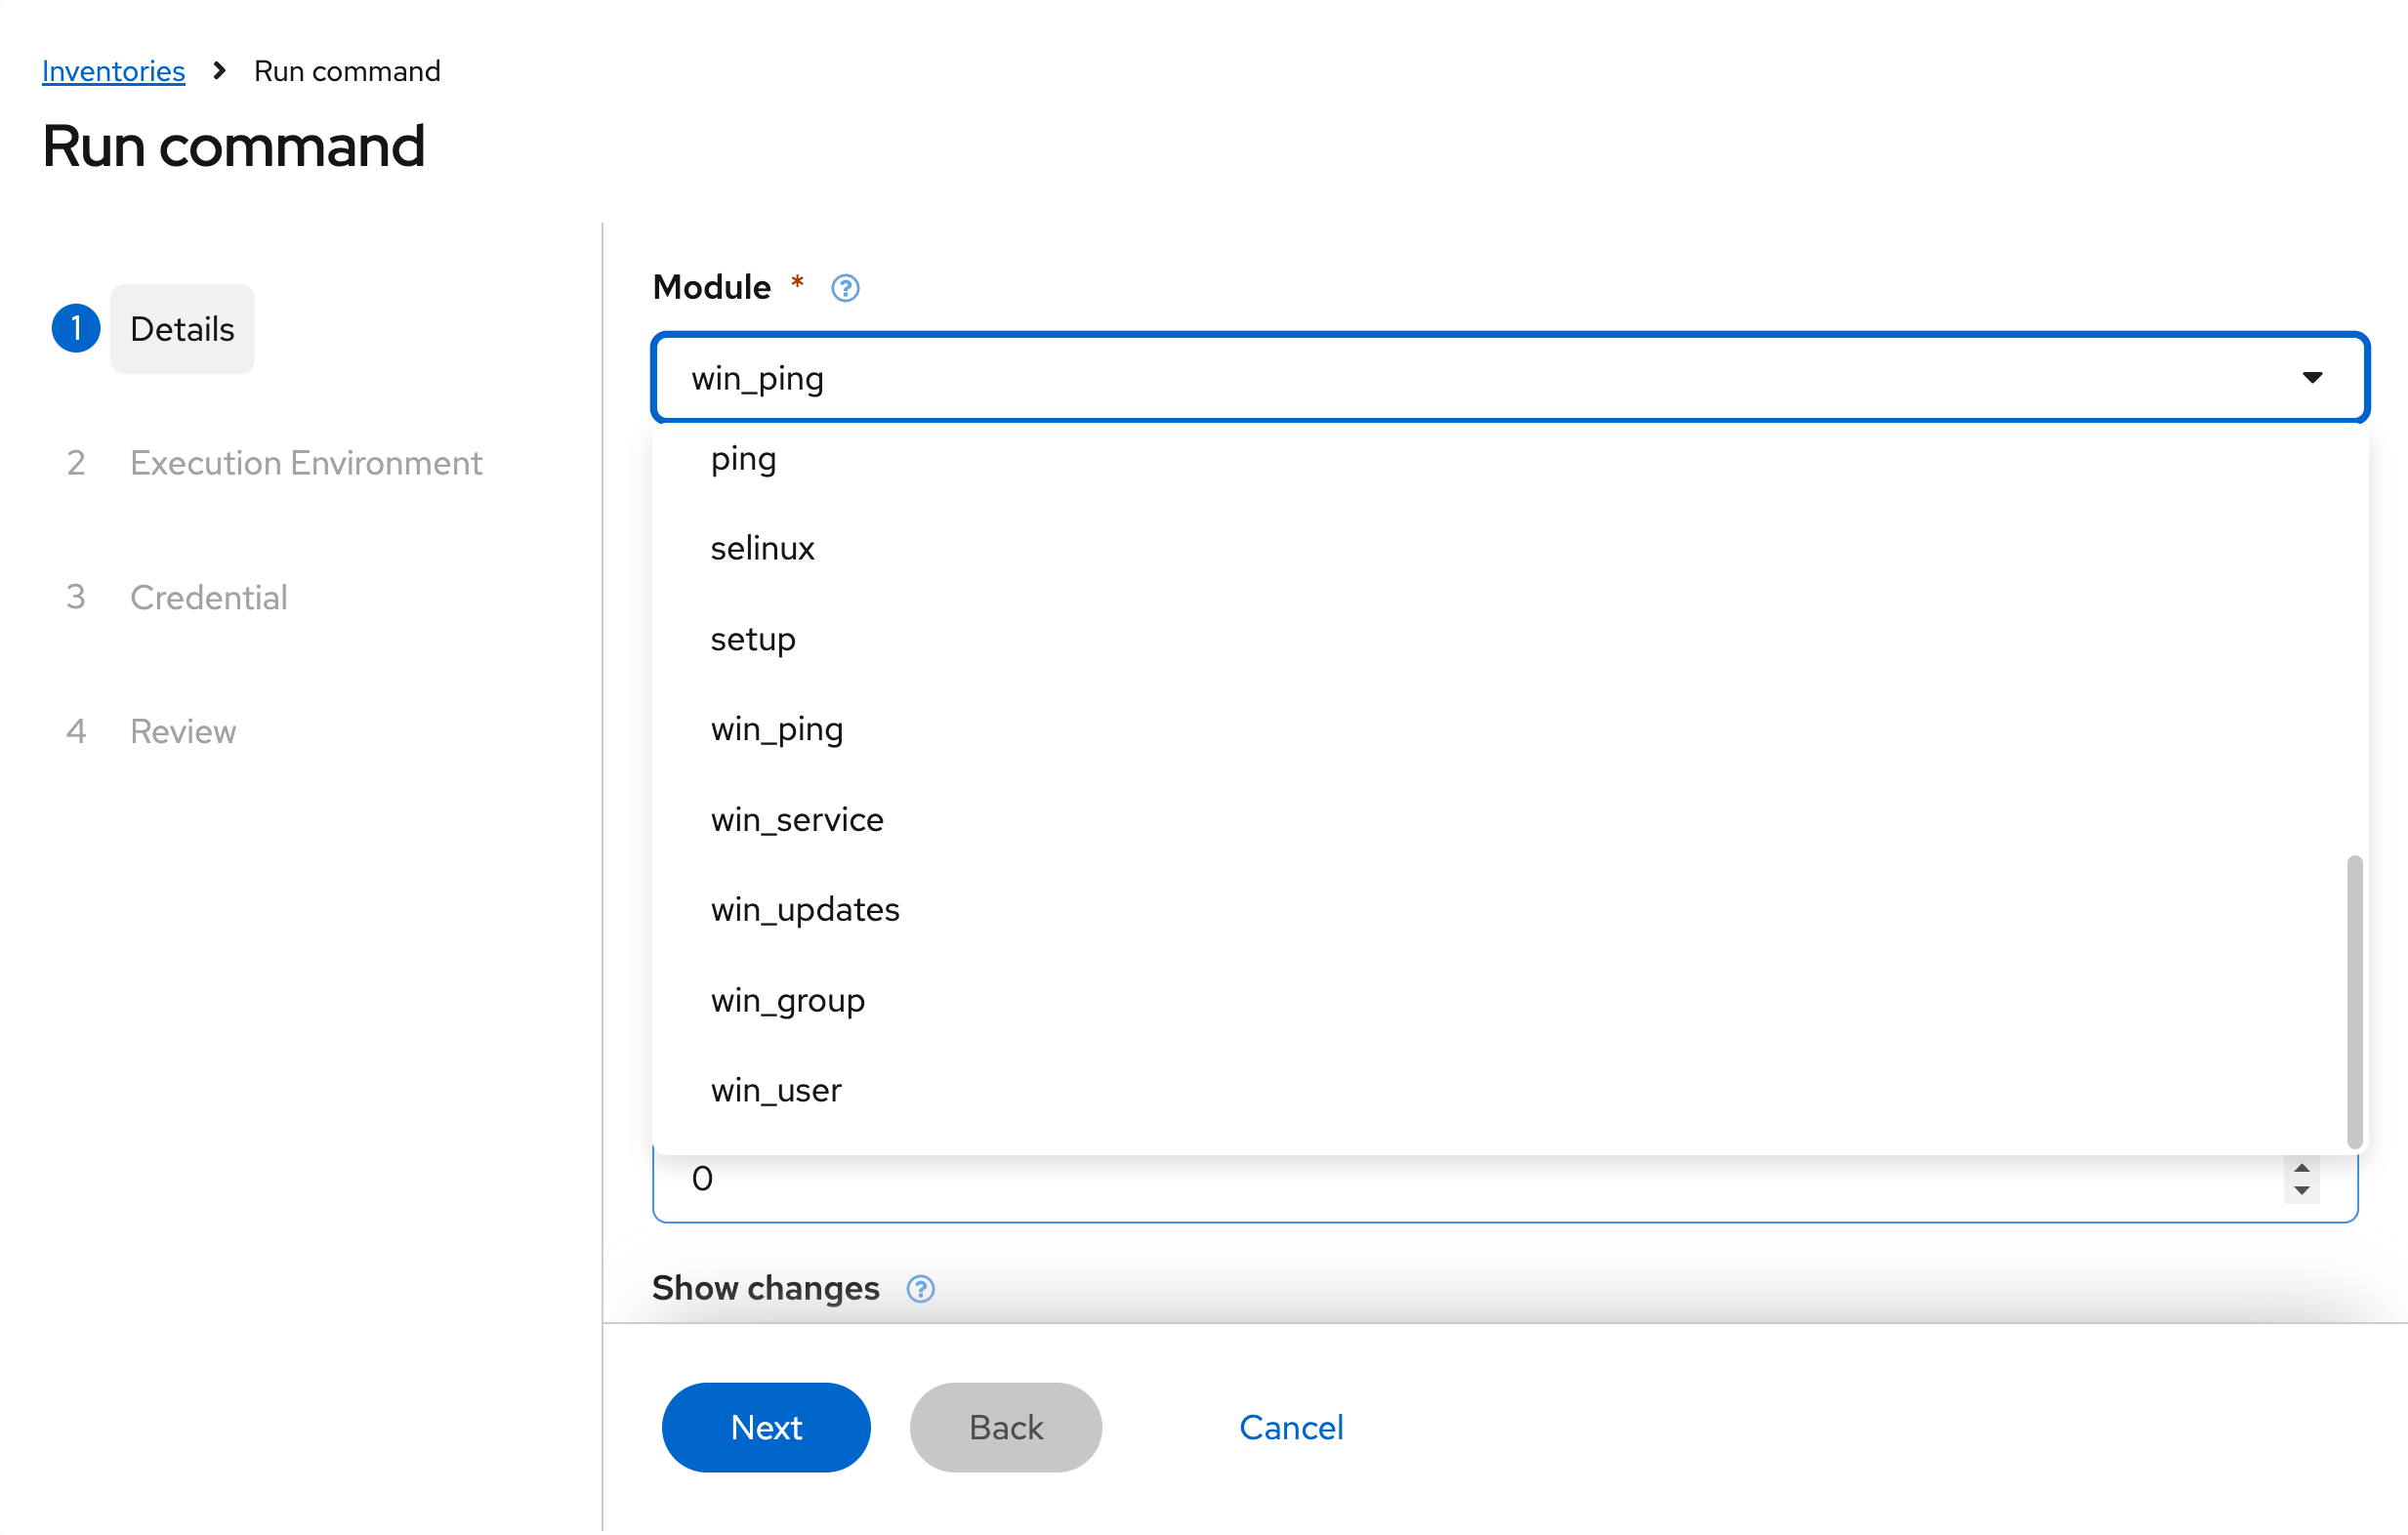
-
For Execution Environment, just choose Next without a selection, it will use the default EE
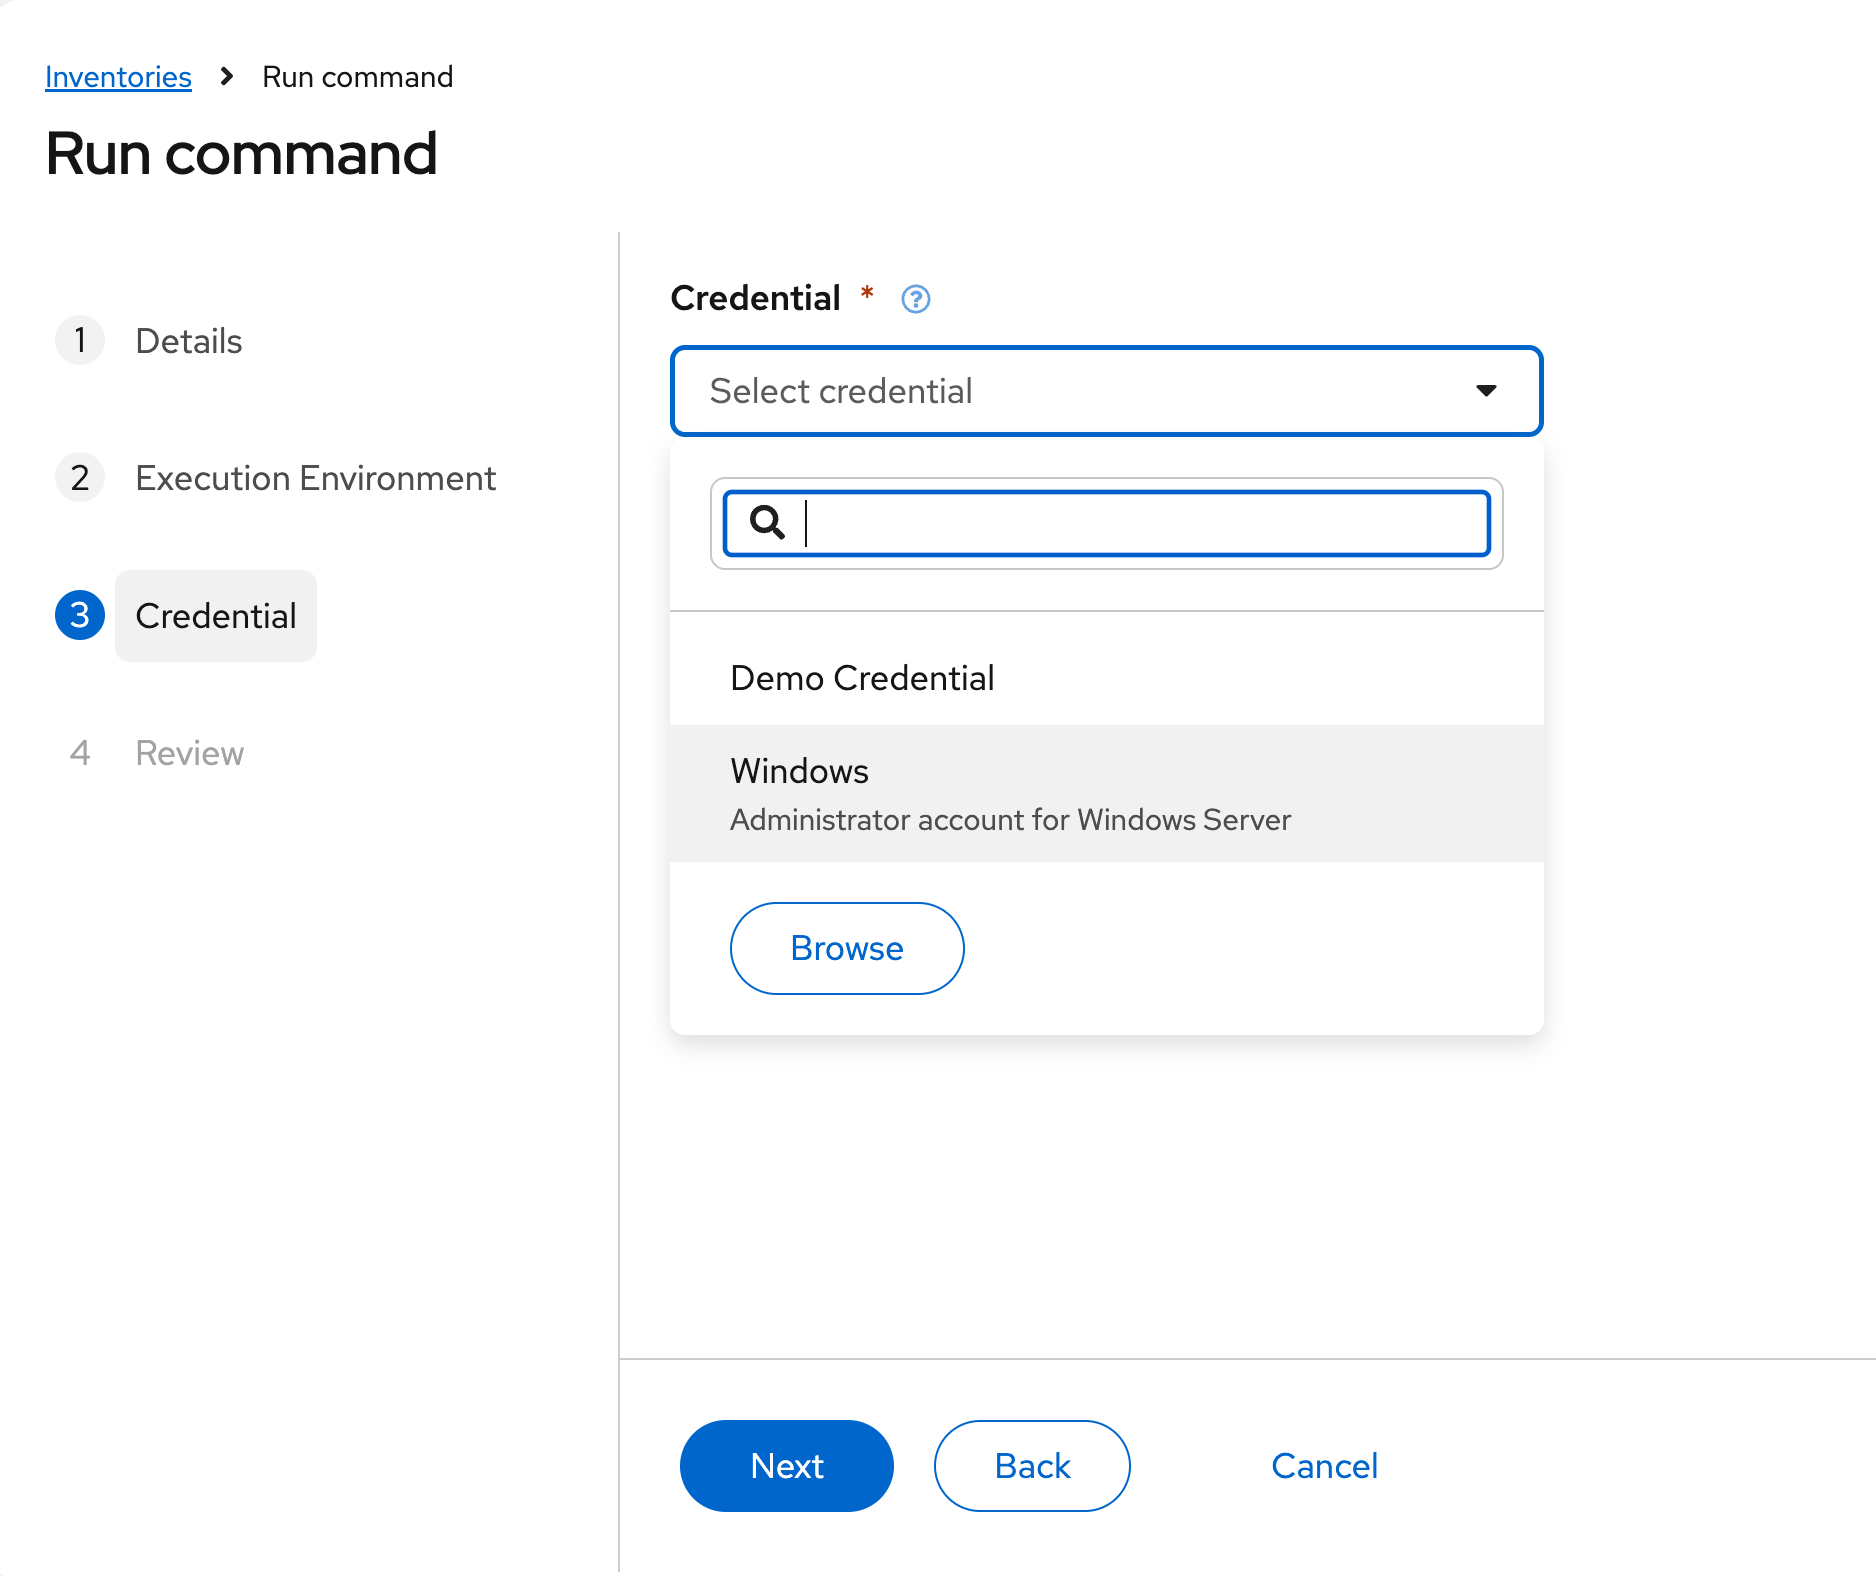
-
For Credential select Windows then Next
-
Finally, choose Finish. The job will run and you will be taken to the Jobs section
-
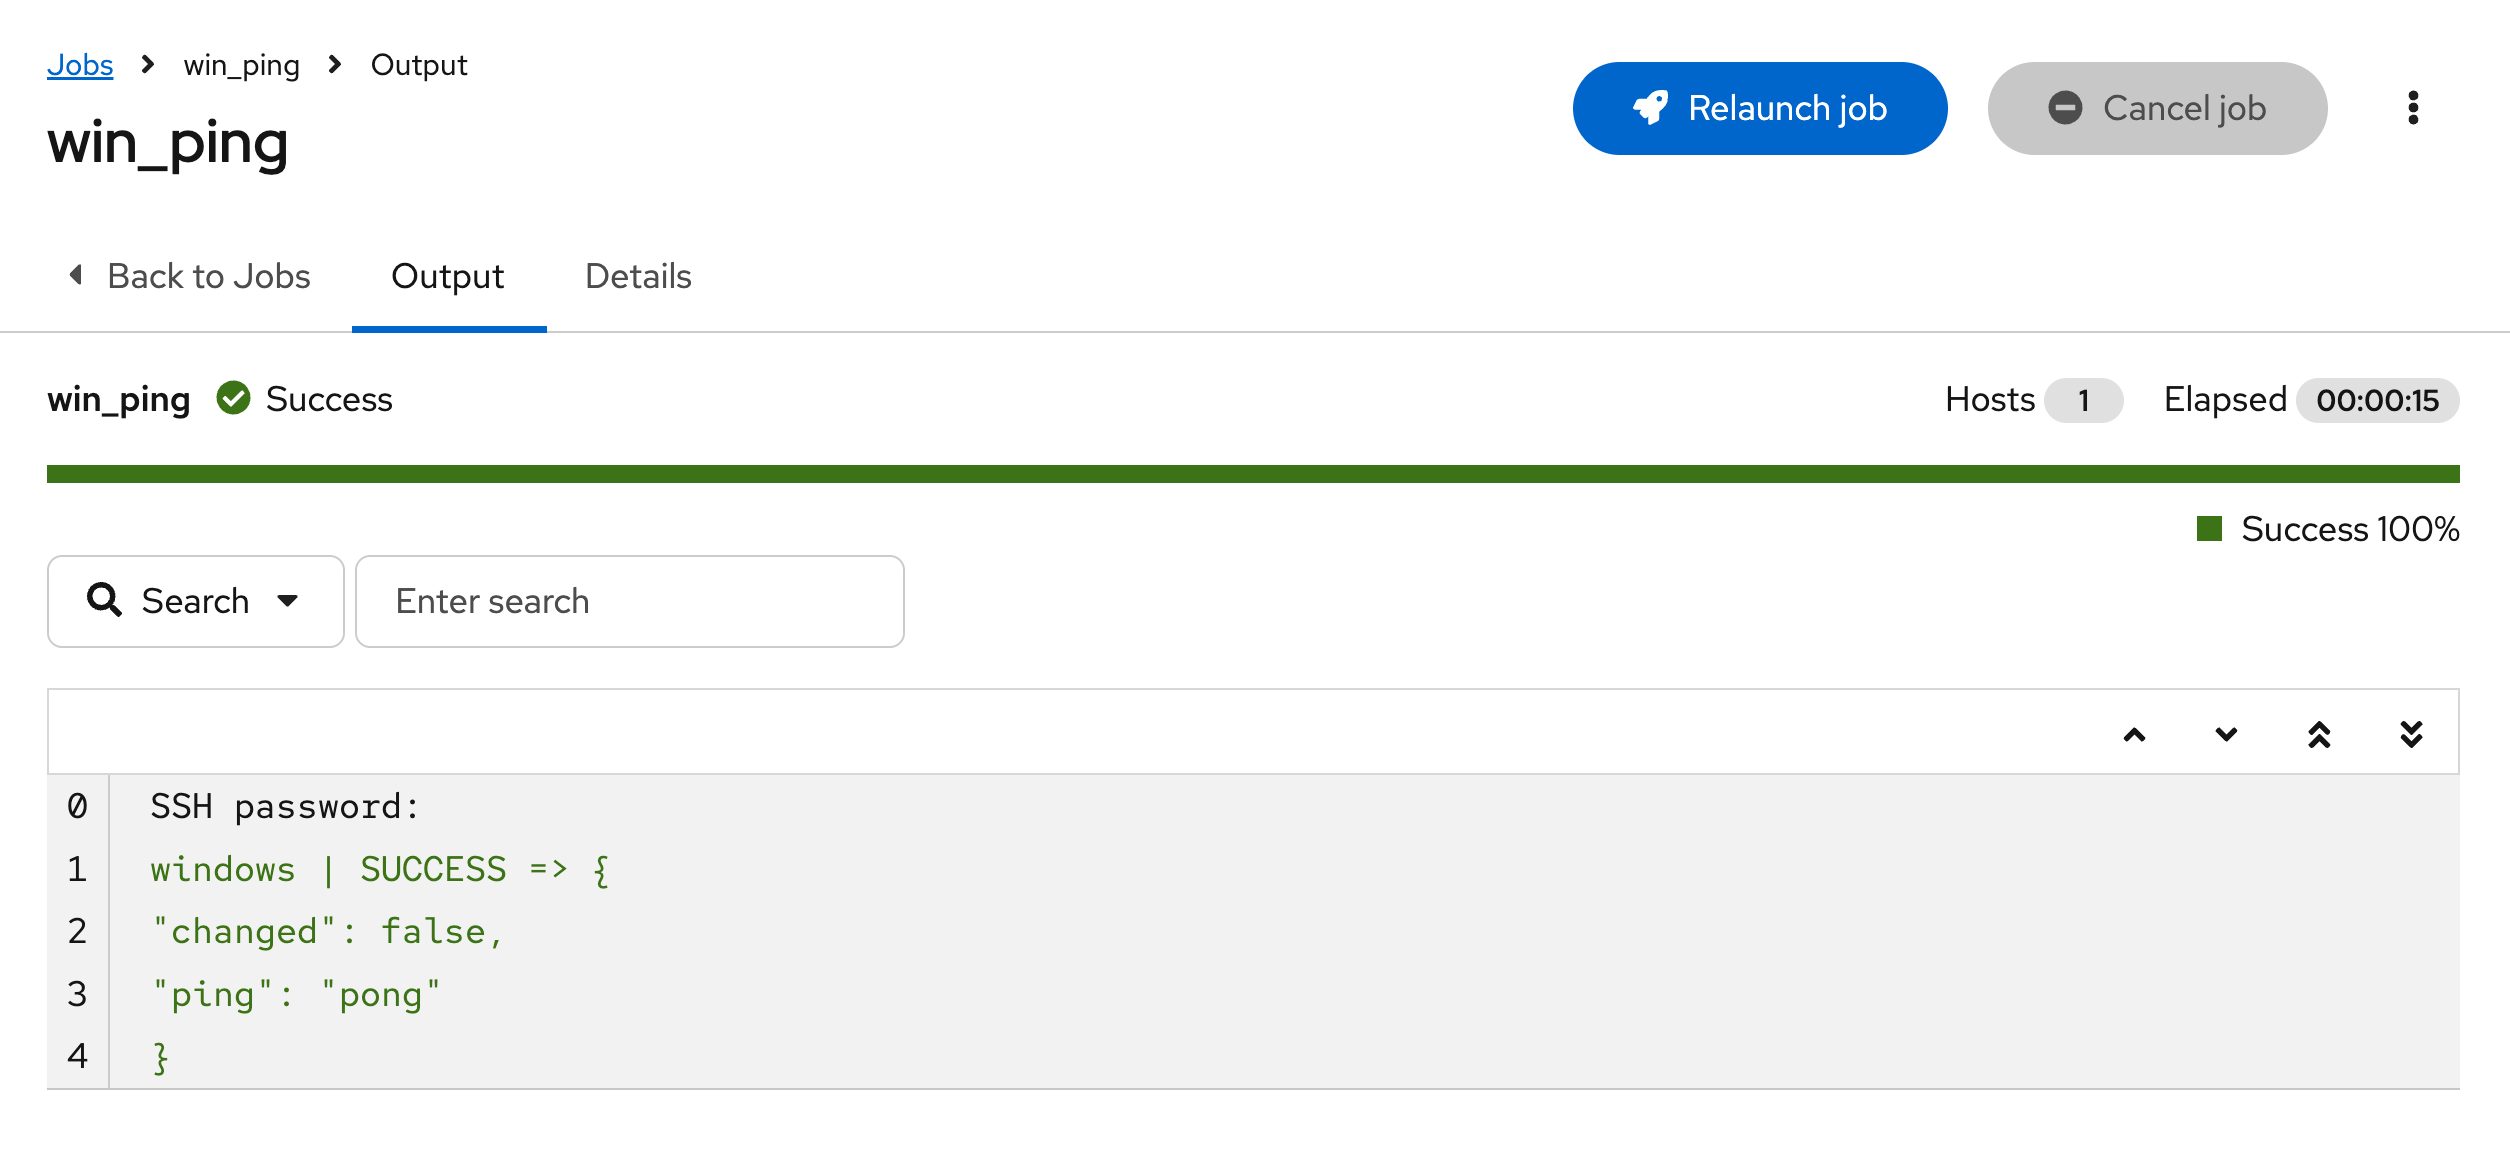
After a few seconds a result will display which should resemble this output:
If you encounter any issues with your Windows server during any parts of these labs, repeat these steps and choose win_reboot as a Run command if needed.
1.2: Review Connectivity Details
In the previous section, an ad-hoc command was run to verify connectivity. Let’s review some of these artifacts used to connect to Windows:
-
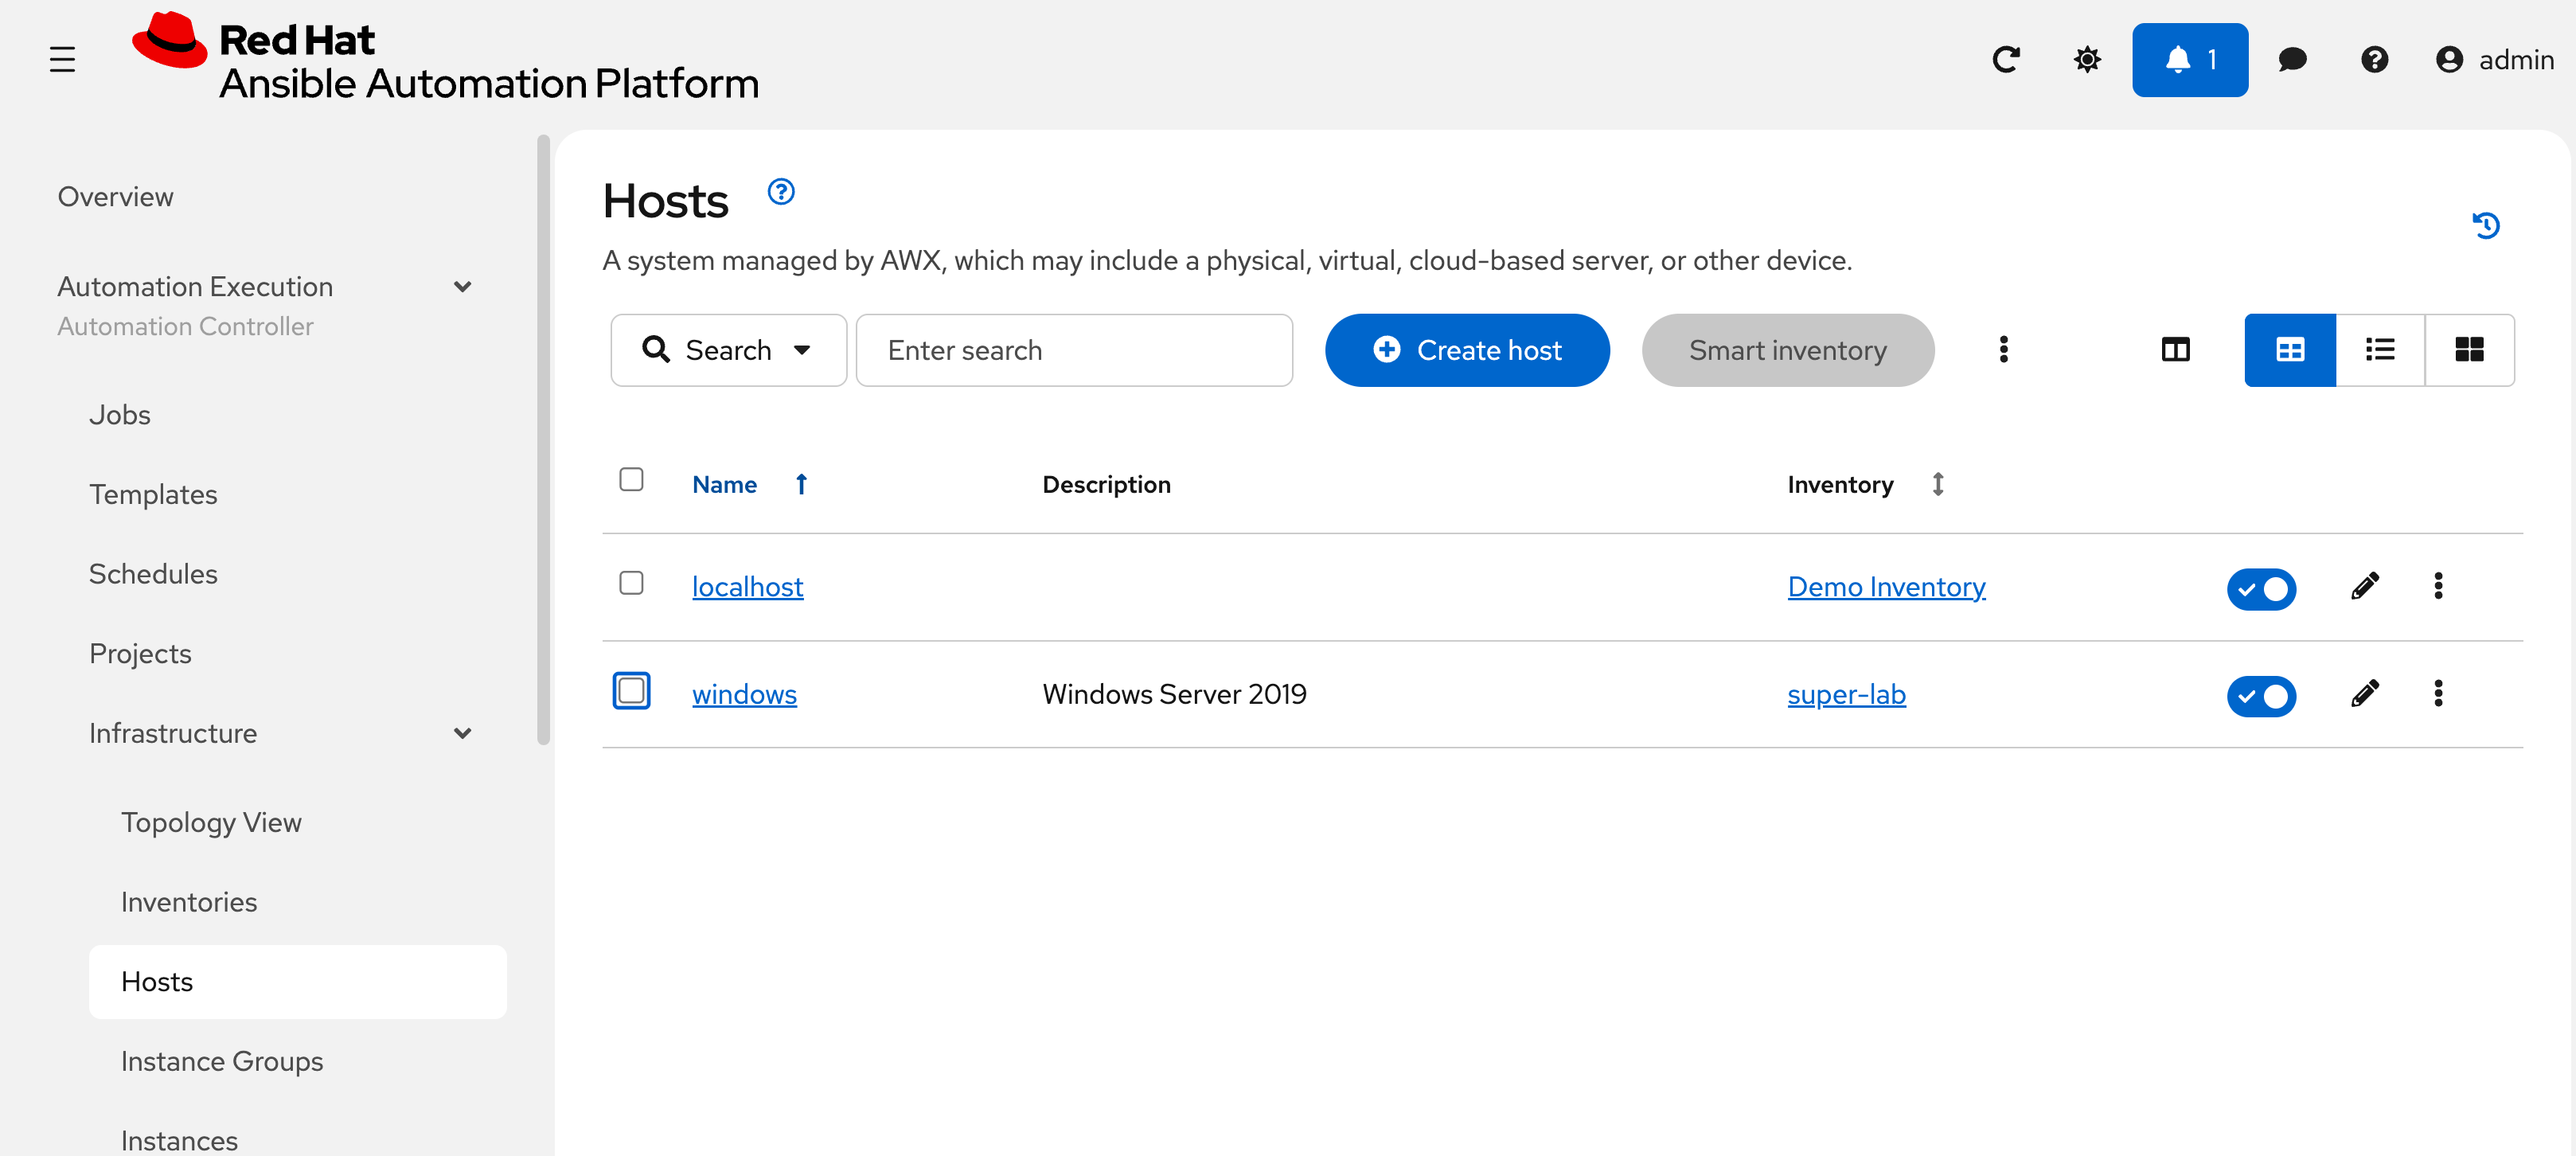
Navigate to Automation Execution → Infrastructure → Hosts
-
Notice that unlike when selecting Inventories as was done in the previous section, looking directly at the Hosts section does NOT allow running ad-hoc commands
-
Select the windows host
-
Review the defined variables for connecting using
psrp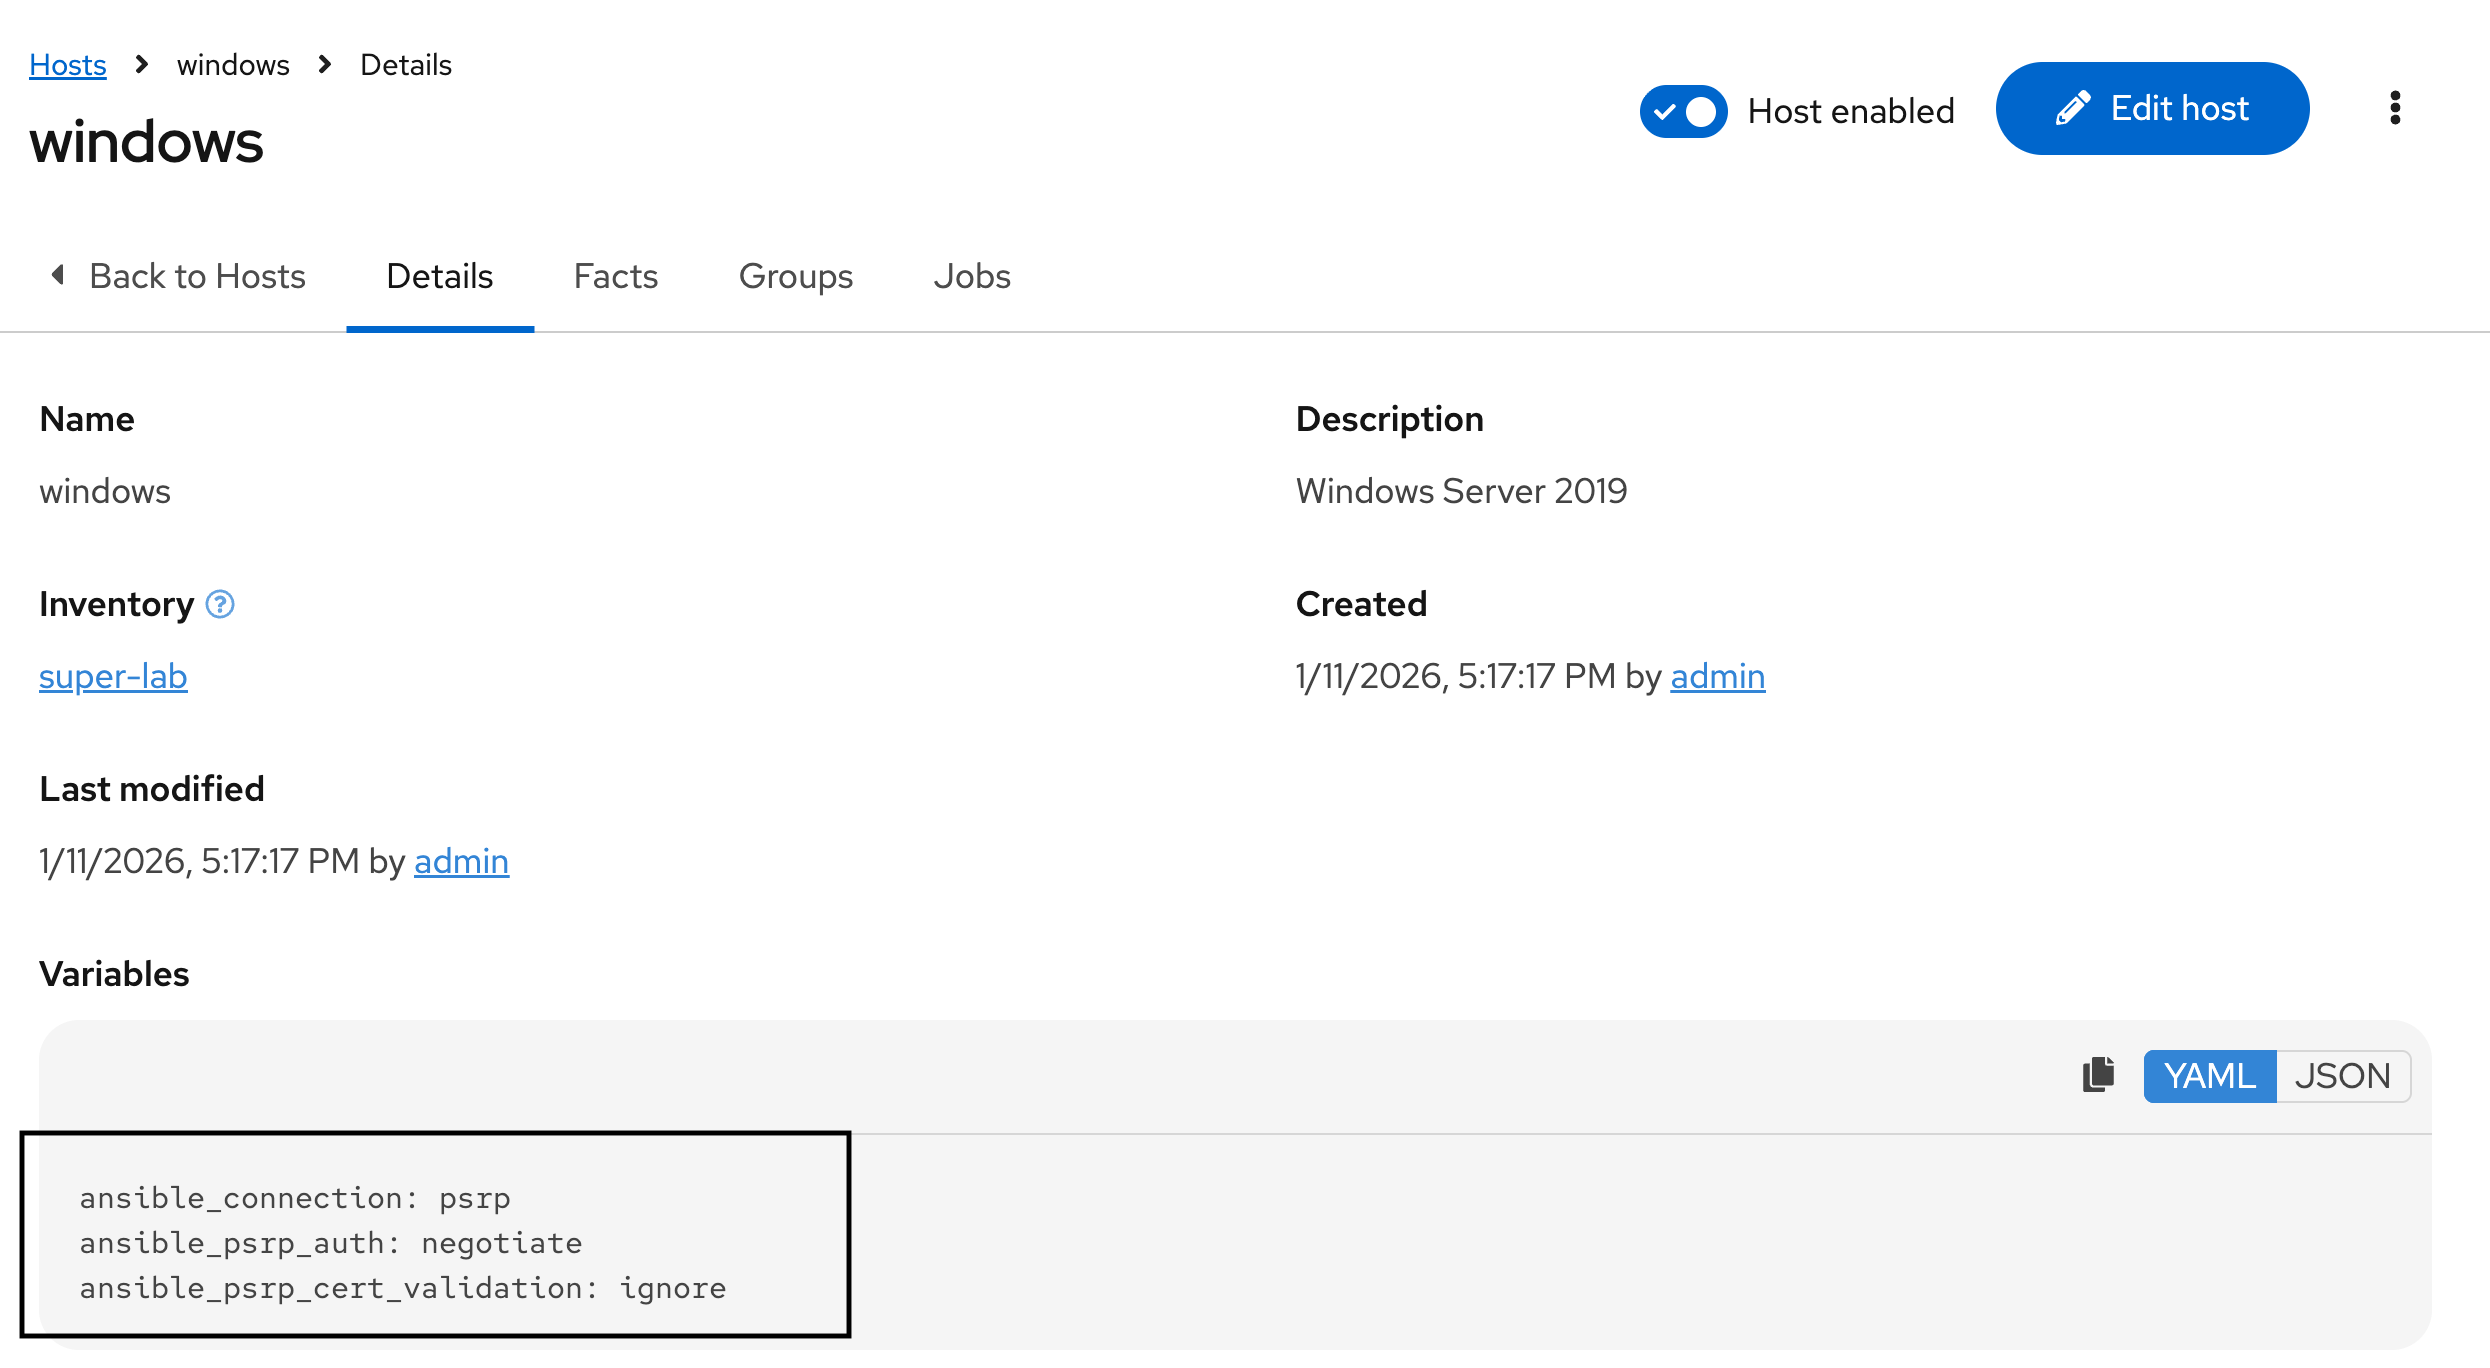
-
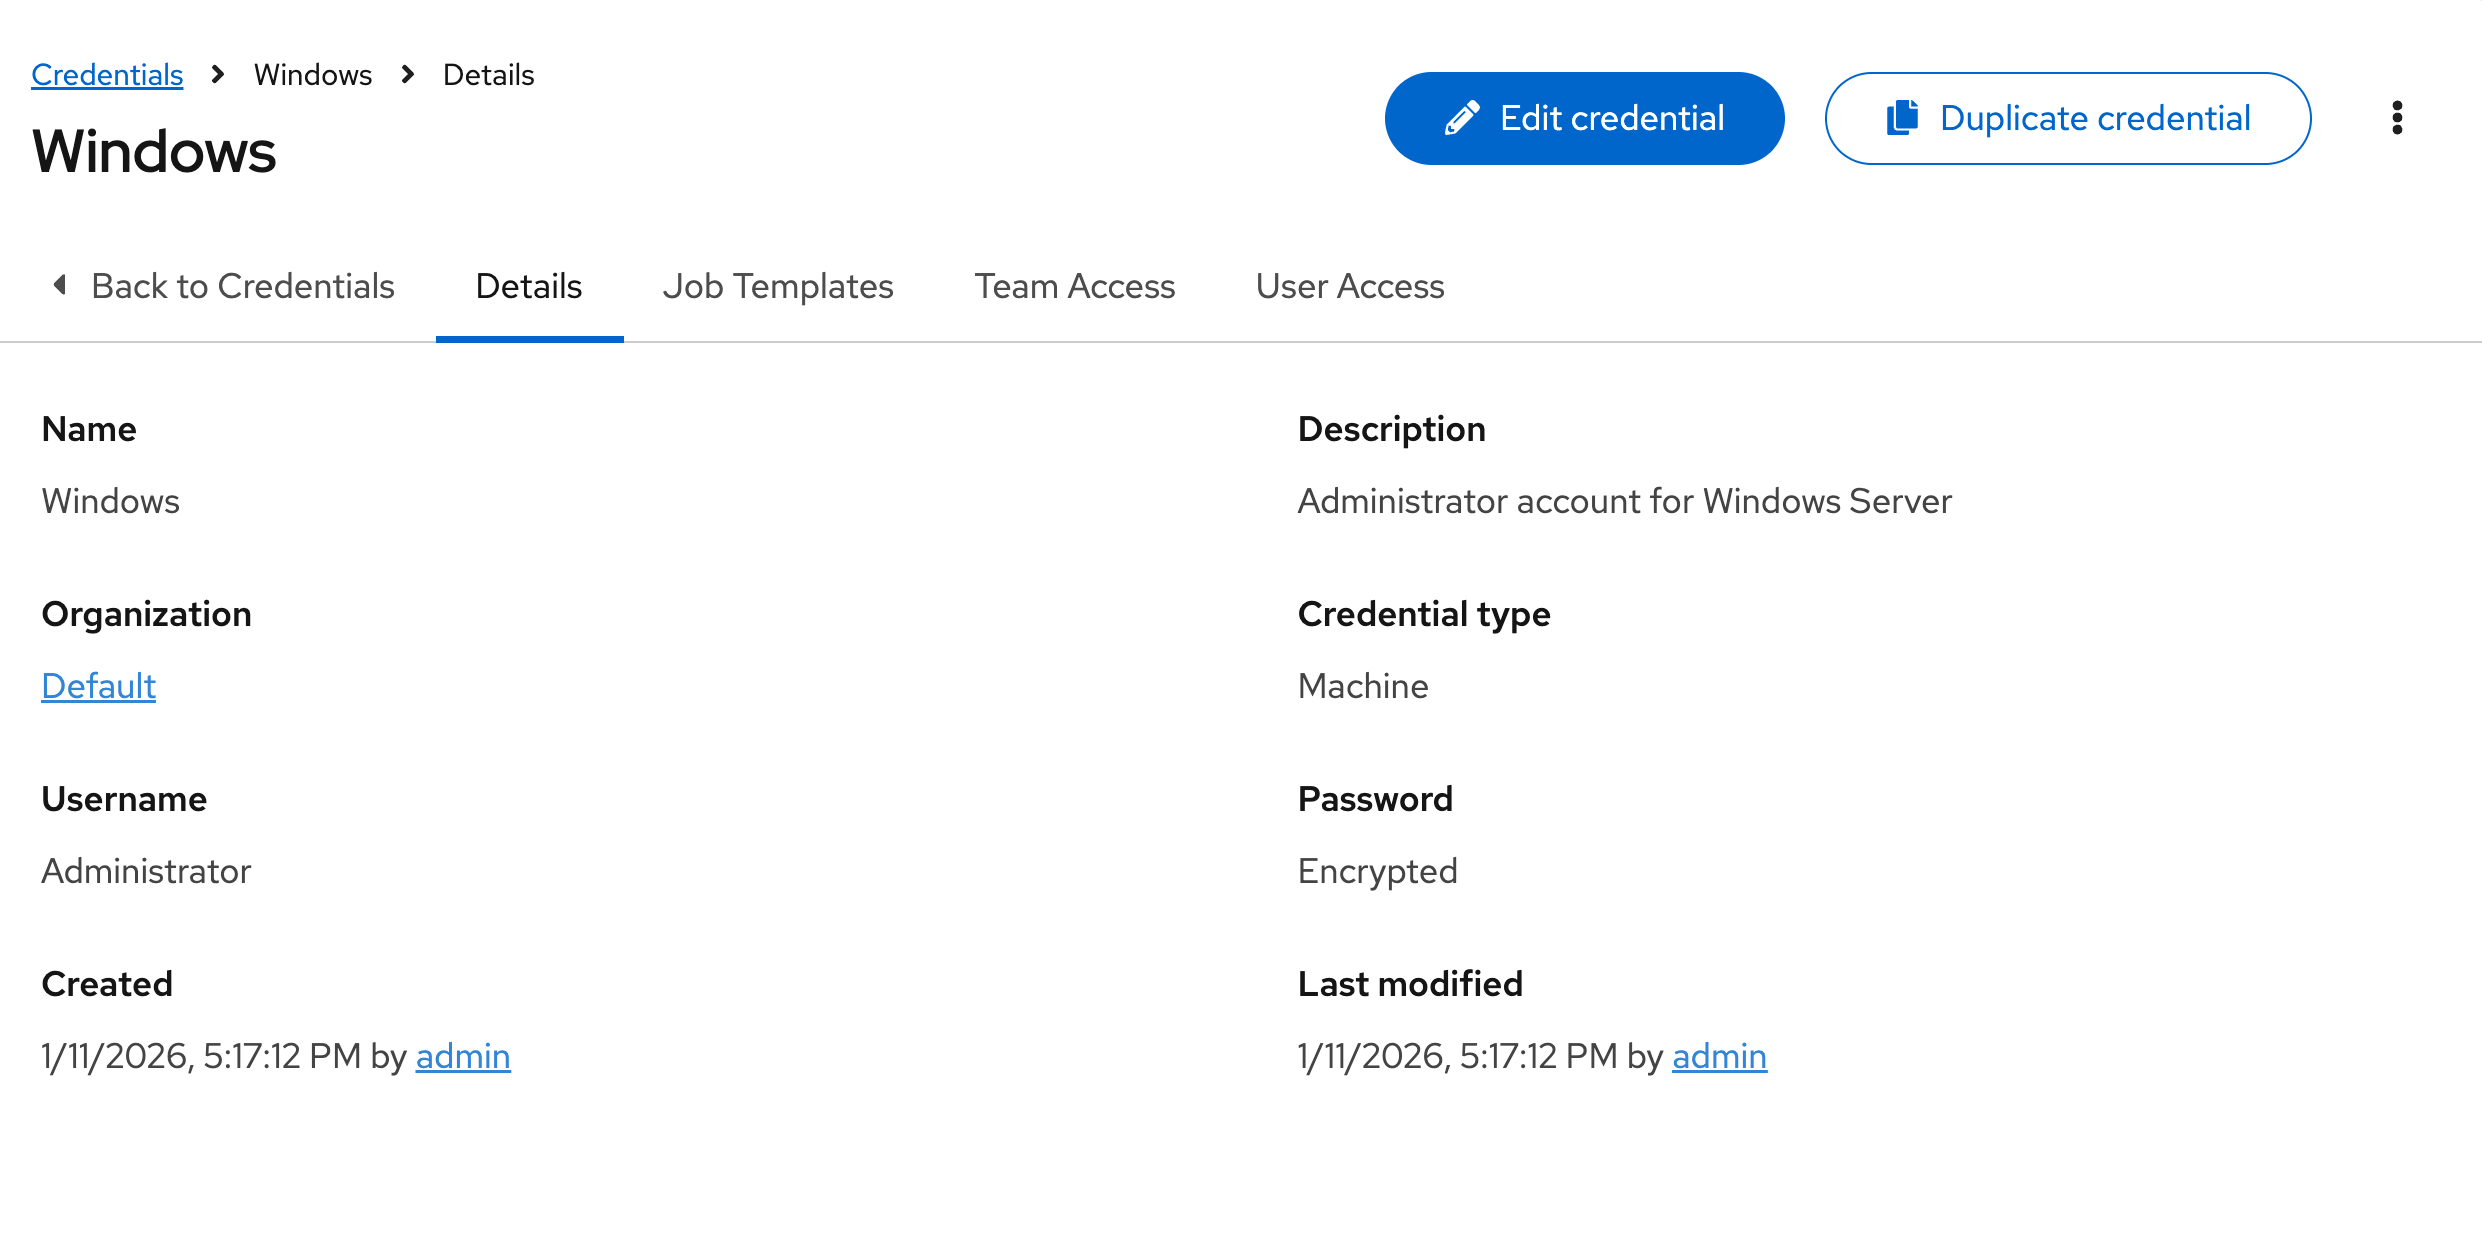
Navigate to Credentials in this same Infrastructure subsection under Automation Execution
-
Select the Windows credential
-
These values should be pre-populated with {windows_user} and {windows_password} from the Environment Details page.
1.3: Connectivity Options
Some of you may be wondering what psrp is, rather than the typical winrm connection used. psrp is a newer protocol that has several advantages over legacy winrm. psrp does still in fact run over WinRM but uses PowerShell Remoting Protocol for execution, similar to native powershell Invoke-Command, rather than WinRM’s SOAP based WS-Management. psrp also supports authentication negotiation, which allows for less explicit configuration allowing Ansible to negotiate the most effective and secure authentication transport.
Bonus lab: If desired, feel free to replace the psrp connection details with winrm for comparison
-
Navigate to Automation Execution → Infrastructure → Hosts
-
Select the windows host
-
In the upper right, select Edit Host
-
At the bottom of the page edit the Variables section
-
For reference, here are the variables as defined using
psrpansible_connection: psrp ansible_psrp_auth: negotiate ansible_psrp_cert_validation: ignore -
Replace with the following variables. Unlike with
psrpwhich can auto-negotiate, you must specify a transport forwinrmso pick one of the three defined below. Feel free to try all three, but only one at a time. NOTE: Additional options includecertificateandkerberos, which are not configured in this lab.ansible_connection: winrm ansible_winrm_server_cert_validation: ignore ansible_winrm_transport: basic|ntlm|credssp -
Before finishing this lab, ensure the
psrpconfiguration is replaced.
2: Build Content for Managing Windows
In this section we will begin building content to setup and configure our Windows server.
| The remainder of this lab takes place inside OpenShift Dev Spaces. As a quick reminder, here are the relevant steps: |
-
Launch OpenShift Dev Spaces
-
Return to your Workspace or see Module 1 Lab 1 for more details
-
If needed, ensure a terminal is open by selecting the hamburger (3 dashes) in the top left and choosing Terminal → New Terminal
-
See Environment Details for more information.
2.1: Build Collection and Roles
We will create a collection containing two roles to manage server configuration and software installation. Start by using ansible-creator to scaffold a directory structure.
2.1.1: Using the Ansible Creator CLI
| Choose either this section or 2.1.2 Using the Ansible Creator GUI, not both. |
-
Use
ansible-creatorto quickly scaffold a directory structure to contain a new collection:ansible-creator init collection \ red_hat_one.super_lab \ /projects/lab_collection/Note: collection project created at /projects/lab_collection -
Add two new roles (
web_serverandlog_shipper) to manage the software the Windows server:for role in web_server log_shipper do ansible-creator \ add resource role ${role} \ /projects/lab_collection/ doneNote: Resource added to /projects/lab_collection Note: Resource added to /projects/lab_collection -
Open the directory at a lower level of the file structure in order to see all of these files in VSCode by selecting the hamburger (3 dashes) menu in the top left and choosing File → Open Folder
-
The dialogue box should contain /projects/ then hit OK
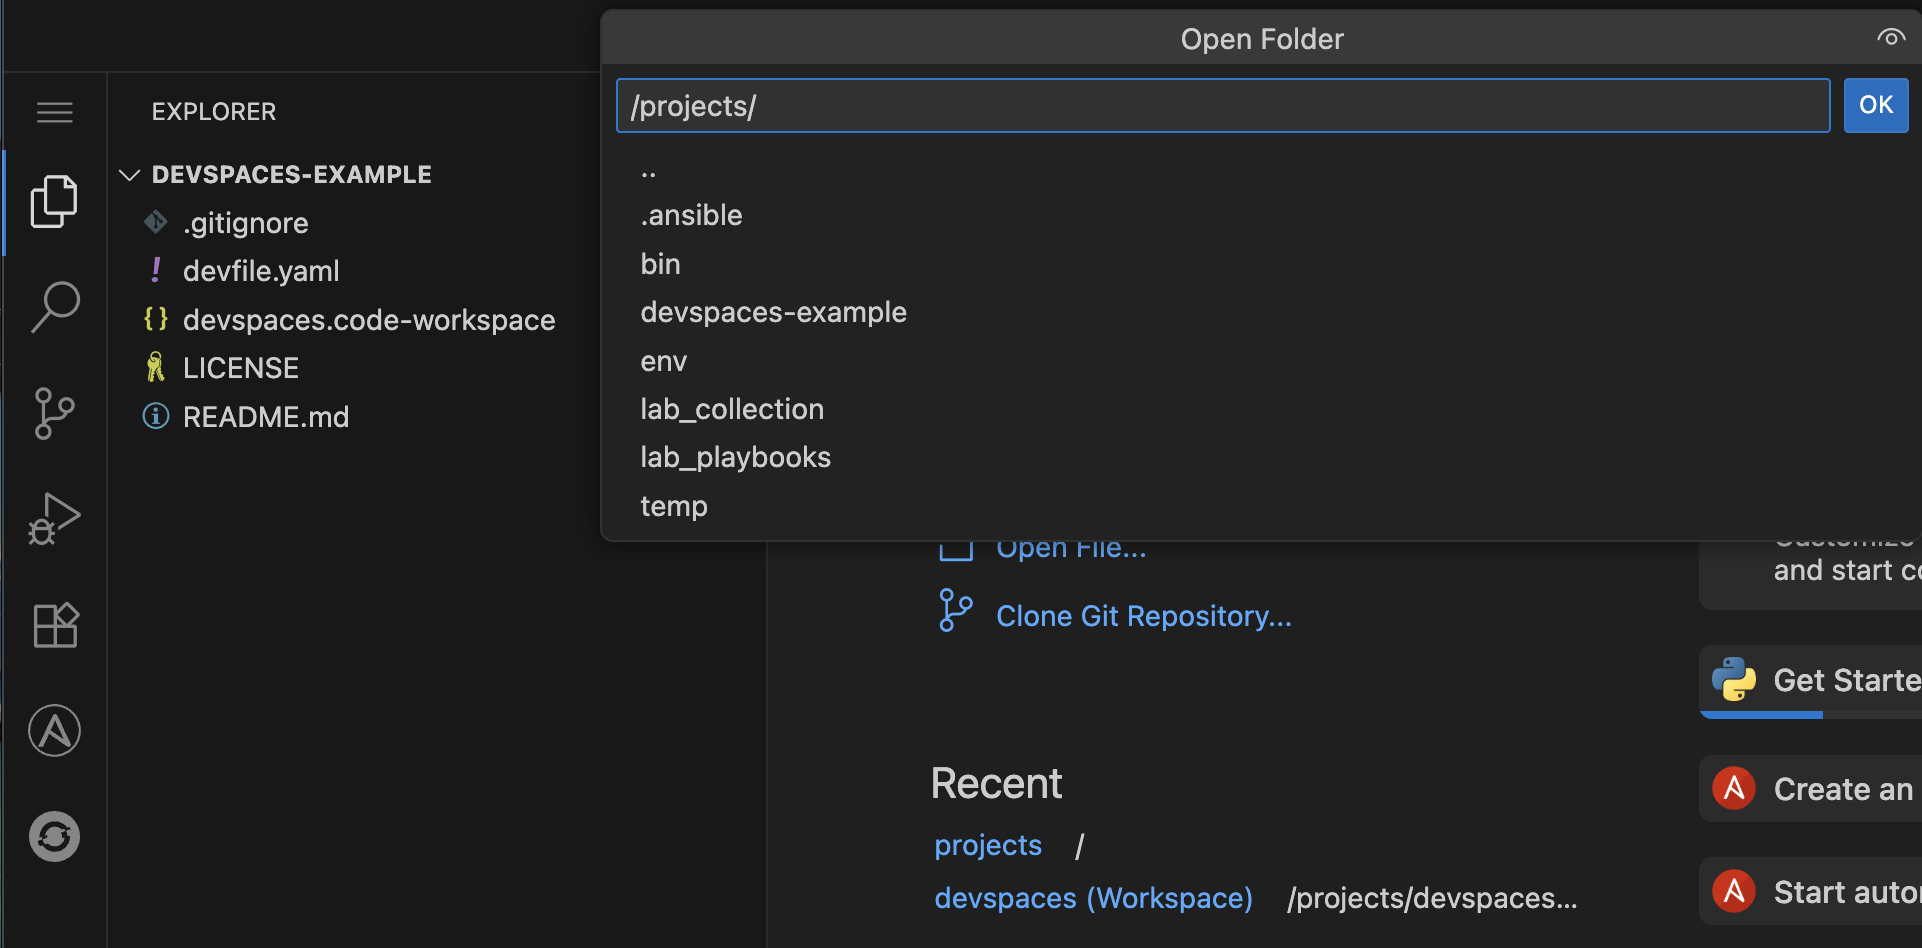
-
Dev Spaces will reload with the root as the /projects/ directory
Proceed to 2.2: Add content to the collection.
2.1.2: Using the Ansible Creator UI
| Choose either this section or 2.1.1 Using the Ansible Creator CLI, not both. |
2.1.2.1: Create a Collection in the UI
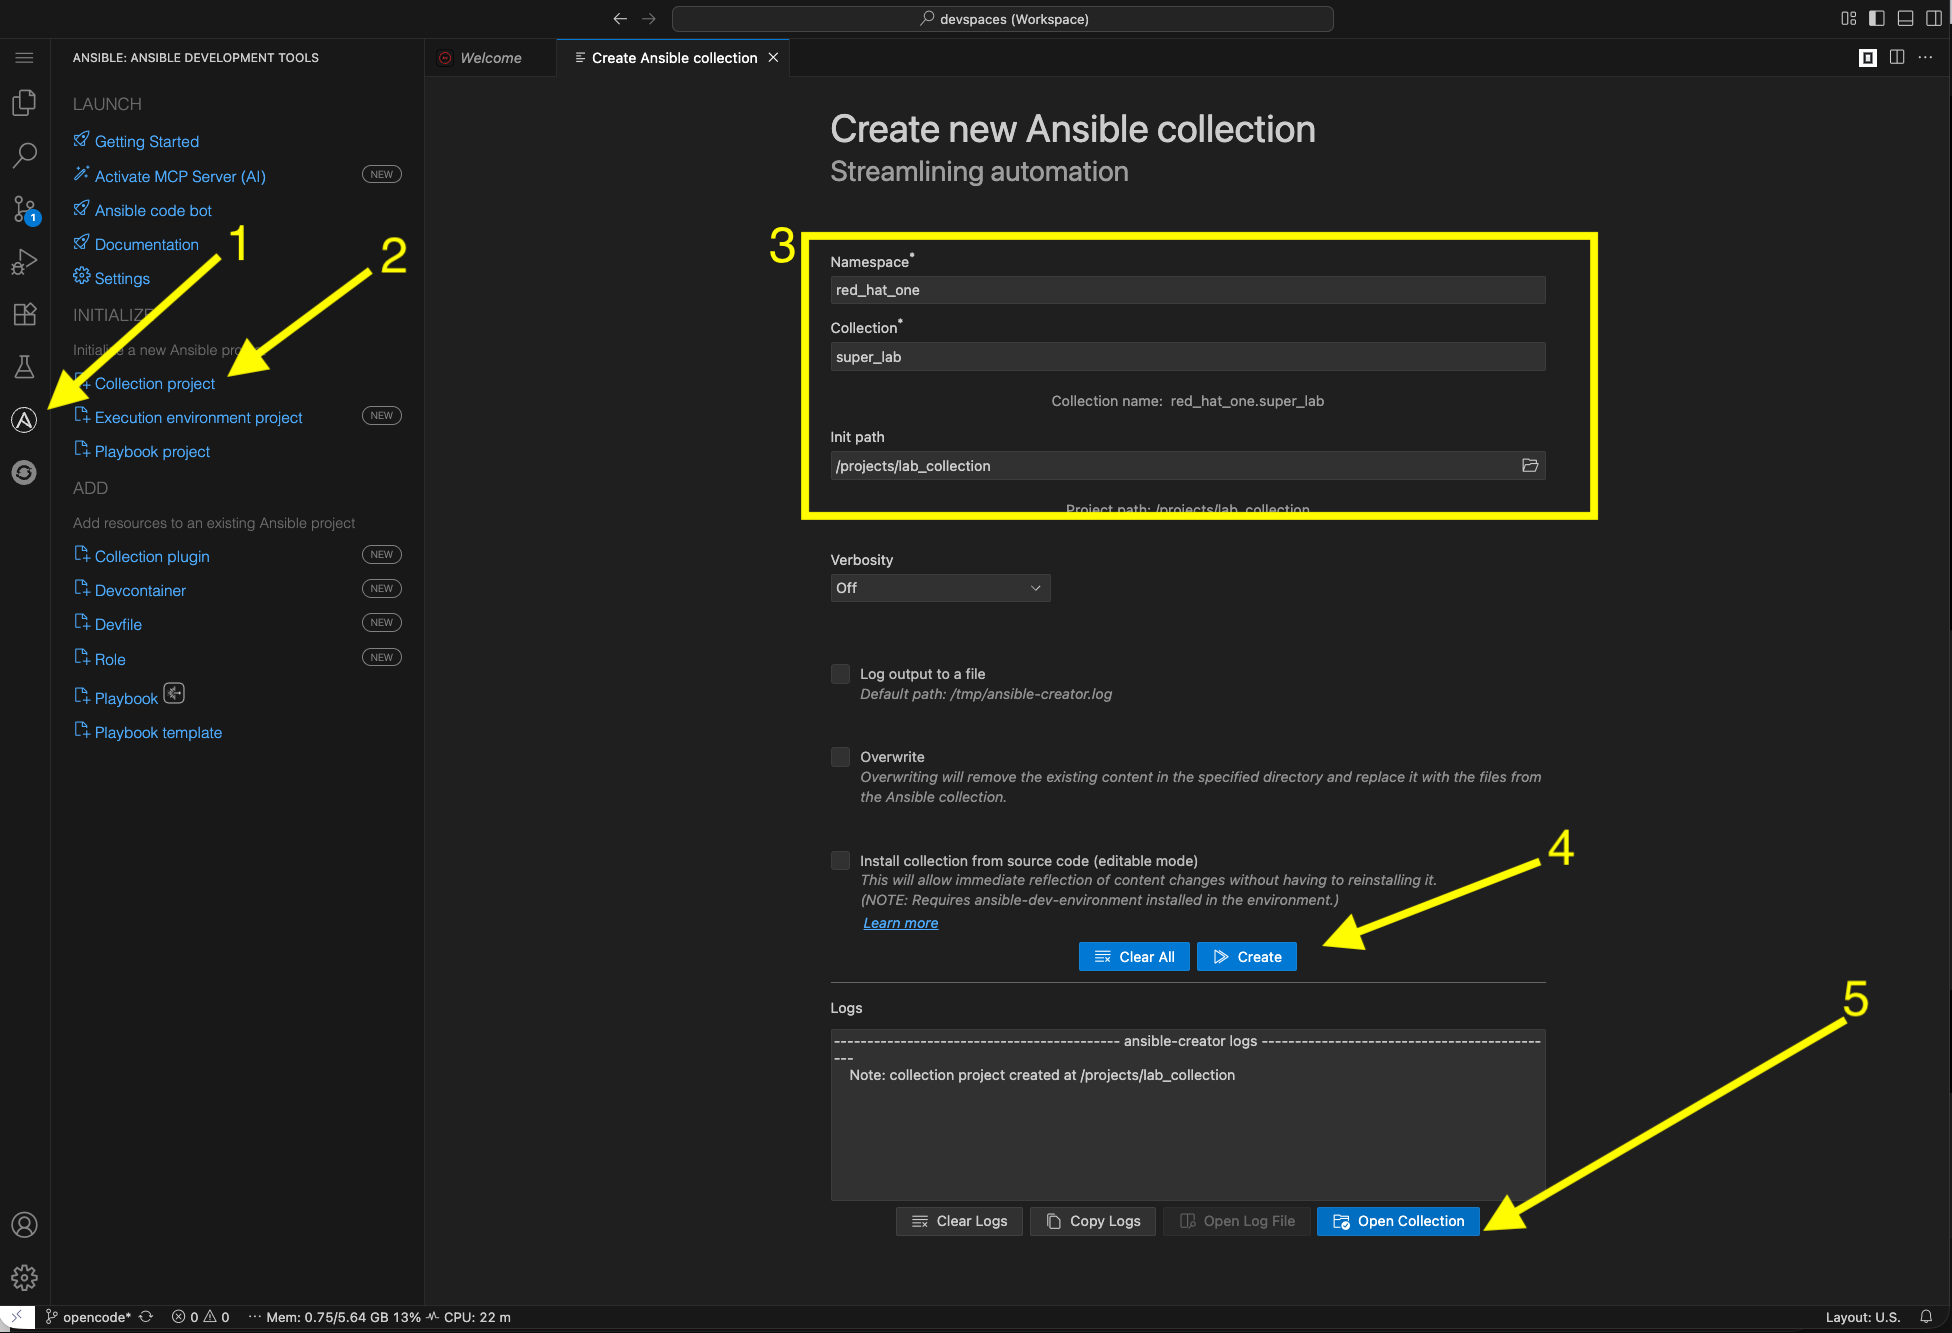
Use the ansible-creator UI to create a collection:
-
Click on the Ansible extension icon on the left
-
Select Collection project
-
Fill in the following details:
-
Namespace
red_hat_one -
Collection
super_lab -
Init path
/projects/lab_collection
-
-
Click Create
-
Lastly, select Open Collection
2.1.2.2: Create Roles in the UI
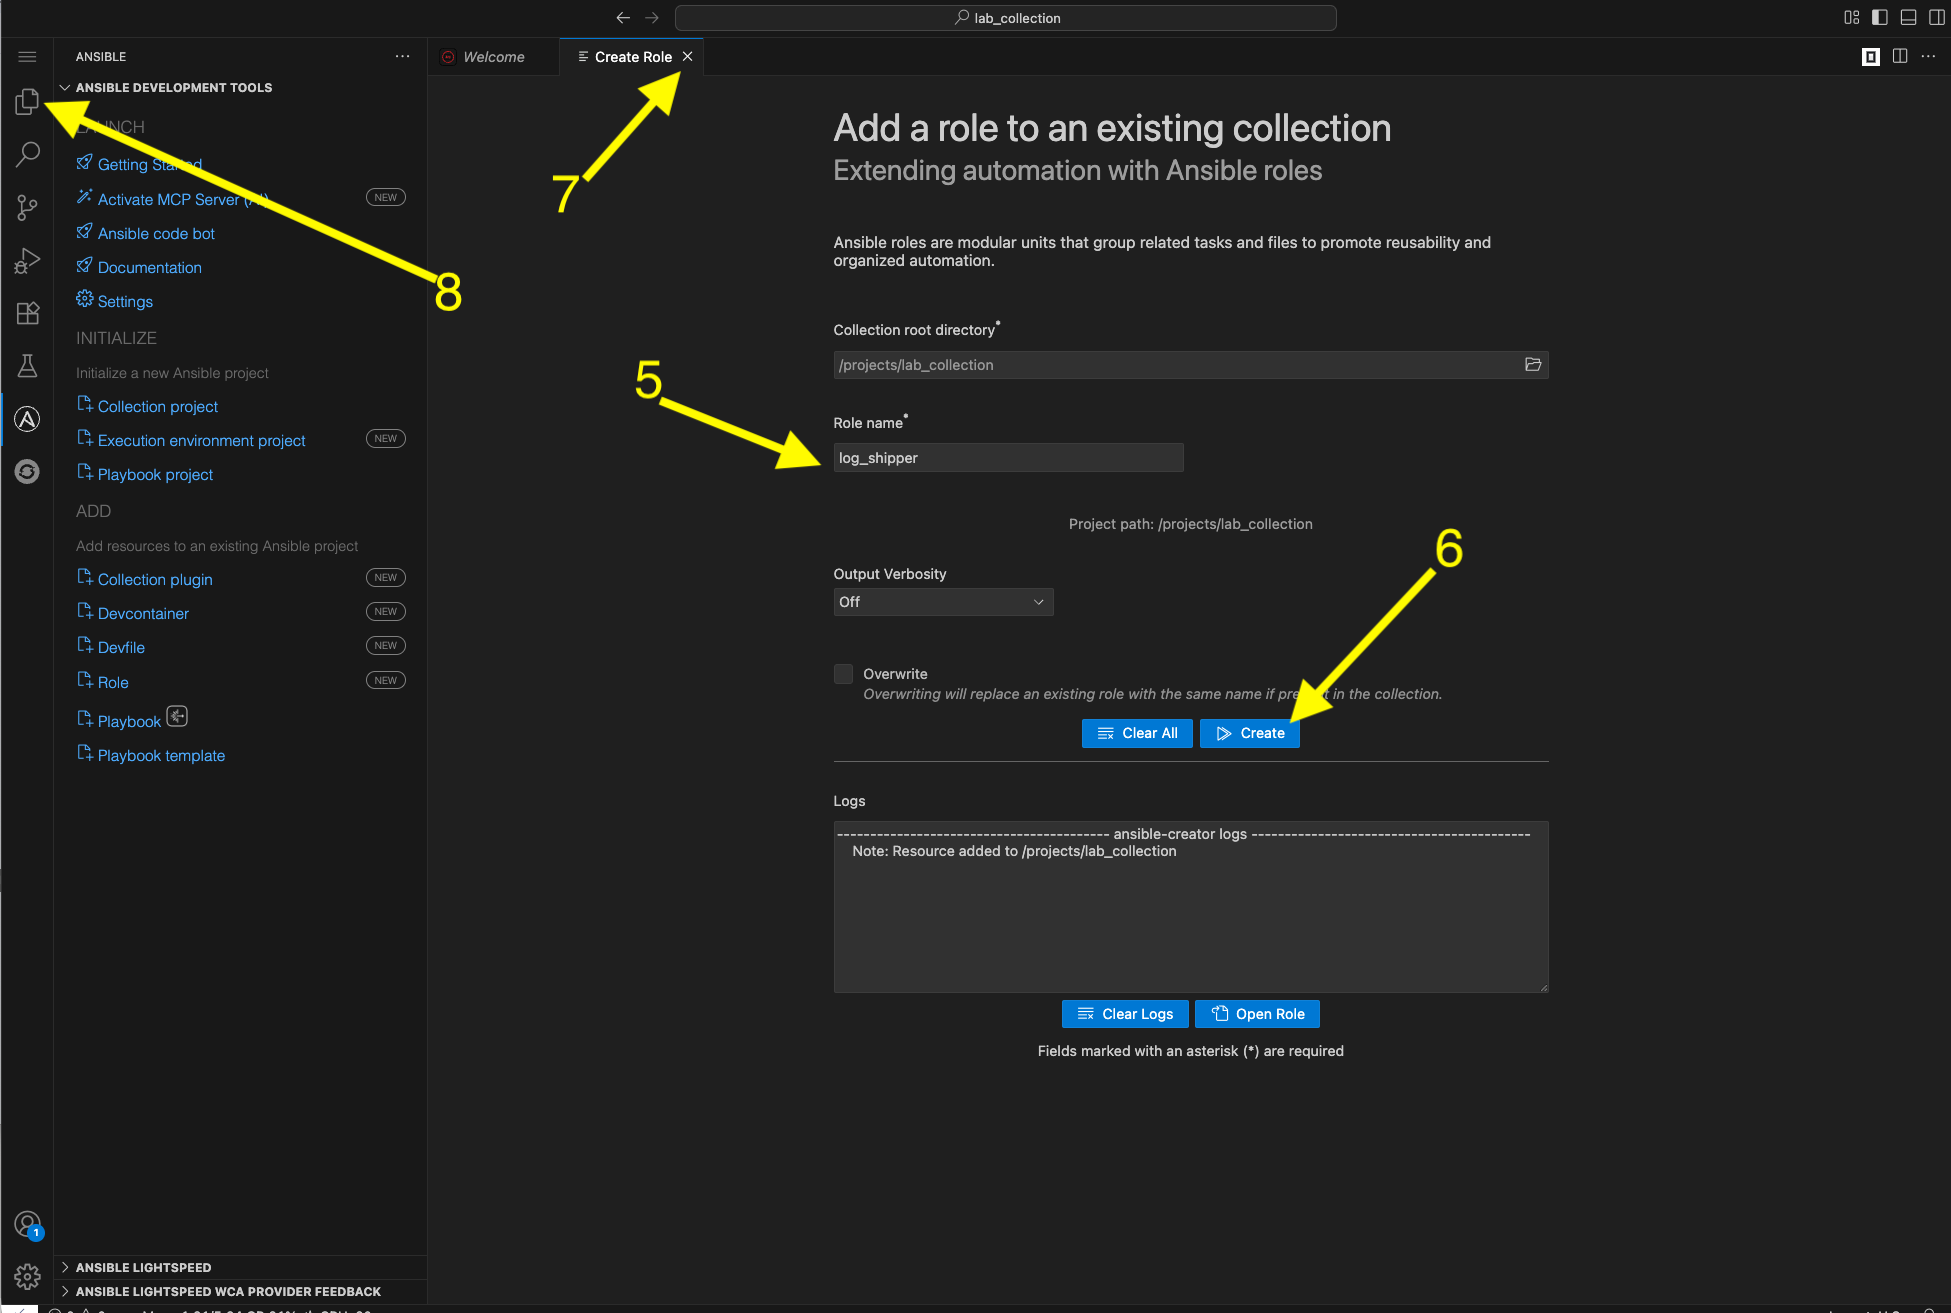
Use the ansible-creator UI to create two new roles:
-
Click on the Ansible extension icon on the left
-
Under the ADD section select Role
-
Fill in the following details:
-
Collection root directory:
/projects/lab_collection -
Role Name:
web_server
-
-
Click Create
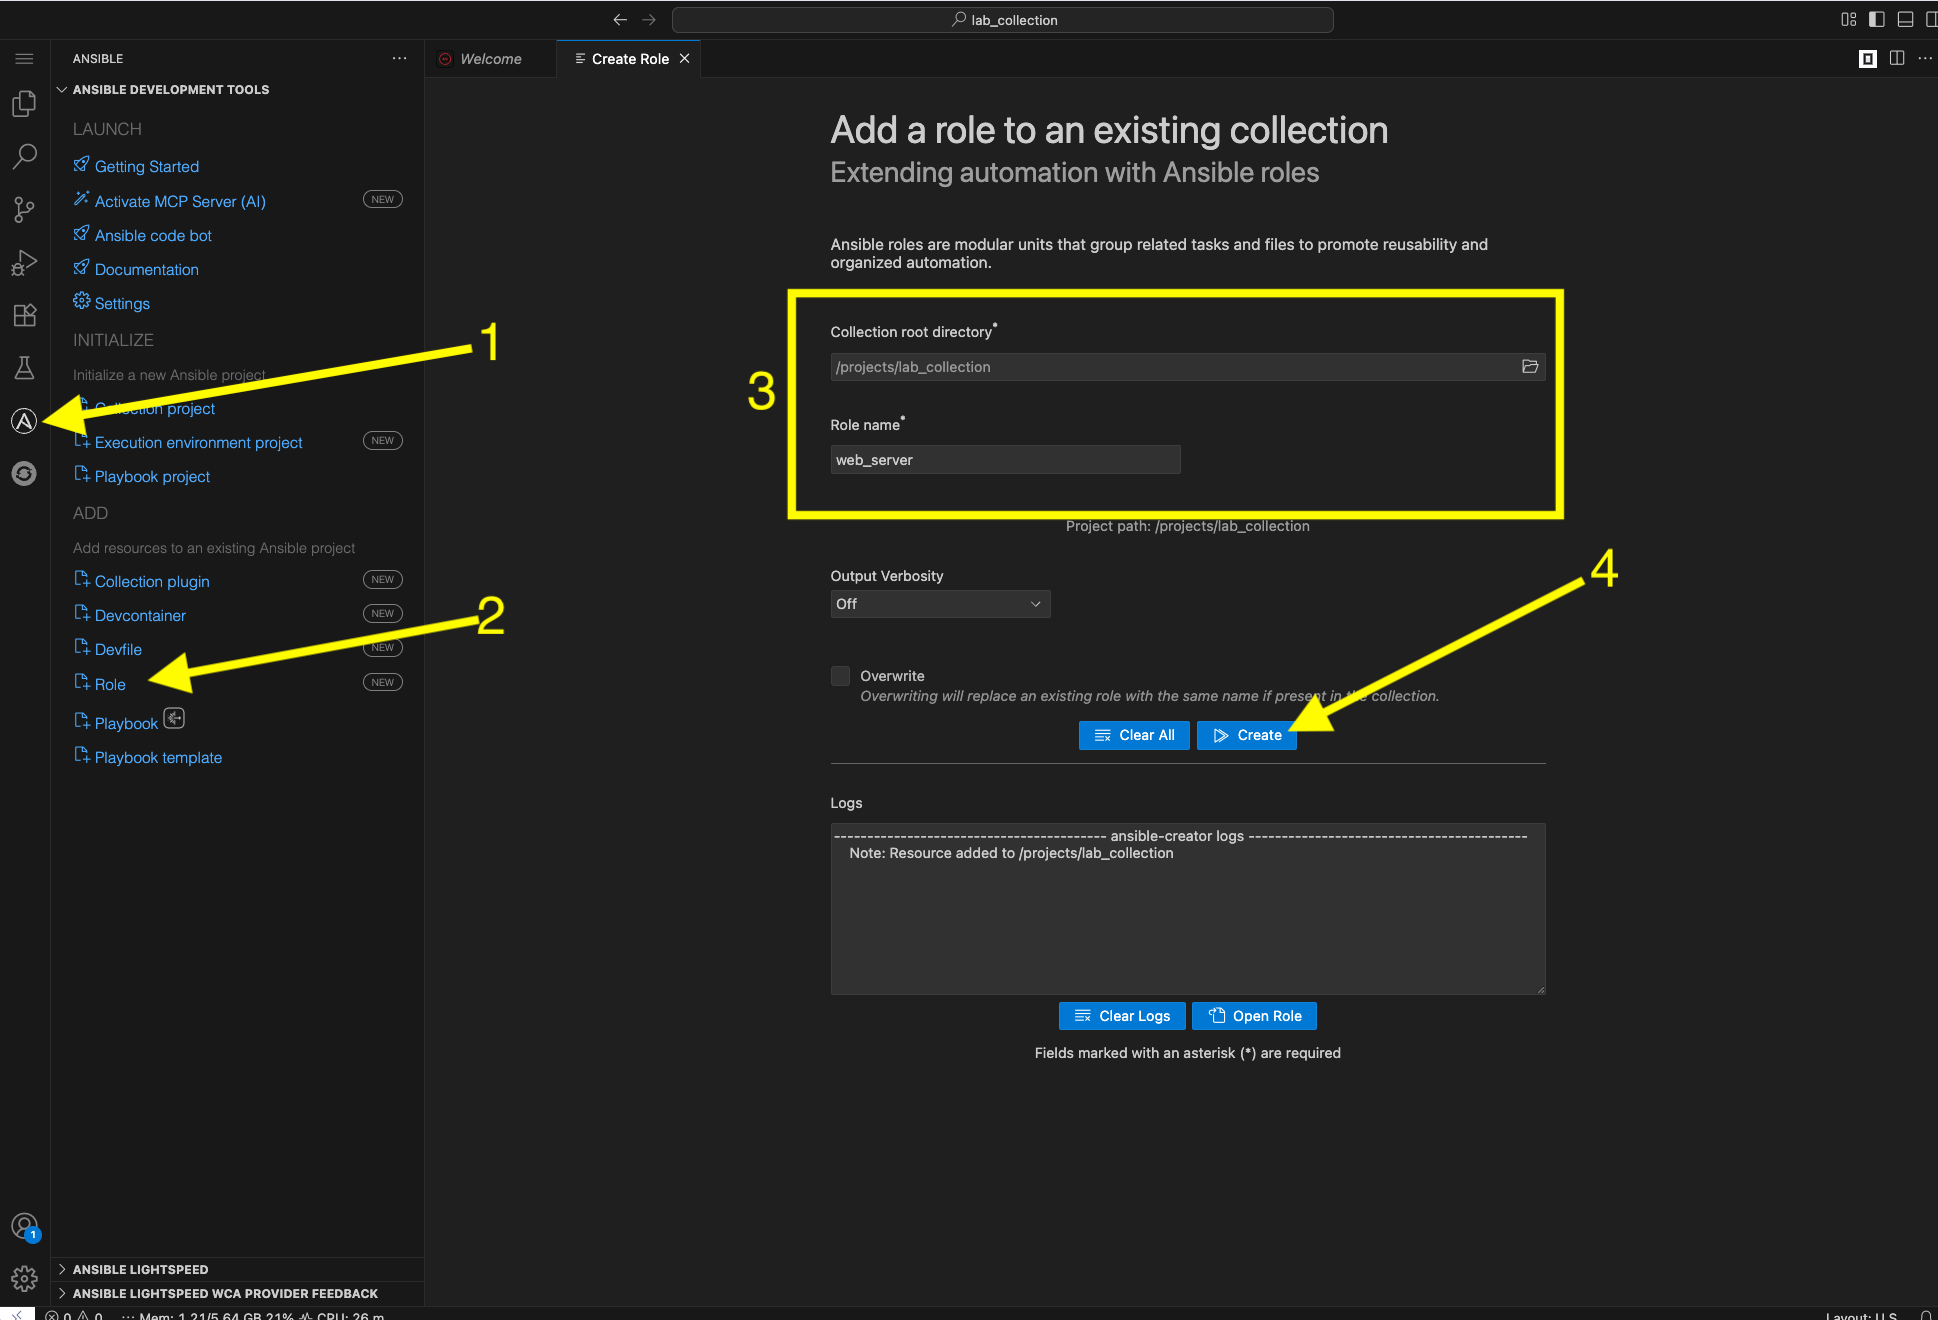
-
Without leaving this screen, create the other role by keeping the existing values the same with the exception of the Role Name field. Enter a new role called
log_shipper -
Click Create
-
Close this UI window
-
Click on the File Explorer icon to return to the file structure
Proceed to 2.2: Add content to the collection.
2.2: Add content to the collection
The following sections can be done in either the UI or CLI. Navigate in the newly created /projects/lab_collection/roles/ directory to the newly created roles.
2.2.1: Build Web Server Role
-
Expand the directory for the
web_serverrole. -
Create a new task file in the
tasksdirectory for the tasks to setup IIS:/projects/lab_collection/roles/web_server/tasks/setup.yml--- - name: Install IIS Web-Server features and management tools ansible.windows.win_feature: name: Web-Server state: present include_sub_features: true include_management_tools: true - name: Remove Default Web Site to free up Port 80 microsoft.iis.website: name: "Default Web Site" state: absent ...ansible-lintwill complain unless each file ends with and empty newline, so keep that in mind as you paste. -
Create another new task file in that same
tasksdirectory to configure the site:/projects/lab_collection/roles/web_server/tasks/website.yml--- - name: Ensure the website physical path directory exists ansible.windows.win_file: path: C:\sites\superlab state: directory - name: Copy a sample index.html file to the web root ansible.windows.win_template: src: index.html.j2 dest: C:\sites\superlab\index.html force: true - name: Create an IIS Website microsoft.iis.website: name: SuperLabWebsite physical_path: C:\sites\superlab application_pool: DefaultAppPool bindings: set: - protocol: http ip: '*' port: 80 state: started register: r_website_status when: not ansible_check_mode - name: Display website status ansible.builtin.debug: var: r_website_status verbosity: 1 ... -
Create another new task file in that same
tasksdirectory for validation tasks:/projects/lab_collection/roles/web_server/tasks/service.yml--- - name: Ensure W3SVC (IIS) is started ansible.windows.win_service: name: W3SVC state: started - name: Include validation tasks ansible.builtin.include_tasks: file: validate.yml ... -
Create another new task file in that same
tasksdirectory for validation tasks:/projects/lab_collection/roles/web_server/tasks/validate.yml--- - name: Verify service is responsive ansible.windows.win_uri: url: http://localhost return_content: false register: web_check until: web_check.status_code == 200 retries: 3 delay: 5 - name: Capture content for debugging ansible.windows.win_uri: url: "http://localhost" return_content: true register: r_local_test - name: Debug captured result ansible.builtin.debug: var: r_local_test verbosity: 1 ... -
Next, create the template file named
index.html.j2for the web server content into thetemplatesdirectory:/projects/lab_collection/roles/web_server/templates/index.html.j2Welcome to Super Lab IIS Server Machine ID {{ ansible_facts['machine_id'] }} Hostname {{ ansible_facts['fqdn'] + '.' + ansible_facts['interfaces'][0]['dns_domain'] }} Deployed on {{ ansible_facts['date_time']['date'] }} at {{ ansible_facts['date_time']['time'] }}The reason this is plain text and not using HTML tags is because we cannot get directly to the webserver in a browser without some hoops. This is good enough for testing. -
Next, edit the main task file and replace the contents with the following:
/projects/lab_collection/roles/web_server/tasks/main.yml--- - name: Include setup tasks ansible.builtin.include_tasks: file: setup.yml - name: Include website tasks ansible.builtin.include_tasks: file: website.yml - name: Include service tasks ansible.builtin.include_tasks: file: service.yml apply: check_mode: false when: ansible_check_mode ... -
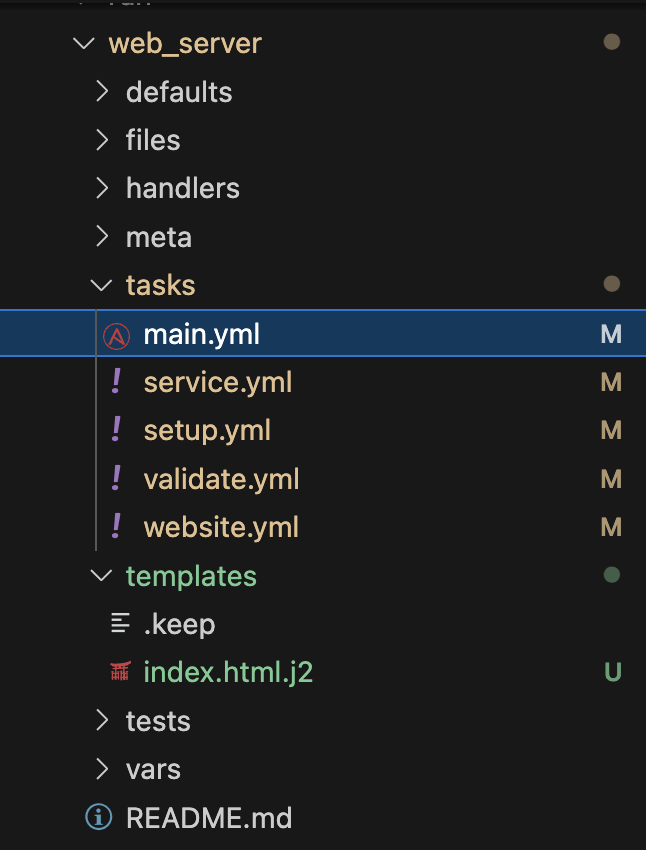
The file structure should look like this:
2.2.2: Build Log Shipper Role
-
Expand the
/projects/lab_collection/roles/log_shipper/directory -
Create a new task file in the
tasksdirectory to handle setup requirements:/projects/lab_collection/roles/log_shipper/tasks/prerequisites.yml--- - name: Install .NET Framework 4.8 via Web Installer win_package: path: https://go.microsoft.com/fwlink/?linkid=2088631 product_id: '{31C94595-568E-4545-9336-69A71B57849D}' arguments: /passive /norestart register: r_dotnet_install - name: Debug .NET install ansible.builtin.debug: var: r_dotnet_install verbosity: 1 - name: Reboot when required ansible.windows.win_reboot: when: r_dotnet_install['reboot_required'] ... -
Create a new task file in the
tasksdirectory to handle setup requirements:/projects/lab_collection/roles/log_shipper/tasks/chocolatey.yml--- - name: Include prerequisite tasks ansible.builtin.include_tasks: file: prerequisites.yml - name: Ensure Chocolatey is installed (requires .NET 4.8) chocolatey.chocolatey.win_chocolatey: name: chocolatey state: present ... -
Create another new task file in the
tasksdirectory to install our log shipper, Filebeat:/projects/lab_collection/roles/log_shipper/tasks/filebeat.yml--- - name: Install a filebeat with Chocolatey chocolatey.chocolatey.win_chocolatey: name: filebeat state: present ... -
Lastly, replace main task file with the following:
/projects/lab_collection/roles/log_shipper/tasks/main.yml--- - name: Include Chocolatey tasks ansible.builtin.include_tasks: file: chocolatey.yml - name: Include install tasks ansible.builtin.include_tasks: file: filebeat.yml ... -
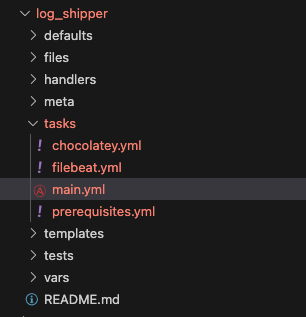
The file structure should look like this:
3: Build Playbook directory for testing content
Now that the code is written, it is time to try running it. A few steps are needed to do that in Dev Spaces before pushing to git.
| If needed, ensure a terminal is open by selecting the hamburger (3 dashes) in the top left and choosing Terminal → New Terminal |
3.1: Use Ansible Creator to create Playbook directory
For the remainder of this lab the ansible-creator CLI will be used for simplicity and speed. It is of course possible to create this same playbook directory from the extension UI.
-
From Dev Spaces create a playbook directory:
ansible-creator init playbook \
  red_hat_one.super_lab \
  /projects/lab_playbooks/
Note: playbook project created at /projects/lab_playbooksIf you used the UI method earlier you may only have the collection open. Feel free to use File → Open Folder to ensure you can access the new folder under /projects/lab_playbooks/in the UI if needed.
3.2: Populate the Inventory
A few steps need to be taken to modify the scaffold files to ensure they work with this lab.
-
Comment or remove the two entries in
/projects/lab_playbooks/inventory/group_vars/all.yml, specifically foransible_userto ensure it doesn’t interfere with our actual user, which will be provided via a secrets file later instead of announced to the world in inventory.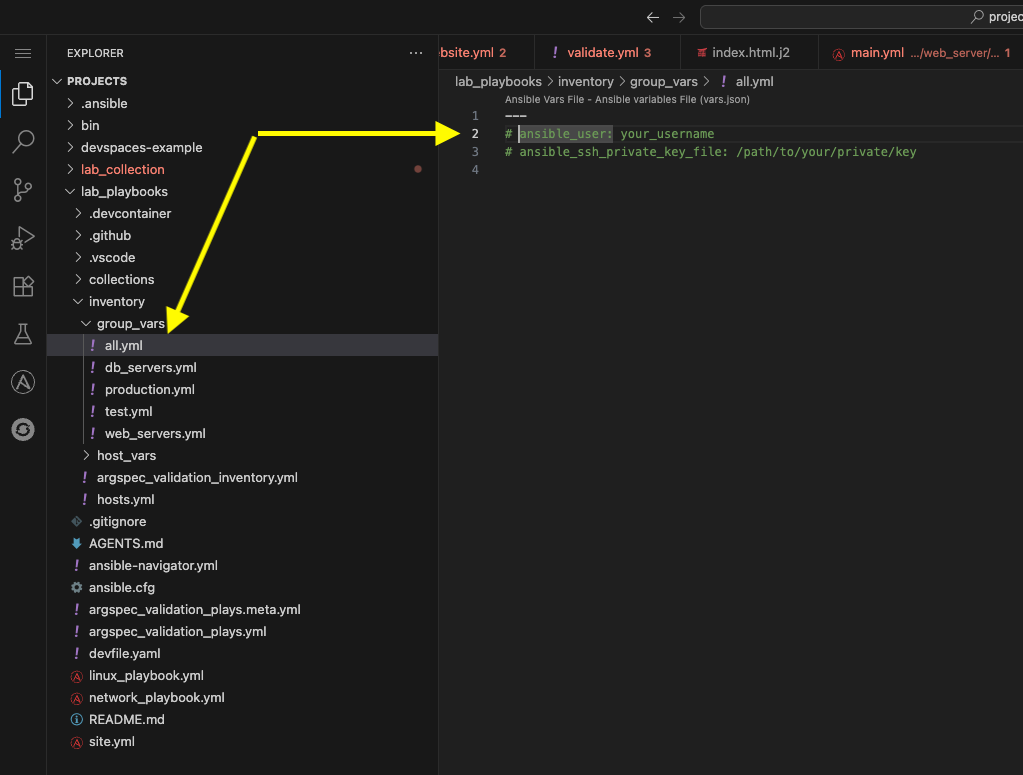
-
Modify the main inventory file and replace it with these lab details:
/projects/lab_playbooks/inventory/hosts.yml--- all: children: windows: hosts: windows: ansible_host: windows.aap.svc.cluster.local ansible_connection: psrp ansible_psrp_auth: negotiate ansible_psrp_cert_validation: ignore ...
3.3: Create secrets file
In AAP, a credential is used to communicate with the remote Windows host. We will simulate that here with a file containing the values found within the Credential which will NOT be committed to any repositories.
-
Create a directory at
/projects/env/to hold local scripts and variables we will use but do not want to commit to any repositories:/projects/env/mkdir --parents --verbose /projects/env/mkdir: created directory '/projects/env/'If the directory already exists from the previous module, there is no output. -
Add the following to a secrets file in the
/projects/env/directory calledsecrets.yml:/projects/env/secrets.yml--- ansible_user: '{windows_user}' ansible_password: '{windows_password}' ...You may need to perform this activity from a terminal or open the /projects/env/folder in the UI.
3.4: Setup ansible.cfg
The file that was automatically scaffolded is acceptable as it currently stands as it correctly specifies the location of the inventory file. However, entries need to be added to install collections from Red Hat Automation Hub. Since we have not configured Private Automation Hub with the collections required, in this step we will use upstream Red Hat Automation Hub.
-
First, obtain a token from Automation Hub
-
Under Offline Token click Load Token and copy this token and store it somewhere secure as it cannot be displayed again.
This is your personal token for console.redhat.com used to communicate upstream with Automation Hub on Red Hat console. For clarification, this token should be several hundred characters long (no need to count). Do NOT confuse this later with the Private Automation Hub token which will be much shorter at around 40 characters. Record this token to /projects/env/my_tokens.envfor safe keeping with a name such asUPSTREAM_CONSOLE_HUB_TOKEN=.For additional information see Managing Automation Content Documentation -
Add the following to the end of the provided
ansible.cfg:Be careful NOT to overwrite the existing content, just append to it! If you completed a previous lab and already have an ansible.cfgsimply copy that and append it./projects/lab_playbooks/ansible.cfg[galaxy] server_list = hub, hub_validated, galaxy [galaxy_server.hub] url=https://console.redhat.com/api/automation-hub/content/published/ auth_url=https://sso.redhat.com/auth/realms/redhat-external/protocol/openid-connect/token token=YOUR_UPSTREAM_CONSOLE_HUB_TOKEN [galaxy_server.hub_validated] url=https://console.redhat.com/api/automation-hub/content/validated/ auth_url=https://sso.redhat.com/auth/realms/redhat-external/protocol/openid-connect/token token=YOUR_UPSTREAM_CONSOLE_HUB_TOKEN [galaxy_server.galaxy] url=https://galaxy.ansible.comBe sure to replace YOUR_UPSTREAM_CONSOLE_HUB_TOKEN with the token obtained from step 2 above (i.e. the very long token from console.redhat.com).
3.5: Configure Collections
This lab_playbooks directory will call the roles we created. We need to install these collections in Dev Spaces:
-
Modify the provided
requirements.ymlfile and replace its contents:/projects/lab_playbooks/collections/requirements.yml--- collections: - chocolatey.chocolatey - ansible.windows - microsoft.iis ... -
Install the collections from the base of the
lab_playbooksdirectory so it can read theansible.cfgfile:cd /projects/lab_playbooks/ ansible-galaxy collection install \ --requirements-file collections/requirements.ymlAdd these commands to /projects/env/config.shansible-galaxy [core 2.19.3] config file = /projects/lab_playbooks/ansible.cfg configured module search path = ['/home/user/.ansible/plugins/modules', '/usr/share/ansible/plugins/modules'] ansible python module location = /usr/local/lib/python3.11/site-packages/ansible ansible collection location = /home/user/.ansible/collections:/usr/share/ansible/collections executable location = /usr/local/bin/ansible-galaxy python version = 3.11.13 (main, Aug 21 2025, 00:00:00) [GCC 11.5.0 20240719 (Red Hat 11.5.0-11)] (/usr/bin/python3.11) jinja version = 3.1.6 pyyaml version = 6.0.3 (with libyaml v0.2.5) Using /projects/lab_playbooks/ansible.cfg as config file Starting galaxy collection install process Process install dependency map Starting collection install process Downloading https://console.redhat.com/api/automation-hub/v3/plugin/ansible/content/published/collections/artifacts/microsoft-iis-1.1.0.tar.gz to /home/user/.ansible/tmp/ansible-local-43743gaazt17/tmpo7v55uhh/microsoft-iis-1.1.0-jaf4wdj_ Downloading https://console.redhat.com/api/automation-hub/v3/plugin/ansible/content/published/collections/artifacts/chocolatey-chocolatey-1.5.3.tar.gz to /home/user/.ansible/tmp/ansible-local-43743gaazt17/tmpo7v55uhh/chocolatey-chocolatey-1.5.3-l4u7_lip Installing 'microsoft.iis:1.1.0' to '/home/user/.ansible/collections/ansible_collections/microsoft/iis' microsoft.iis:1.1.0 was installed successfully Installing 'chocolatey.chocolatey:1.5.3' to '/home/user/.ansible/collections/ansible_collections/chocolatey/chocolatey' Downloading https://console.redhat.com/api/automation-hub/v3/plugin/ansible/content/published/collections/artifacts/ansible-windows-3.3.0.tar.gz to /home/user/.ansible/tmp/ansible-local-43743gaazt17/tmpo7v55uhh/ansible-windows-3.3.0-_e3i_hww chocolatey.chocolatey:1.5.3 was installed successfully Installing 'ansible.windows:3.3.0' to '/home/user/.ansible/collections/ansible_collections/ansible/windows' ansible.windows:3.3.0 was installed successfully
3.6: Install python libraries
Install the required library for either WinRM or PSRP:
-
The lab defaults to the newest protocol using PSRP:
pip install pypsrpAdd this command to /projects/env/config.shDefaulting to user installation because normal site-packages is not writeable Collecting pypsrp Downloading pypsrp-0.8.1-py3-none-any.whl (88 kB) ━━━━━━━━━━━━━━━━━━━━━━━━━━━━━━━━━━━━━━━━ 88.4/88.4 kB 14.9 MB/s eta 0:00:00 Requirement already satisfied: cryptography in /usr/local/lib64/python3.11/site-packages (from pypsrp) (46.0.3) Collecting pyspnego<1.0.0 Downloading pyspnego-0.12.0-py3-none-any.whl (130 kB) ━━━━━━━━━━━━━━━━━━━━━━━━━━━━━━━━━━━━━━━━ 130.2/130.2 kB 37.3 MB/s eta 0:00:00 Requirement already satisfied: requests>=2.9.1 in /usr/local/lib/python3.11/site-packages (from pypsrp) (2.32.5) Requirement already satisfied: charset_normalizer<4,>=2 in /usr/local/lib64/python3.11/site-packages (from requests>=2.9.1->pypsrp) (3.4.4) Requirement already satisfied: idna<4,>=2.5 in /usr/local/lib/python3.11/site-packages (from requests>=2.9.1->pypsrp) (3.11) Requirement already satisfied: urllib3<3,>=1.21.1 in /usr/local/lib/python3.11/site-packages (from requests>=2.9.1->pypsrp) (2.3.0) Requirement already satisfied: certifi>=2017.4.17 in /usr/local/lib/python3.11/site-packages (from requests>=2.9.1->pypsrp) (2025.10.5) Requirement already satisfied: cffi>=2.0.0 in /usr/local/lib64/python3.11/site-packages (from cryptography->pypsrp) (2.0.0) Requirement already satisfied: pycparser in /usr/local/lib/python3.11/site-packages (from cffi>=2.0.0->cryptography->pypsrp) (2.23) Installing collected packages: pyspnego, pypsrp WARNING: The script pyspnego-parse is installed in '/home/user/.local/bin' which is not on PATH. Consider adding this directory to PATH or, if you prefer to suppress this warning, use --no-warn-script-location. Successfully installed pypsrp-0.8.1 pyspnego-0.12.0You may safely ignore the question about creating a virtual environment 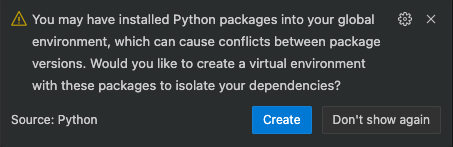
3.7: Configure Collection directory
This ansible-creator command required a collection name when executing. The reason is it creates a sample collection and single role embedded for use by this playbook. Since we already have our own separate collection, we will remove the provided collection and link it to /projects/lab_collection/.
-
Remove the provided collection directory:
rm --force --recursive --verbose \
  /projects/lab_playbooks/collections/ansible_collections/red_hat_one/super_lab/
Do not run this command again AFTER you complete the next step lnor it WILL delete EVERYTHING in your/projects/lab_collection/directory and you will have to perform all the tasks again!removed '/projects/lab_playbooks/collections/ansible_collections/red_hat_one/super_lab/roles/run/README.md' removed '/projects/lab_playbooks/collections/ansible_collections/red_hat_one/super_lab/roles/run/tasks/main.yml' removed directory '/projects/lab_playbooks/collections/ansible_collections/red_hat_one/super_lab/roles/run/tasks' removed directory '/projects/lab_playbooks/collections/ansible_collections/red_hat_one/super_lab/roles/run' removed directory '/projects/lab_playbooks/collections/ansible_collections/red_hat_one/super_lab/roles' removed '/projects/lab_playbooks/collections/ansible_collections/red_hat_one/super_lab/README.md' removed '/projects/lab_playbooks/collections/ansible_collections/red_hat_one/super_lab/CHANGELOG.md' removed '/projects/lab_playbooks/collections/ansible_collections/red_hat_one/super_lab/meta/runtime.yml' removed directory '/projects/lab_playbooks/collections/ansible_collections/red_hat_one/super_lab/meta' removed '/projects/lab_playbooks/collections/ansible_collections/red_hat_one/super_lab/galaxy.yml' removed directory '/projects/lab_playbooks/collections/ansible_collections/red_hat_one/super_lab/' -
Now create a symbolic link to the collection we created earlier:
ln --symbolic --verbose \
  /projects/lab_collection/ \
  /projects/lab_playbooks/collections/ansible_collections/red_hat_one/super_lab
'/projects/lab_playbooks/collections/ansible_collections/red_hat_one/super_lab' -> '/projects/lab_collection/' -
If you expand
/projects/lab_playbooks/collections/ansible_collections/red_hat_one/super_lab, it should list the two roles created in/projects/lab_collection/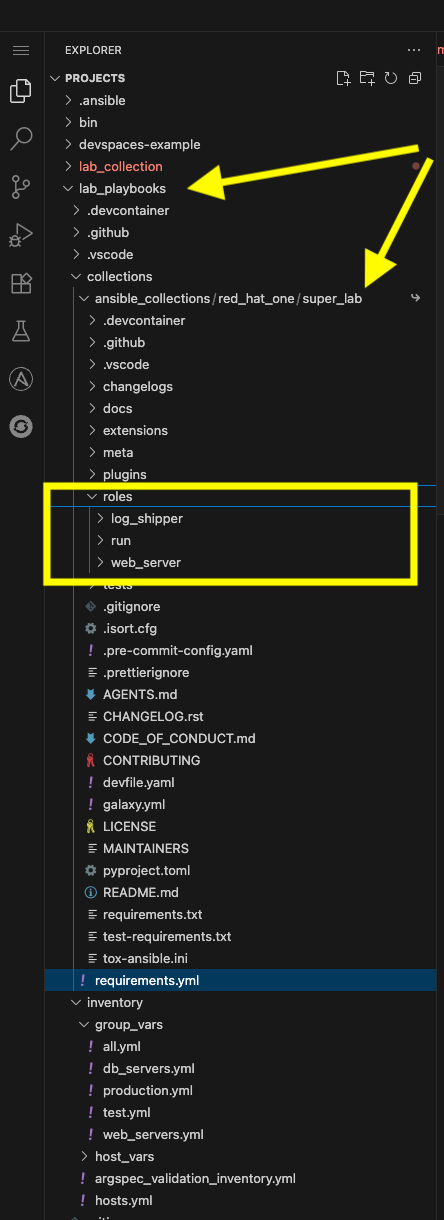
This is only for our lab environment, this is not needed for AAP.
3.8: Setup Playbook
-
Next, replace the contents of
site.ymlwith the following:/projects/lab_playbooks/site.yml--- - name: Setup Windows Server hosts: windows tasks: - name: Call web server role ansible.builtin.include_role: name: red_hat_one.super_lab.web_server - name: Call log shipper role ansible.builtin.include_role: name: red_hat_one.super_lab.log_shipper ...Why are we using taskswthinclude_roleinstead ofroleskeyword? This allows us to usetasks_fromand call the individual tasks we created in each role in addition to being a more modern and flexible way to call roles.
4: Test Content
-
Since an
ansible.cfgand inventory are configured, ensure everything is executed from the/projects/lab_playbooks/directory by navigating to this directory:cd /projects/lab_playbooks/ -
Start by replicating the initial
win_pingfrom AAP at the start of this lab:ansible \ --module-name ansible.builtin.win_ping windows \ --extra-vars @/projects/env/secrets.yml --inventory inventory/hosts.ymlwindows | SUCCESS => { "changed": false, "ping": "pong" } -
If connectivity worked, execute the entire playbook but start in check mode first:
ansible-playbook --extra-vars @/projects/env/secrets.yml \
  --inventory inventory/hosts.yml \
  site.yml --check
This run will fail the first time you run it. The output will be reviewed in the following steps. -
The final task that fails is likely the following. This is due to a requirement that hasn’t been installed yet:
# ... other playbook output TASK [red_hat_one.super_lab.log_shipper : Ensure Chocolatey is installed (requires .NET 4.8)] * task path: /projects/lab_playbooks/collections/ansible_collections/red_hat_one/super_lab/roles/log_shipper/tasks/chocolatey.yml:6 [ERROR]: Task failed: Module failed: Chocolatey 2.0.0 requires .NET Framework 4.8 or higher to be installed. Please install .NET Framework 4.8 or higher and try again, or specify a 1.x version of Chocolatey to install. Origin: /projects/lab_playbooks/collections/ansible_collections/red_hat_one/super_lab/roles/log_shipper/tasks/chocolatey.yml:6:3 4 file: prerequisites.yml 5 6 - name: Ensure Chocolatey is installed (requires .NET 4.8) ^ column 3 fatal: [windows]: FAILED! => {"changed": false, "command": "", "msg": "Chocolatey 2.0.0 requires .NET Framework 4.8 or higher to be installed. Please install .NET Framework 4.8 or higher and try again, or specify a 1.x version of Chocolatey to install.", "rc": 0} PLAY RECAP ** windows : ok=19 changed=5 unreachable=0 failed=1 skipped=2 rescued=0 ignored=0 -
The first role will succeed. Notice the tasks in
validate.ymlwill run, which are specified only to run in check mode. If you scroll up to the task named Debug captured result you can see the default website, not the one we want to configure.View Output Detail
# ... other playbook output TASK [red_hat_one.super_lab.web_server : Debug captured result] ********************************************************************************************************************************************************* task path: /projects/lab_playbooks/collections/ansible_collections/red_hat_one/super_lab/roles/web_server/tasks/validate.yml:8 ok: [windows] => { "r_local_test": { "accept_ranges": "bytes", "changed": false, "character_set": "ISO-8859-1", "content": "<!DOCTYPE html PUBLIC \"-//W3C//DTD XHTML 1.0 Strict//EN\" \"http://www.w3.org/TR/xhtml1/DTD/xhtml1-strict.dtd\">\r\n<html xmlns=\"http://www.w3.org/1999/xhtml\">\r\n<head>\r\n<meta http-equiv=\"Content-Type\" content=\"text/html; charset=iso-8859-1\" />\r\n<title>IIS Windows Server</title>\r\n<style type=\"text/css\">\r\n<!--\r\nbody {\r\n\tcolor:#000000;\r\n\tbackground-color:#0072C6;\r\n\tmargin:0;\r\n}\r\n\r\n#container {\r\n\tmargin-left:auto;\r\n\tmargin-right:auto;\r\n\ttext-align:center;\r\n\t}\r\n\r\na img {\r\n\tborder:none;\r\n}\r\n\r\n-->\r\n</style>\r\n</head>\r\n<body>\r\n<div id=\"container\">\r\n<a href=\"http://go.microsoft.com/fwlink/?linkid=66138&clcid=0x409\"><img src=\"iisstart.png\" alt=\"IIS\" width=\"960\" height=\"600\" /></a>\r\n</div>\r\n</body>\r\n</html>", # ... other playbook outputThere are several ways to address this situation, but this was included intentionally to demonstrate this scenario. -
Run the full playbook now without
--check:ansible-playbook --extra-vars @/projects/env/secrets.yml \ --inventory inventory/hosts.yml \ site.ymlIf you have any issues with the Windows server, you may need to reboot the server. Use the AAP ad-hoc command discussed in the first lab or see the appendix for additional troubleshooting. -
Review the output. Notice this time the validation tasks did not run:
... TASK [red_hat_one.super_lab.web_server : Include validate tasks] ******************************************************************************************************************************************************** task path: /projects/lab_playbooks/collections/ansible_collections/red_hat_one/super_lab/roles/web_server/tasks/main.yml:10 skipping: [windows] => {"changed": false, "false_condition": "ansible_check_mode", "skip_reason": "Conditional result was False"} ... -
The missing .NET prerequisites were installed:
... TASK [red_hat_one.super_lab.log_shipper : Install .NET Framework 4.8 via Web Installer] ********************************************************************************************************************************* task path: /projects/lab_playbooks/collections/ansible_collections/red_hat_one/super_lab/roles/log_shipper/tasks/prerequisites.yml:2 redirecting (type: modules) ansible.builtin.win_package to ansible.windows.win_package redirecting (type: modules) ansible.builtin.win_package to ansible.windows.win_package redirecting (type: modules) ansible.builtin.win_package to ansible.windows.win_package changed: [windows] => {"changed": true, "checksum": "CA87B70910F131B625D140FFBFD1C232EA27AB71", "elapsed": 1.5315671, "msg": "OK", "rc": 3010, "reboot_required": true, "status_code": 200} TASK [red_hat_one.super_lab.log_shipper : Debug .NET install] *********************************************************************************************************************************************************** task path: /projects/lab_playbooks/collections/ansible_collections/red_hat_one/super_lab/roles/log_shipper/tasks/prerequisites.yml:9 ok: [windows] => { "r_dotnet_install": { "changed": true, "checksum": "CA87B70910F131B625D140FFBFD1C232EA27AB71", "elapsed": 1.5315671, "failed": false, "msg": "OK", "rc": 3010, "reboot_required": true, "status_code": 200 } } TASK [red_hat_one.super_lab.log_shipper : Reboot when required] ********************************************************************************************************************************************************* task path: /projects/lab_playbooks/collections/ansible_collections/red_hat_one/super_lab/roles/log_shipper/tasks/prerequisites.yml:14 ansible.windows.win_reboot: rebooting server... ansible.windows.win_reboot validating reboot ansible.windows.win_reboot running post reboot test command ansible.windows.win_reboot: system successfully rebooted changed: [windows] => {"changed": true, "elapsed": 75, "rebooted": true, "unreachable": false} ... -
The full run including reboot should take under 10 minutes:
... TASK [red_hat_one.super_lab.log_shipper : Install a filebeat with Chocolatey] ******************************************************************************************************************************************* task path: /projects/lab_playbooks/collections/ansible_collections/red_hat_one/super_lab/roles/log_shipper/tasks/filebeat.yml:2 changed: [windows] => {"changed": true, "choco_cli_version": "2.6.0", "rc": 0, "stdout": "Installing the following packages:\r\nfilebeat\r\nBy installing, you accept licenses for the packages.\r\nDownloading package from source 'https://community.chocolatey.org/api/v2/'\r\n\r\nfilebeat v7.15.1 [Approved]\r\nfilebeat package files install completed. Performing other installation steps.\r\nDownloading filebeat 64 bit\r\n from 'https://artifacts.elastic.co/downloads/beats/filebeat/filebeat-7.15.1-windows-x86_64.zip'\r\n\r\nDownload of filebeat-7.15.1-windows-x86_64.zip (25.8 MB) completed.\r\nHashes match.\r\nExtracting C:\\Users\\Administrator\\AppData\\Local\\Temp\\chocolatey\\filebeat\\7.15.1\\filebeat-7.15.1-windows-x86_64.zip to C:\\ProgramData\\chocolatey\\lib\\filebeat\\tools...\r\nC:\\ProgramData\\chocolatey\\lib\\filebeat\\tools\r\nfilebeat\r\n ShimGen has successfully created a shim for filebeat.exe\r\n The install of filebeat was successful.\r\n Deployed to 'C:\\ProgramData\\chocolatey\\lib\\filebeat\\tools'\r\n\r\nChocolatey installed 1/1 packages. \r\n See the log for details (C:\\ProgramData\\chocolatey\\logs\\chocolatey.log).\r\n", "stdout_lines": ["Installing the following packages:", "filebeat", "By installing, you accept licenses for the packages.", "Downloading package from source 'https://community.chocolatey.org/api/v2/'", "", "filebeat v7.15.1 [Approved]", "filebeat package files install completed. Performing other installation steps.", "Downloading filebeat 64 bit", " from 'https://artifacts.elastic.co/downloads/beats/filebeat/filebeat-7.15.1-windows-x86_64.zip'", "", "Download of filebeat-7.15.1-windows-x86_64.zip (25.8 MB) completed.", "Hashes match.", "Extracting C:\\Users\\Administrator\\AppData\\Local\\Temp\\chocolatey\\filebeat\\7.15.1\\filebeat-7.15.1-windows-x86_64.zip to C:\\ProgramData\\chocolatey\\lib\\filebeat\\tools...", "C:\\ProgramData\\chocolatey\\lib\\filebeat\\tools", "filebeat", " ShimGen has successfully created a shim for filebeat.exe", " The install of filebeat was successful.", " Deployed to 'C:\\ProgramData\\chocolatey\\lib\\filebeat\\tools'", "", "Chocolatey installed 1/1 packages. ", " See the log for details (C:\\ProgramData\\chocolatey\\logs\\chocolatey.log)."]} PLAY RECAP ************************************************************************************************************************************************************************************************************** windows : ok=21 changed=9 unreachable=0 failed=0 skipped=1 rescued=0 ignored=0 -
If everything worked, after a few minutes, the server will be configured and running both Internet Information Services (IIS), a Windows web server, and Filebeat.
-
Use
curlto test the site remotely:curl http://windows.aap.svc.cluster.localWelcome to Super Lab IIS Server Machine ID S-1-5-21-2979851890-3482578088-4054385452 Hostname windows.lab.sandbox-xz6nl-ocp4-cluster.svc.cluster.local Deployed on 2026-01-25 at 09:27:26 -
Run check mode once again, this time it will succeed:
ansible-playbook --extra-vars @/projects/env/secrets.yml \ --inventory inventory/hosts.yml \ site.yml --check -
This time the validate tasks content matches
curl:... TASK [red_hat_one.super_lab.web_server : Test IIS locally on the Windows Server] **************************************************************************************************************************************** task path: /projects/lab_playbooks/collections/ansible_collections/red_hat_one/super_lab/roles/web_server/tasks/validate.yml:2 ok: [windows] => {"accept_ranges": "bytes", "changed": false, "character_set": "ISO-8859-1", "content": "Welcome to Super Lab IIS Server\r\nMachine ID S-1-5-21-2979851890-3482578088-4054385452\r\nHostname windows.lab.sandbox-gtjkm-ocp4-cluster.svc.cluster.local\r\nDeployed on 2026-01-14 at 17:29:19\r\n", "content_encoding": "", "content_length": "190", "content_type": "text/html", "cookies": [], "date": "Thu, 15 Jan 2026 01:44:03 GMT", "e_tag": "\"36c620eebe85dc1:0\"", "elapsed": 0.3750282, "headers": ["Accept-Ranges", "Content-Length", "Content-Type", "Date", "ETag", "Last-Modified", "Server", "X-Powered-By"], "is_from_cache": false, "is_mutually_authenticated": false, "last_modified": "Thu, 15 Jan 2026 01:33:19 GMT", "method": "GET", "msg": "OK", "protocol_version": {"Build": -1, "Major": 1, "MajorRevision": -1, "Minor": 1, "MinorRevision": -1, "Revision": -1}, "response_uri": "http://localhost/", "server": "Microsoft-IIS/10.0", "status_code": 200, "status_description": "OK", "supports_headers": true, "url": "http://localhost", "x_powered_by": "ASP.NET"} TASK [red_hat_one.super_lab.web_server : Debug captured result] ********************************************************************************************************************************************************* task path: /projects/lab_playbooks/collections/ansible_collections/red_hat_one/super_lab/roles/web_server/tasks/validate.yml:8 ok: [windows] => { "r_local_test": { "accept_ranges": "bytes", "changed": false, "character_set": "ISO-8859-1", "content": "Welcome to Super Lab IIS Server\r\nMachine ID S-1-5-21-2979851890-3482578088-4054385452\r\nHostname windows.lab.sandbox-gtjkm-ocp4-cluster.svc.cluster.local\r\nDeployed on 2026-01-14 at 17:29:19\r\n", ...
5: Next Steps
In the next lab, we will create an Execution Environment containing the collection in this lab, build it, and publish the resulting image to AAP. In addition, we will also commit all of our code to a git repository.
Conclusion
In this lab, you have learned how to:
-
Validate connectivity to Windows servers from AAP
-
Use
ansible-creatorto scaffold the collection, roles, playbooks and inventory associated with automation targeting a Windows instance -
Create content using the
ansible.windowsandmicrosoft.iiscollections -
Create content to ensure prerequisites are installed including .NET and Chocolatey
-
Use Chocolatey to install Filebeat
-
Use Dev Spaces and Ansible Development Tools (ADT) to create, modify and test content
Appendix
Dev Spaces Workspace Restarts
In case your workspace restarts, all files and directories will be preserved but this script may need to be run:
cd /projects/lab_playbooks/
ansible-galaxy collection install --requirements-file collections/requirements.yml
pip install pypsrp---
ansible_user: {windows_user}
ansible_password: {windows_password}
...