Module 2 Lab 5: Content - Configuration as Code
Learn how to manage your entire Ansible Automation Platform with collections for both Infrastructure as Code (IaC) and Configuration as Code (CaC) using Ansible playbooks. This includes deployment to OpenShift, as well as configuring various objects such as organizations, teams, users, credentials, projects, inventories, job templates, and execution environments through an automated, version-controlled processes.
Learning Objectives
After completing this module, you will be able to:
-
Understand the principles of infrastructure and configuration as code
-
Deploy AAP via
infra.aap_utilities -
Configure AAP via
infra.aap_configuration -
Manage AAP organizations, inventories, hosts, credentials and more through code
1: Introduction
In this module, we will explore how to manage Ansible Automation Platform (AAP) configurations declaratively as code using Ansible playbooks and the infra.aap_configuration and infra.aap_utilities collections. instead of manually configuring settings through the AAP user interface (ClickOps). This approach allows for automated, repeatable, and version-controlled management of AAP settings, ensuring consistency across environments.
| In prior labs, we provided many of the values that are required to simplify the experience. |
2. Lab Setup: Configuring Your Environment
We need to build a new Execution Environment with all our required collections including validated collections for infra.aap_configuration and infra.aap_utilities and their requirements. A few steps are needed to accomplish this.
2.1: Add Required Collections to Remotes on PAH
Start by synching the required collections in Private Automation Hub.
-
Go to Automation Content → Remotes and edit rh-certified
-
Ensure the following collections are specified in the Requirements file section:
You may have additional collections from previous labs, just ensure these are appended to the list: collections: - ansible.platform - ansible.controller - ansible.hub - ansible.eda - ansible.posix - kubernetes.core - redhat.openshift -
Go to Automation Content → Remotes and edit validated
-
Ensure the following collections are specified in the Requirements file section:
collections: - infra.aap_configuration - infra.aap_utilities -
Go to Automation Content → Repositories and sync both of these repositories
2.2: Local Environment Preparation
Create a new directory called aap-as-code for the resources that will be created within this lab and change into the newly created directory.
mkdir /projects/aap-as-code
cd /projects/aap-as-code
2.2: Create a new Execution Environment
Create a new execution-environment.yml file within the aap-as-code directory with the following contents:
---
version: 3

images:
  base_image:
    name: aap-aap.{openshift_cluster_ingress_domain}/ansible-automation-platform-26/ee-minimal-rhel9:latest

dependencies:
  system:
    - gcc [platform:rpm]
    - systemd-devel [platform:rpm]
    - python3.11-devel [platform:rpm]
  galaxy:
    collections:
      - name: ansible.platform
      - name: ansible.controller
      - name: ansible.hub
      - name: ansible.eda
      - name: ansible.posix
      - name: infra.aap_configuration
      - name: infra.aap_utilities
      - name: redhat.openshift
      - name: kubernetes.core
  python:
    - requests
    - requests-oauthlib
    - kubernetes
  exclude:
    system:
      - openshift-clients
options:
  package_manager_path: /usr/bin/microdnf

additional_build_steps:
  prepend_galaxy:
    - ARG TOKEN
    - ENV ANSIBLE_GALAXY_SERVER_LIST='published,certified,validated,community'
    - ENV ANSIBLE_GALAXY_SERVER_CERTIFIED_URL='https://aap-aap.{openshift_cluster_ingress_domain}/pulp_ansible/galaxy/rh-certified/'
    - ENV ANSIBLE_GALAXY_SERVER_CERTIFIED_TOKEN=$TOKEN
    - ENV ANSIBLE_GALAXY_SERVER_VALIDATED_URL='https://aap-aap.{openshift_cluster_ingress_domain}/pulp_ansible/galaxy/validated/'
    - ENV ANSIBLE_GALAXY_SERVER_VALIDATED_TOKEN=$TOKEN
    - ENV ANSIBLE_GALAXY_SERVER_COMMUNITY_URL='https://aap-aap.{openshift_cluster_ingress_domain}/pulp_ansible/galaxy/community/'
    - ENV ANSIBLE_GALAXY_SERVER_COMMUNITY_TOKEN=$TOKEN
    - ENV ANSIBLE_GALAXY_SERVER_PUBLISHED_URL='https://aap-aap.{openshift_cluster_ingress_domain}/pulp_ansible/galaxy/published/'
    - ENV ANSIBLE_GALAXY_SERVER_PUBLISHED_TOKEN=$TOKEN
...
2.3: Build the Execution Environment
Build a new execution environment (EE) that will enable the use of Config as Code.
Ensure that the PAH_API_TOKEN environment variable is set within your terminal session so the build process can retrieve the required dependencies. You may need to run: source /projects/env/set_pah_vars.env again.
|
-
Log in to your PAH container registry
podman login \ aap-aap.{openshift_cluster_ingress_domain}-
Username:
{aap_controller_admin_user} -
Password:
{aap_controller_admin_password}Username: admin Password: Login Succeeded!
-
-
Build the new Execution Environment. It will pull the base from PAH, then add our content.
ansible-builder build \
  --tag config_as_code_ee:1.0 \
  --build-arg TOKEN=${PAH_API_TOKEN} \
  --verbosity 2(1)
1 --verbosity 3will produce an extremely detailed amount of debug output but is very useful for viewing all the steps involved.This will take roughly 7 minutes. Running command: podman build -f context/Containerfile -t config_as_code_ee:1.0 --build-arg=TOKEN=631a17b4a900efdc878726c7cbd40ab892fdbb2f context Complete! The build context can be found at: /projects/aap-config-as-code/contextAn error such as the following indicates your PAH environment variables are not set properly and you need to run source /projects/env/set_pah_vars.env:ERROR! Error when getting the collection info for ansible.platform from community (https://aap-aap.{openshift_cluster_ingress_domain}/pulp_ansible/galaxy/community/api) (HTTP Code: 401, Message: Authentication credentials were not provided. Code: not_authenticated) -
Tag the image with
podman:podman tag \ localhost/config_as_code_ee:1.0 aap-aap.{openshift_cluster_ingress_domain}/config_as_code_ee:1.0podman images | grep config_as_codeaap-aap.{openshift_cluster_ingress_domain}/config_as_code_ee 1.0 e950419cd988 7 minutes ago 654 MB localhost/config_as_code_ee 1.0 e950419cd988 7 minutes ago 654 MB
2.4: Create a Secrets file
As a best practice, use a separate file to avoid putting any secrets directly in playbooks.
| If you completed the earlier labs in this module you will already have this file, simply append to it. |
---
ansible_user: '{windows_user}'
ansible_password: '{windows_password}'
openshift_username: '{openshift_cluster_admin_username}'
openshift_password: '{openshift_cluster_admin_password}'
...
2.5: Create Playbook to Install AAP
Create a playbook to call the infra.aap_utilities.aap_ocp_install role with task vars defining vital values:
---
- name: Install AAP on OCP
  hosts: localhost
  gather_facts: false
  tasks:
    - name: Include AAP OCP Install role
      ansible.builtin.include_role:
        name: infra.aap_utilities.aap_ocp_install
      vars:
        aap_ocp_install_connection:
          host: '{openshift_api_server_url}'
          username: '{{ openshift_username }}'
          password: '{{ openshift_password }}'
          validate_certs: false
        aap_ocp_install_namespace: aap-as-code
        aap_ocp_install_operator:
          channel: "stable-2.6"
        aap_ocp_install_platform:
          instance_name: lab
        aap_ocp_install_controller:
          install: true
        aap_ocp_install_eda:
          install: false
        aap_ocp_install_hub:
          install: false
          file_storage_size: 100Gi
          file_storage_storage_class: ocs-external-storagecluster-cephfs
        aap_ocp_install_lightspeed:
          install: false
...| The more components installed at once, the longer it will take. These settings will start with controller only and allow you to enable and re-run with more components to iteratively deploy additional components, similar to the lab in Module 1. |
3: Install AAP on OpenShift via Infrastructure as Code
3.1: Run Installation Playbook
Now that the required environment is setup and Execution Environment created, we can test it locally:
ansible-navigator run \
  --execution-environment-image aap-aap.{openshift_cluster_ingress_domain}/config_as_code_ee:1.0 \
  --mode stdout \
  install_aap.yml \
  --extra-vars @/projects/env/secrets.yml \
--execution-environment-volume-mounts /projects/env:/projects/env:Z| The installation process can take 10-15 minutes as OpenShift all the resources, depending on which components are enabled in the playbook. |
[WARNING]: No inventory was parsed, only implicit localhost is available
[WARNING]: provided hosts list is empty, only localhost is available. Note that
the implicit localhost does not match 'all'

PLAY [Install AAP on OCP] ******************************************************

TASK [Include AAP OCP Install role] ********************************************

TASK [infra.aap_utilities.aap_ocp_install : Include pre-validation tasks] ******
included: /usr/share/ansible/collections/ansible_collections/infra/aap_utilities/roles/aap_ocp_install/tasks/pre-validate.yml for localhost

TASK [infra.aap_utilities.aap_ocp_install : Ensure OpenShift host variable is set] ***
ok: [localhost]

...

TASK [infra.aap_utilities.aap_ocp_install : Include Ansible Automation Platform EDA install tasks] ***
skipping: [localhost]

TASK [infra.aap_utilities.aap_ocp_install : Include OpenShift finalization tasks] ***
included: /usr/share/ansible/collections/ansible_collections/infra/aap_utilities/roles/aap_ocp_install/tasks/finalization.yml for localhost

TASK [infra.aap_utilities.aap_ocp_install : If login succeeded revoke OpenShift API token] ***
ok: [localhost]

PLAY RECAP *********************************************************************
localhost                  : ok=34   changed=0    unreachable=0    failed=0    skipped=28   rescued=0    ignored=0
3.2: Verify the Deployment
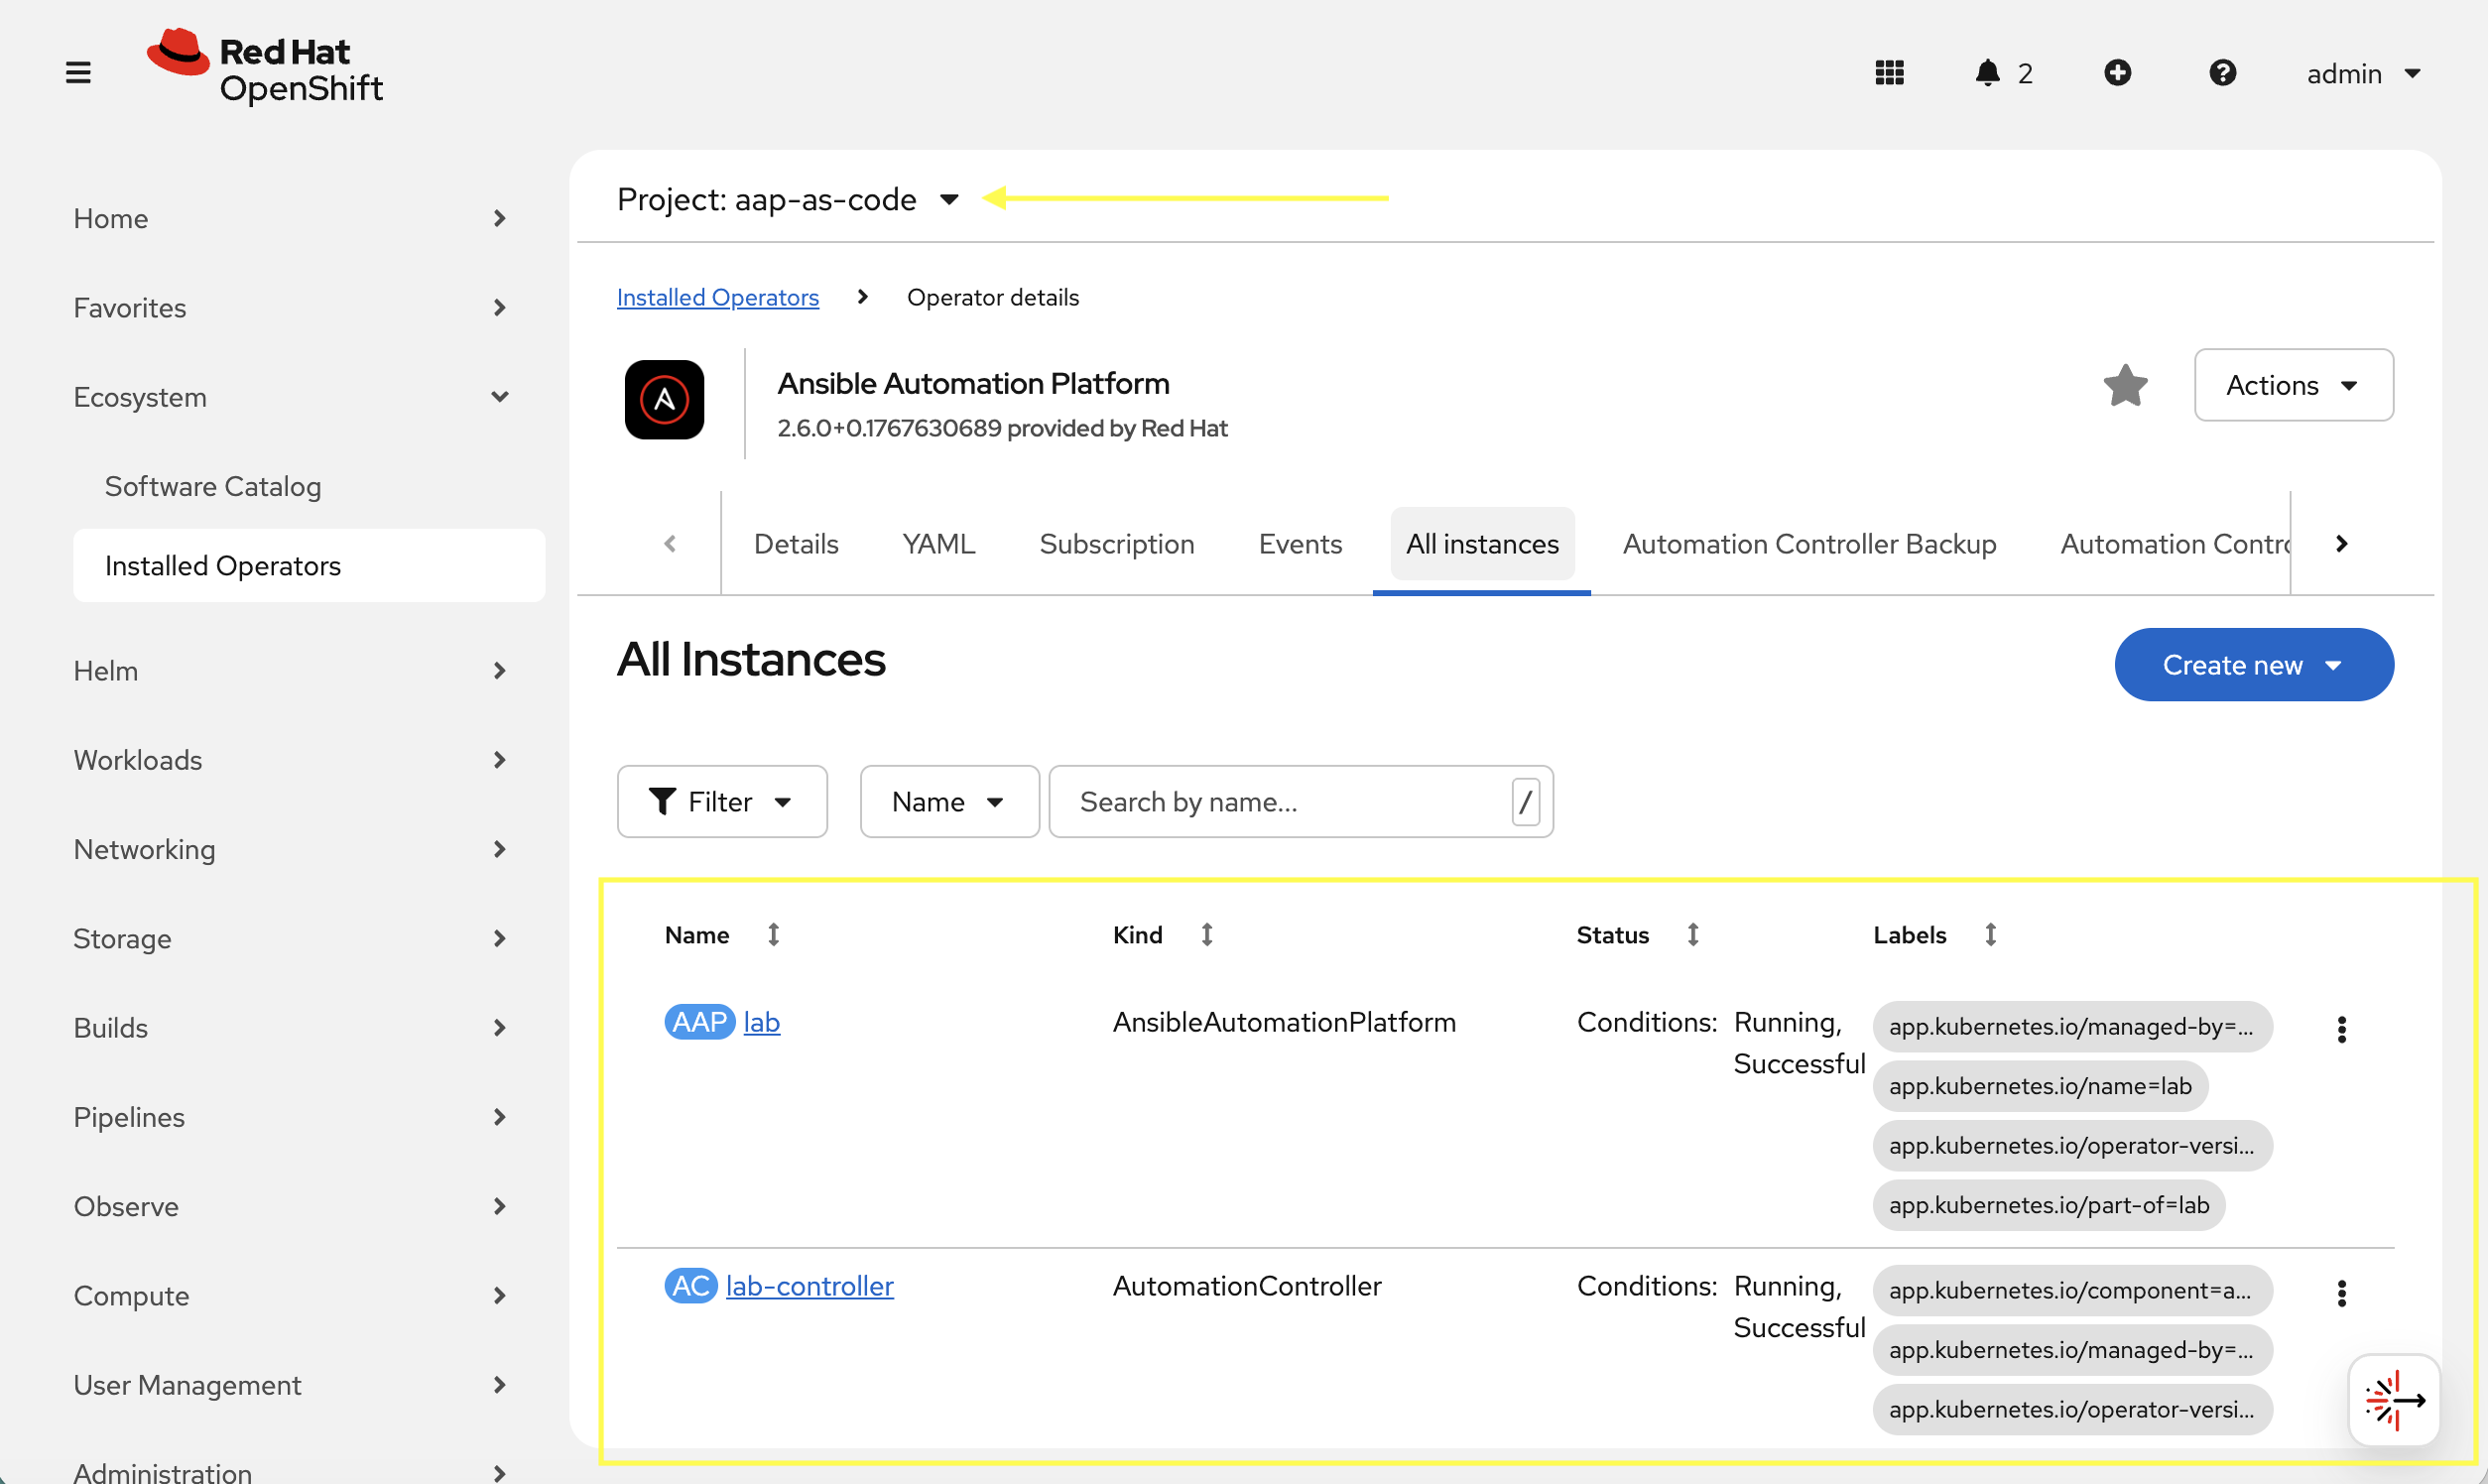
Once the playbook completes, verify that the AAP components are running in OpenShift.
-
Launch the OpenShift Web Console
-
Navigate to Ecosystem on the left hand navigation → Installed Operators.
-
Next to the
Project:dropdown in the top left, ensureaap-as-codeis the project shown. -
Click on the
Ansible Automation Platformoperator. -
In the toolbar, click on
All instances. -
Verify installation was completed.
-
Navigate to Networking → Routes
-
Open the URL under Location for the lab instance in a new window which should be link:https://lab-aap-as-code.{openshift_cluster_ingress_domain}/
-
Still within OpenShift, navigate to Workloads → Secrets
-
In the search box type
admin -
Click on lab-admin-password
-
Scroll to the bottom and copy the password
-
Use
adminas the username and the secret copied to login and verify -
Feel free as a bonus to modify your playbook and deploy additional items
4: Configuration As Code
Config as Code leverages standard Ansible variable files containing properties that will be used to drive the configuration of AAP. These variables include all the typical objects usually configured manually via ClickOps, organizations, inventories, hosts, projects, and other items that each have a role contained within the Config as Code collection that will configure these through modules.
4.1: Define Secrets
The best practice is to use ansible-vault to encrypt files. For this lab we will keep our secrets in the same file we have been using for simplicity.
-
Append the following variables to the
/projects/env/secrets.ymlfile:/projects/env/secrets.ymlaap_username: admin aap_password: PASSWORD_FROM_OPENSHIFT(1)1 Obtain this random password from OpenShift → Workloads → Secrets.
4.2: Define Environment Variables File
Since we already have a few AAP deployments on OpenShift, we can consider these different namespaces each a different AAP environment, with different URLs, secrets and resources for each deployment. For now let’s create one for this environment.
-
Create a new variable file to represent this environment. This would typically be handled by inventory
group_varsor separatevars_files, but for this lab we’ll simplify to a single file. Place this file in the same directory/projects/aap-as-code/:/projects/aap-as-code/lab.yml--- aap_hostname: 'lab-aap-as-code.{openshift_cluster_ingress_domain}'(1) aap_validate_certs: false1 Verify this is the correct hostname that was just deployed or modify as needed.
4.3: Define some Configuration
Define a few objects as specified below in the data structure. Append the following to the environment variable file:
aap_organizations:
  - name: config_as_code
aap_teams:
  - name: config as code team
    description: config as code team
    organization: config_as_code
controller_inventories:
  - name: super-lab
    organization: config_as_code
controller_hosts:
  - name: "Windows"
    inventory: "super-lab"
    variables:
      ansible_host: windows.aap.svc.cluster.local
      ansible_connection: psrp
      ansible_psrp_auth: negotiate
      ansible_psrp_cert_validation: ignore
    enabled: true
controller_credentials:
  - name: Windows
    description: Administrator user
    credential_type: Machine
    inputs:
      username: "{{ ansible_user }}"
      password: "{{ ansible_password }}"
4.4: Create a playbook to apply the configuration
Create a simple playbook to call the inra.aap_configuration.dispatch role which will evaluate the variables defined and call the appropriate roles in the proper order based on precedence.
---
- name: Playbook to configure AAP
  hosts: localhost
  gather_facts: false
  tasks:
    - name: Call dispatch role
      ansible.builtin.include_role:
        name: infra.aap_configuration.dispatch
...
4.5: Run Configuration as Code Playbook
Run a similar command to what was used earlier in this lab to run the install_aap.yml playbook, but this time also attach the new environment file via a volume mount:
ansible-navigator run  \
  --execution-environment-image aap-aap.{openshift_cluster_ingress_domain}/config_as_code_ee:1.0 \
  --mode stdout  \
  configure_aap.yml \
  --extra-vars @/projects/env/secrets.yml \
  --execution-environment-volume-mounts /projects/env:/projects/env:Z \
  --extra-vars @lab.yml \
--execution-environment-volume-mounts $(pwd)/lab.yml:lab.yml:Z| This is expected to fail. Review the output. If you look closely, some objects were created but ultimately it fails as follows: |
TASK [infra.aap_configuration.collect_async_status : Create/Update Credential Windows | Wait for finish the credential creation] ***
FAILED - RETRYING: [localhost]: Create/Update Credential Windows | Wait for finish the credential creation (50 retries left).
fatal: [localhost]: FAILED! => {"attempts": 2, "censored": "the output has been hidden due to the fact that 'no_log: true' was specified for this result", "changed": false}(1)
...ignoring

TASK [infra.aap_configuration.collect_async_status : Register value] ***********
ok: [localhost]

TASK [infra.aap_configuration.collect_async_status : Handle Async Job Failure] ***
included: /usr/share/ansible/collections/ansible_collections/infra/aap_configuration/roles/collect_async_status/tasks/handle_error.yml for localhost => (item=(censored due to no_log))

TASK [infra.aap_configuration.collect_async_status : handle_error | Show error and stop execution] ***
fatal: [localhost]: FAILED! => {"censored": "the output has been hidden due to the fact that 'no_log: true' was specified for this result", "changed": false}

TASK [infra.aap_configuration.controller_credentials : Cleanup async results files] ***
ok: [localhost] => (item=None)
ok: [localhost]

PLAY RECAP *********************************************************************
localhost                  : ok=22   changed=0    unreachable=0    failed=1    skipped=9    rescued=0    ignored=1
Please review the log for errors.| 1 | This is the failure but the details are hidden. |
Check the AAP UI to see what worked and what didn’t. The next section goes into troubleshooting steps.
4.6: Verify Run
Verify what did work.
-
Navigate to Access Management → Organizations you should see the config_as_code
-
Navigate to Access Management → Teams you should see the config_as_code
-
Navigate to Automation Controller → Infrastructure → Credentials there will NOT be a new credential created
-
Navigate to Automation Controller → Infrastructure → Inventories no inventory or hosts were created either.
4.7: Troubleshoot Failed Runs
The first time this playbook runs it will fail. By default you cannot see why because of secure logging. However, you get a clue by the failed controller_credentials task. If you read the readme for this role, you will see a section on how to disable secure logging. Add these two variables to the lab.yml environment file:
-
View the role documentation for
controller_credentialat https://console.redhat.com/ansible/automation-hub/repo/validated/infra/aap_configuration/content/role/controller_credentials/ -
Read the Secure Logging Variables section and define the two mentioned variables in that section.
-
Append the following anywhere in the
lab.ymlfile:/projects/aap-as-code/lab.yml... controller_configuration_credentials_secure_logging: false aap_configuration_secure_logging: false ... -
Run the playbok again and this time scroll up and look more closely at the output:
TASK [infra.aap_configuration.collect_async_status : Create/Update Credential Windows | Wait for finish the credential creation] ***
FAILED - RETRYING: [localhost]: Create/Update Credential Windows | Wait for finish the credential creation (50 retries left).
fatal: [localhost]: FAILED! => {"ansible_job_id": "j920878083329.281", "attempts": 2, "changed": false, "finished": 1, "msg": "Unable to create credential Windows: {'detail': [\"Missing 'user', 'team', or 'organization'.\"]}", "results_file": "/root/.ansible_async/j920878083329.281", "started": 1, "stderr": "", "stderr_lines": [], "stdout": "", "stdout_lines": []}(1)
...ignoring

TASK [infra.aap_configuration.collect_async_status : Register value] ***********
ok: [localhost]

TASK [infra.aap_configuration.collect_async_status : Handle Async Job Failure] ***
included: /usr/share/ansible/collections/ansible_collections/infra/aap_configuration/roles/collect_async_status/tasks/handle_error.yml for localhost => (item=(censored due to no_log))

TASK [infra.aap_configuration.collect_async_status : handle_error | Show error and stop execution] ***
fatal: [localhost]: FAILED! => {"changed": false, "msg": "error: Unable to create credential Windows: {'detail': [\"Missing 'user', 'team', or 'organization'.\"]}"}

TASK [infra.aap_configuration.controller_credentials : Cleanup async results files] ***
ok: [localhost] => (item=Cleaning up job results file: /root/.ansible_async/j920878083329.281)

PLAY RECAP *********************************************************************
localhost                  : ok=22   changed=0    unreachable=0    failed=1    skipped=9    rescued=0    ignored=1
Please review the log for errors.
1 Now we can see the actual error. -
Fix the issue by adding an
organizationdefinition to the credential:/projects/aap-as-code/lab.yml... controller_credentials: - name: Windows description: Administrator user credential_type: Machine organization: config_as_code(1) inputs: username: "{{ ansible_user }}" password: "{{ ansible_password }}"1 This is the only change that is needed. -
Run the playbook again:
ansible-navigator run
  --execution-environment-image aap-aap.{openshift_cluster_ingress_domain}/config_as_code_ee:1.0 \
  --mode stdout  \
  configure_aap.yml \
  --extra-vars @/projects/env/secrets.yml \
  --execution-environment-volume-mounts /projects/env:/projects/env:Z \
  --extra-vars @lab.yml \
  --execution-environment-volume-mounts $(pwd)/lab.yml:lab.yml:Z
If an errors occurs during the execution with a message similar to "Failed to get token: HTTP Error 401: Unauthorized" while other tasks pass, please rerun the playbook. this is a known issue within the collection.
5: Review the Results
Once the playbook has completed successfully, navigate to AAP to review the configurations that have been applied.
-
Navigate to Automation Controller → Infrastructure → Credentials you should see the Windows credential
-
Navigate to Automation Controller → Infrastructure → Inventories and you should see super-lab
-
Select this inventory then Hosts tab
-
Select Windows and review the variables which will match what was defined in the
lab.yml -
Feel free to run
win_pingmodule using the credential to verify
-
6: Publish Artifacts
With the proper configurations in place, we can save our work to our Gitea instance.
6.1: Create Gitea Repository
Use the following steps to create a new repository on your Gitea instance.
-
Navigate to your Gitea instance and click the Sign In button on the upper right hand corner
-
Enter the username and password using the credentials provided from the Environment Details page and click the Sign In button
-
In the top left corner, click on the + symbol and select New Repository.
-
On the New Repository page, enter 'aap-as-code' in the Repository Name field.
-
Leave everything else as default and click on the button at the bottom, Create Repository.
6.2: Create .gitignore file
Create a file named .gitignore in the root of your repository with the following content to exclude unnecessary files and directories from being tracked by Git.
context/
.password
ansible.cfg
.ansible/
.vscode/
6.3: Push code to repository
After an empty repository is created on your Gitea, we need to push the collection to the repository.
In the section Clone this repository, click the Copy URL icon on the far right to copy Gitea repository URL for the HTTPS protocol option.
Execute the following commands in the root directory of aap-as-code directory.
git init
git switch --create main
git add --all
git commit --message "Uploading config on initial commit"
git remote add origin {gitea_console_url}/{gitea_user}/aap-as-code.git
git push origin main
Conclusion
Within this lab, you have successfully implemented Configuration as Code using Validated Content provided for Ansible Automation Platform. In particular, you have completed the following tasks:
-
Built custom Execution Environments with all required collections for AAP configuration
-
Created structured variable files and encrypted secrets using Ansible Vault
-
Configured organizations, teams, users, and service accounts
-
Set up collection repositories, remotes, and automation credentials
-
Deployed and configured Ansible projects, inventories, job templates, and workflows
-
Performed all of the above configurations using the
infra.aap_configurationcollection
This approach enables you to manage your entire AAP infrastructure as code, ensuring consistency, version control, and repeatability across environments. The skills learned here form the foundation for managing complex enterprise automation platforms.