Module 4 Lab 2: AI - Ansible Model Context Protocol (MCP) Server
We will explore the Ansible MCP Server and its role in integrating external AI tools with Ansible Automation Platform (AAP). This lab will guide you through how to deploy the Ansible MCP Server to your OpenShift environment and configure one or more external AI tools to interact with Ansible Automation Platform.
Learning Objectives
After completing this module, you will be able to:
-
Understand the role of MCP Servers in the AI ecosystem
-
Deploy the Ansible MCP Server to an OpenShift environment
-
Generate API tokens that can be used to interact with Ansible Automation Platform
-
Customize OpenShift Dev Spaces to inject variables into the workspace
-
Configure external AI tools to connect and interact with Ansible Automation Platform using the Ansible MCP Server
1: Introduction
In the prior lab, you explored the Ansible Lightspeed Intelligent Assistant and how by leveraging LLM’s, generative AI capabilities can be integrated into Ansible Automation Platform (AAP) to enable to be empowered through the use of a chat-based interface to interact with AAP using natural language prompts. One of the limitation of LLM’s is that they are essentially a snapshot in time and do not have access to real-time information or context about specific systems or environments. To overcome this limitation, the Ansible Model Context Protocol (MCP) Server was developed to provide a standardized way for LLM’s and other AI tools to access real-time data and context from Ansible Automation Platform.
1.1: What is the Model Context Protocol (MCP)?
The Model Context Protocol (MCP) is an open-source standard designed to universalize how AI models interact with external data and tools, effectively acting as a "USB-C" for the AI ecosystem. Instead of having to develop custom integrations for models to interact with external systems, MCP allows developers and consumers a standardized method for connecting AI models to a wide range of data sources and tools. This interoperability enables AI agents to securely access real-time information and perform complex tasks across different platforms without the need for model-specific code, significantly reducing development complexity while improving the accuracy and utility of AI-driven workflows.
1.2: What is the Ansible MCP Server
The Ansible MCP Server enables connecting the Ansible Automation Platform with any preferred external AI tool (such as Claude, Cursor, or ChatGPT). The AI tools can access key information about the Ansible Automation Platform environment and perform a variety of tasks. Ansible users can query information, execute workflows, and perform automation tasks using natural language prompts directly within their preferred AI tool.
1.3: Communication Workflow
The following describes the workflow between the different parties involved in the communication process when using an external AI tool to interact with Ansible Automation Platform via the Ansible MCP Server.
-
AI client (The requester): The user initiates a request through their external AI agent (for example, Cursor or Claude) using natural-language prompts.
-
The AI model (The translator): The AI agent receives the request, interprets the intent, and maps it to the appropriate exposed Ansible toolset. It then sends a structured toolset call with the necessary parameters.
-
Ansible MCP server (The gatekeeper): Upon receiving the call, the Ansible MCP server validates the request. It uses the user’s API token to authenticate with the automation controller.
-
Ansible controller (The executor): The automation controller accepts the validated command from the MCP server and triggers the appropriate automation job.
-
Response loop: The automation result is returned to the Ansible MCP server, standardized into a format the AI agent can process, and displayed to the user via the AI client.
1.4: AAP Enabled Toolsets via MCP
The following toolsets of Ansible Automation Platform are currently enabled via the Ansible MCP Server:
-
Job management
-
Inventory management
-
System monitoring
-
User management
-
Security/compliance
-
Platform configuration
Given that the Ansible MCP Server enables access to end user and system level data, RBAC permissions can be applied to provide granular control over what data and actions are accessible via the MCP server.
1.5 End to End Workflow
To make use of the Ansible MCP Server, the following steps are required:
-
Deploy the Ansible MCP Server within Ansible Automation Platform
-
Generate an API token for use by the external AI tool
-
Configure the external AI tool to connect to the Ansible MCP Server using the generated API token
We will walk through each of these steps in the following sections.
2: Deploying the Ansible MCP Server
Deploy the Ansible MCP Server to your OpenShift environment by enabling the MCP capability within the AnsibleAutomationPlatform custom resource.
-
Launch the OpenShift Web Console
-
Select the htpasswd_provider button and use the credentials provided in the Environment Details page to login to the OpenShift console
-
Navigate to Ecosystem → Installed Operators
-
From the Project dropdown, ensure
aapis selected -
The
Ansible Automation Platformoperator is listed and installed within this project.
-
Click on the
Ansible Automation Platformoperator which will display all of the resources that are managed by the operator. -
In the top tab, click on
Ansible Automation Platformand select aap.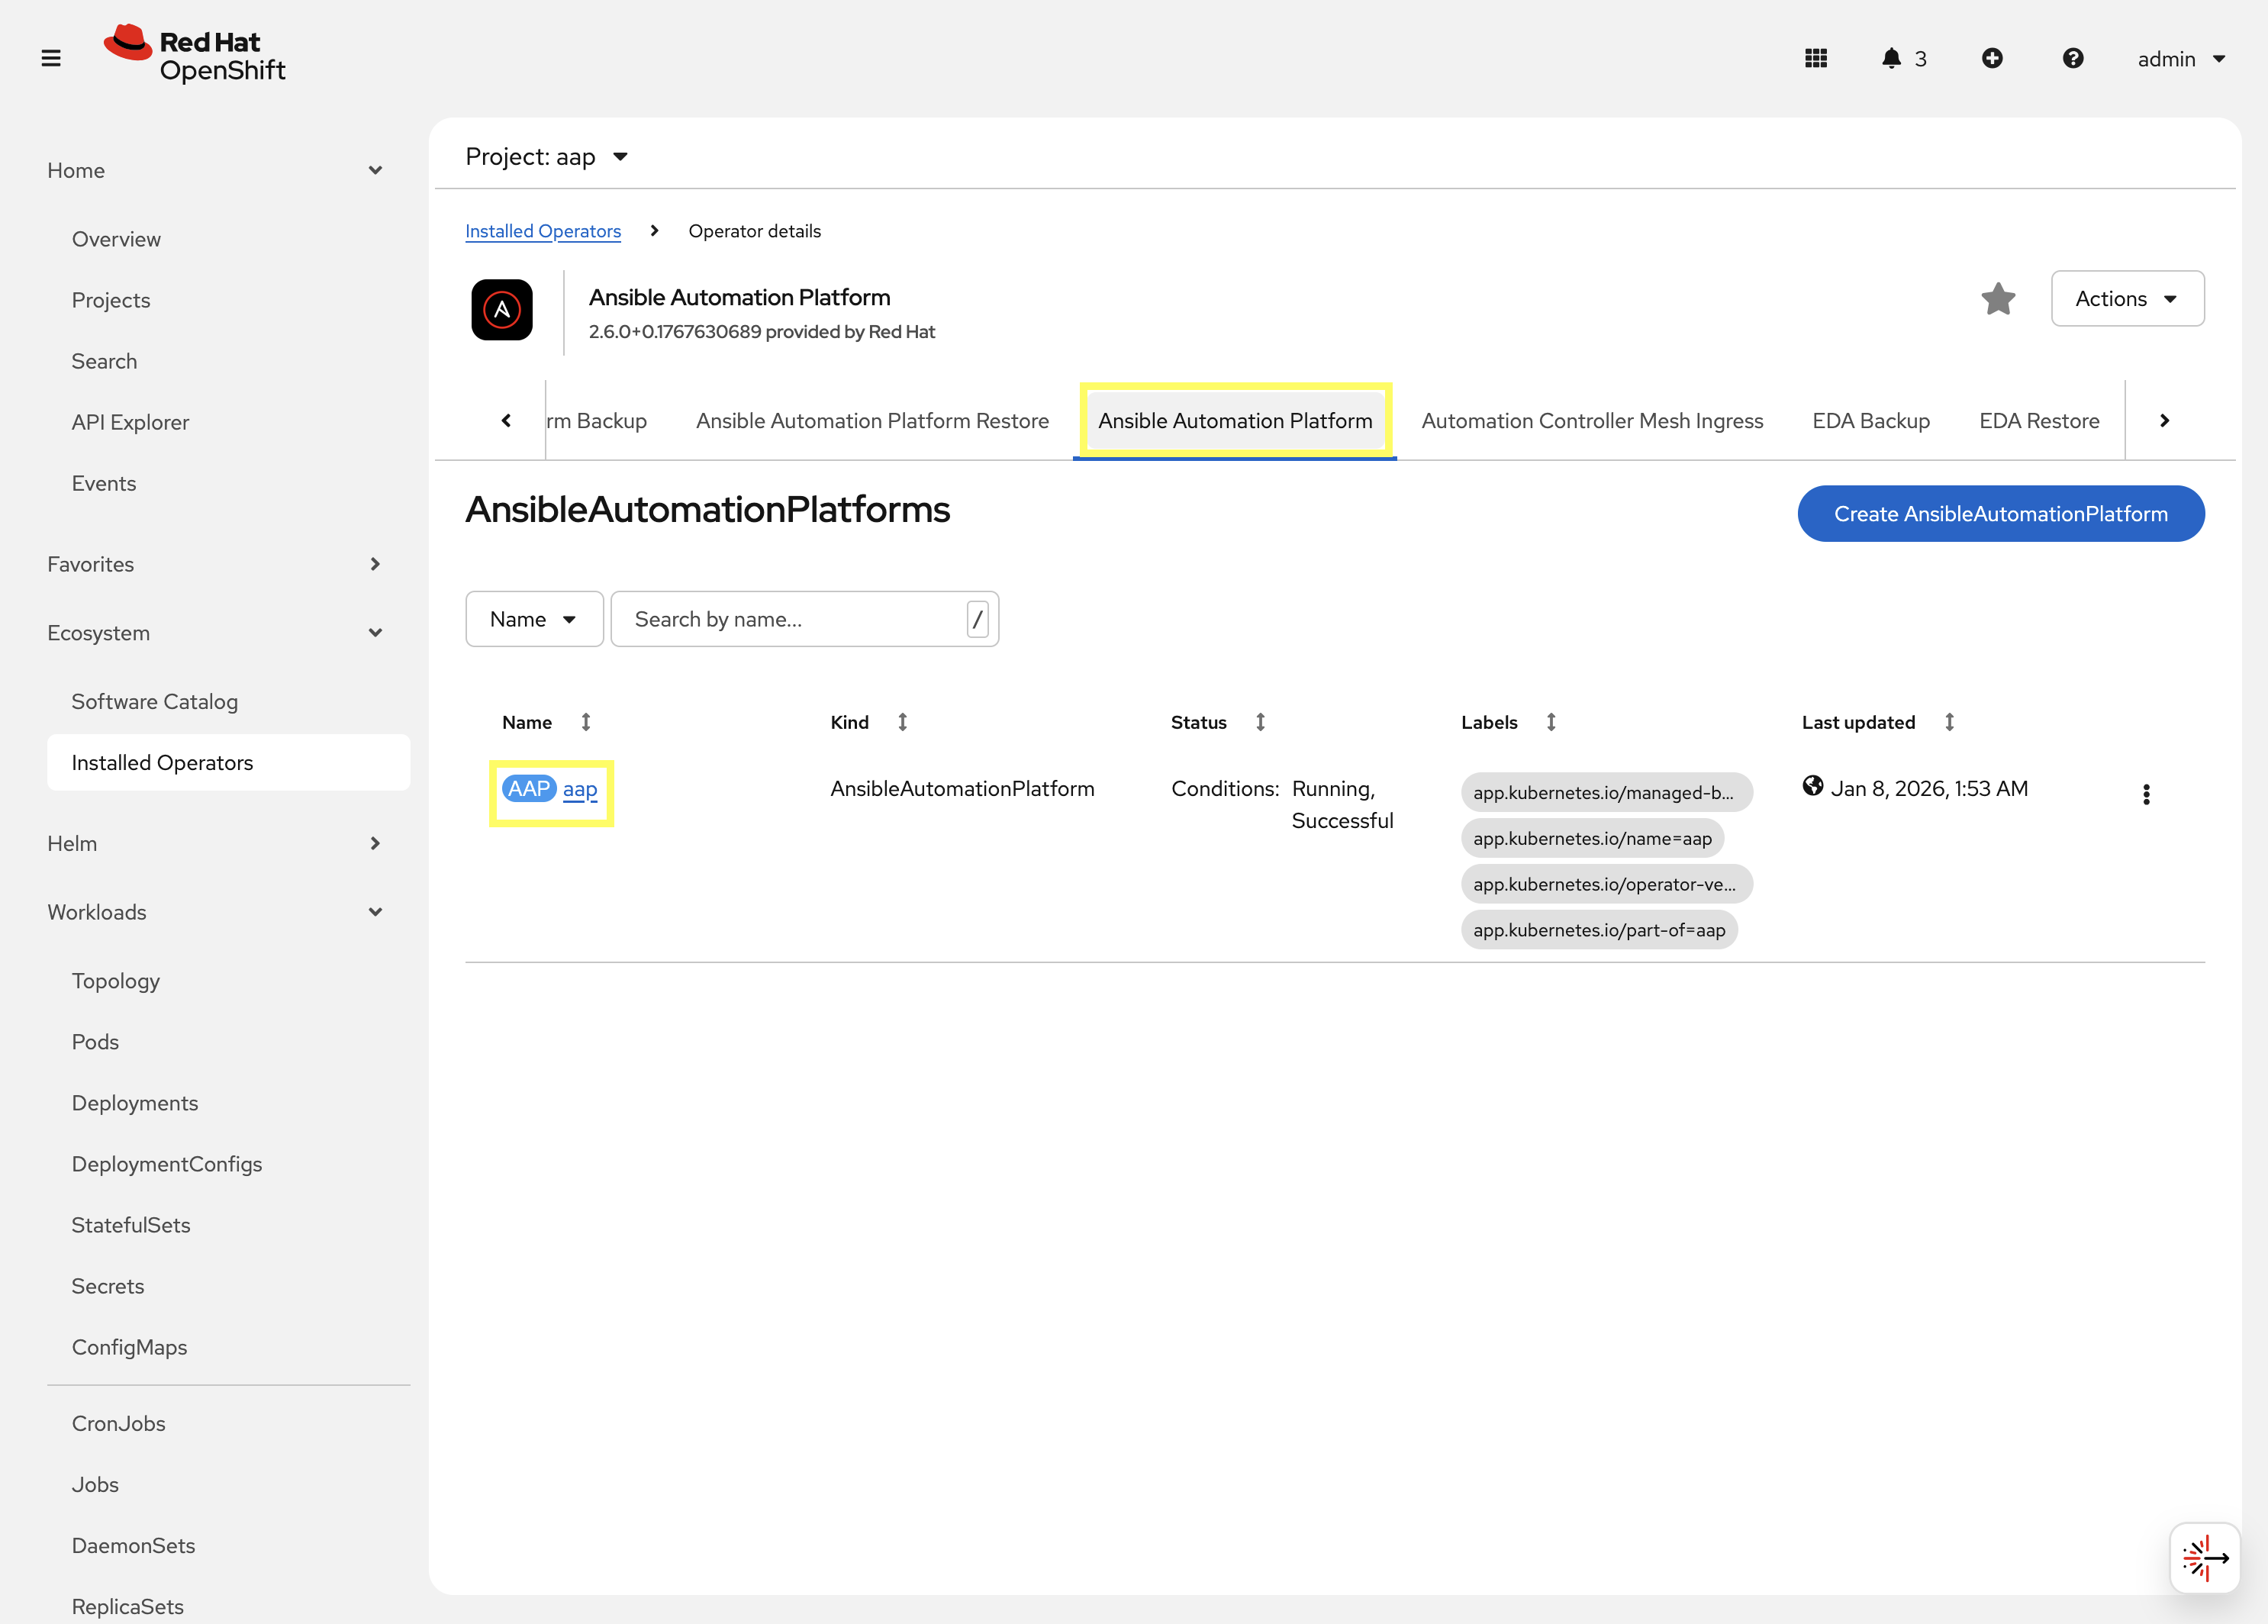
-
Click on the YAML tab to edit the resource in YAML format.
-
Add the following to the
specsection by updating the configuration to enable the MCP server:... spec: mcp: disabled: false allow_write_operations: false image: registry.redhat.io/ansible-automation-platform-tech-preview/mcp-server-rhel9 image_version: latestSetting allow_write_operationstofalsewill restrict the MCP server to read-only operations. This is the preferred option, especially in Enterprise environments, when beginning to incorporate AAP with external AI tools. The AI tool may perform unwanted actions if write operations are enabled without fully understanding the implications. For the purpose of this lab, access to write operations will be restricted.The latest version of the AAP MCP server is being specified within the imageandimage_versionproperties above as the specific version of Ansible Automation Platform included within the environment contains a known issue. By specifying the latest version, the issue can be avoided. -
Click the Save button to apply the changes.
Once the configuration has been applied, the Ansible Automation Platform operator will begin to reconcile the changes. This process can take several minutes to complete.
A new Deployment resource named <instance_name>-mcp will be created when the MCP capability is enabled, where <instance_name> is the name of your AnsibleAutomationPlatform custom resource.
3: Generating an API Token
To allow an external AI tool to interact with Ansible Automation Platform via the Ansible MCP Server, an API token must be generated which can then be configured in the external AI tool. An API token in Ansible Automation Platform can either be associated with an OAuth Application or as a Personal Account Token (PAT). For the purpose of this lab, we will use the Personal Access Token method.
3.1: Creating a Personal Access Token (PAT)
Create a Personal Access Token (PAT) by performing the following:
-
Launch the Ansible Automation Platform web interface and login using the credentials from the Environment Details page.
-
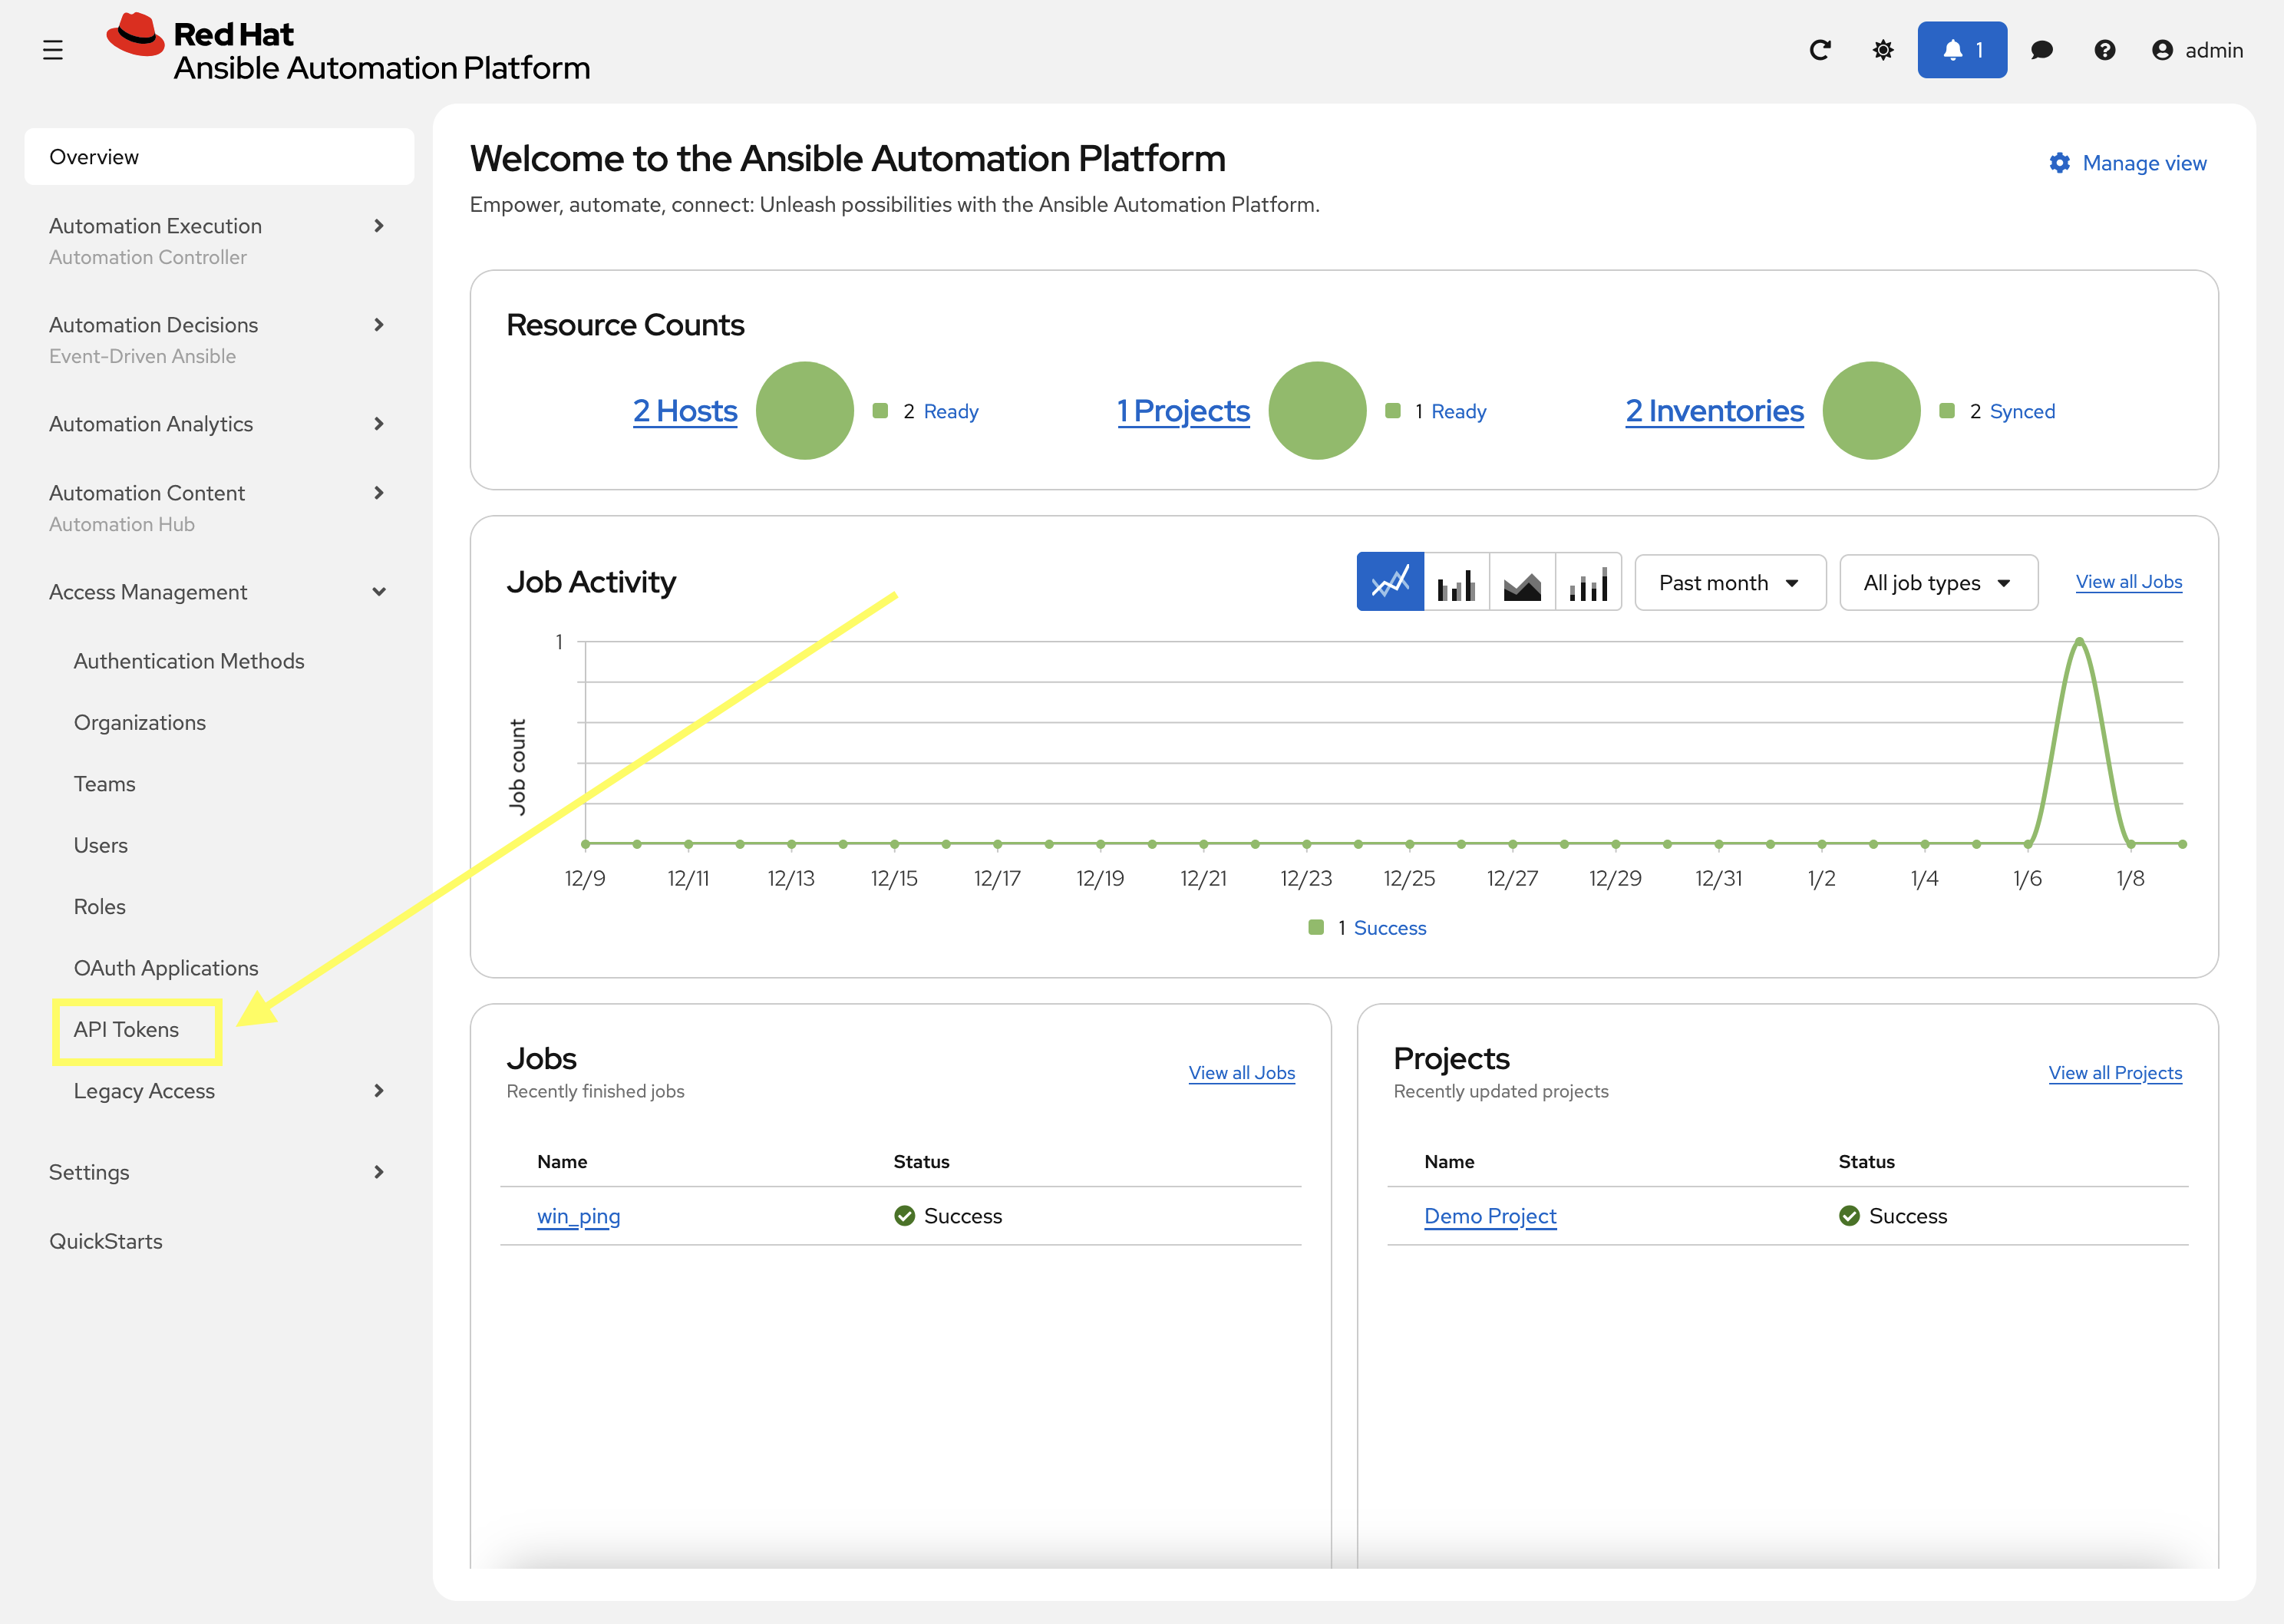
From the navigation menu on the left, expand Access Management and click on API Token.
-
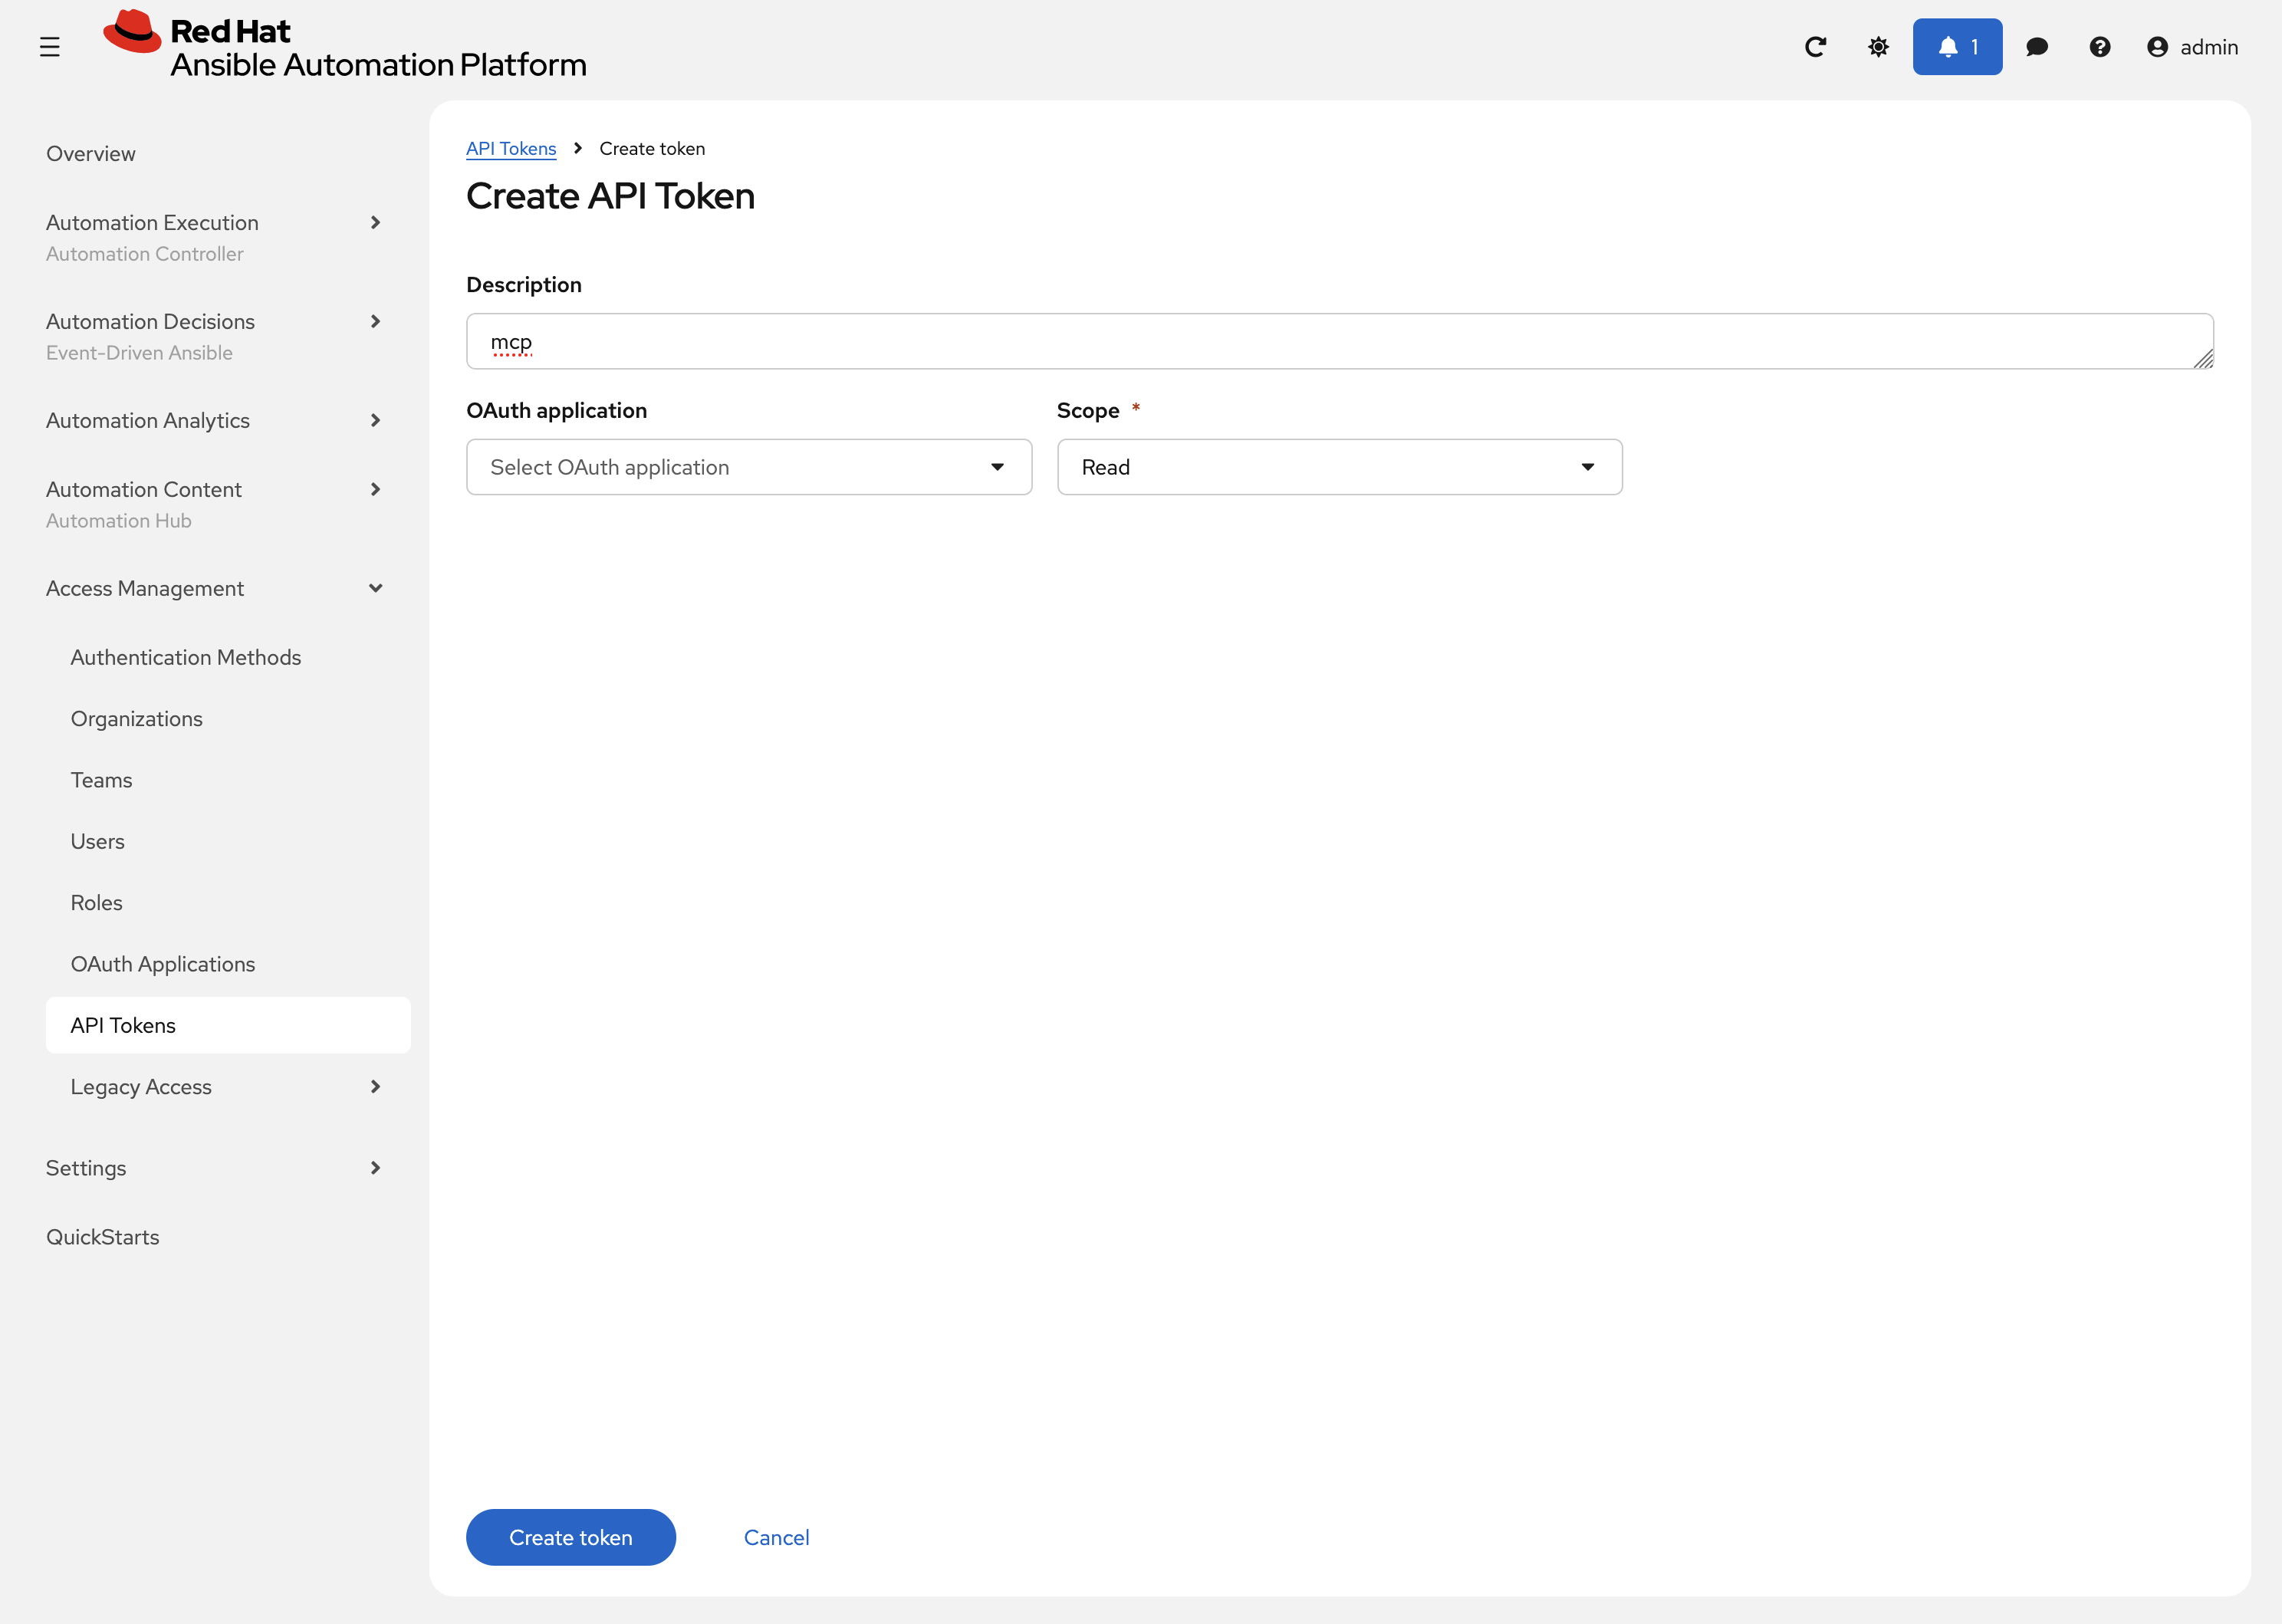
On the API Token page, click the Create API Token button
-
On the Create API Token page, enter the following details:
-
Description:
mcp -
OAuth Application: Leave this field blank which will result in a Personal Access Token (PAT) being created.
-
Scope: Select Read to restrict the token to read-only operations.
-
-
Click Create token to generate the API token which will be displayed in the resulting dialog
| Make sure to store the token securely, as it will not be displayed again. |
4: Configuring External AI Tools
Now that the Ansible MCP Server is deployed and an API token has been generated, the final step is to configure external AI tools that can be used to connect to the Ansible MCP Server using the generated API token. While there are multiple external AI tools that can be used to demonstrate the integration with the Ansible MCP Server, for the purpose of this lab, the following solutions will be demonstrated:
| While steps will be provided for both OpenCode and LibreChat, it is recommended that you utilize the LibreChat given some of the limitations that have been encountered when using OpenCode in this lab environment. |
4.1: Using LibreChat with the Ansible MCP Server
LibreChat is a Open Source AI chat tool that can be integrated with various hosted and self-hosted LLM’s. LibreChat can be accessed via a web browser and provides a chat-based interface for interacting with AI models. This section will illustrate how to configure LibreChat to connect to the Ansible MCP Server.
4.1.1: Configuring LibreChat
LibreChat has been deployed within the OpenShift environment as part of the lab setup. While most of the configurations have been pre-configured for you, there is one final step that you need to complete to enable the integration with the Ansible MCP Server: Specifying the API token that was generated in the prior section.
All of the resources associated with LibreChat have been deployed in the librechat Project. To configure the Ansible MCP API token, perform the following steps in the OpenShift web console to update the value stored in the librechat-credentials-env Secret resource in the librechat Project:
-
Launch the OpenShift Web Console
-
Select the htpasswd_provider button and use the credentials provided in the Environment Details page to login to the OpenShift console
-
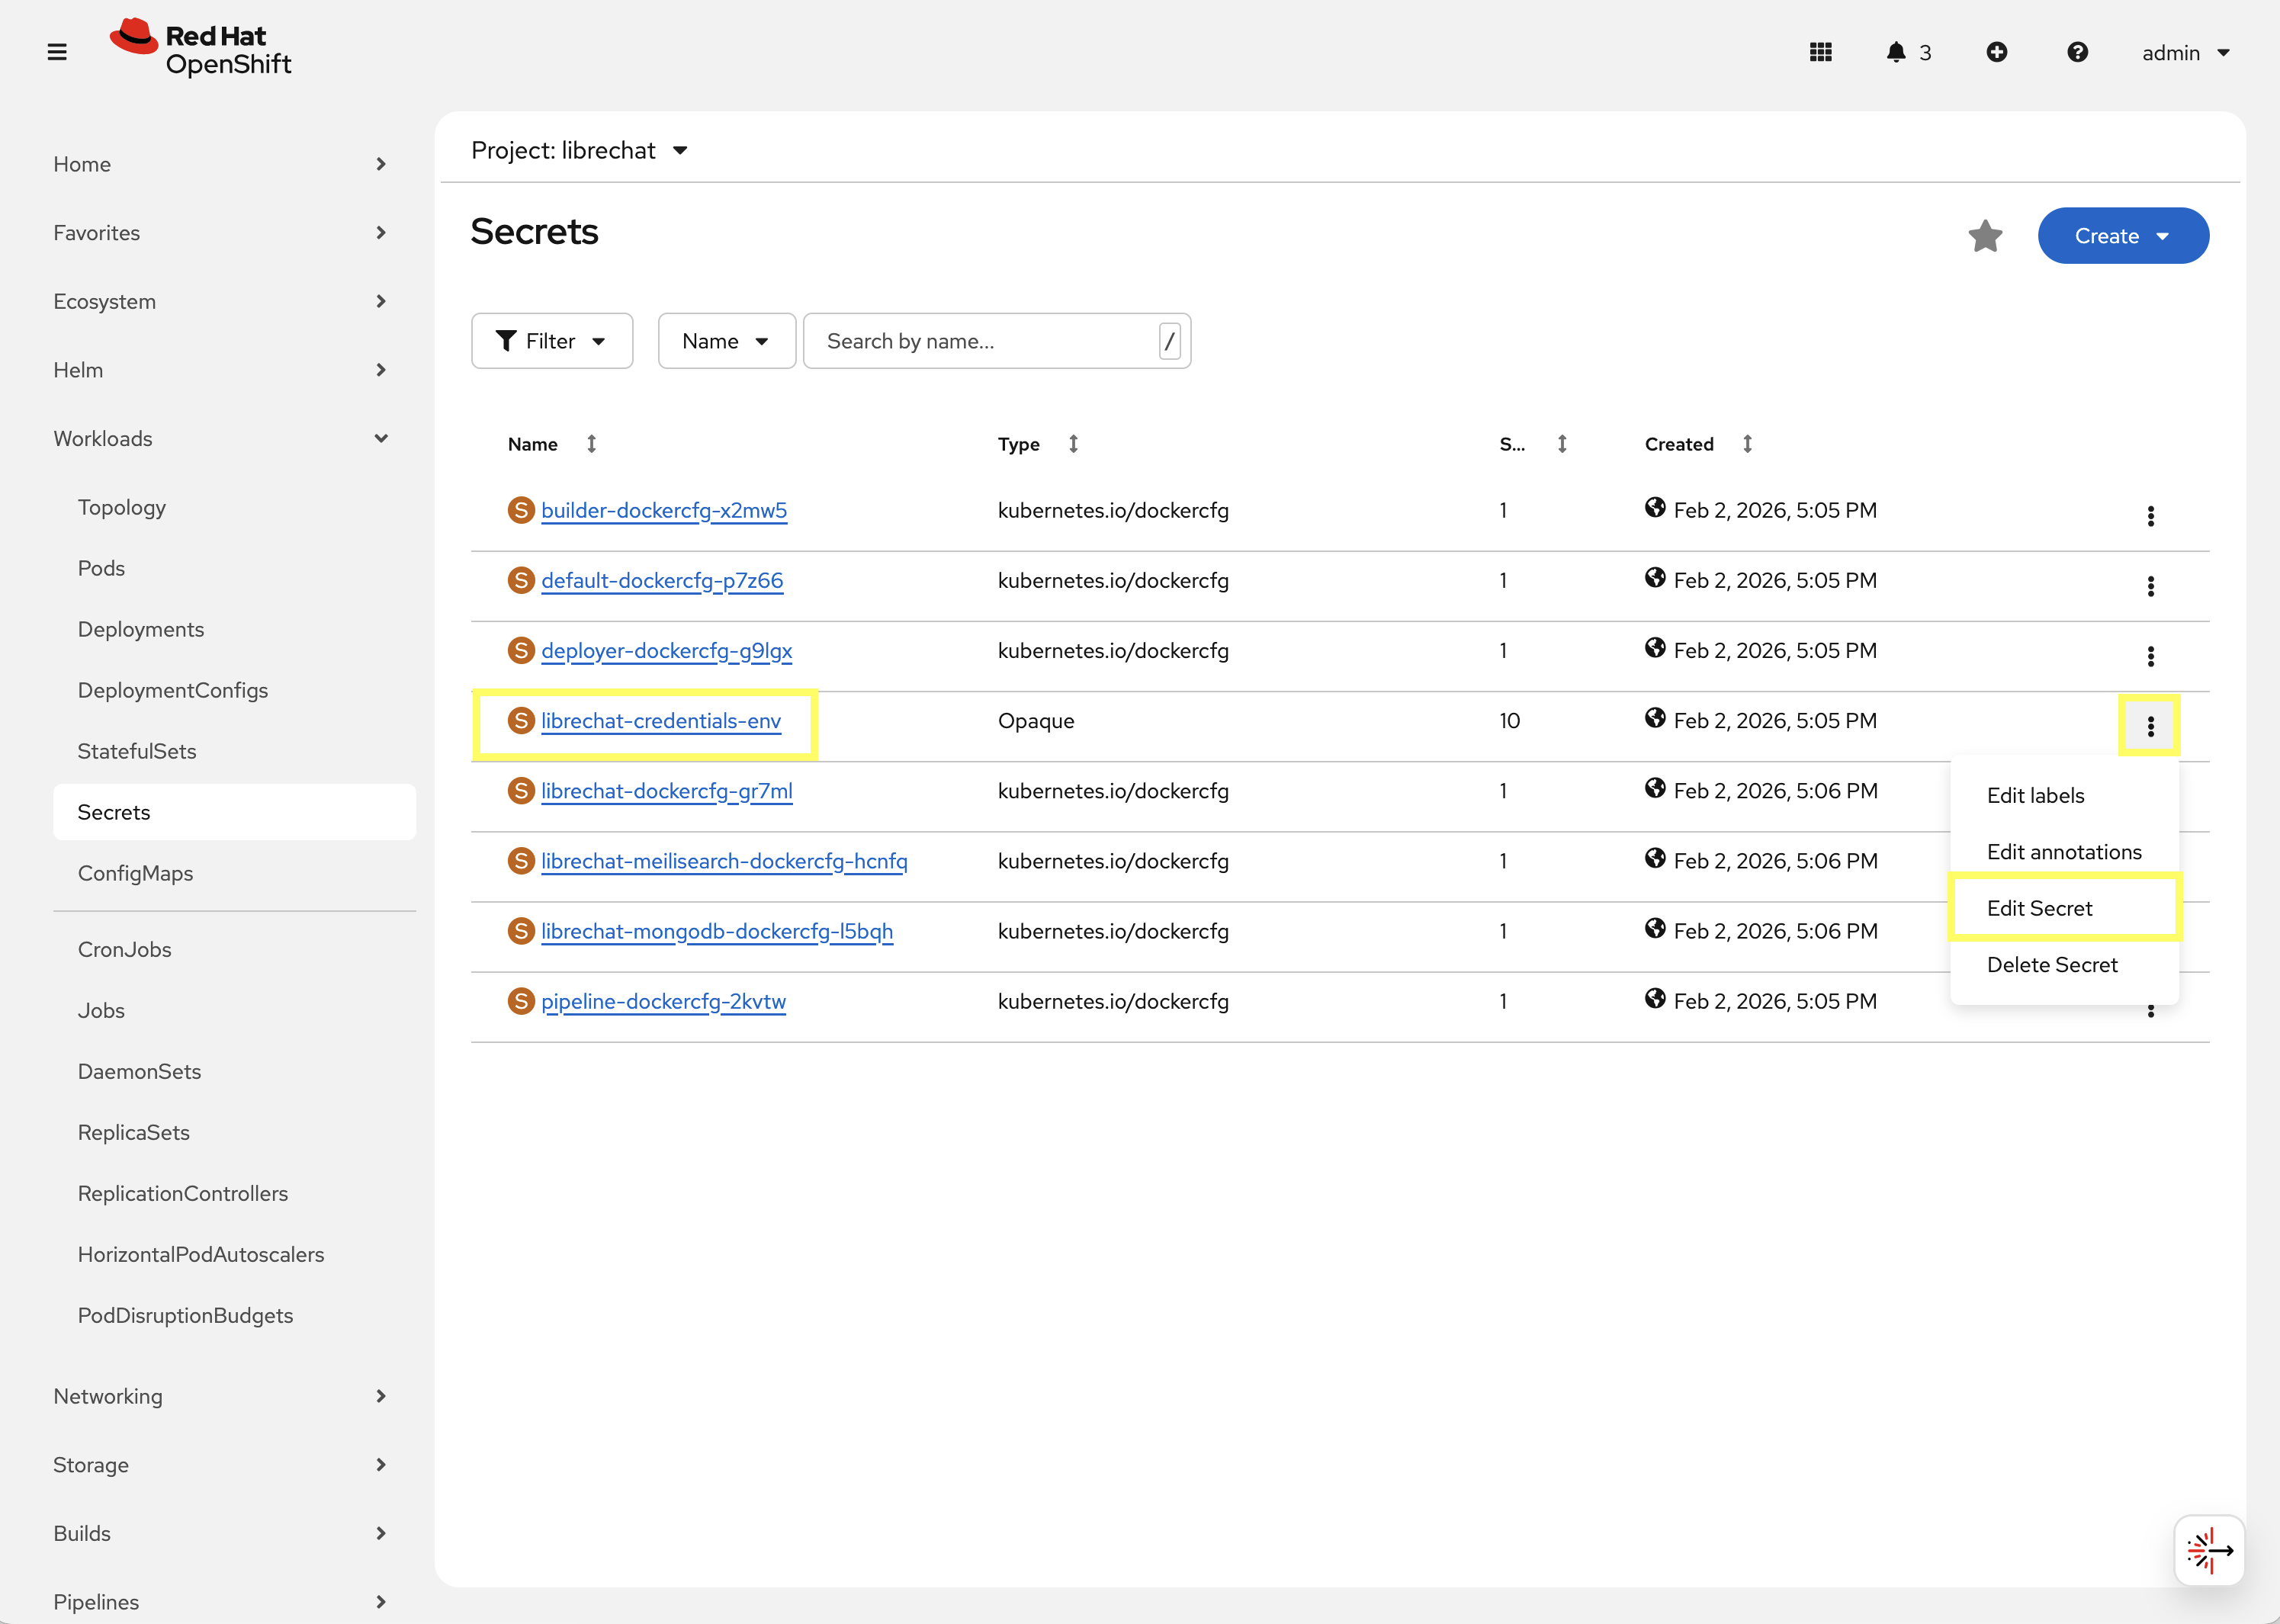
Navigate to Workloads on the left hand navigation → Secrets. From the project dropdown at the top, select librechat.
-
Locate the librechat-credentials-env Secret resource, click the kebab menu (three vertical dots) on the right hand side of the entry and select Edit Secret.
-
Locate the
ANSIBLE_MCP_TOKENentry. By default, the value is set asplaceholder. Update the value of this entry by replacingplaceholderwith the API token that was generated in the prior section.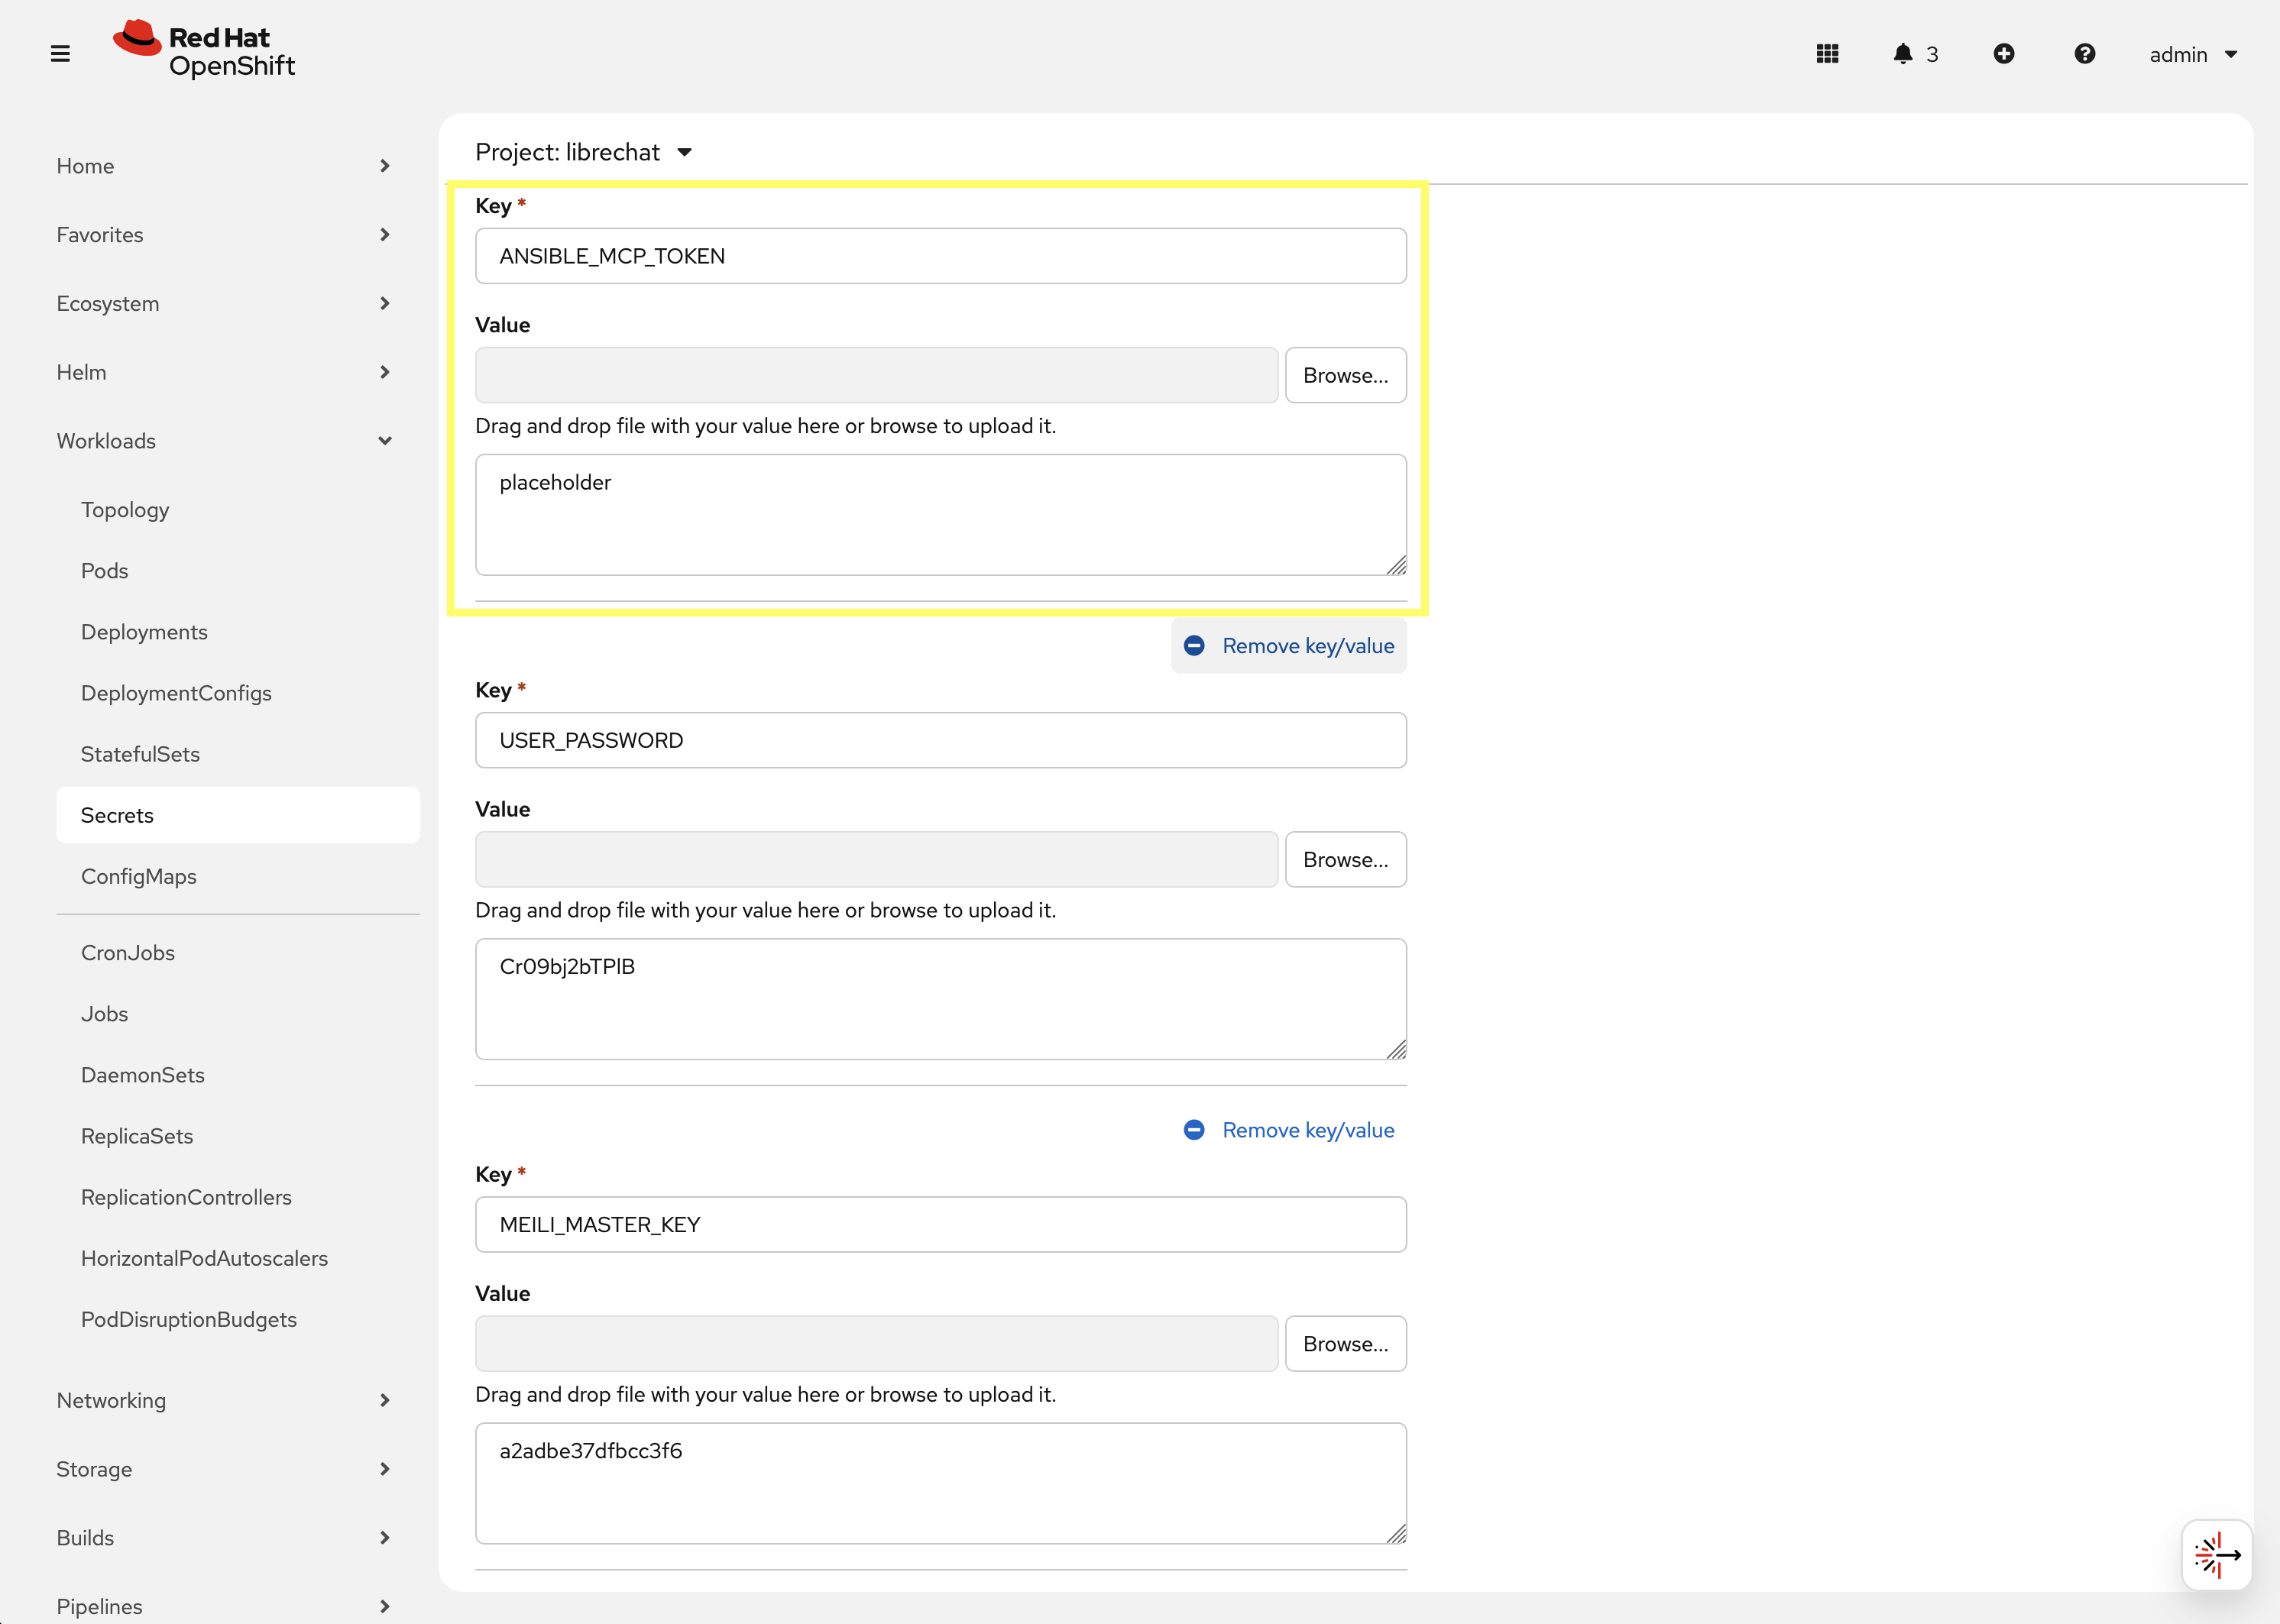
-
Scroll to the bottom of the page and click the Save button to apply the changes.
Once the Secret containing the API token has been updated, the next step is to restart the LibreChat pod so that it can load the updated value. To restart the LibreChat pod, perform the following steps:
-
Navigate to Workloads on the left hand navigation → Pods. From the project dropdown at the top, ensure librechat is selected.
-
Locate the filter section at the top of the page and select the dropdown that has the value of
Namepresent and select Label. Enter app.kubernetes.io/name=librechat in the text box and select the button provided below the textbox to apply the filter.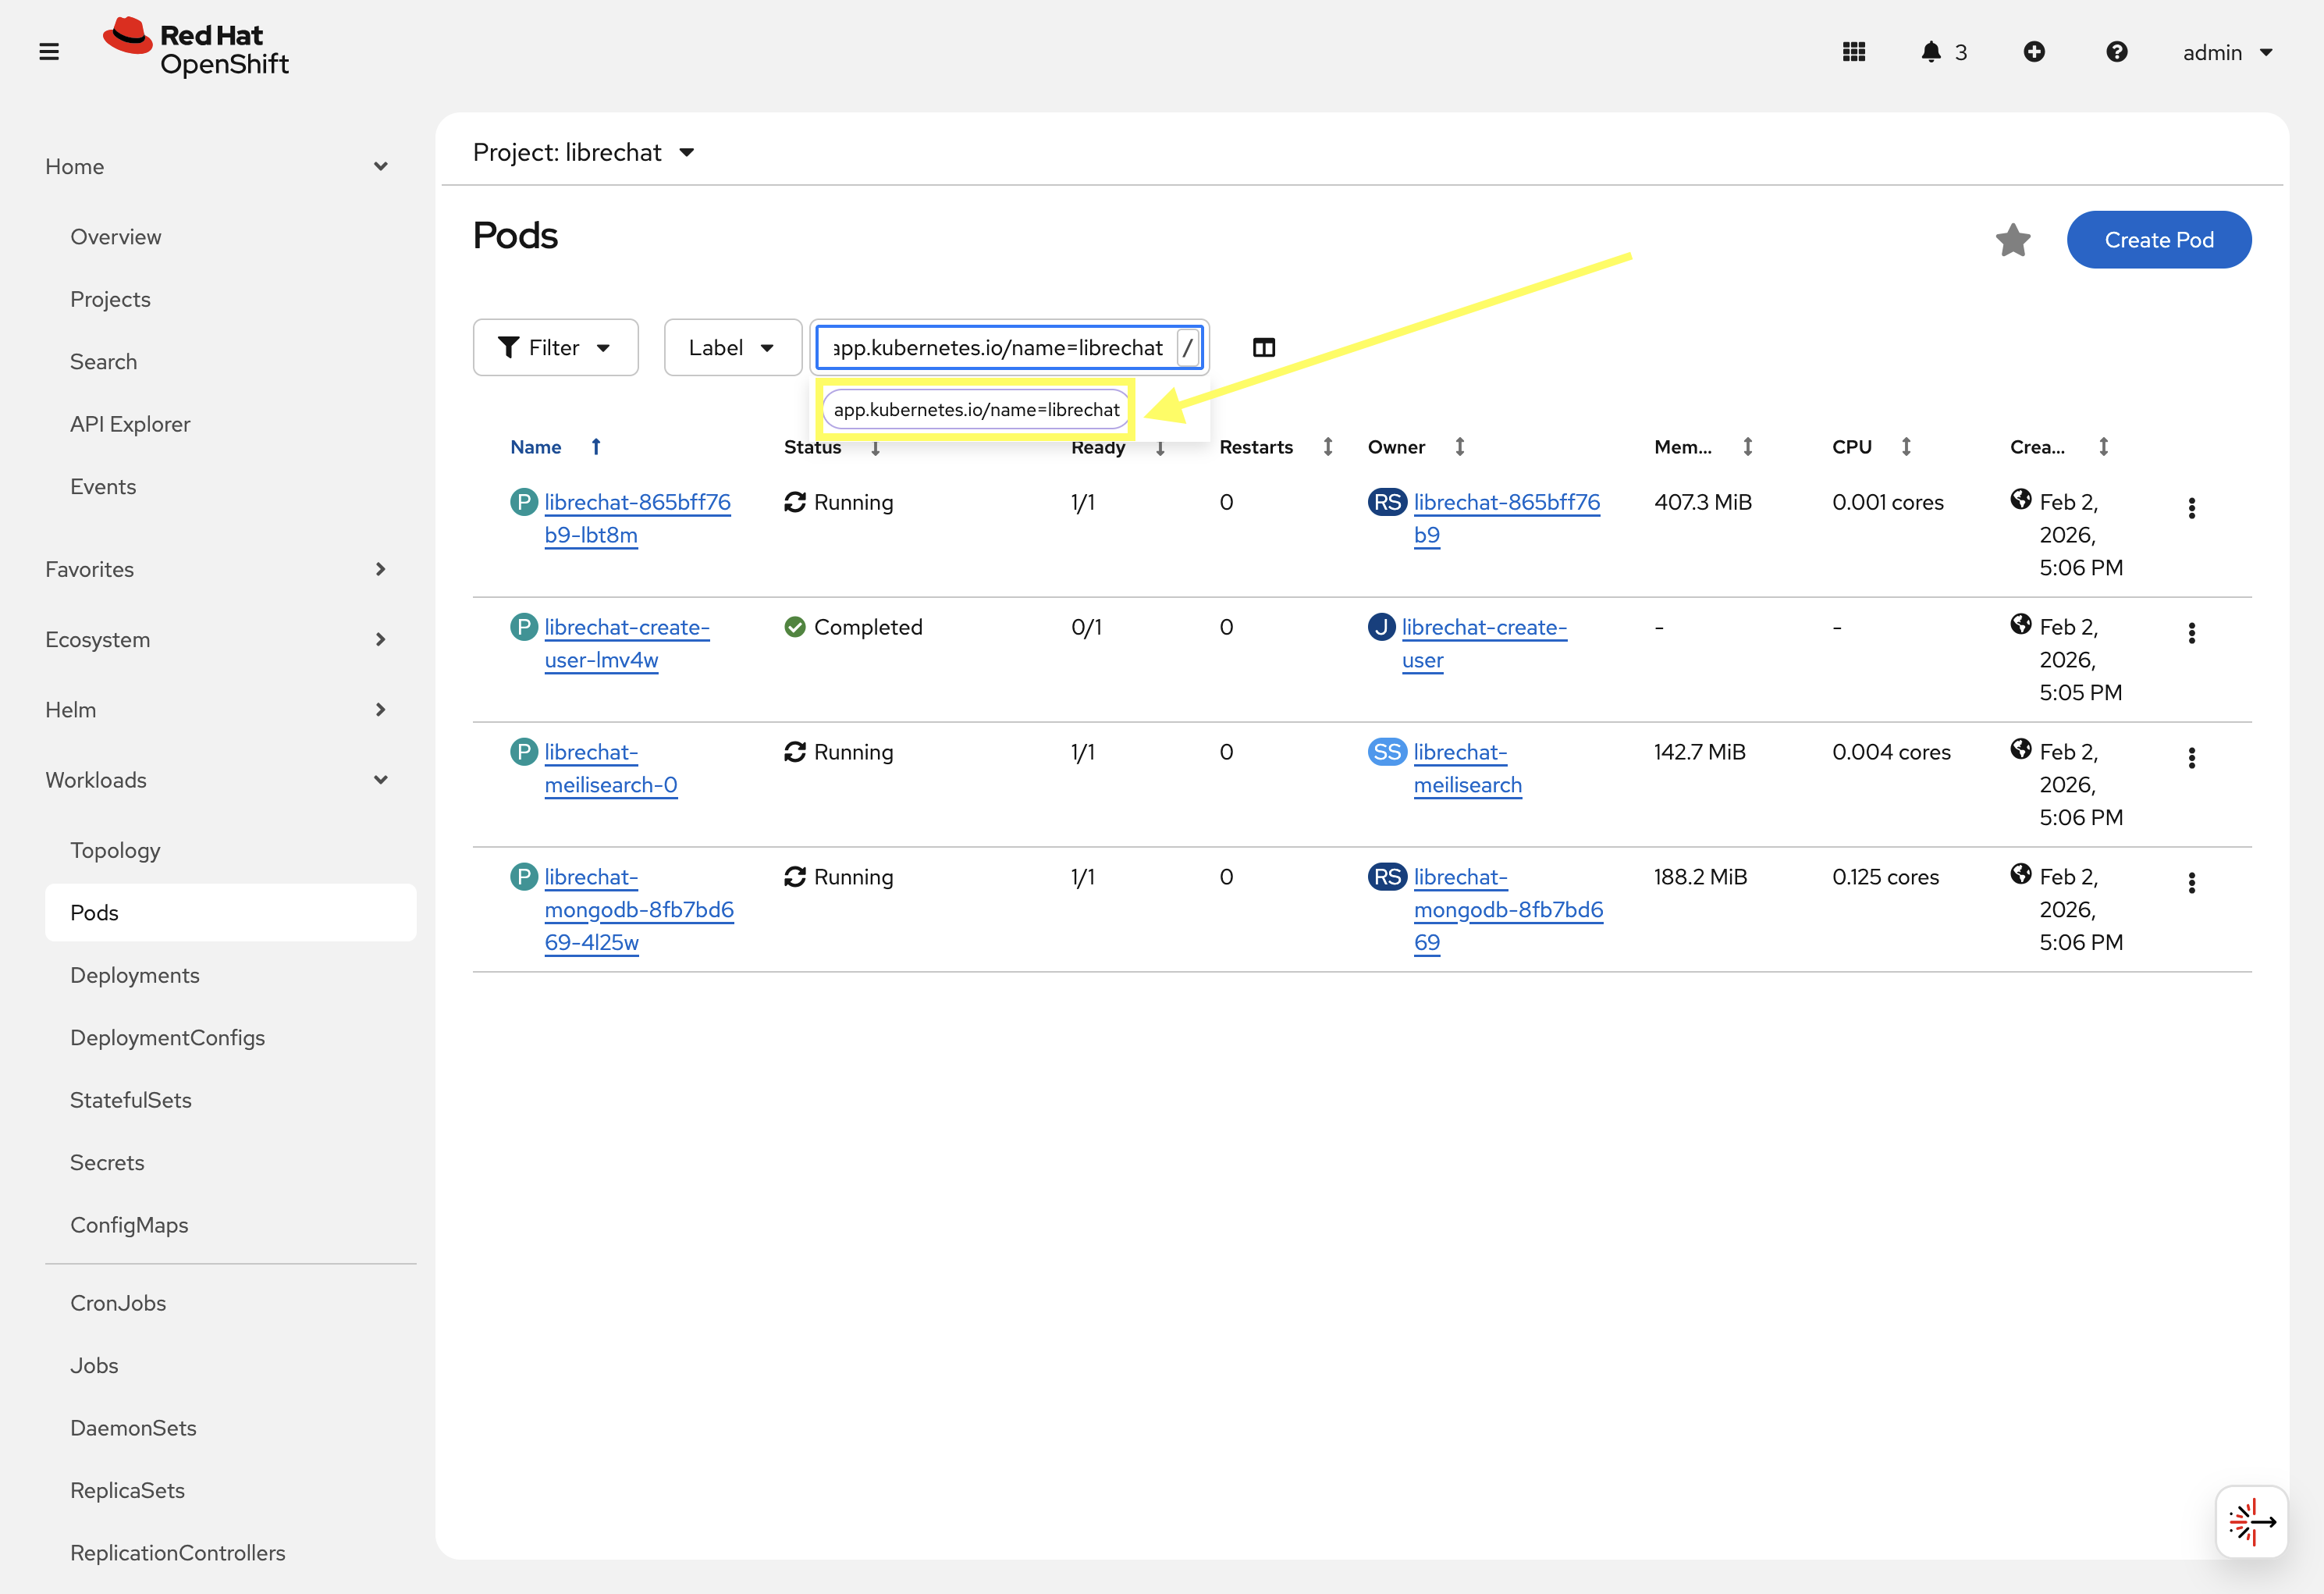
-
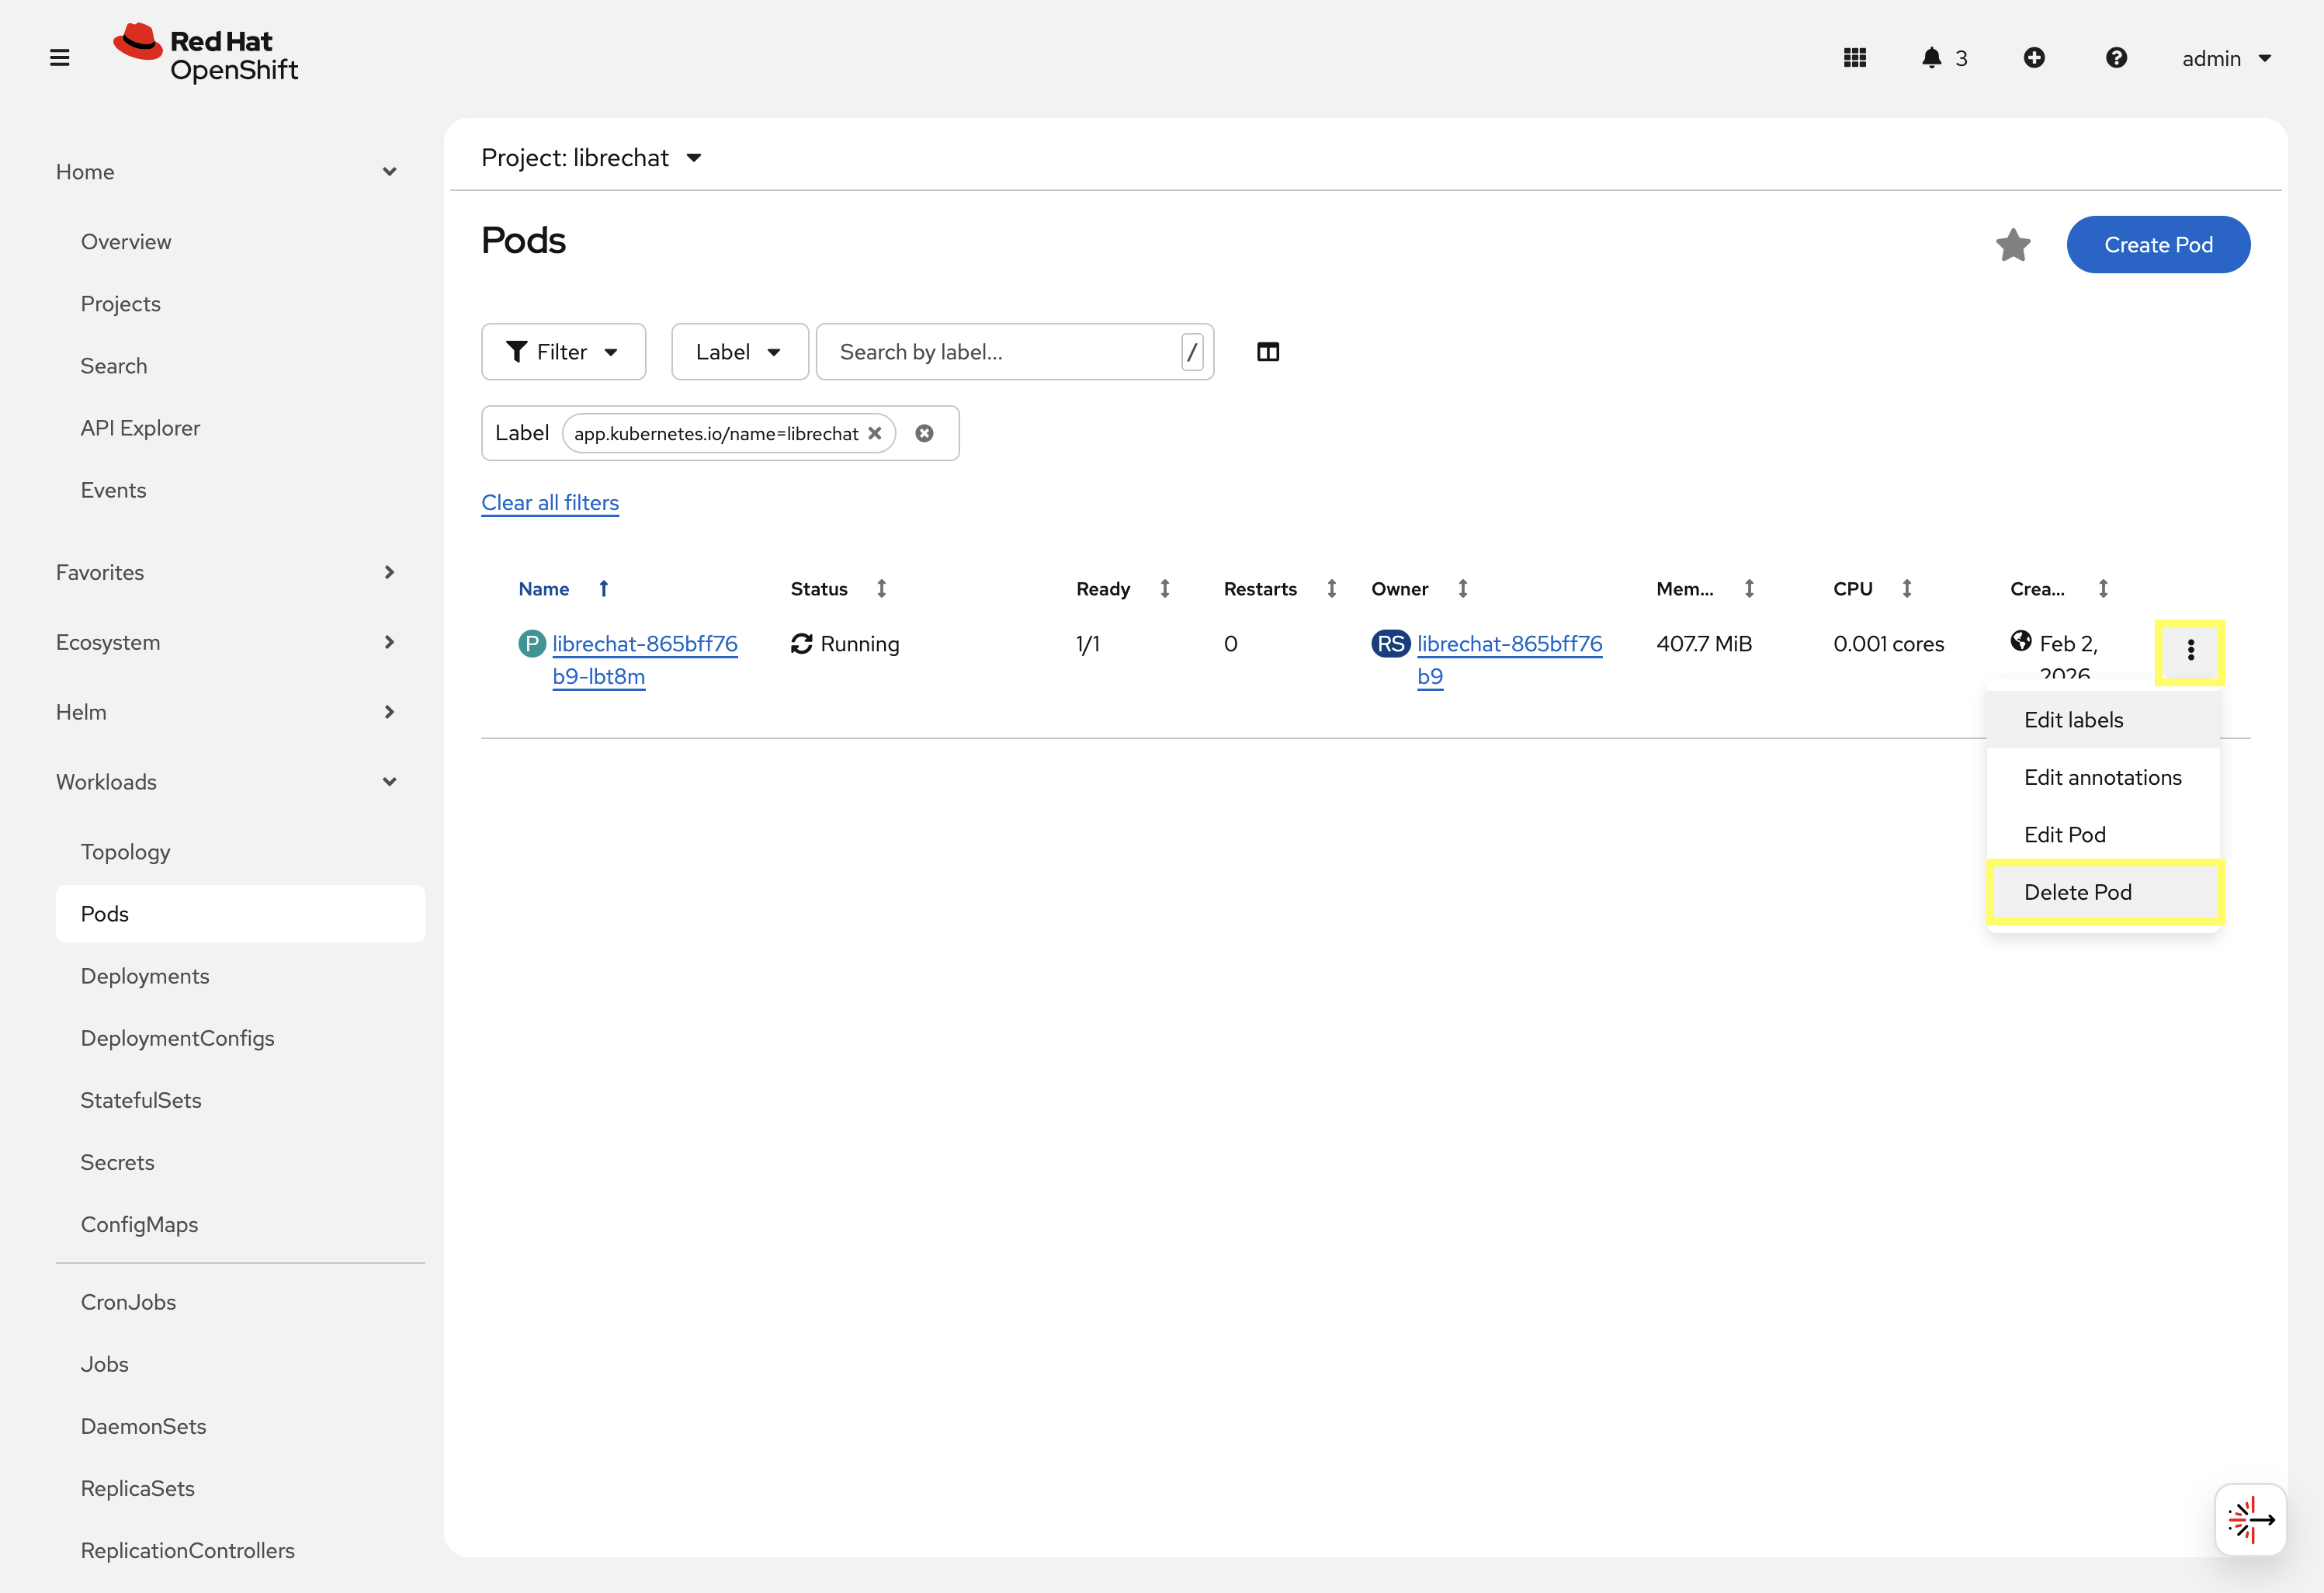
Locate the single pod that is displayed and click the kebab menu (three vertical dots) on the right hand side of the entry and select Delete Pod.
-
Wait until the pod has been recreated, is Running, and displays
1/1in the Ready column. -
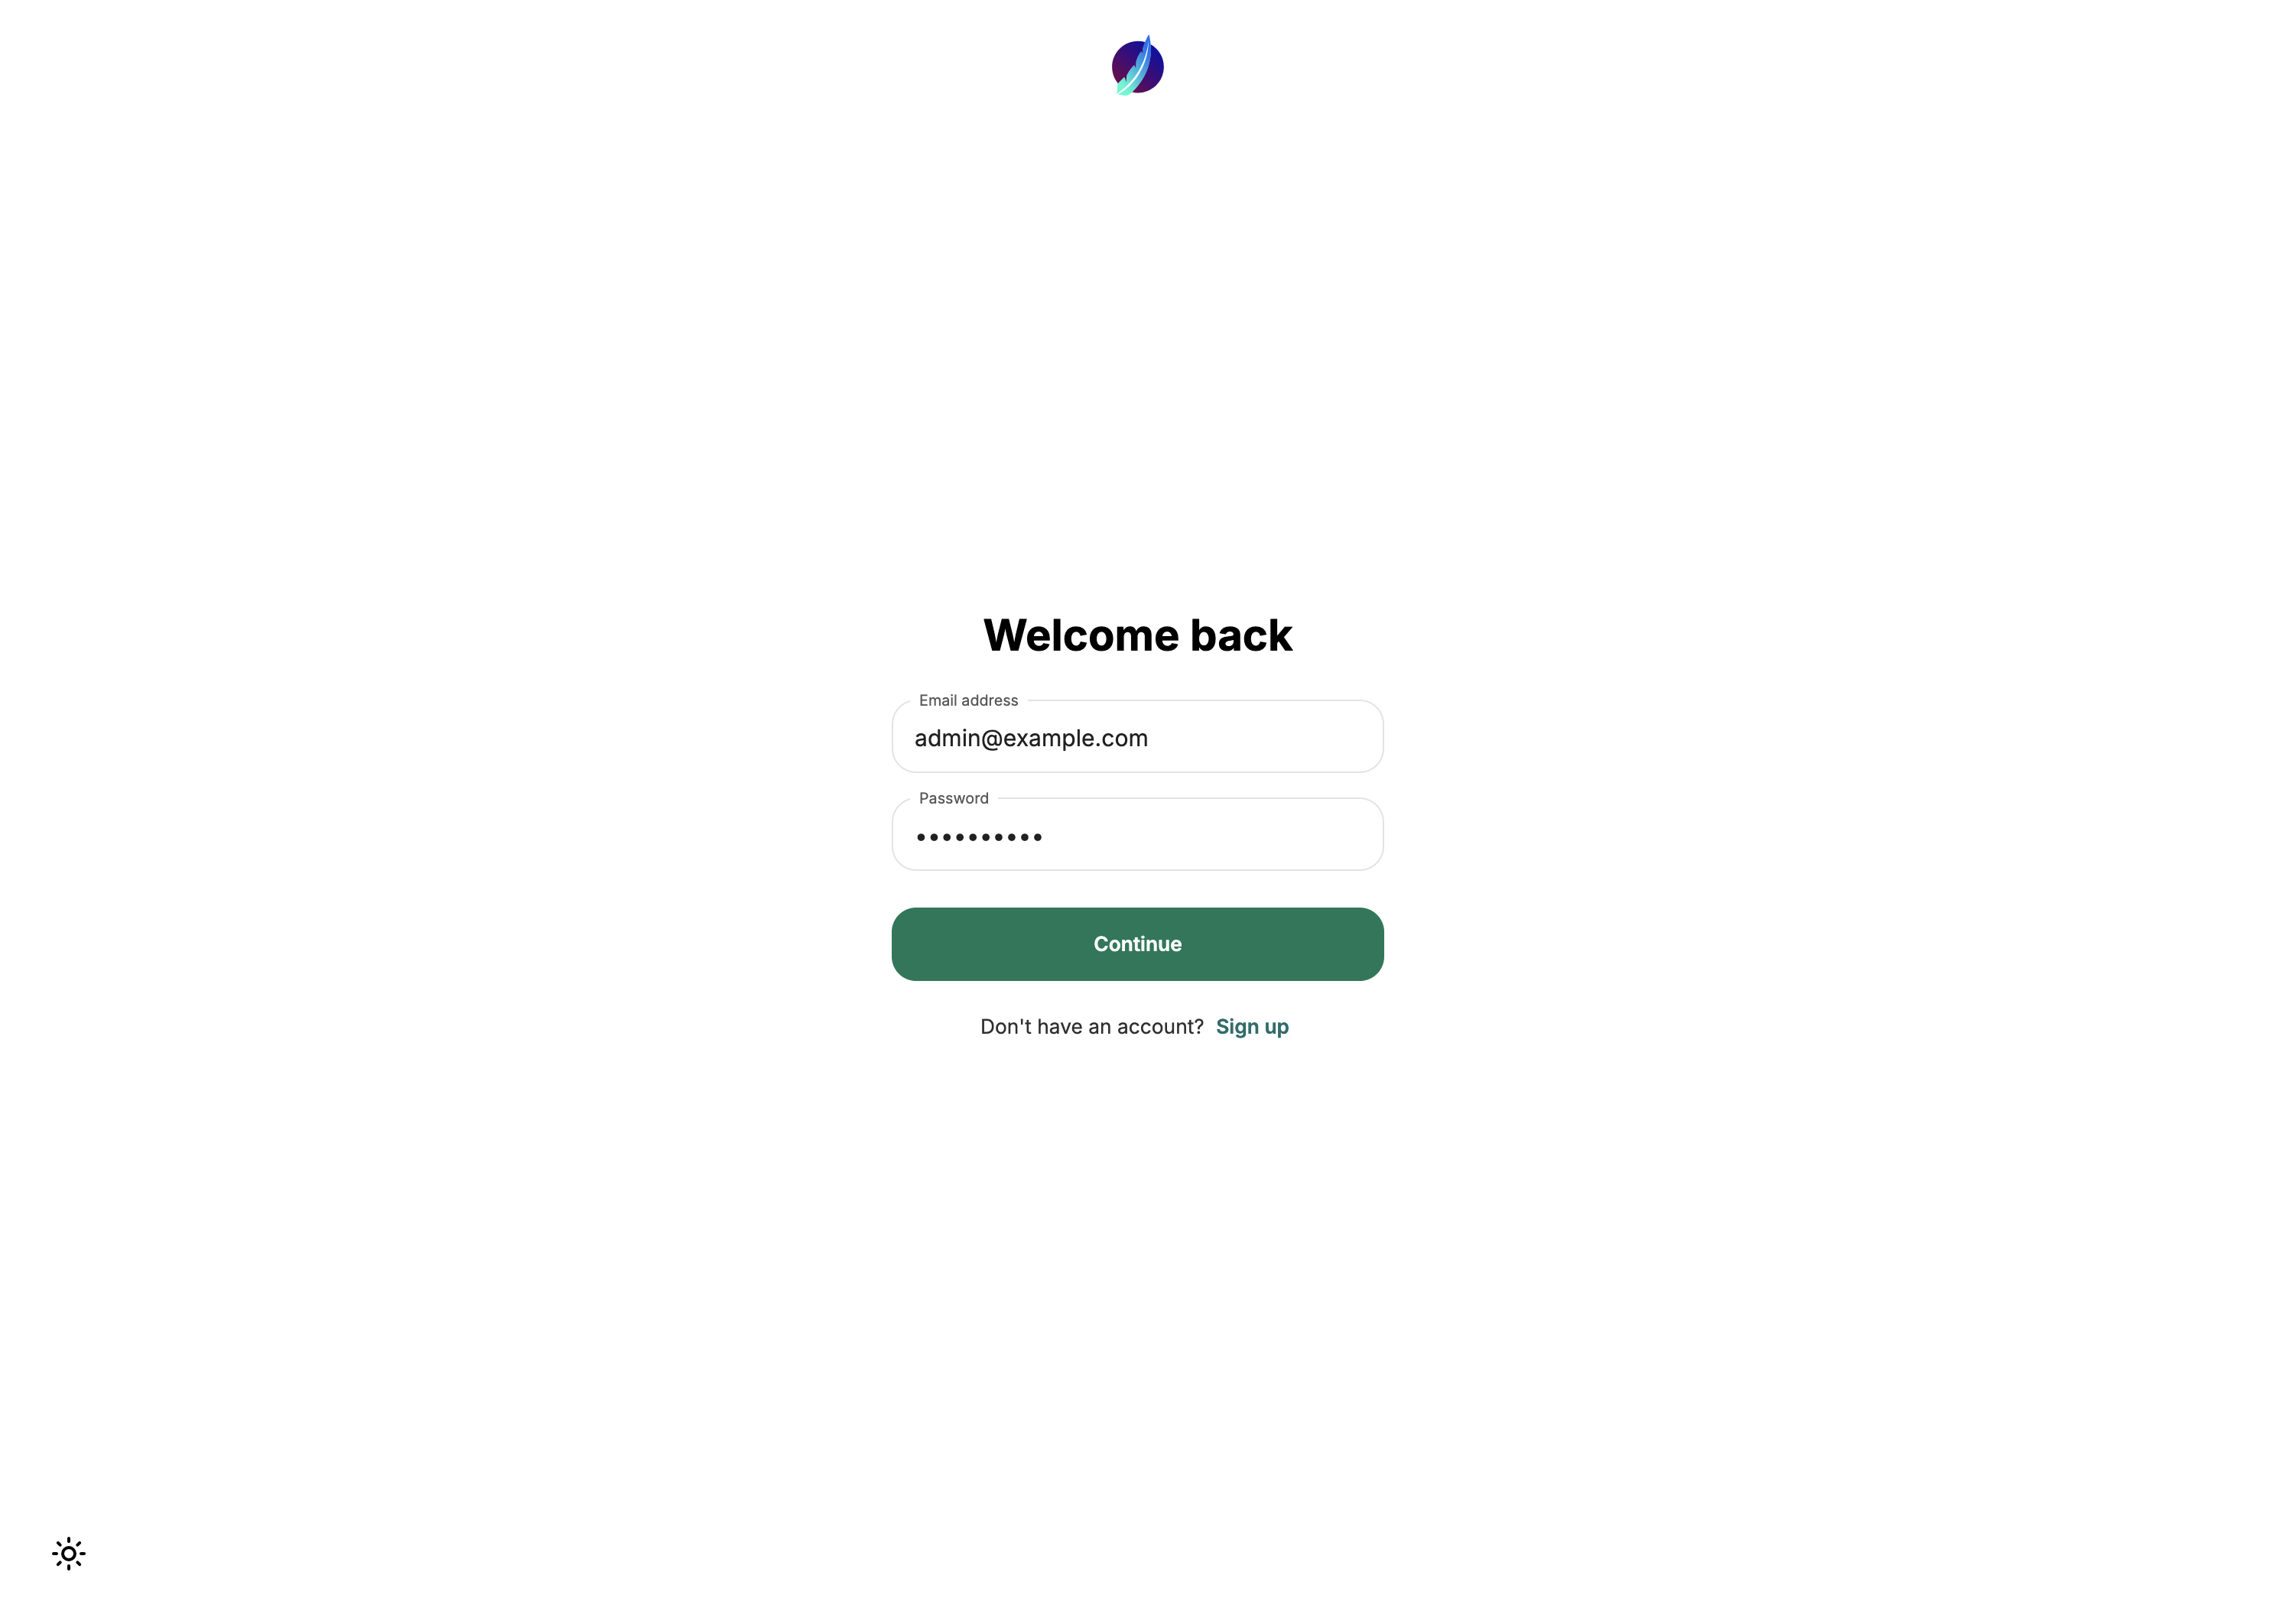
Launch the LibreChat web interface by navigating to: LibreChat Web Interface. You will be presented with the LibreChat login page.
-
Enter the username and password using the credentials provided from the Environment Details page and click the Continue button.
Once authenticated, you will be presented with the LibreChat main interface.
-
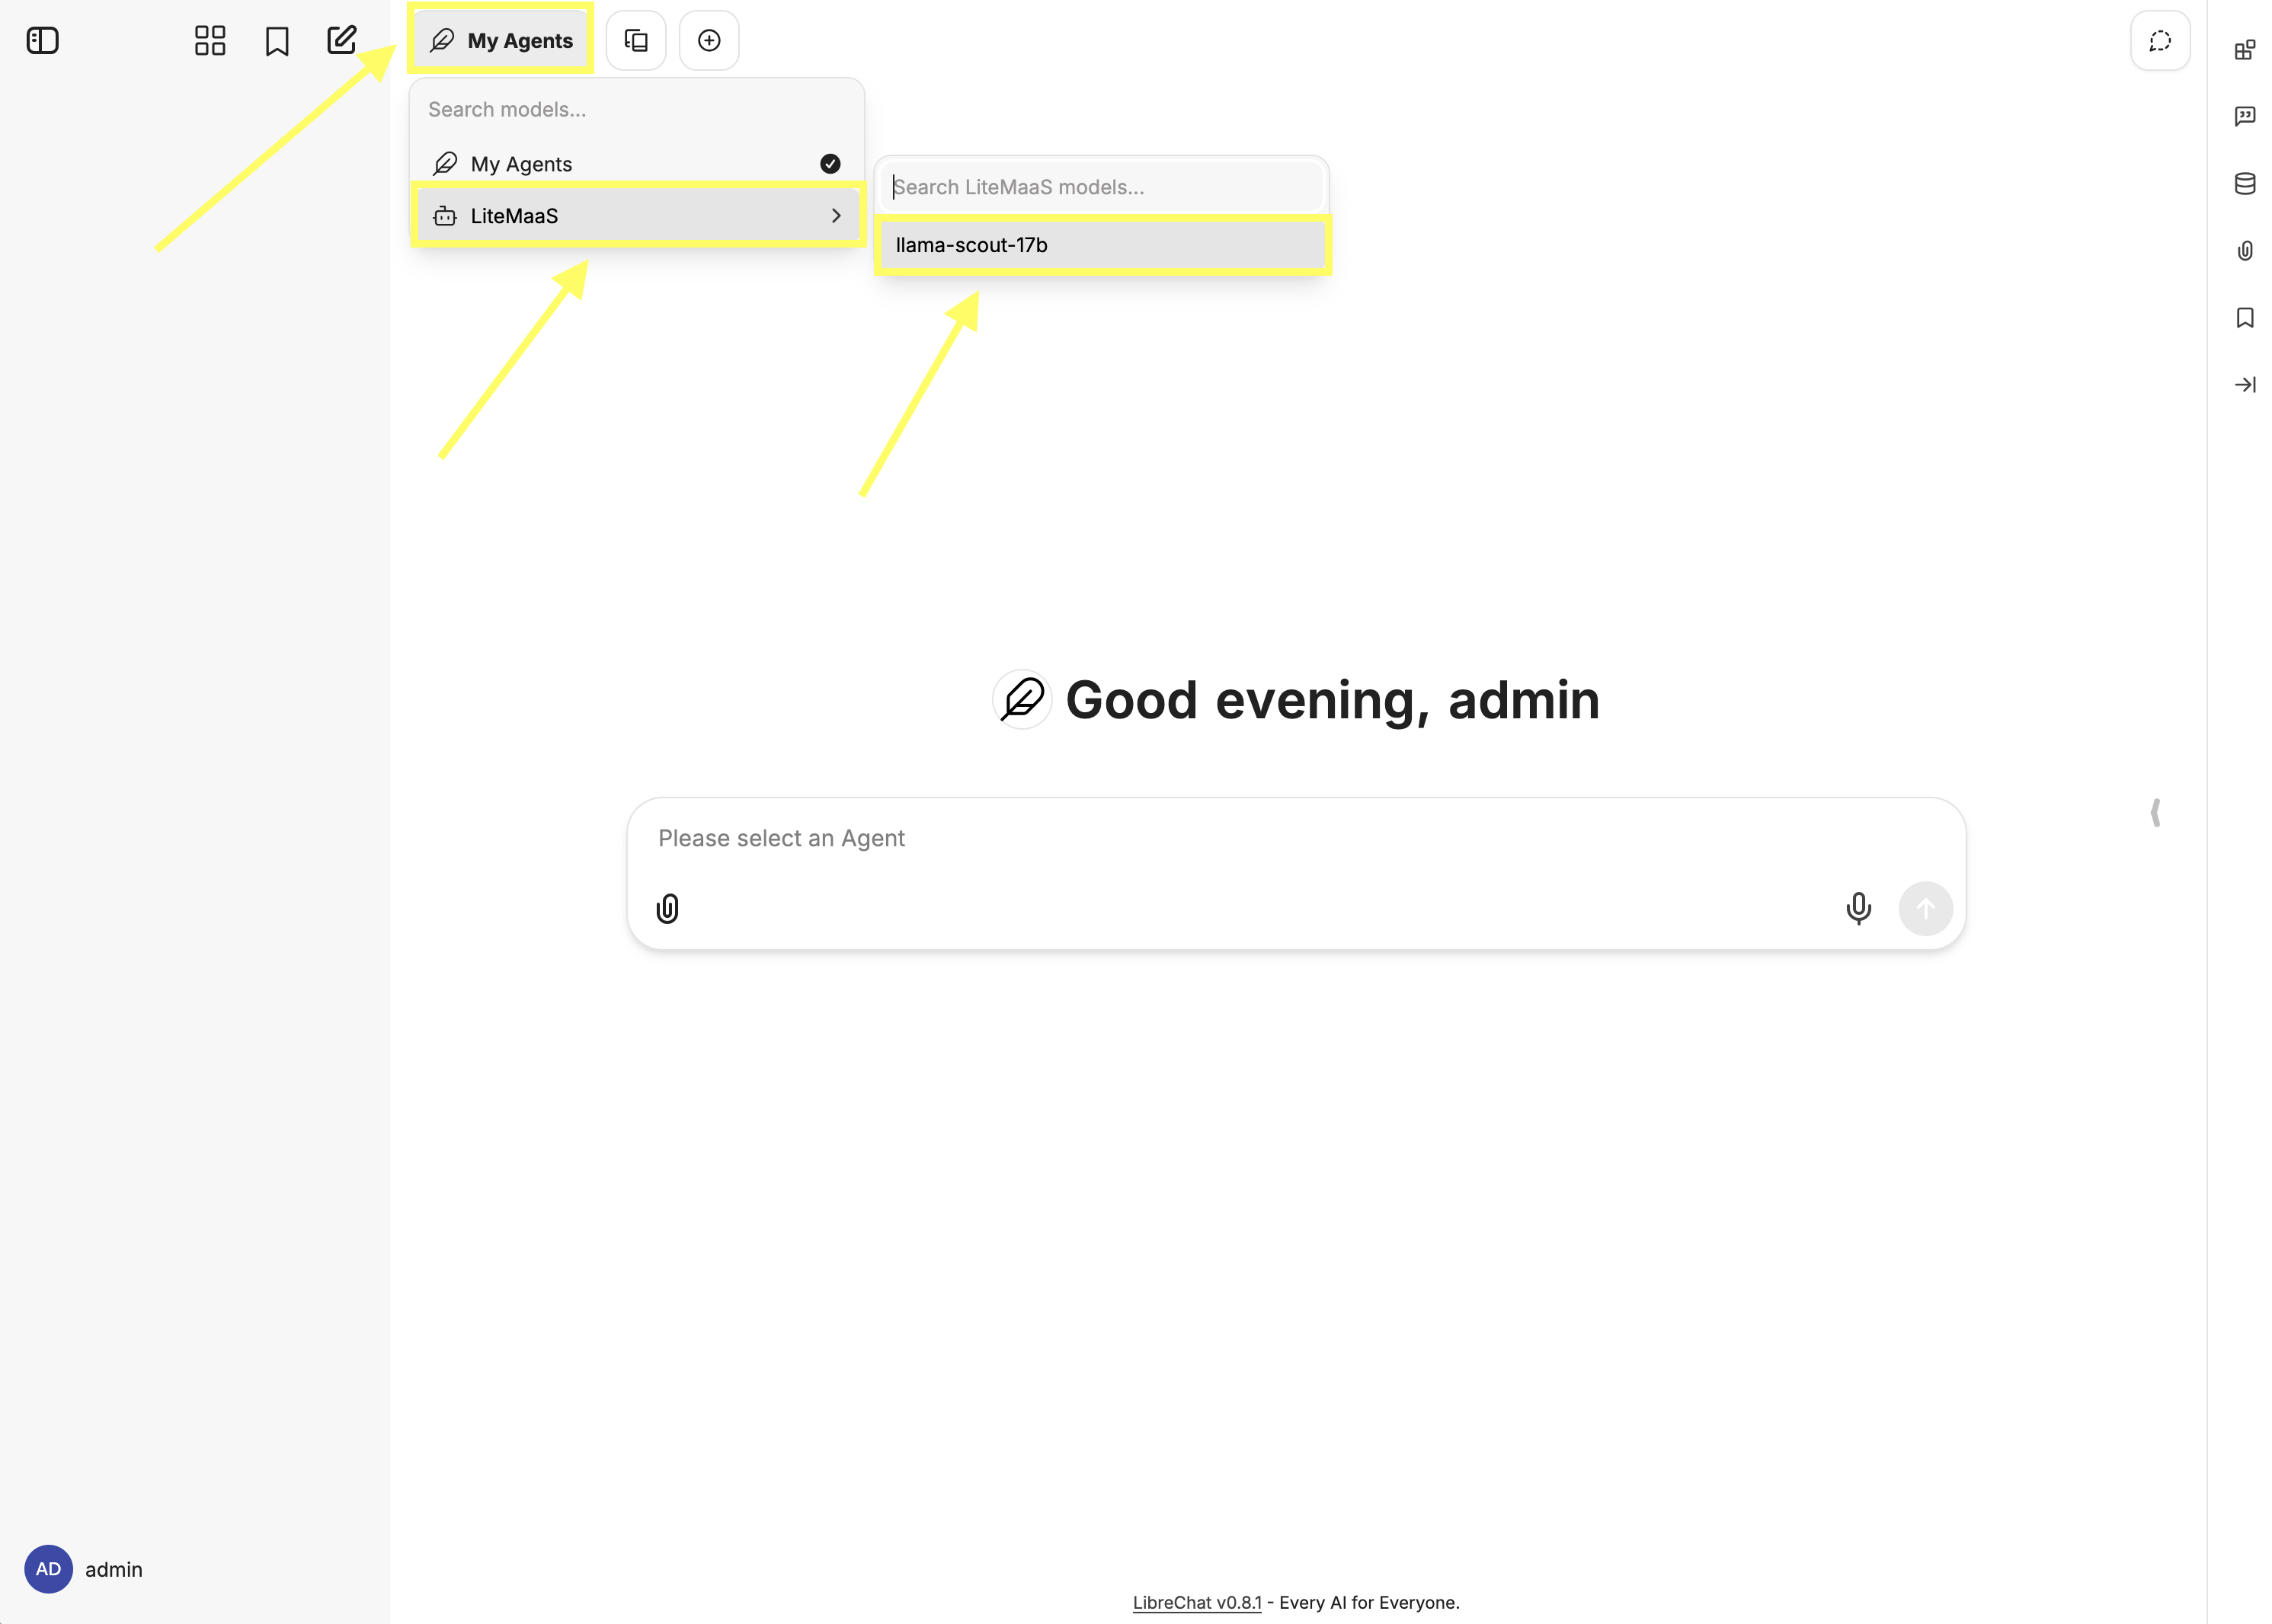
Enable the {litellm_available_models_list} model by clicking on the My Agents button at the top of the page, hover over LiteMaaS, and then select {litellm_available_models_list}.
-
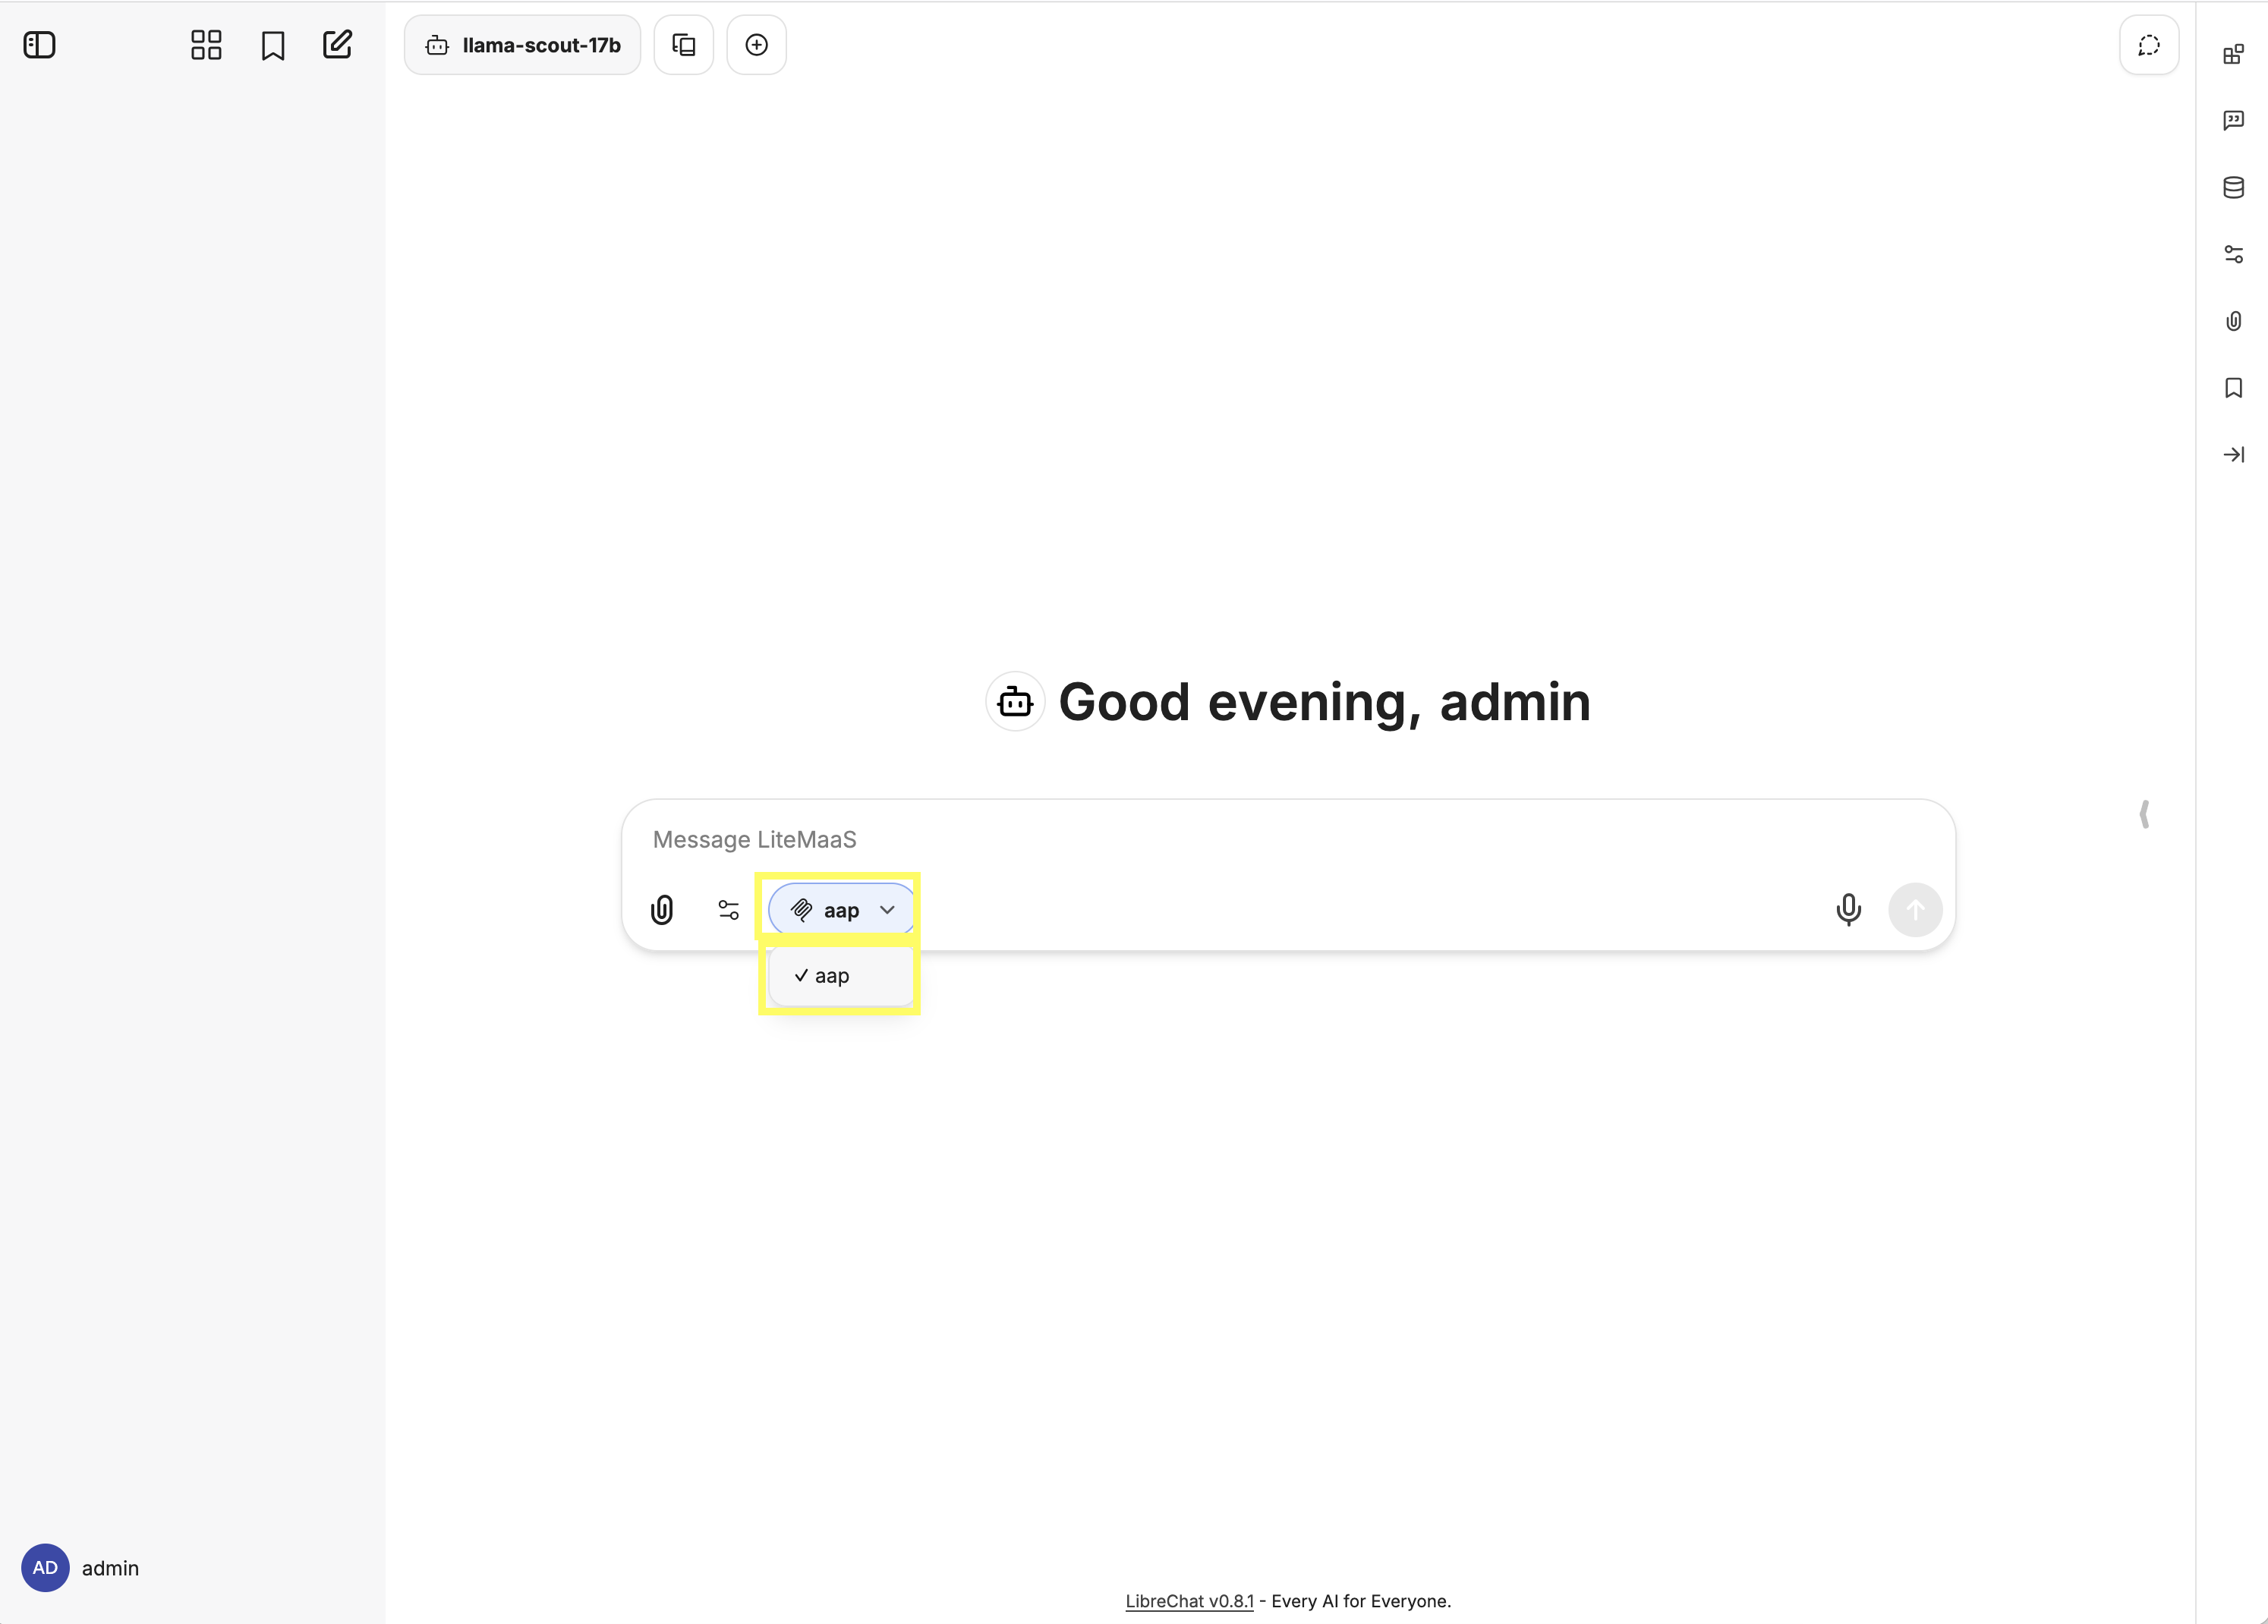
Enable the connection to the Ansible MCP Server by selecting the MCP Servers dropdown within the chat window and selecting aap. A successful connection will display a checkmark next to the MCP server name.
Now, lets start a chat session using our natural language that retrieves details that originate from Ansible Automation Platform that is facilitated through the integration with the AAP MCP Server.
-
Ask for information related to the Projects that have been defined:
Display the names of aap projectsIn a few moments, you will see LibreChat making queries to the Tools exposed by the AAP MCP Server and then providing a natural language response based on the information retrieved. A successful invocation of the MCP tool will display similar to the following:
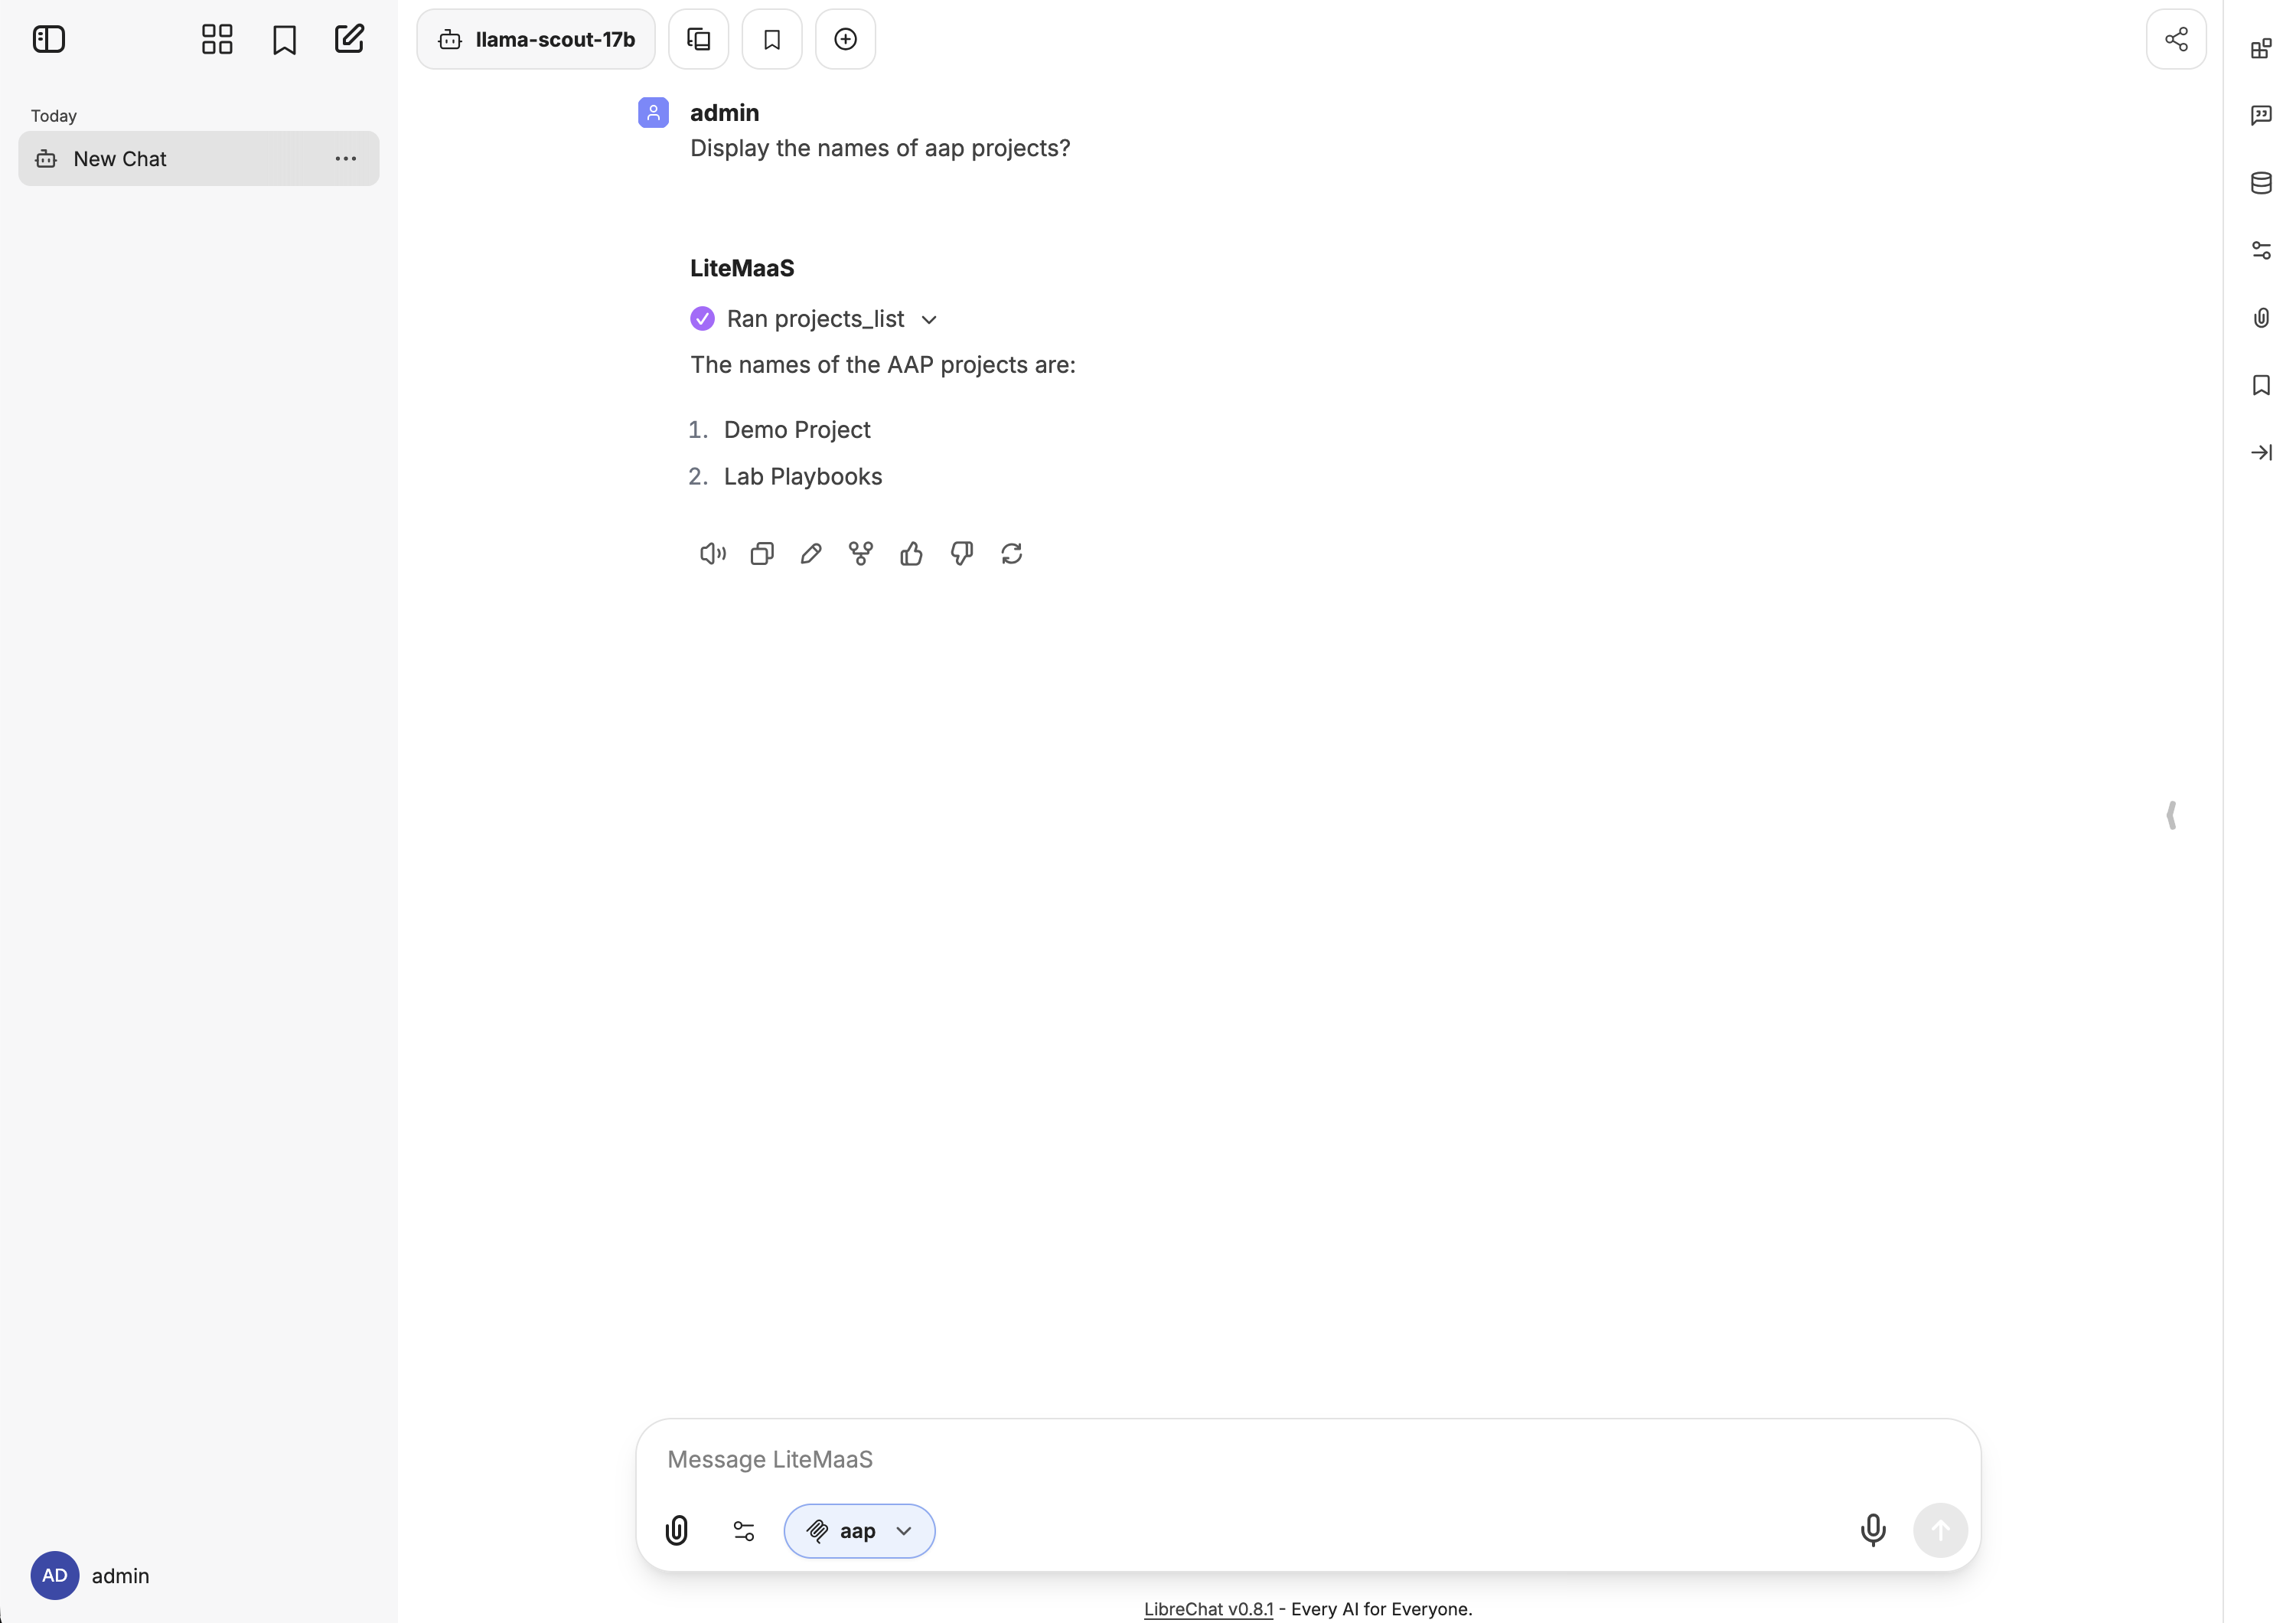
Notice how the projects_list tool was invoked to retrieve the list of projects from Ansible Automation Platform. The response provided by LibreChat includes the names of the projects that were retrieved. You can expand the result of the projects_list tool to see the raw data that was returned from Ansible Automation Platform if desired.
| Due to the non-deterministic nature of LLM’s, the exact response provided by LibreChat may vary between invocations and may not match exactly what is shown in the screenshot or steps above. |
Feel free to continue the chat session or start a new session to continuing to converse with the LLM, obtaining realtime insights from Ansible Automation Platform though the use of the Ansible MCP Server.
4.2: Using OpenCode with the Ansible MCP Server
OpenCode is an Open Source, terminal based AI agent. It is already installed in your Dev Spaces workspace and requires that a few steps be completed prior to its use.
4.2.1: Customizing a Dev Spaces Workspace
OpenShift Dev Spaces includes several different methods for configuring and customizing a workspace. For this section, we will create a ConfigMap and Secret resource within the admin-devspaces project containing your workspace to externalize and inject environment variables into your workspace. These values will be referenced by the OpenCode configuration file that you will then define to drive the functionality of the tool.
Labels and annotations are applied to the ConfigMap and Secret resources so that they become eligible for injection into the Dev Spaces workspace. By setting the controller.devfile.io/mount-to-devworkspace label to true, the Dev Spaces controller will automatically mount the resources into the workspace. The contents of the ConfigMap or Secret can either by mounted as files or environment variables. This is dictated by the controller.devfile.io/mount-as annotation.
First, create a ConfigMap resource to contain the non-sensitive configuration values by performing the following in the OpenShift web console. Instead of using the OpenShift web console to interactively create the ConfigMap, you will import the raw YAML definition using the Import YAML feature.
-
Launch the OpenShift Web Console
-
Select the htpasswd_provider button and use the credentials provided in the Environment Details page to login to the OpenShift console
-
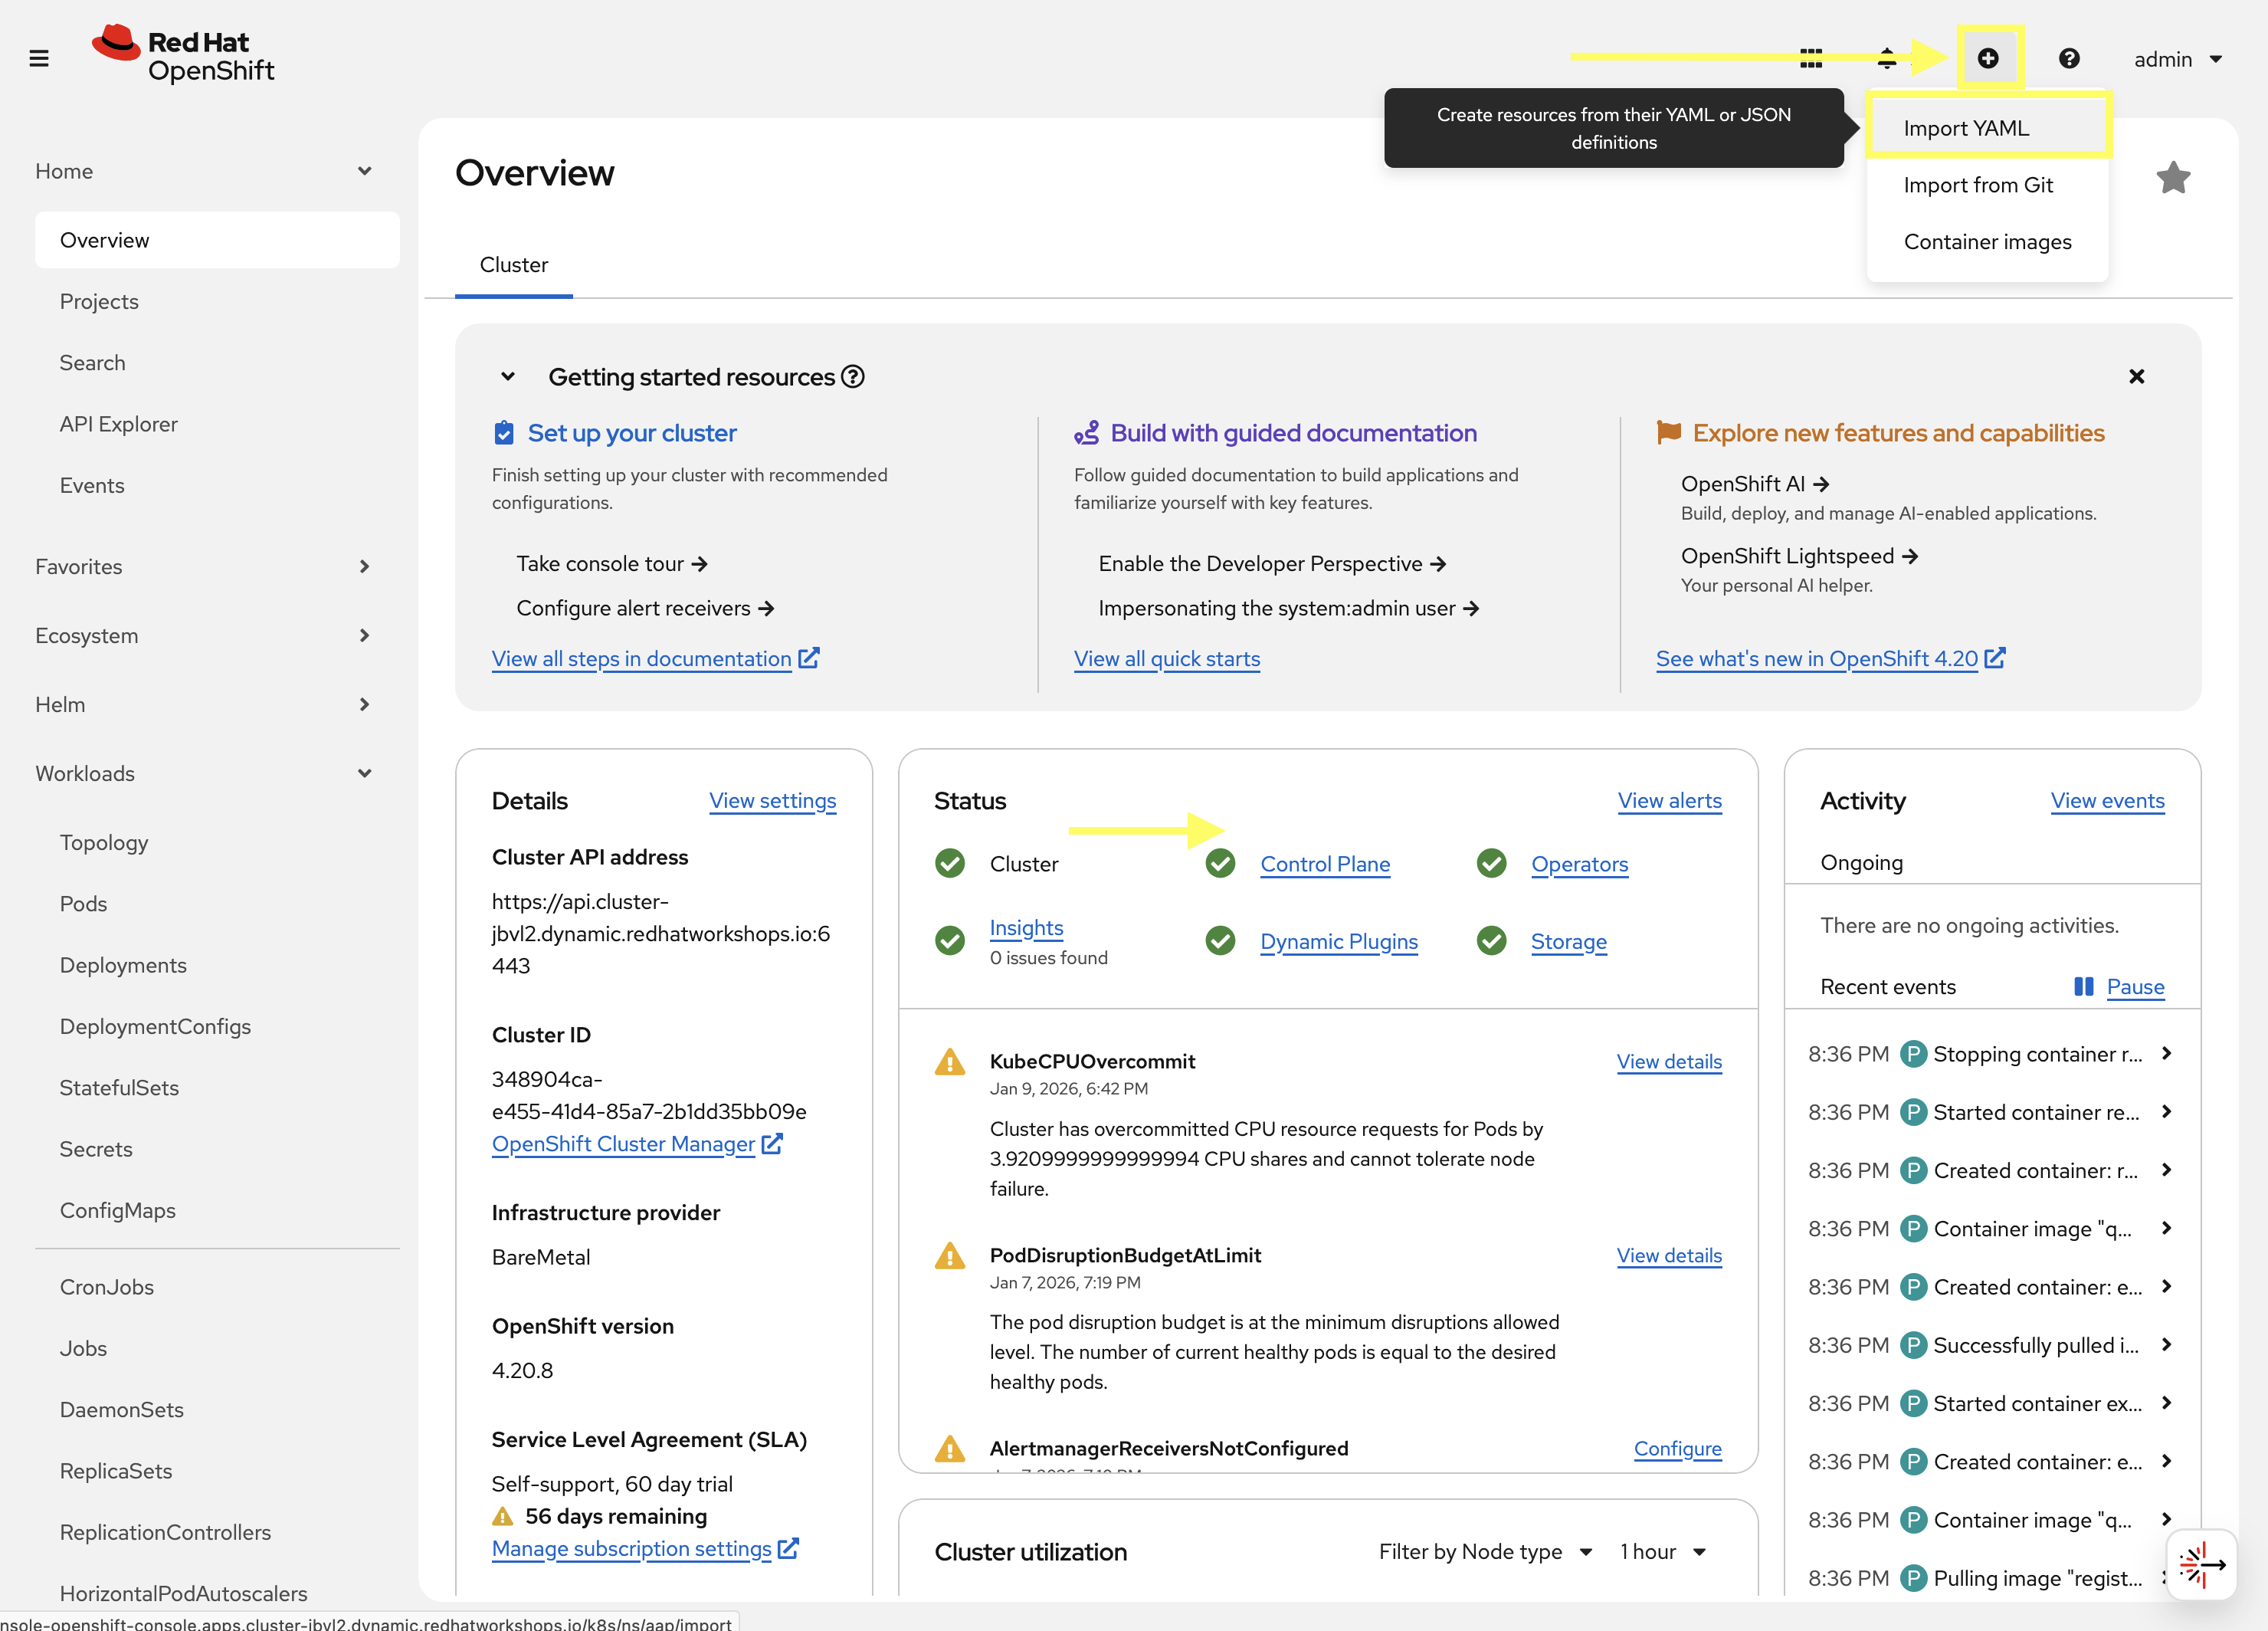
On the top navigation bar, click on the + icon and select Import YAML
-
Enter the following into the Import YAML dialog:
kind: ConfigMap
apiVersion: v1
metadata:
  name: superlab-devspaces-config
  namespace: admin-devspaces
  labels:
    controller.devfile.io/mount-to-devworkspace: 'true'
    controller.devfile.io/watch-configmap: 'true'
  annotations:
    controller.devfile.io/mount-as: env
data:
  AAP_MCP_URL: https://aap-mcp-aap.{openshift_cluster_ingress_domain}/mcp
  LITELLM_MODEL_NAME: {litellm_available_models_list}
  LITELLM_URL: {litellm_api_base_url}
  OPENCODE_CONFIG: /projects/devspaces-example/opencode.json
Notice the value of the controller.devfile.io/mount-asannotation in the snippet above is set toenv, which means the contents of theConfigMapwill be mounted as environment variables in the Dev Spaces workspace. -
Click the Create button to create the ConfigMap resource.
Now, create a Secret resource to contain the sensitive configuration values by repeating the same steps as above by using the Import YAML feature.
-
On the top navigation bar, click on the + icon and select Import YAML
-
Enter the following into the Import YAML dialog. Make sure to replace
PLACEHOLDER_REPLACE_MEwith the AAP API Token you generated in the prior section:kind: Secret apiVersion: v1 metadata: name: superlab-devspaces-secret namespace: admin-devspaces labels: controller.devfile.io/mount-to-devworkspace: 'true' controller.devfile.io/watch-secret: 'true' annotations: controller.devfile.io/mount-as: env stringData: AAP_MCP_API_KEY: PLACEHOLDER_REPLACE_ME LITELLM_API_KEY: {litellm_virtual_key} type: Opaque -
Click the Create button to create the Secret resource.
With the environment variables defined in the ConfigMap and Secret now defined within OpenShift, the next step is to restart your Dev Spaces workspace so that it can mount the values contained within these resources. To restart your Dev Spaces workspace, perform the following steps in the OpenShift web console:
-
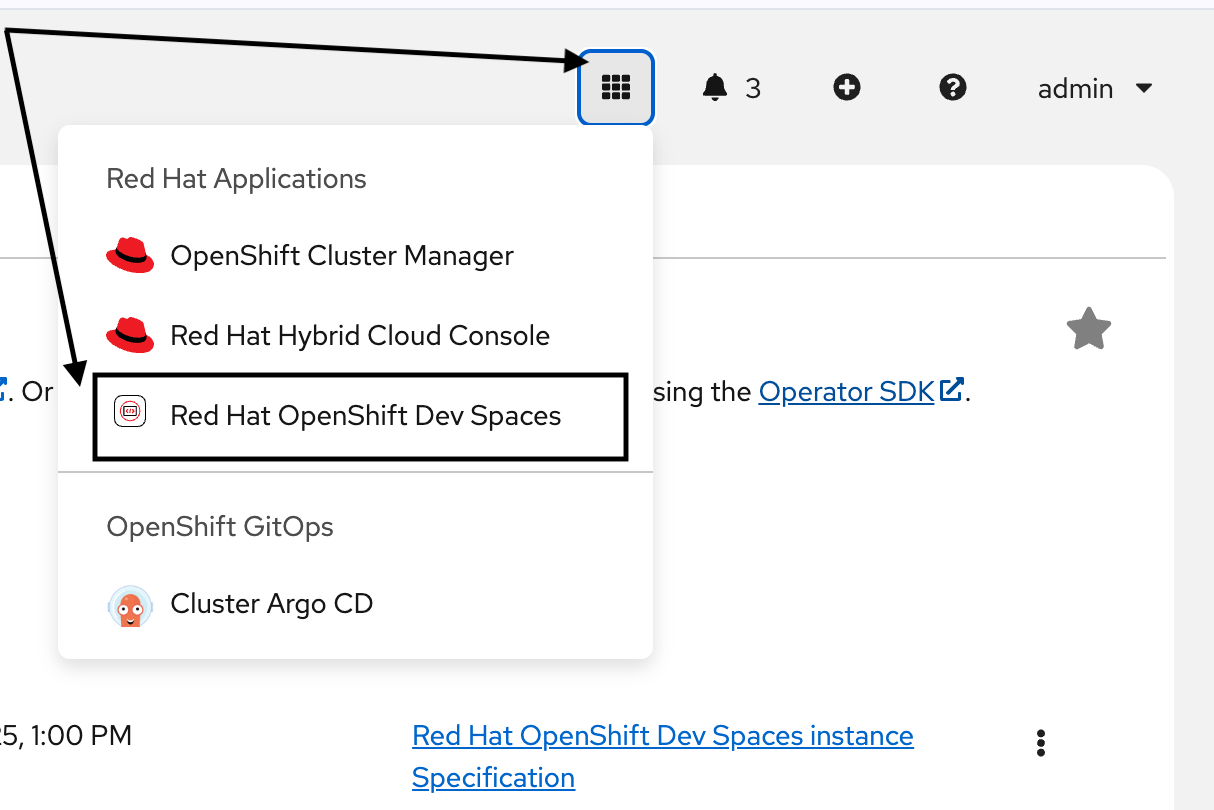
Use the 9-block icon in the upper right to launch Red Hat OpenShift Dev Spaces directly from the OpenShift console header.
-
Within the Dev Spaces console, on the Workspaces page, click the kebab menu (three vertical dots) next to your
ansible-dev-spaces-example-xxxxworkspace and select Restart Workspace.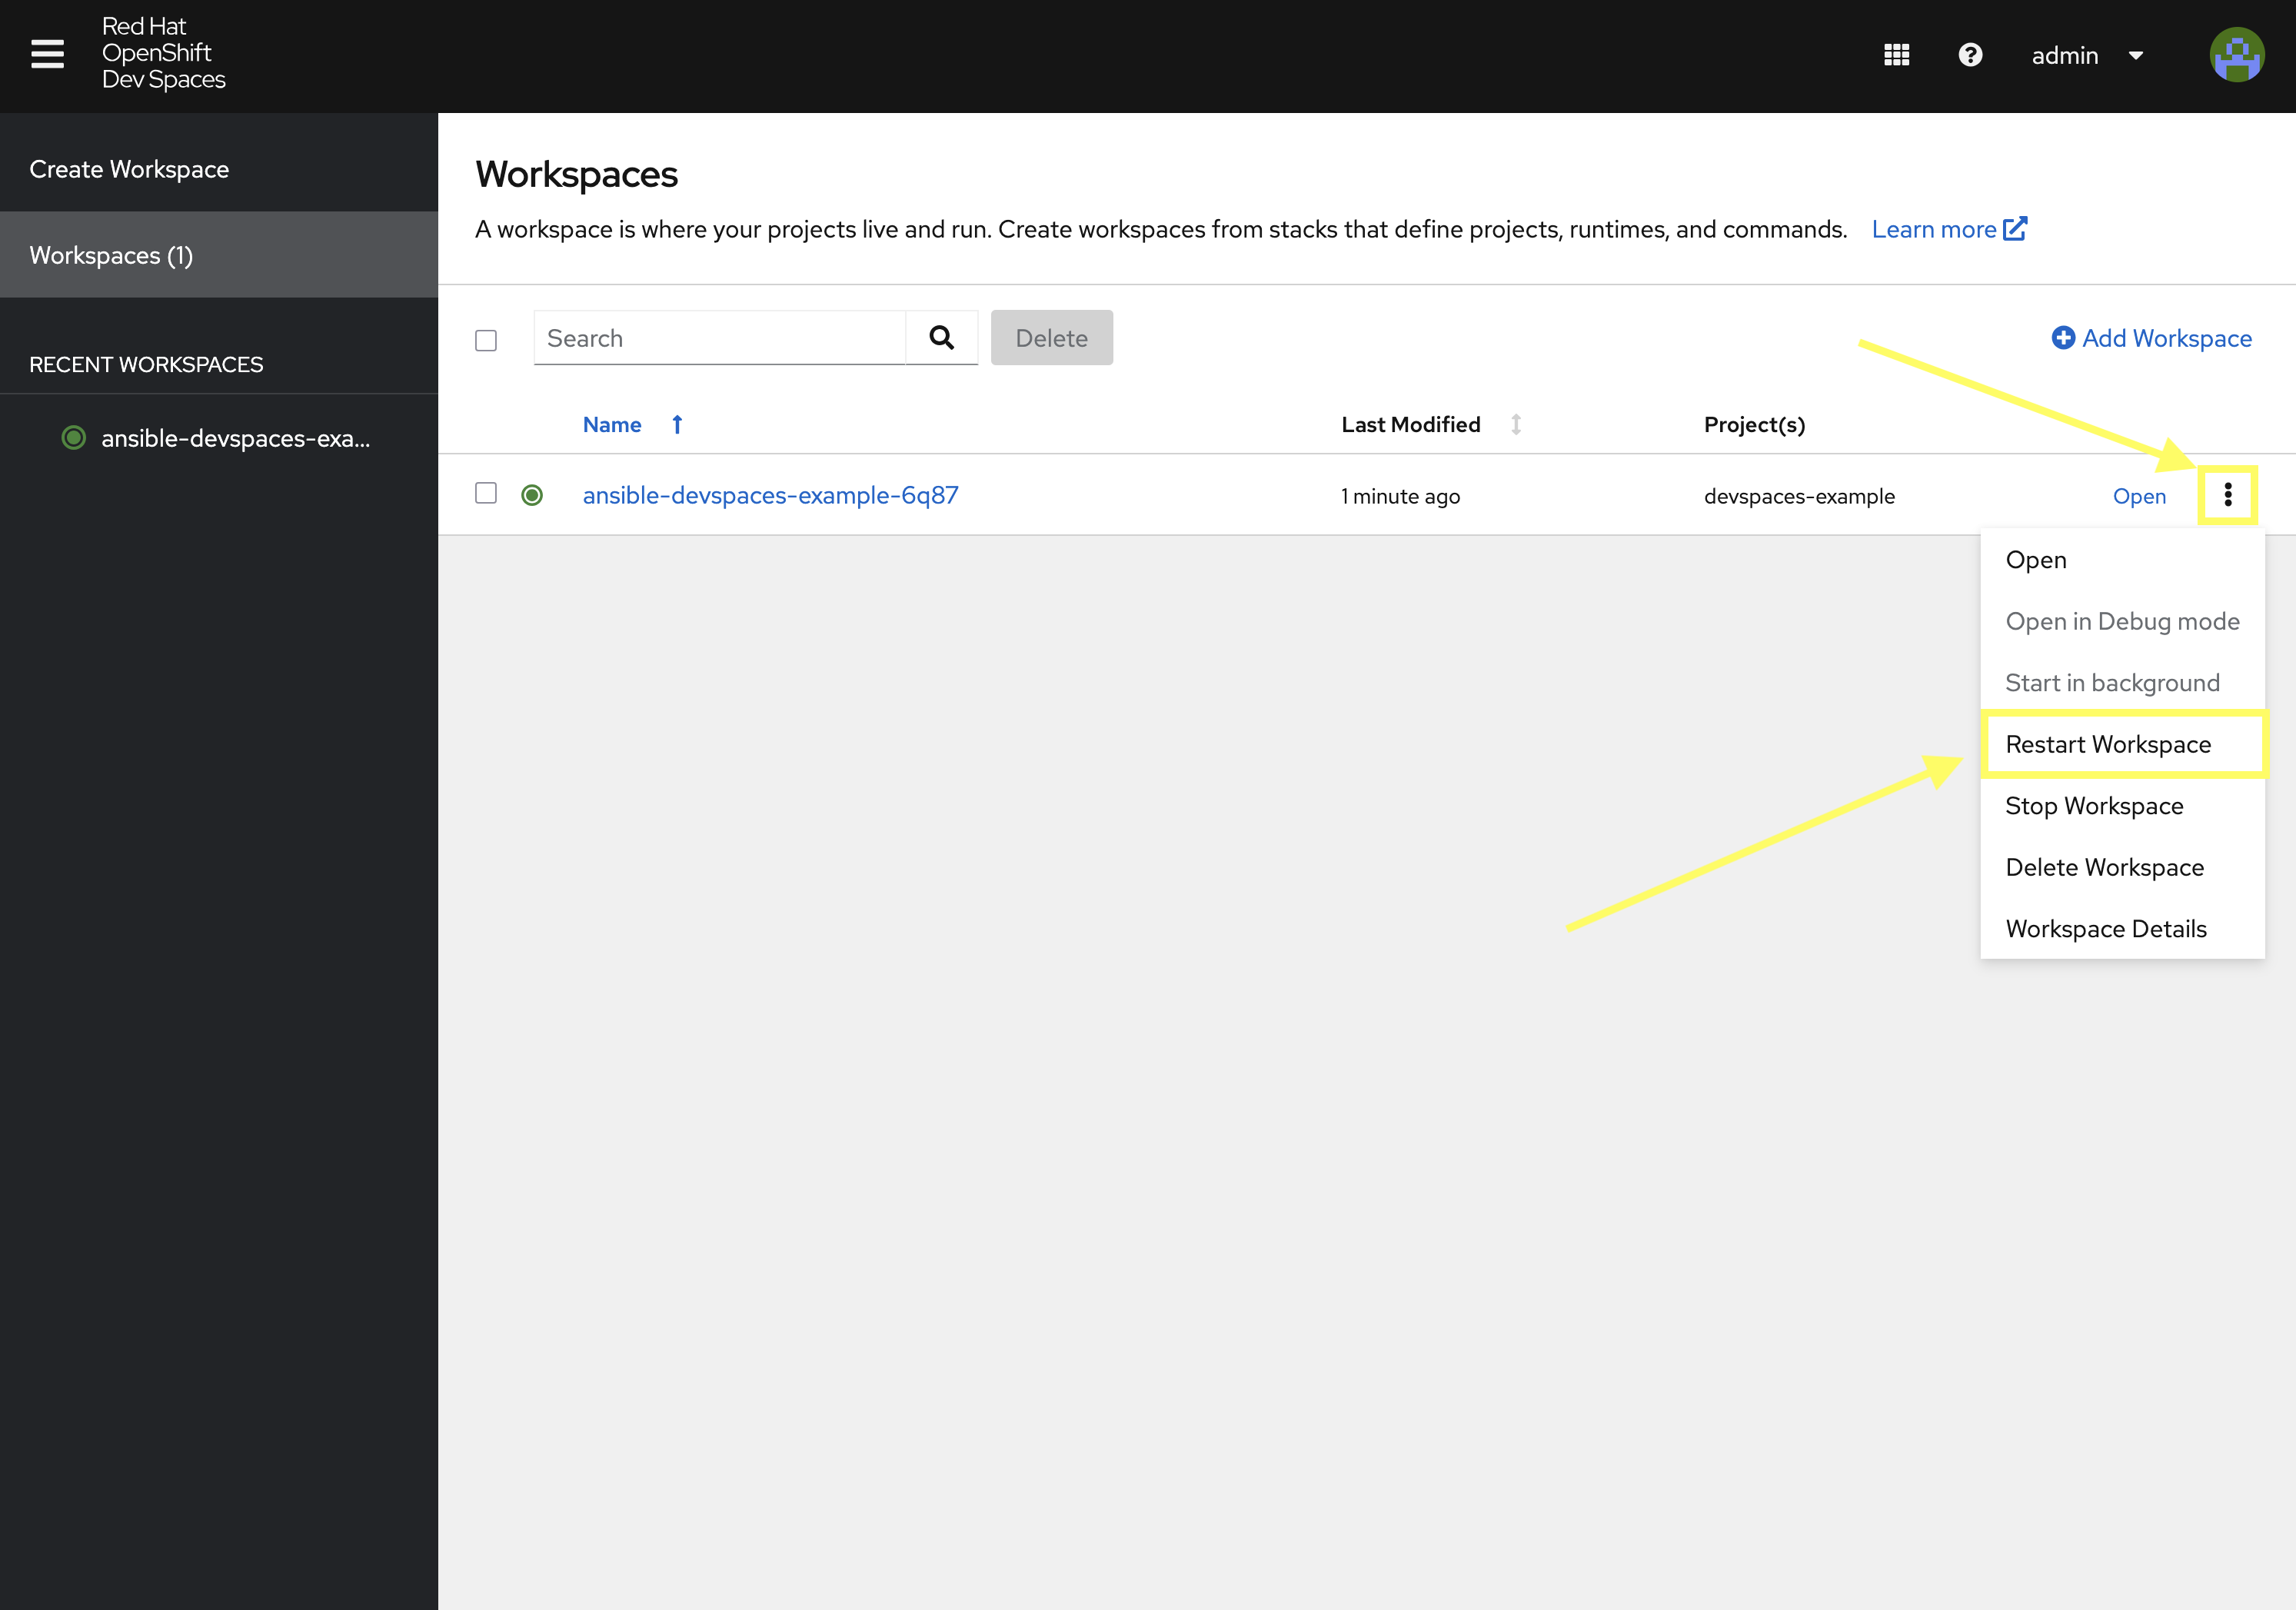
-
Click the Open link next to your workspace to relaunch the workspace
When the workspace has started, you can verify that the environment variables are correctly mounted by executing the following command in the terminal which will check for the presence of the environment variables as defined in the ConfigMap and Secret resources:
env | grep -E "(AAP_MCP|LITELLM)"The output should display values that correspond to the environment variables defined in the ConfigMap and Secret resources previously.
4.2.2: Configuring OpenCode
With the necessary environment variables now mounted into your Dev Spaces workspace, the next step is to introduce the external AI tool that will interact with Ansible Automation Platform via the Ansible MCP Server. For this section, we will utilize OpenCode, an open-source AI development platform that enables developers to build, deploy, and manage AI applications. OpenCode provides a unified interface for interacting with various AI models and services, making it easier to integrate AI capabilities into applications.
You may have noticed earlier that one of the environment variables defined in the ConfigMap resource was the OPENCODE_CONFIG property, which specifies the location of the OpenCode configuration file (Hint: you can run the command env | grep OPENCODE_CONFIG to see the value). This file does not exist yet as we will need to create it as part of this exercise. An OpenCode configuration file contains details related to the inference service as well as any MCP servers that should be utilized.
Create a new file named opencode.json at the within the /projects/devspaces-example directory containing the following:
{
    "$schema": "https://opencode.ai/config.json",
    "autoupdate": false,
    "enabled_providers": [
        "LiteLLM"
    ],
    "mcp": {
        "aap": {
            "type": "remote",
            "enabled": true,
            "oauth": false,
            "url": "{env:AAP_MCP_URL}",
            "headers": {
                "Authorization": "Bearer {env:AAP_MCP_API_KEY}"
            }
        }
    },
    "provider": {
        "LiteLLM": {
            "npm": "@ai-sdk/openai-compatible",
            "name": "LiteLLM",
            "options": {
                "baseURL": "{env:LITELLM_URL}",
                "apiKey": "{env:LITELLM_API_KEY}",
            },
            "models": {
                "llama-scout-17b": {
                    "name": "{env:LITELLM_MODEL_NAME}",
                    "limit": {
                        "context": 120000,
                        "output": 120000
                    }
                }
            }
        }
    }
}
In this configuration file, we are specifying details related to our inference service along with the AAP MCP Server. Take note of the variables beginning with {env:…} which will replace the the values with the content injected from the Secret or ConfigMap defined previously.
4.2.3: Using OpenCode to Interact with the Ansible MCP Server
With all of the configuration steps complete, let’s utilize OpenCode to interact with the Ansible MCP Server.
To launch OpenCode, execute the following command:
opencodeLike many other AI coding tools, OpenCode is a Text User Interface (TUI) based tool which allows you to interact directly with the tool. By launching OpenCode, you will be placed at a prompt for which you can enter commands or execute queries:

As you can see, OpenCode is leveraging the LiteLLM inference service along with the {litellm_available_models_list} Model that was defined in the ConfigMap.
Use the /status command to view the status of the tool including any integration with external components, such as the AAP MCP server.
/statusIf your MCP server is running and the API token that was stored in the Secret is being loaded properly, the status being displayed should look similar to the following:

The aap MCP server displays Connected indicating that it is able to integrate with Ansible Automation Platform as needed. If the status being displayed indicates an error, investigate any message/error code that may be present. In addition, you can view the logs from the AAP MCP Sever pod that is running in the aap Project. The pod will have a name of <instance_name>-mcp-xxxx which may provide additional insights related to the failed integration.
Hit the ESC key to exit the status dialog to return to the main prompt.
Now, lets start a chat session using our natural language that retrieves details that originate from Ansible Automation Platform that is facilitated through the integration with the AAP MCP Server.
Let’s ask for information related to the Projects that have been defined:
Display the names of aap projectsIn a few moments, you will see OpenCode making queries to the Tools exposed by the AAP MCP Server and then providing a natural language response based on the information retrieved.
A successful invocation of the project_list MCP tool will display similar to the following:

Either the list of AAP project that are returned as a result of the projects_list tool invocation will be displayed or you can continue the conversation by asking additional questions to display more information related to the desired query.
If an error or returned or no data is displayed, you can review the troubleshooting section below for additional guidance.
| Due to the non-deterministic nature of LLM’s, the exact response provided by OpenCode may vary between invocations and may not match exactly what is shown in the screenshot or steps above. |
4.2.3: Troubleshooting OpenCode MCP Integration
If you encounter issues when attempting to interact with the Ansible MCP Server via OpenCode, consider the following troubleshooting steps:
-
Response similar to
Your current request is incomplete. Please provide more details or specify the task you need help with-
This response typically indicates that the LLM model was unable to interpret the request or map it to an available MCP tool. Feel free to retry the request again.
Hitting the up arrow key will place the last request into the chat window for easy access for subsequent invocations.
-
-
No response is provided
-
Retry the request again
-
-
Abort the current request
-
If the request appears to be taking too long to process, or you wish to abort the current request, hit the
ESCkey to interrupt the current operation.
-
-
Clear the existing context/start a new chat session
-
Enter
/newinto the chat prompt to start a new session
-
Conclusion
In this lab, you have learned:
-
An overview of the Model Context Protocol (MCP) and its role in the AI ecosystem
-
MCP capabilities provided by Ansible Automation Platform
-
How to deploy the AAP MCP Server
-
How to configure AI chat tools (LibreChat/OpenCode) to integrate with the APP MCP Server
-
Interact with the Ansible MCP Server using natural language prompts
The MCP capabilities provided by Ansible Automation Platform are not limited to the MCP Server that was used in this exercise. MCP capabilities are also available in Ansible Lightspeed intelligent assistant which enables realtime insights to be applied to the responses provided by the chatbot within the AAP user interface. Enabling this capability can be achieved by defining additional properties within the chatbot secret that is referenced in the AnsibleAutomationPlatform custom resource. Consult the Ansible Lightspeed intelligent assistant documentation for further details.