Connecting to a Database
In this section, you will deploy and connect a MongoDB database that the
nationalparks application will use to store location information.
Finally, you will mark the nationalparks application as a backend for the map
visualization tool, so that it can be dynamically discovered by the parksmap
component using the OpenShift discovery mechanism and map data will be displayed
automatically.
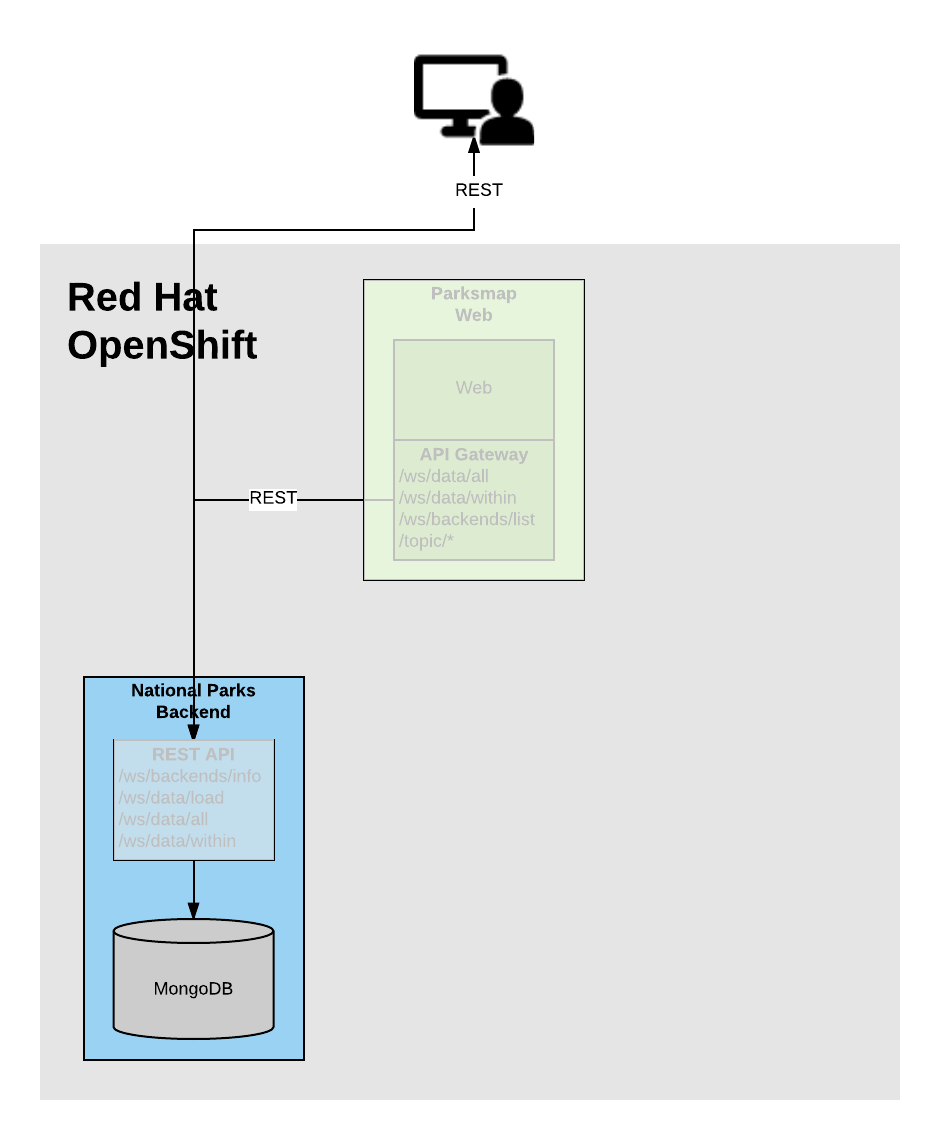
Background: Storage
Most useful applications are "stateful" or "dynamic" in some way, and this is
usually achieved with a database or other form of data storage. In this workshop section, you are
going to add MongoDB to your application architecture, and then configure the nationalparks Deployment to
connect to the database. The connection parameters are provided to the Deployment using environment variables using a Secret.
Exercise: Deploy MongoDB
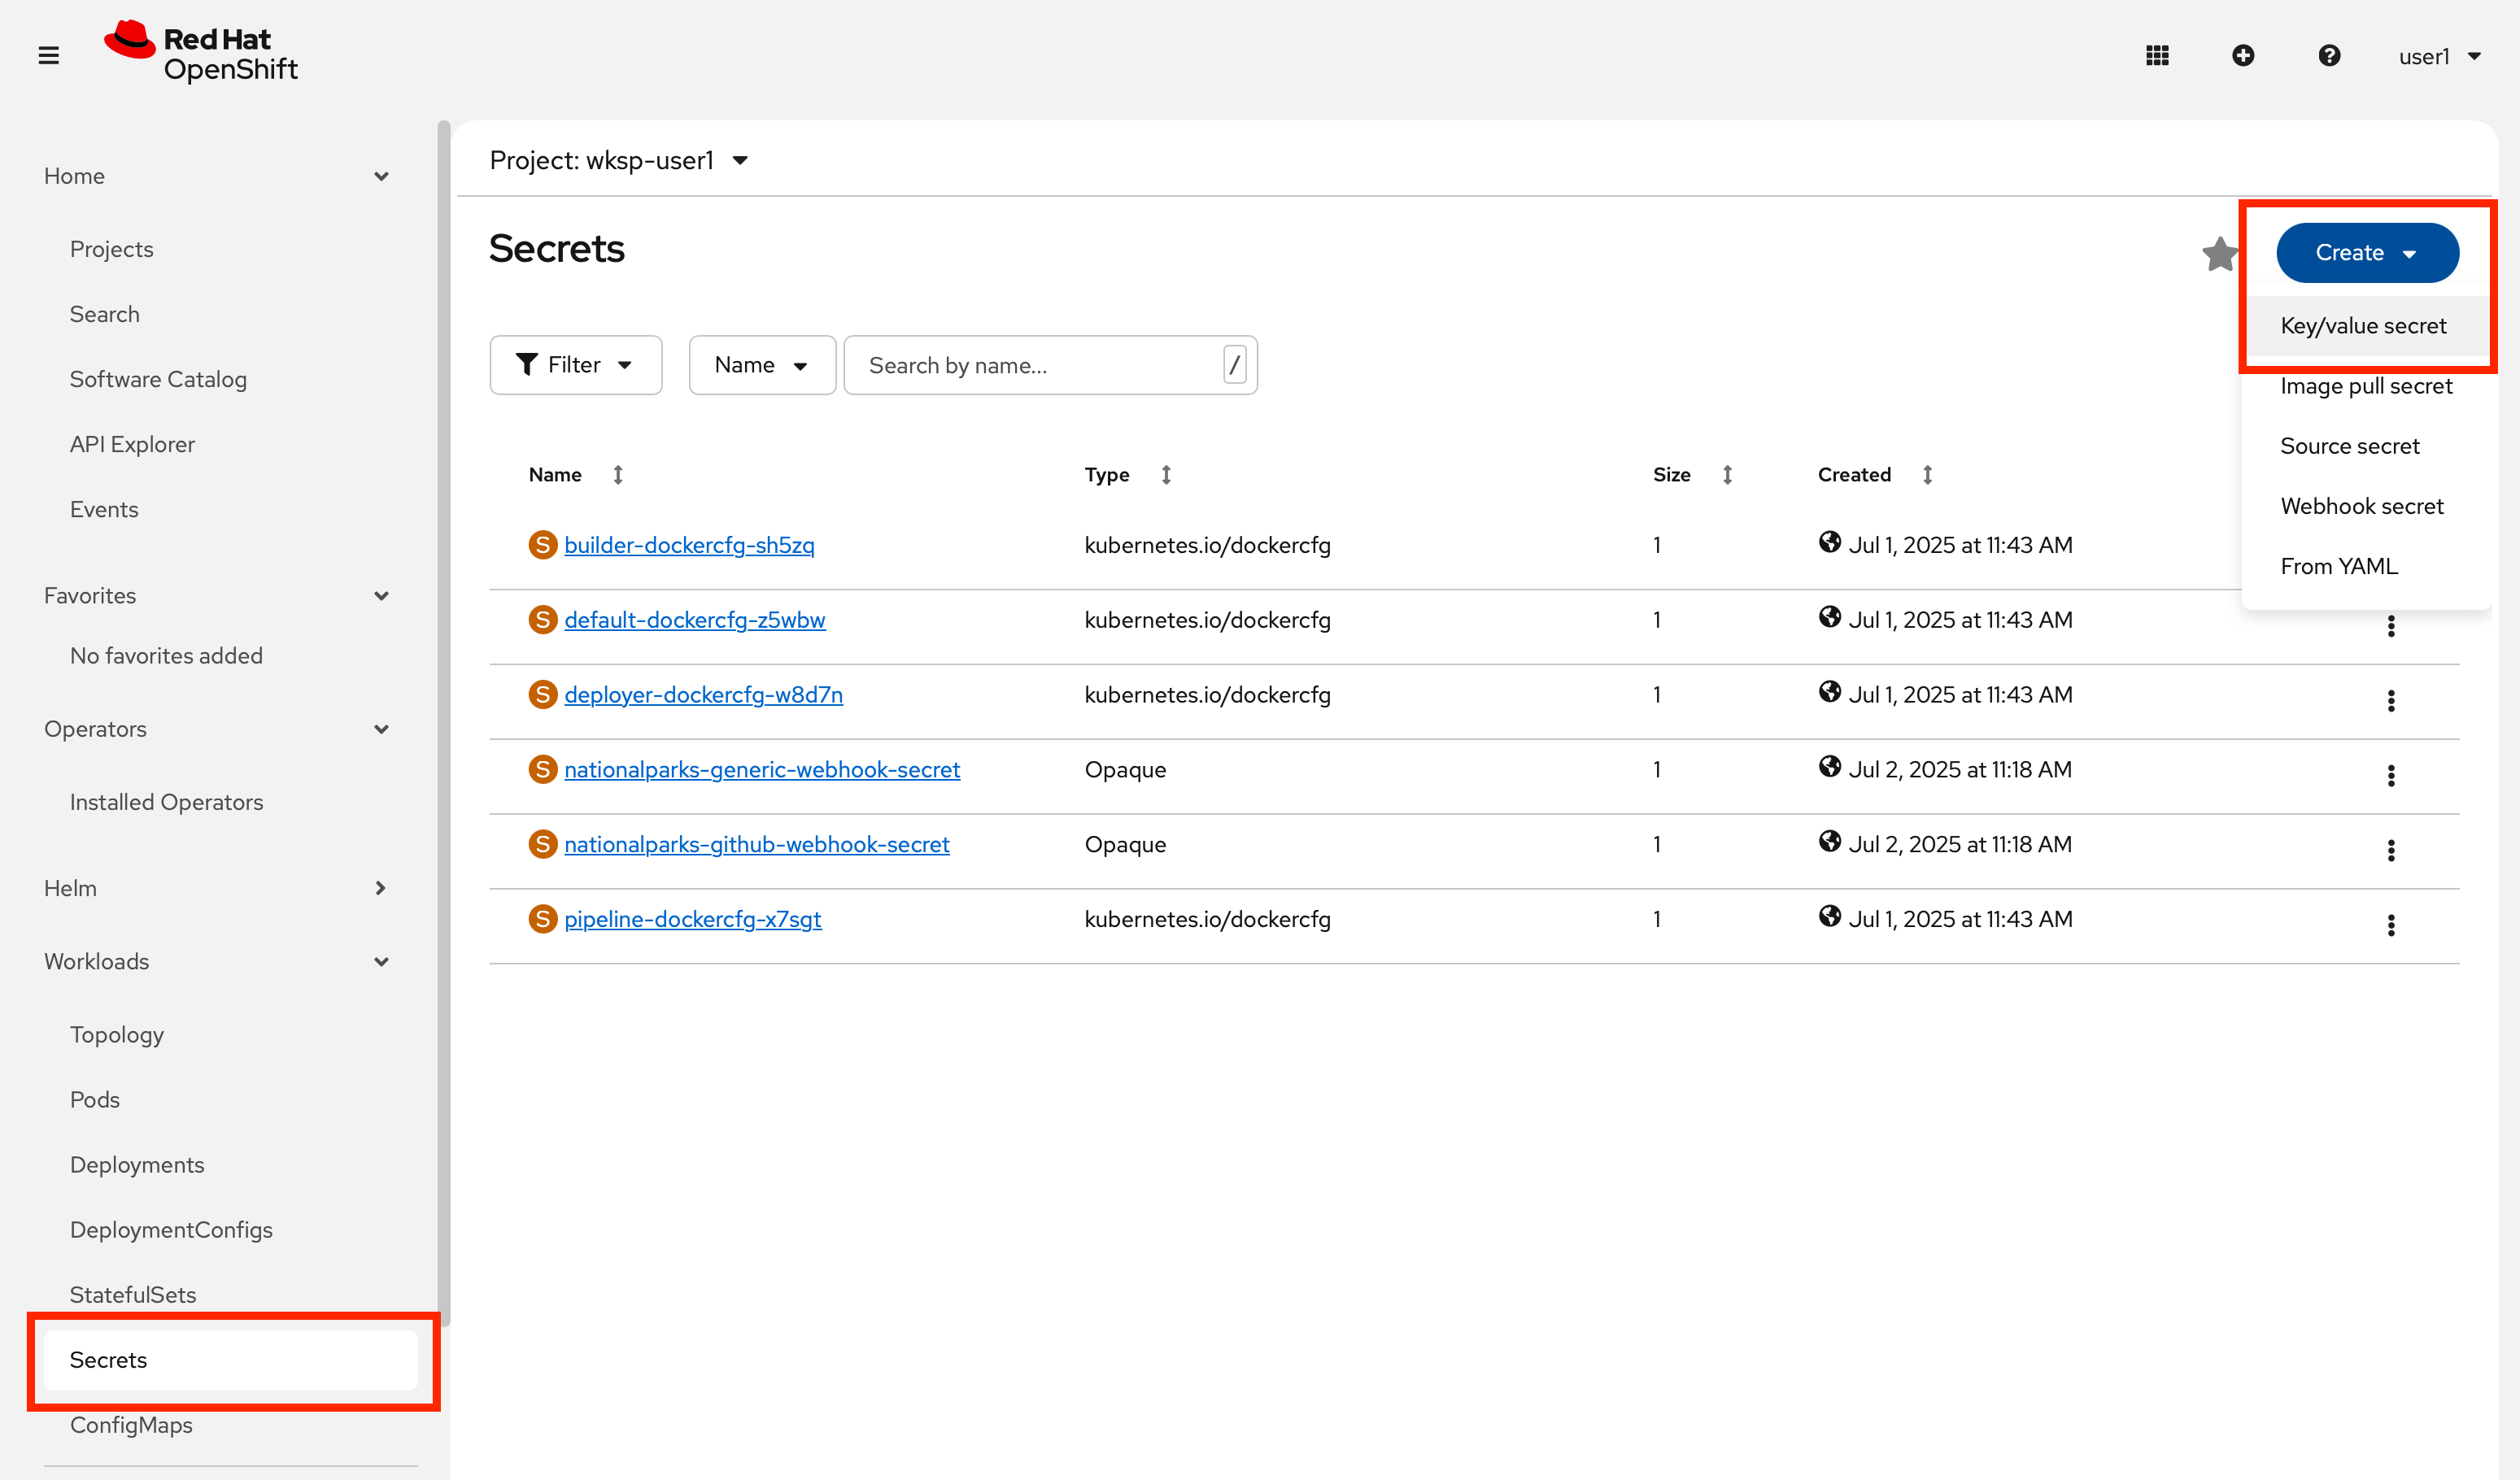
The first step is to create a Secret which is used to store senstive information such as database connection credentials. In Workloads → Secrets, click the Create button in the upper right and select From YAML.
In the editor, paste the following YAML:
apiVersion: v1
kind: Secret
metadata:
  name: mongodb-credentials
  namespace: wksp-userX
type: Opaque
stringData:
  admin-usr: admin
  admin-pwd: secret
  app-usr: parksapp
  app-pwd: keepsafe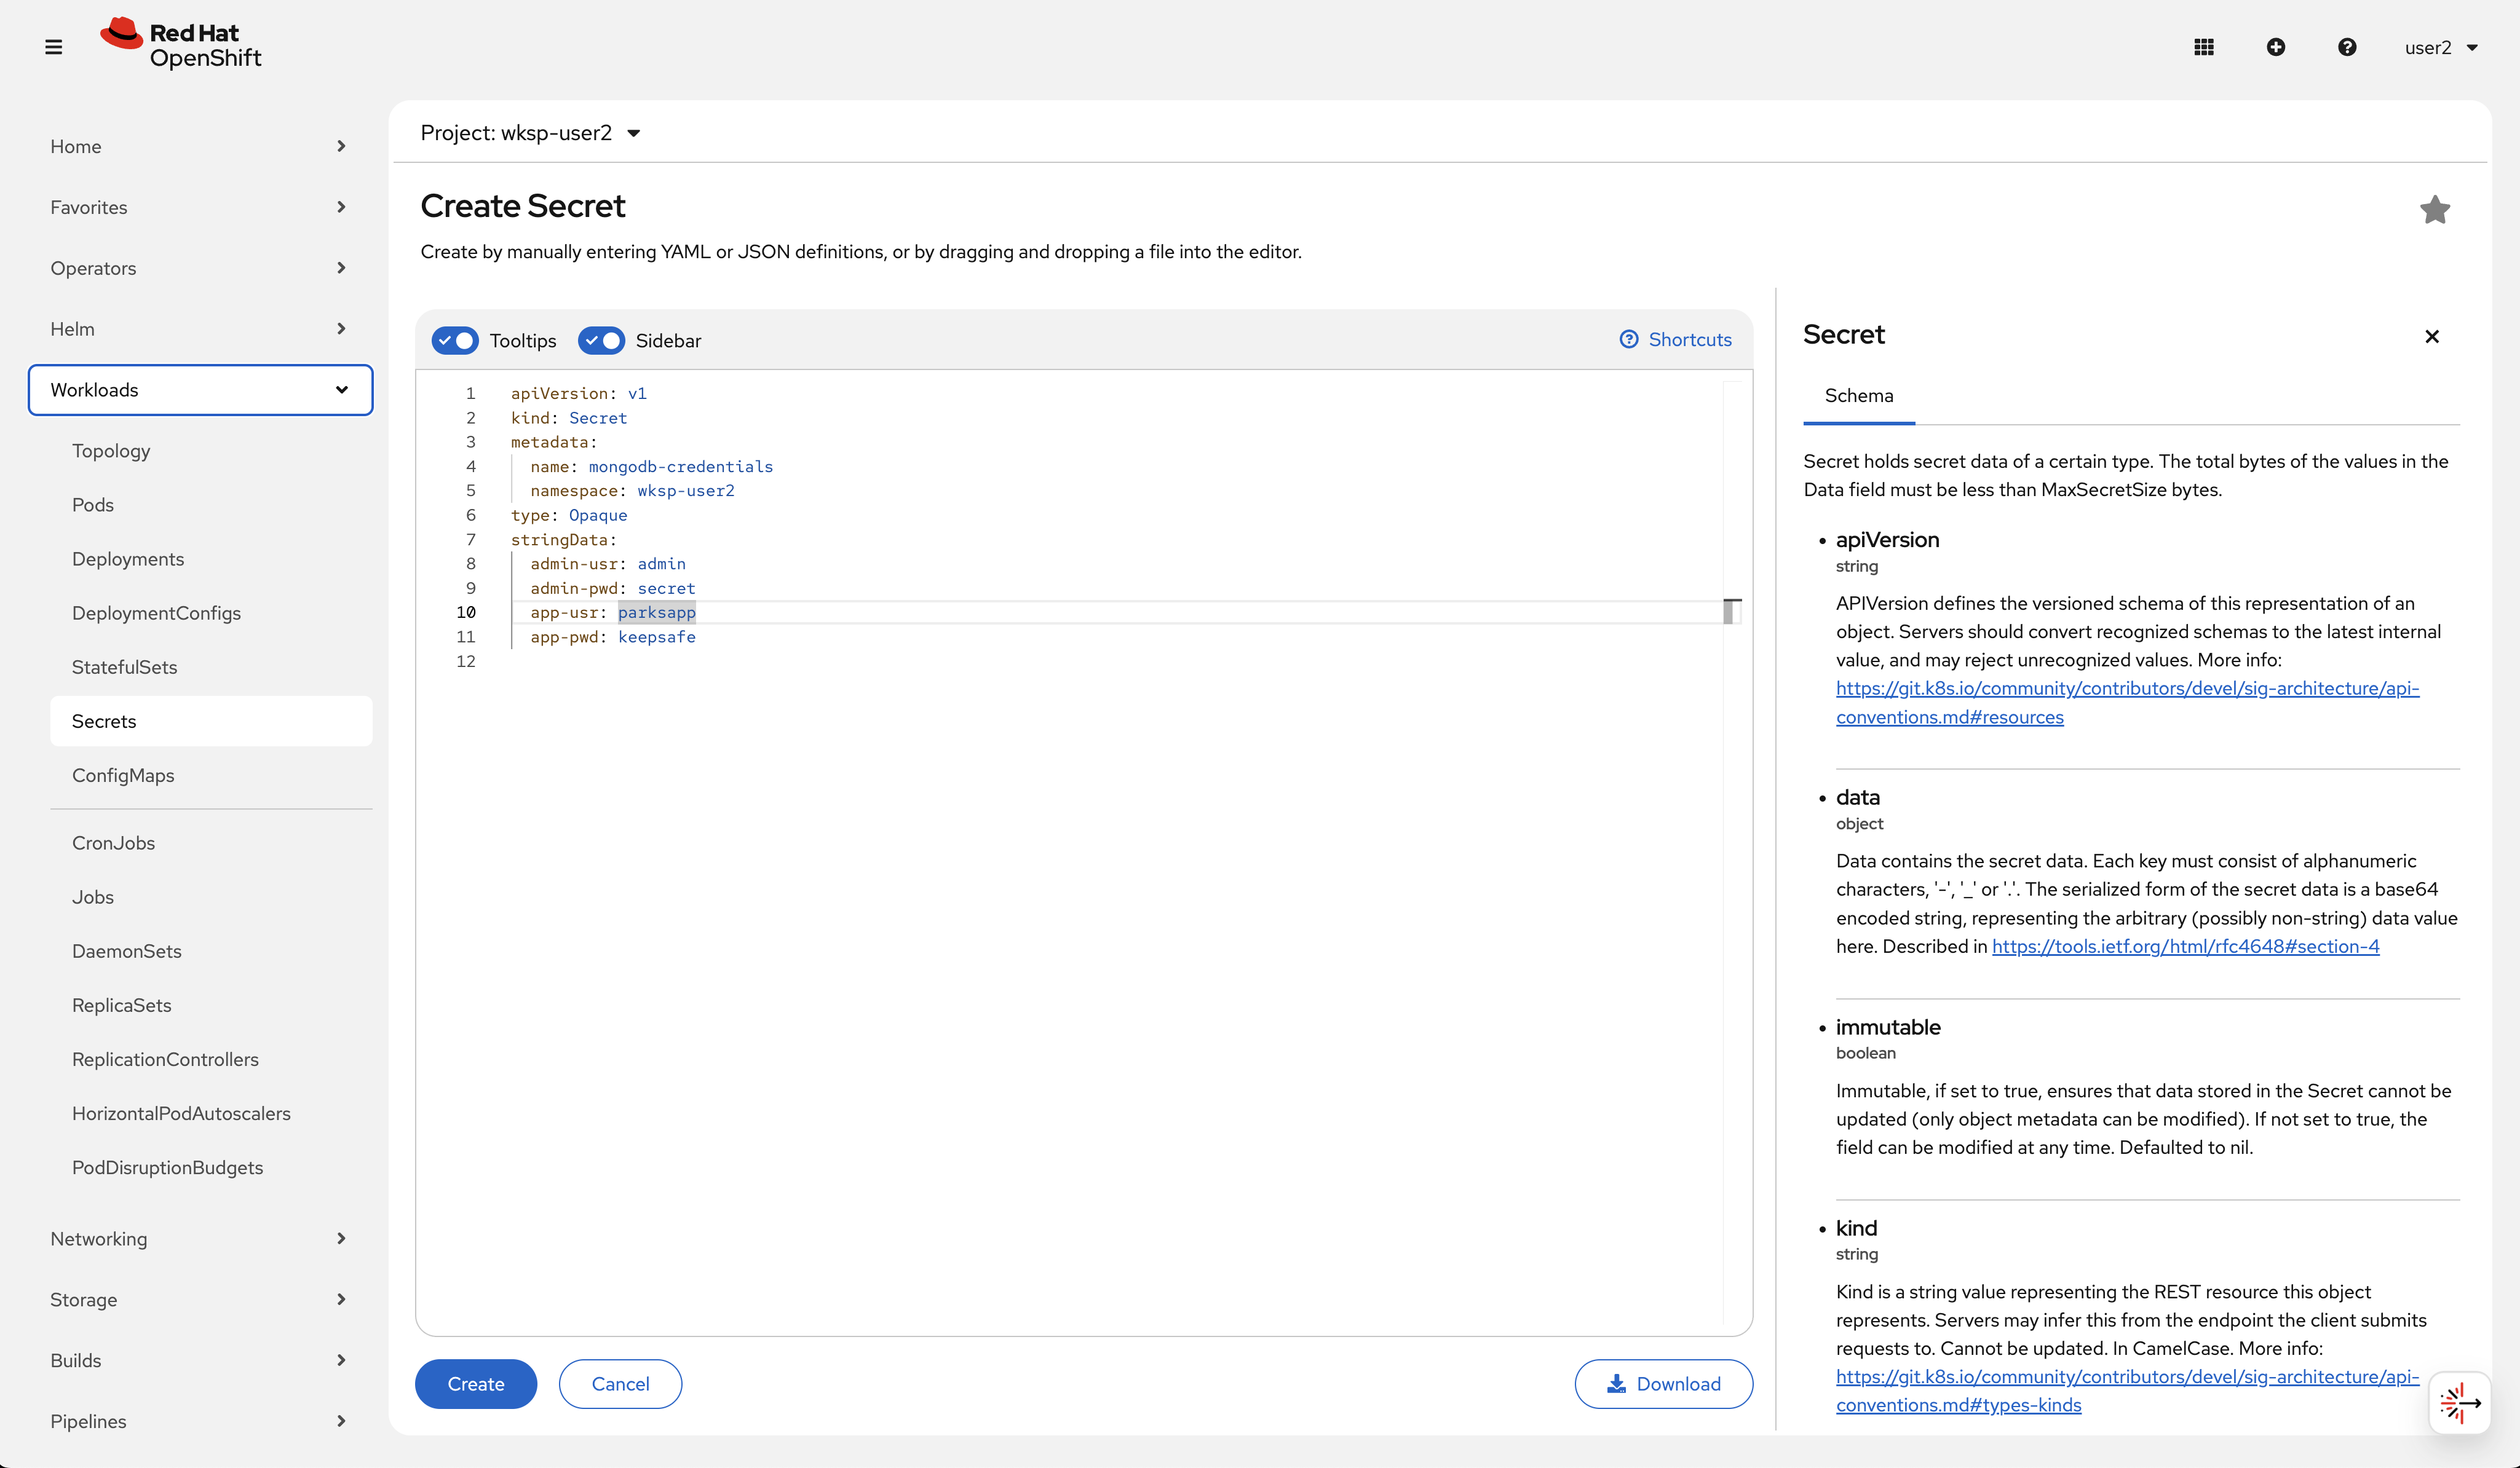
Click the Create button at the bottom of the form.
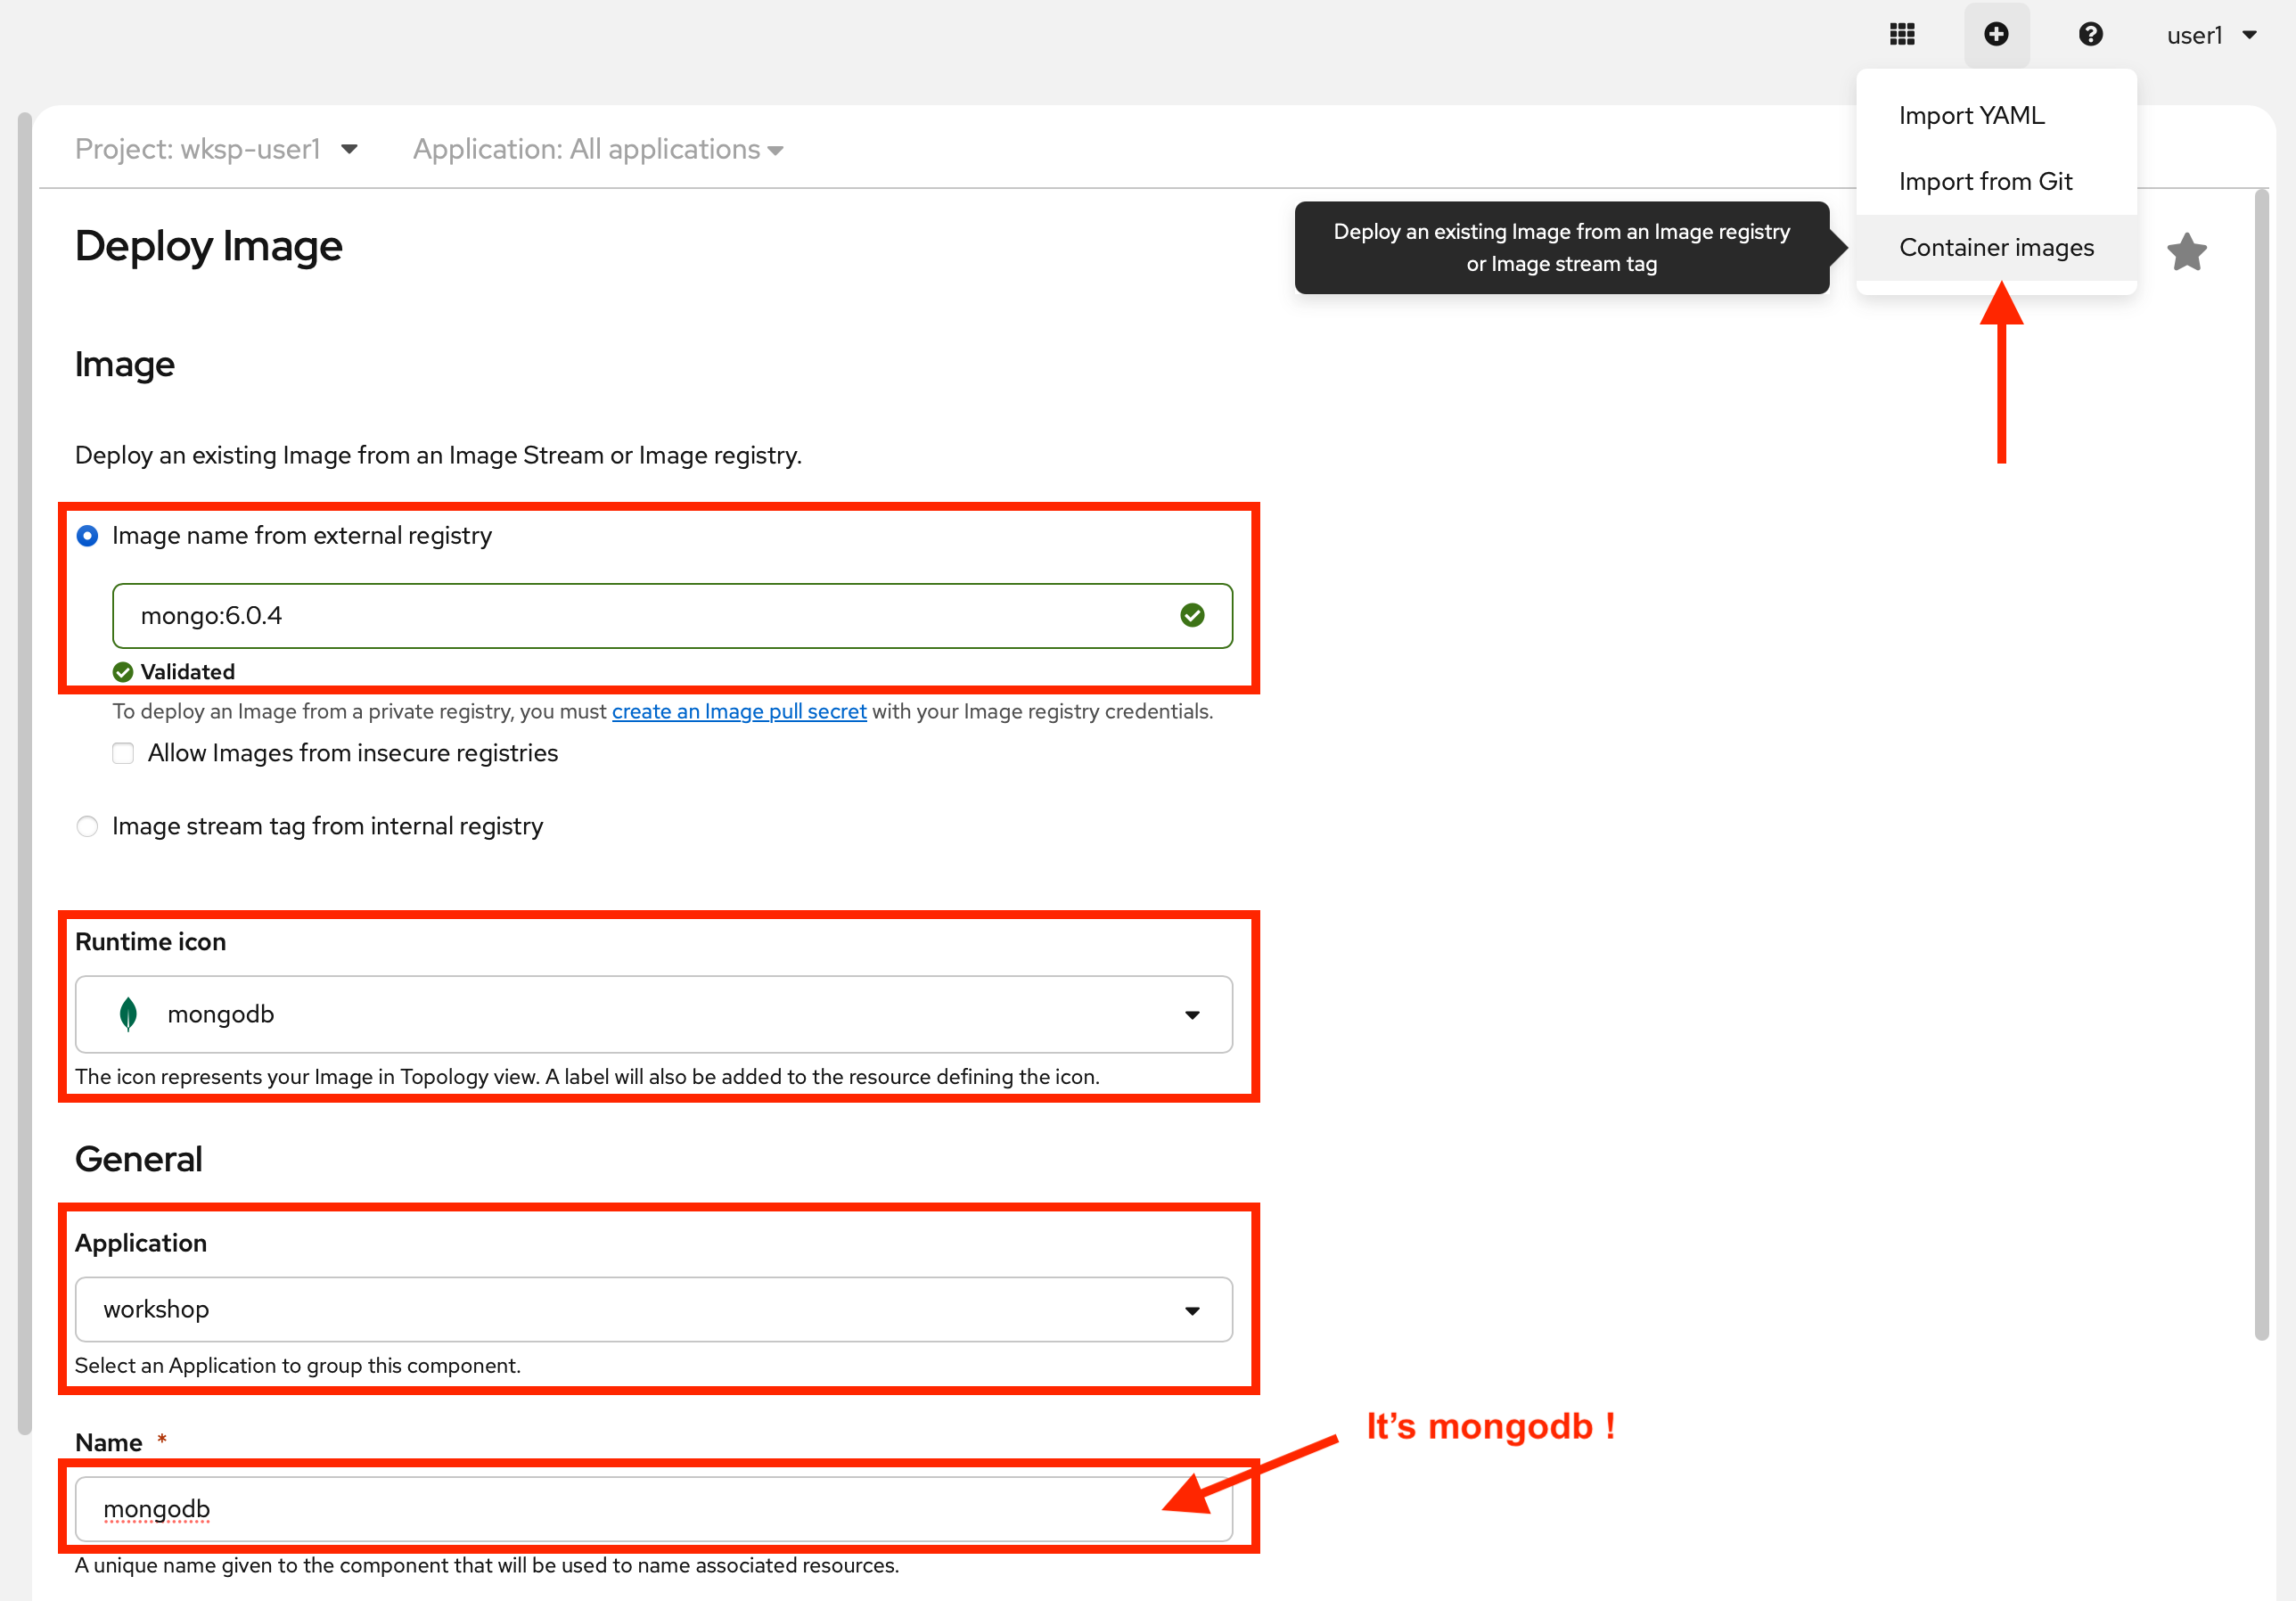
With the Secret in place, click the + icon in the upper right, as done previously for adding the other applications. Choose the Container images option. Fill in the following details:
-
Image section:
-
Image name from external registry →
mongo:6.0.4 -
Runtime icon → choose
mongodb
-
-
General section:
-
Application →
workshop -
Name →
mongodb
-
-
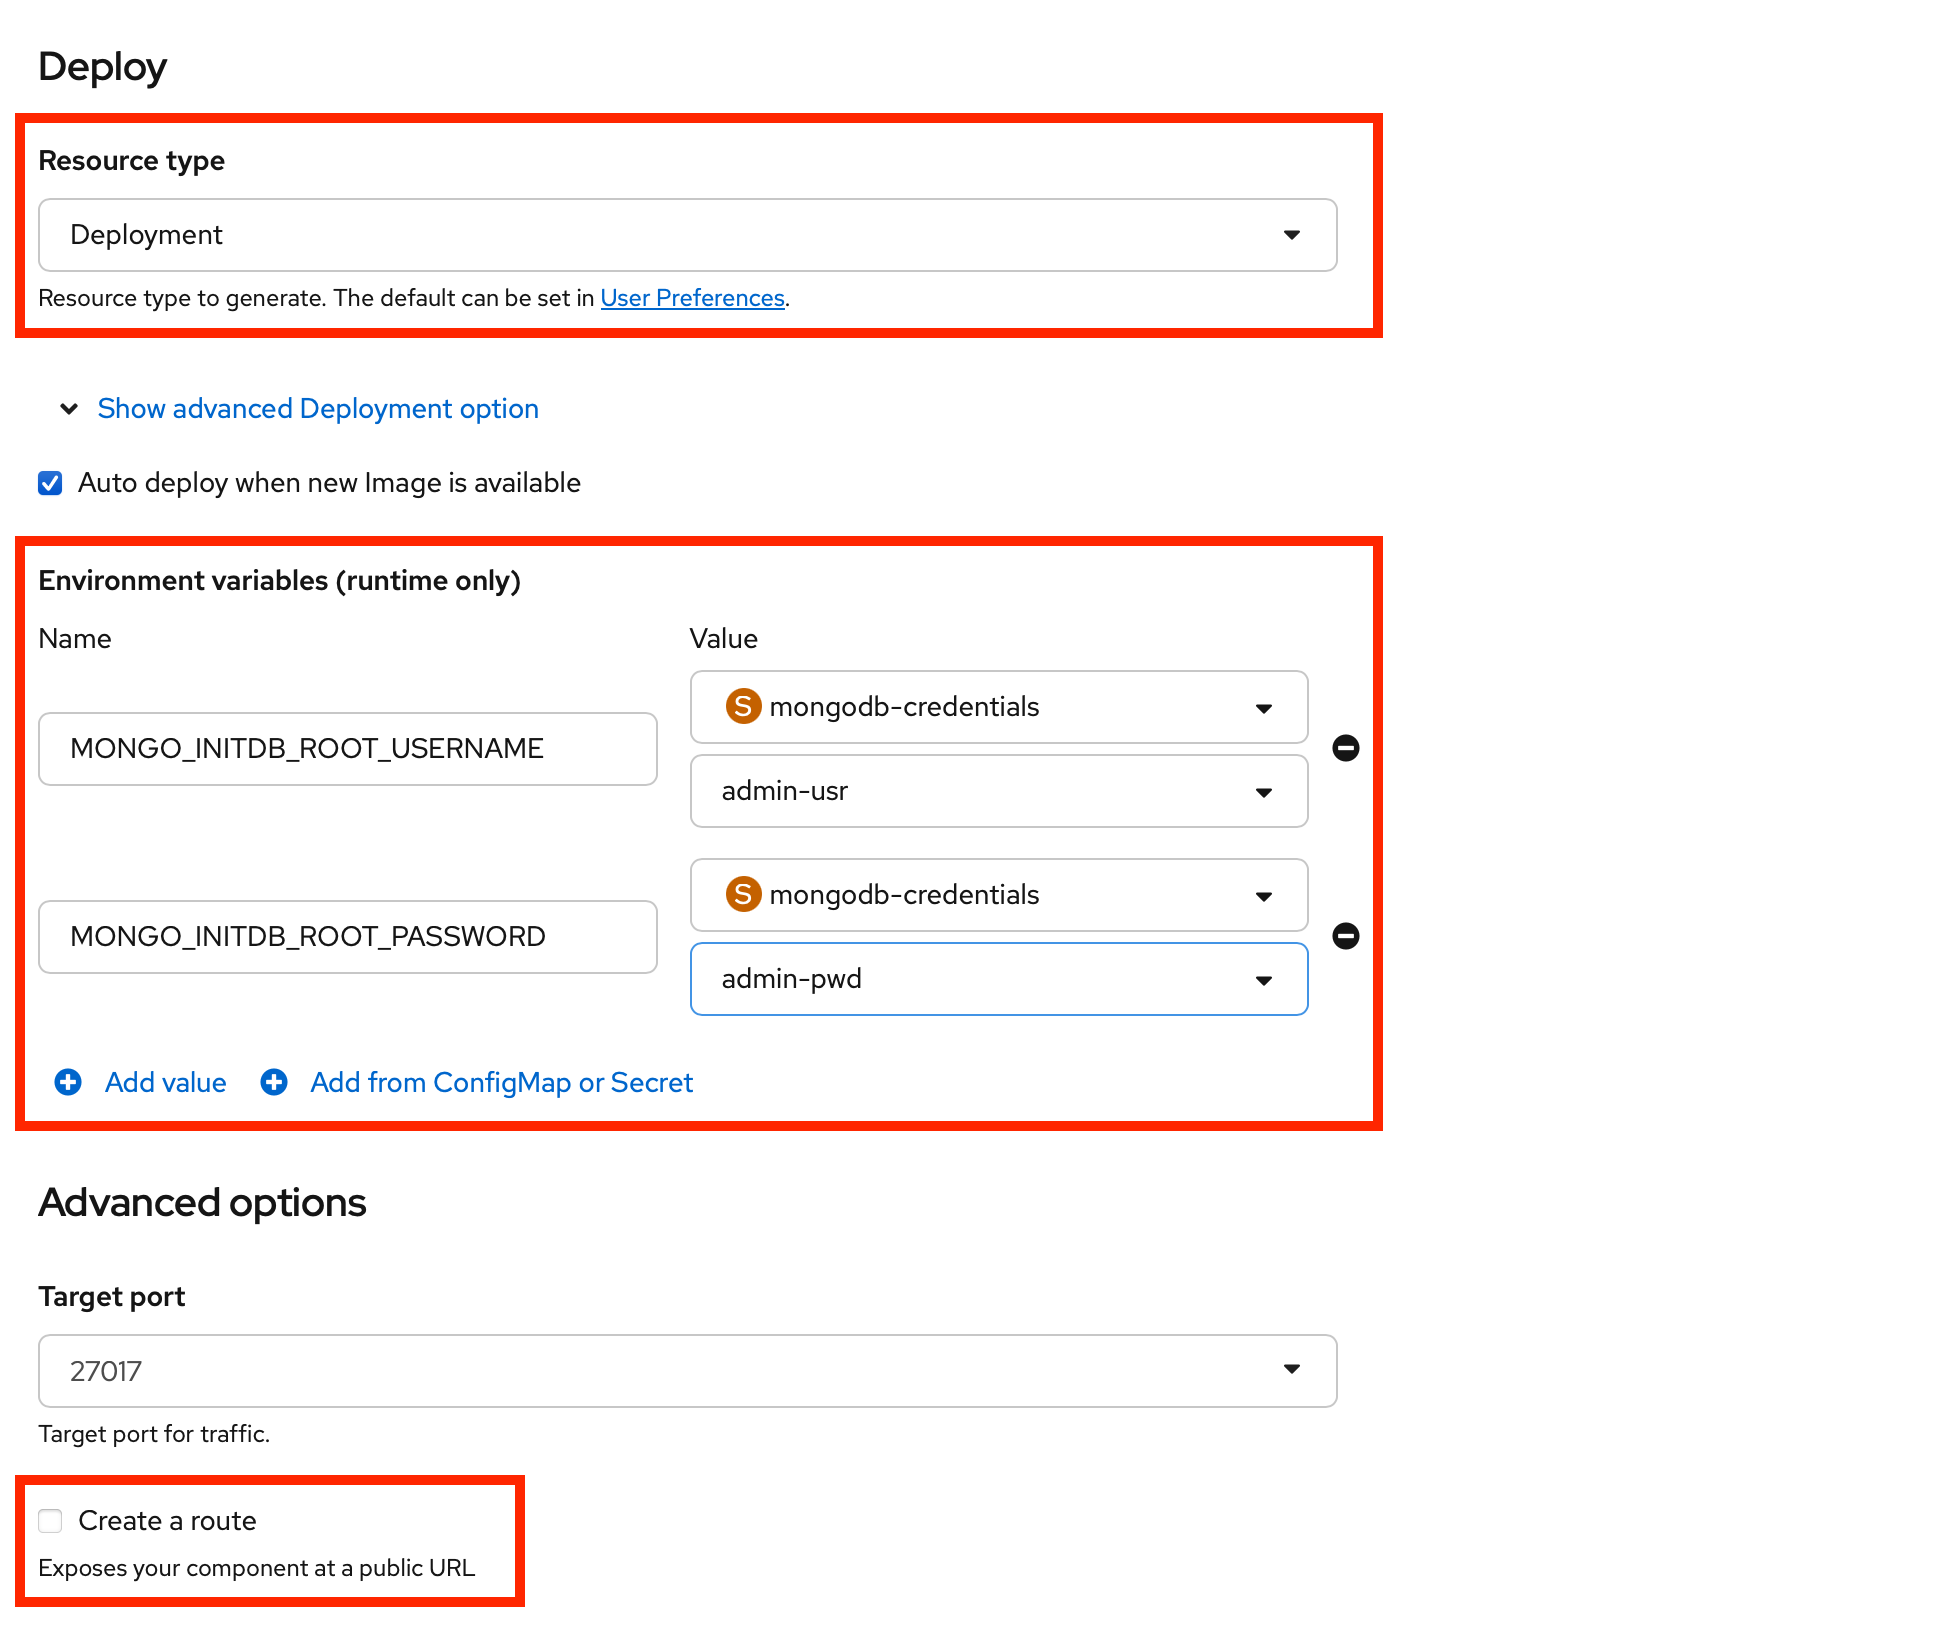
Make sure that the drop-down for resource type is set to the Deployment option.
-
Click Show advanced Deployment options.
-
Here, you’ll add the following two environment variables which will be sourced from the previously created secret named
mongodb-credentials. -
Click +Add from ConfigMap or Secret and enter
MONGO_INITDB_ROOT_USERNAMEas the name. For the value, choosemongodb-credentialsas resource andadmin-usras key. -
Again, click +Add from ConfigMap or Secret and enter
MONGO_INITDB_ROOT_PASSWORDas the name. For the value, choosemongodb-credentialsas resource andadmin-pwdas key.
-
-
Advanced options:
-
Create a route → uncheck because the database will not be accessed by clients outside the OpenShift cluster.
-
Finally, click the Create button at the bottom of the page to deploy a MongoDB container.
The next step is to create a specific user in this MongoDB instance which the nationalparks application will use to create a connection. For this, click the MongoDB Deployment in the Topology view, then click on the corresponding Pod shown in the right view pane.
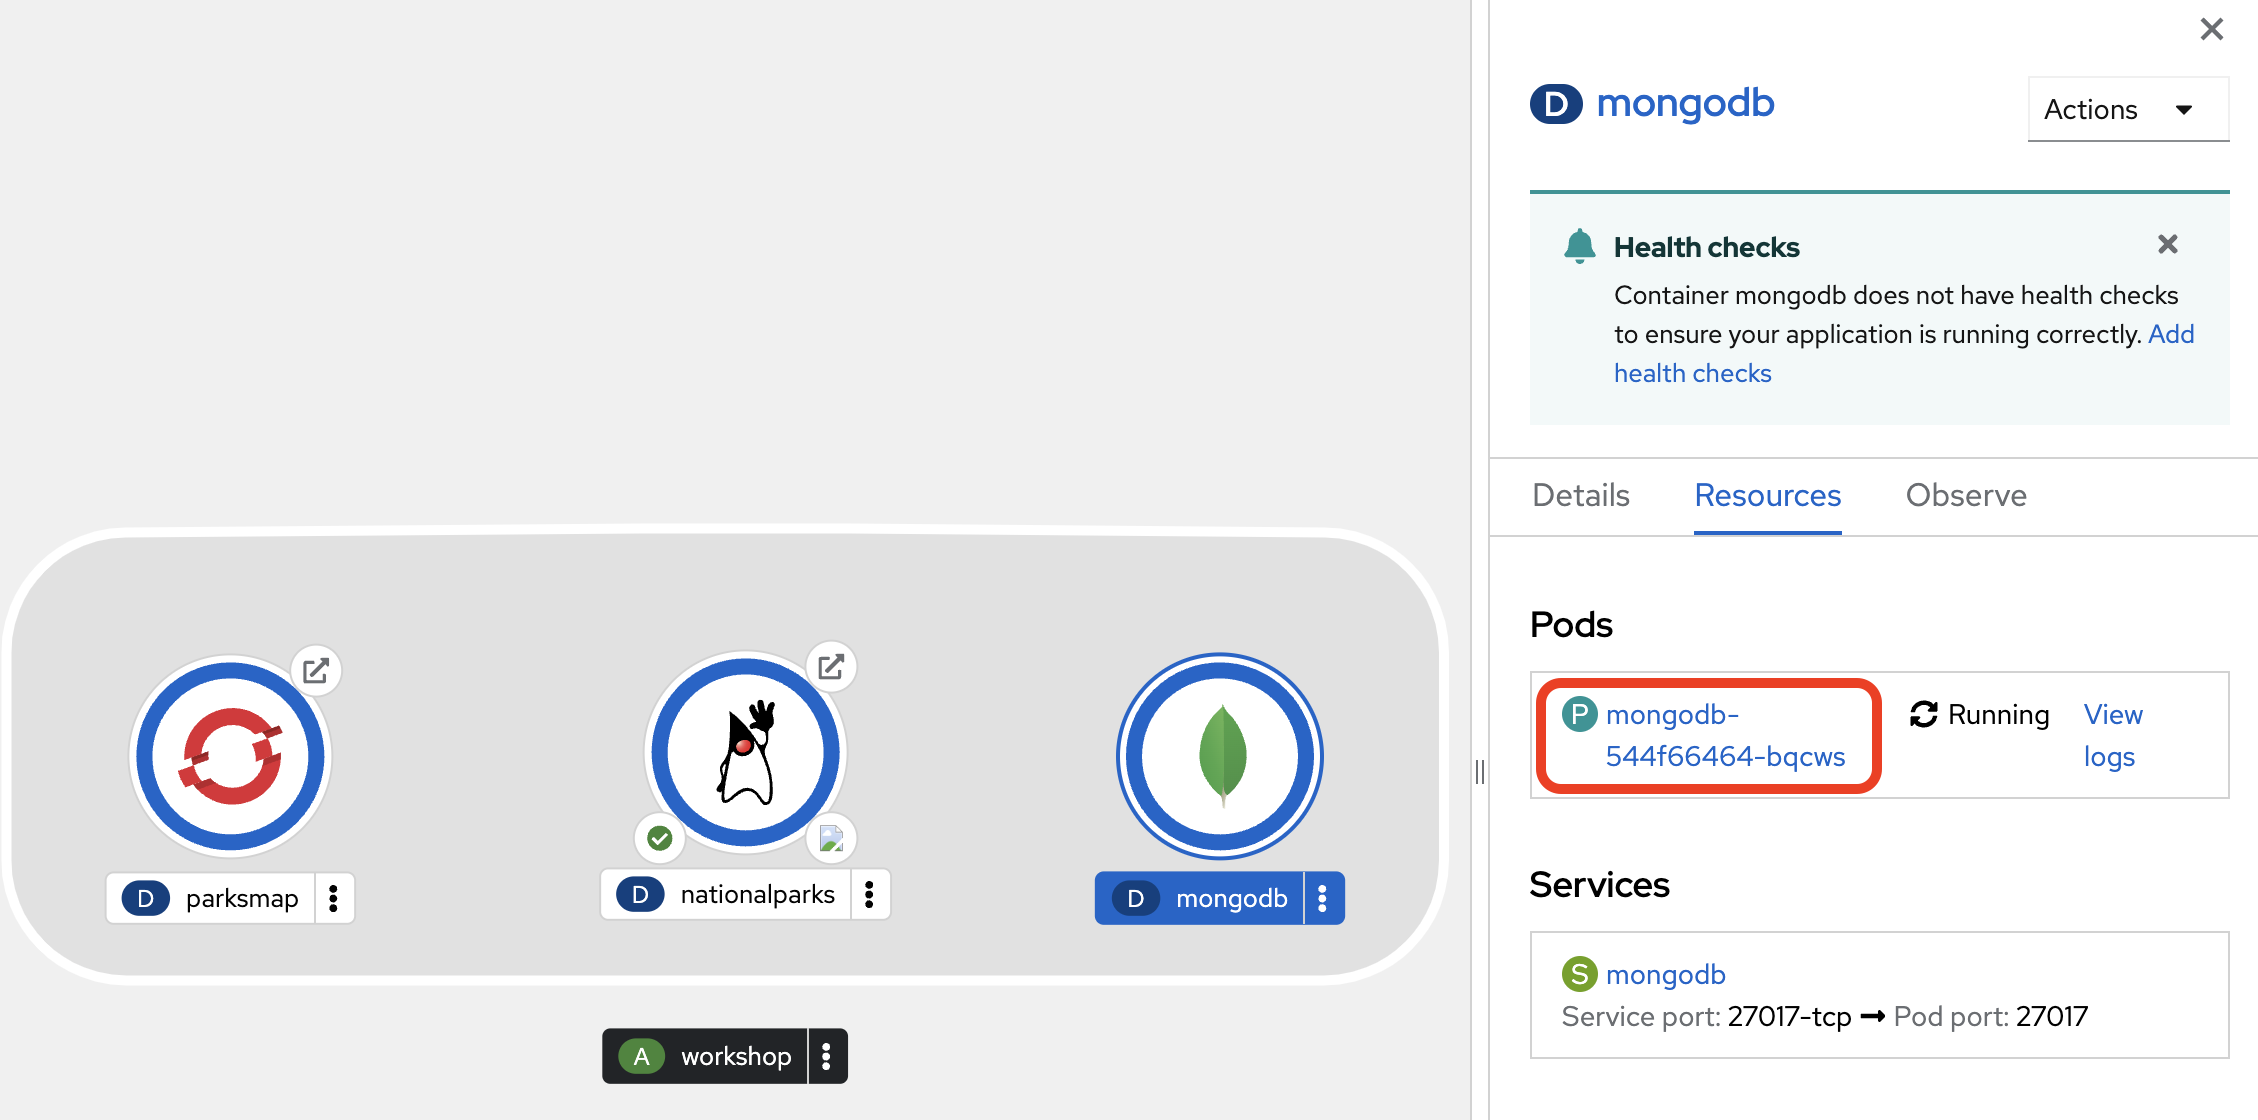
You will end up in the Pod details view where you can click Terminal to start a terminal session in the underlying container.
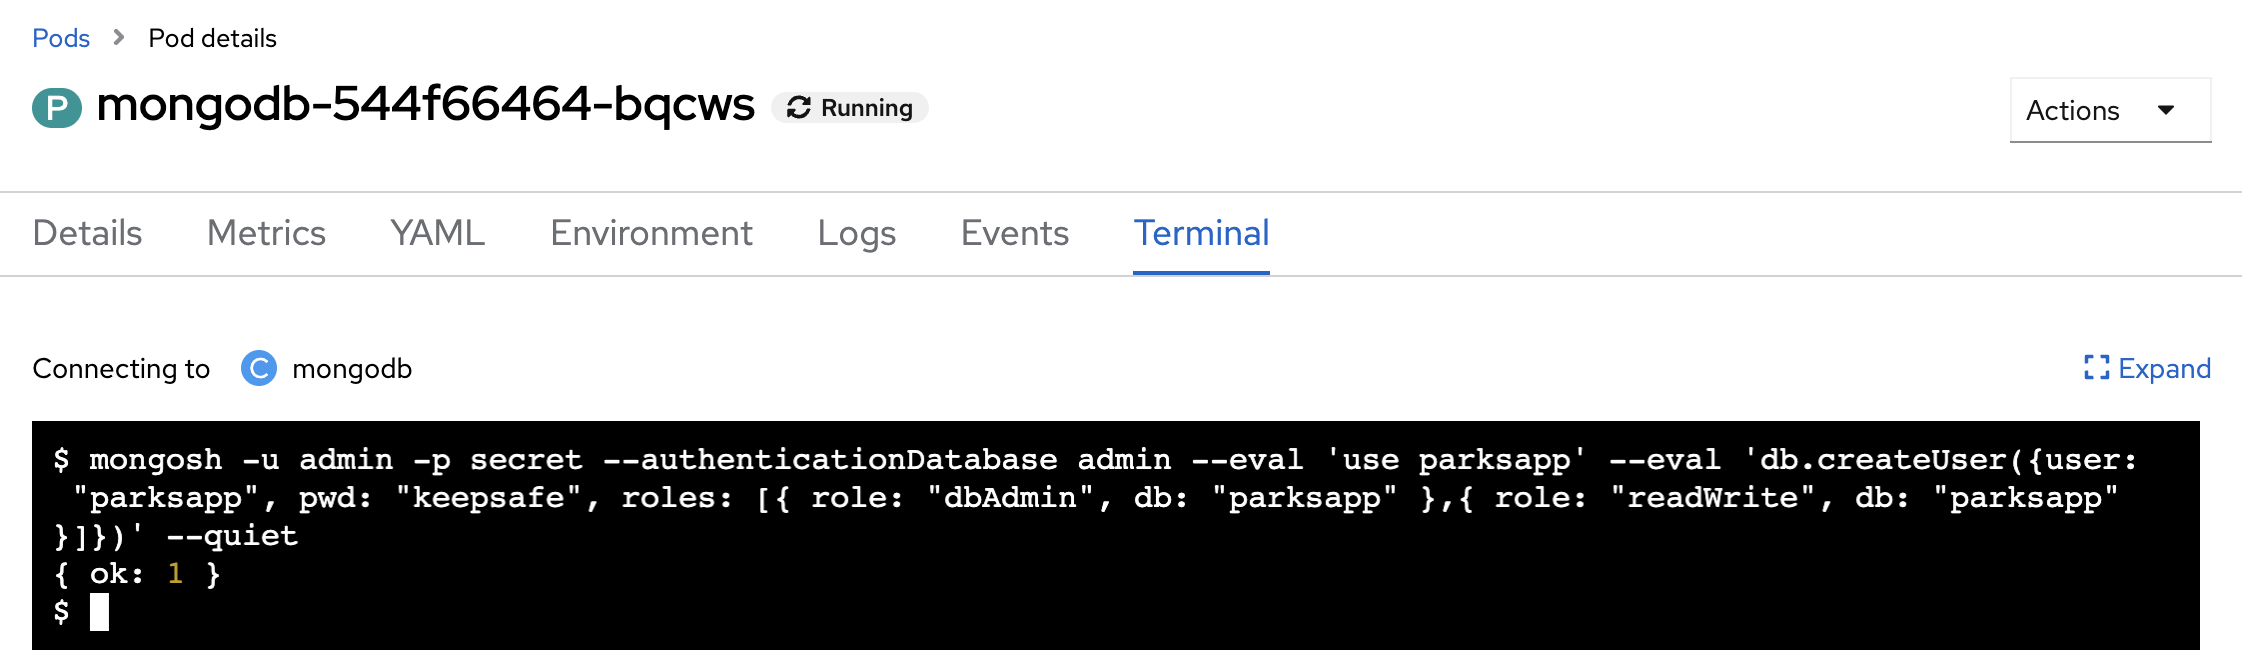
Copy and paste the following snippet into the terminal window to create a database user with the proper settings and roles:
mongosh -u admin -p secret --authenticationDatabase admin --eval 'use parksapp' --eval 'db.createUser({user: "parksapp", pwd: "keepsafe", roles: [{ role: "dbAdmin", db: "parksapp" },{ role: "readWrite", db: "parksapp" }]})' --quiet| In production environments you could modify the container entrypoint or use an init container to manage database configuration. |
If the command is successful, you’ll see the output below:
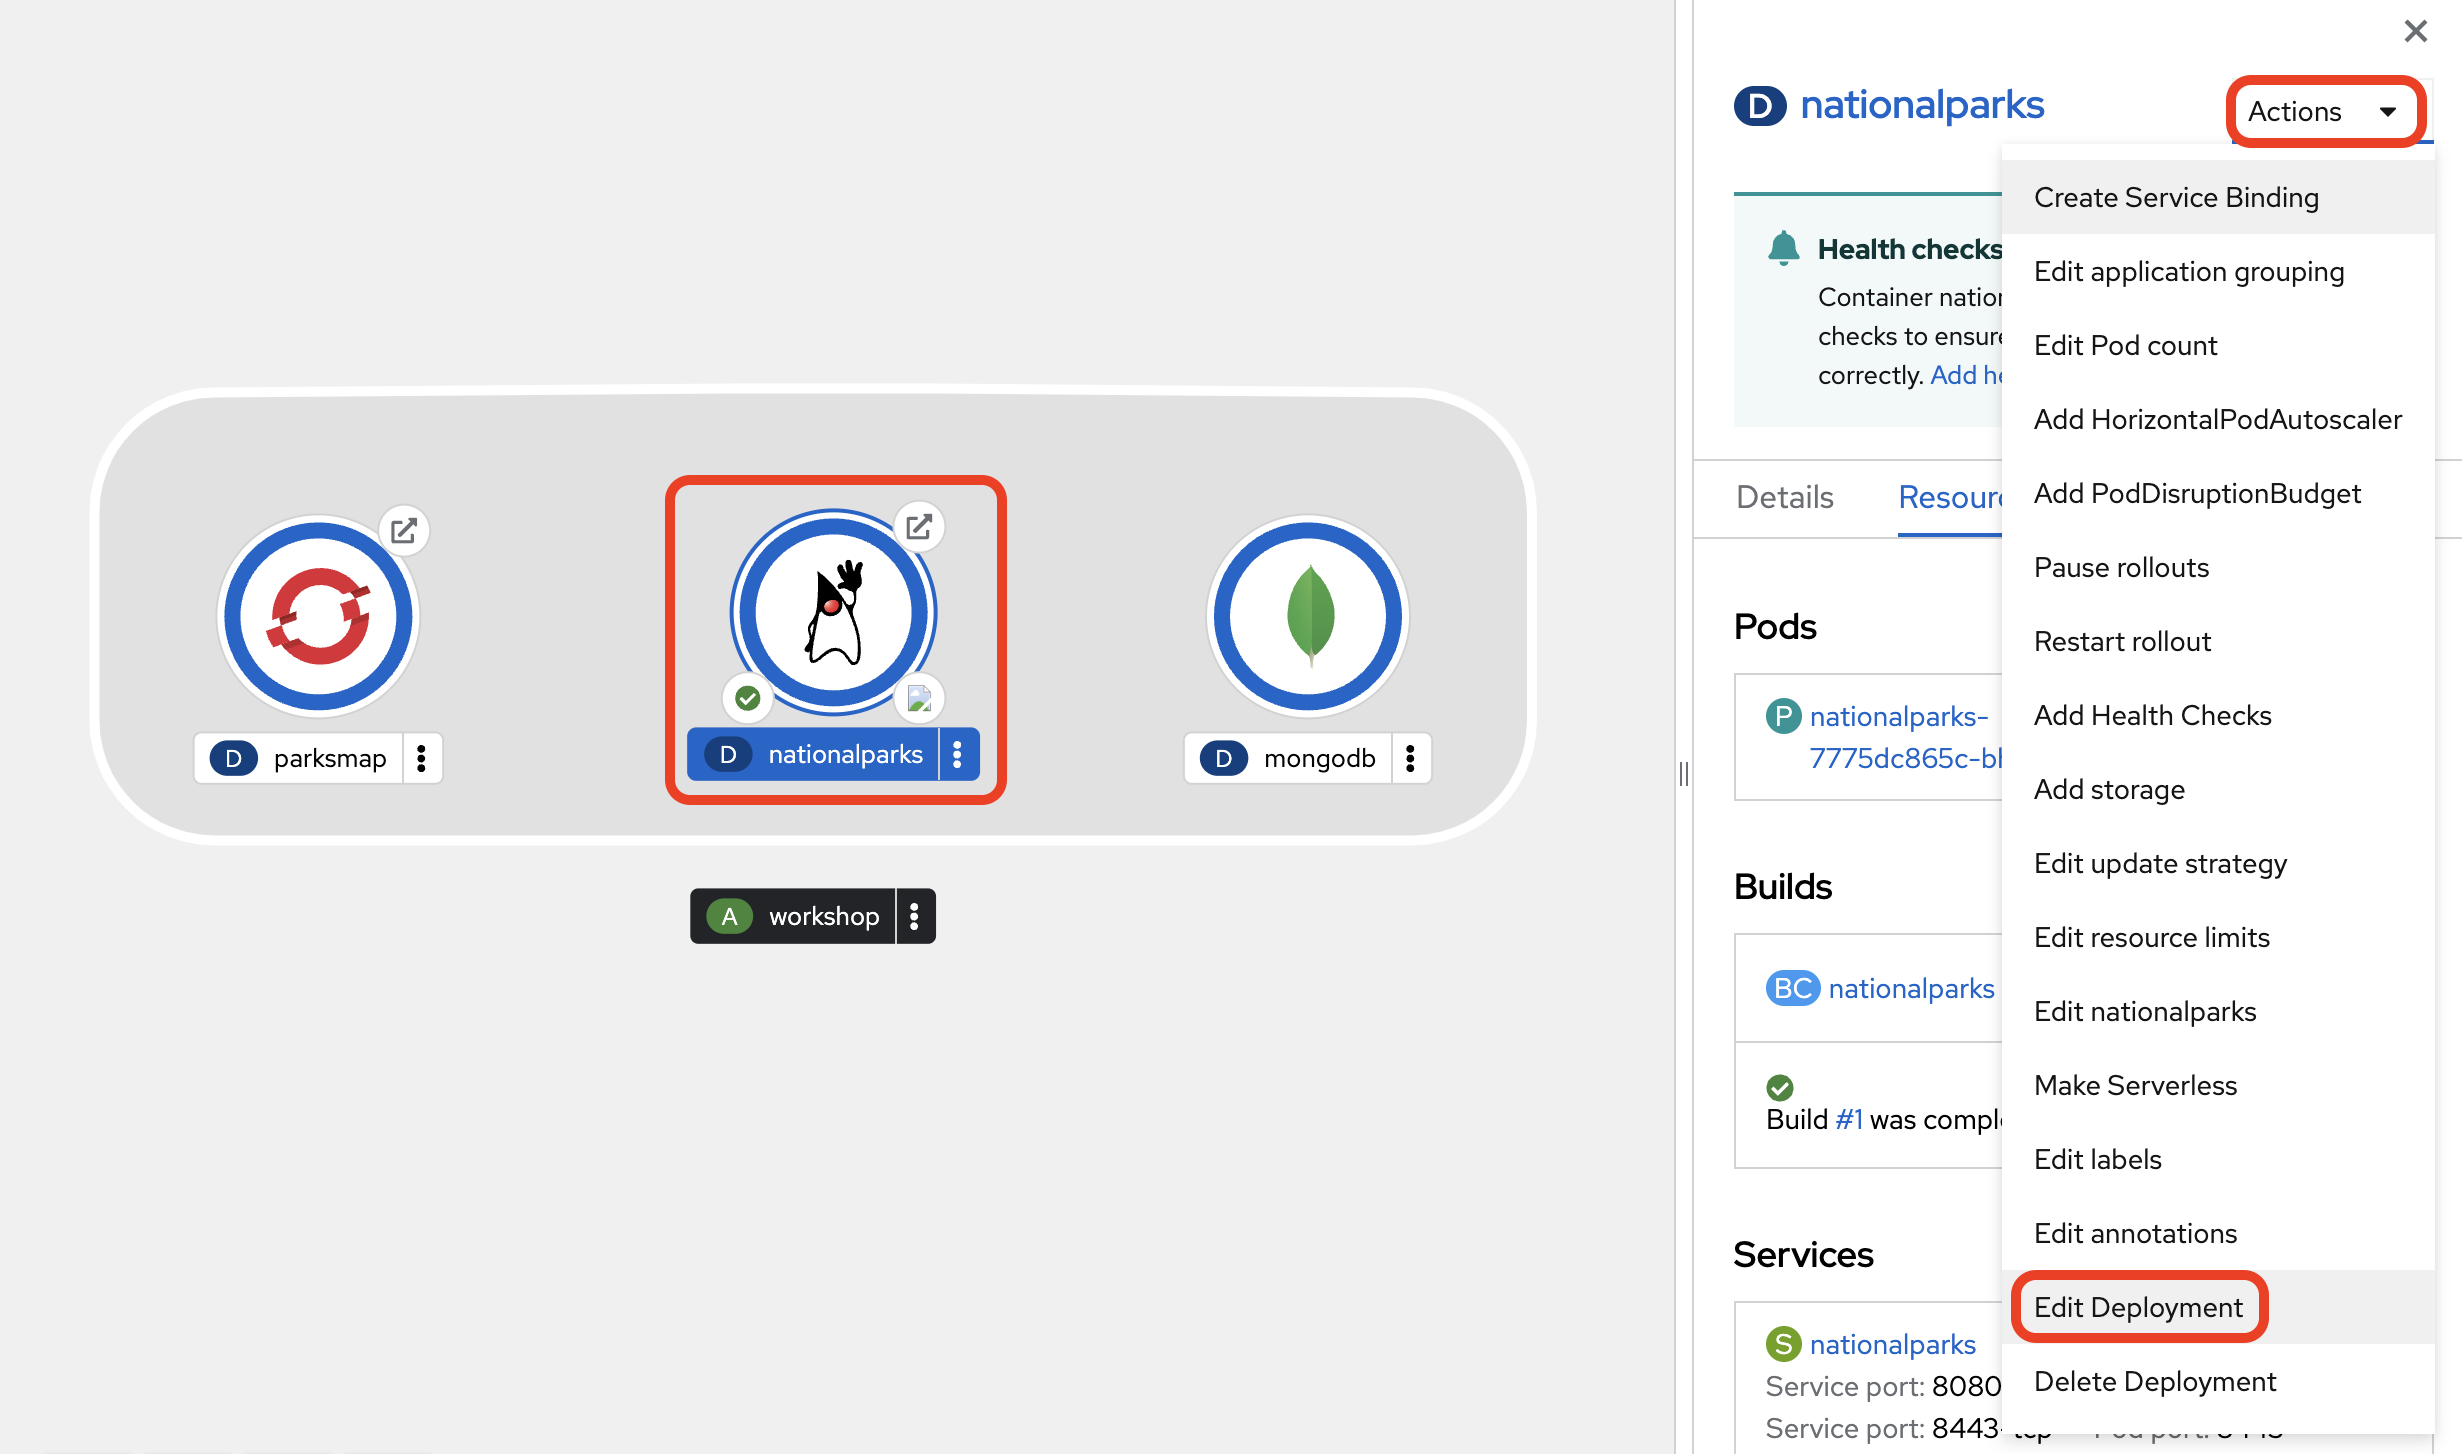
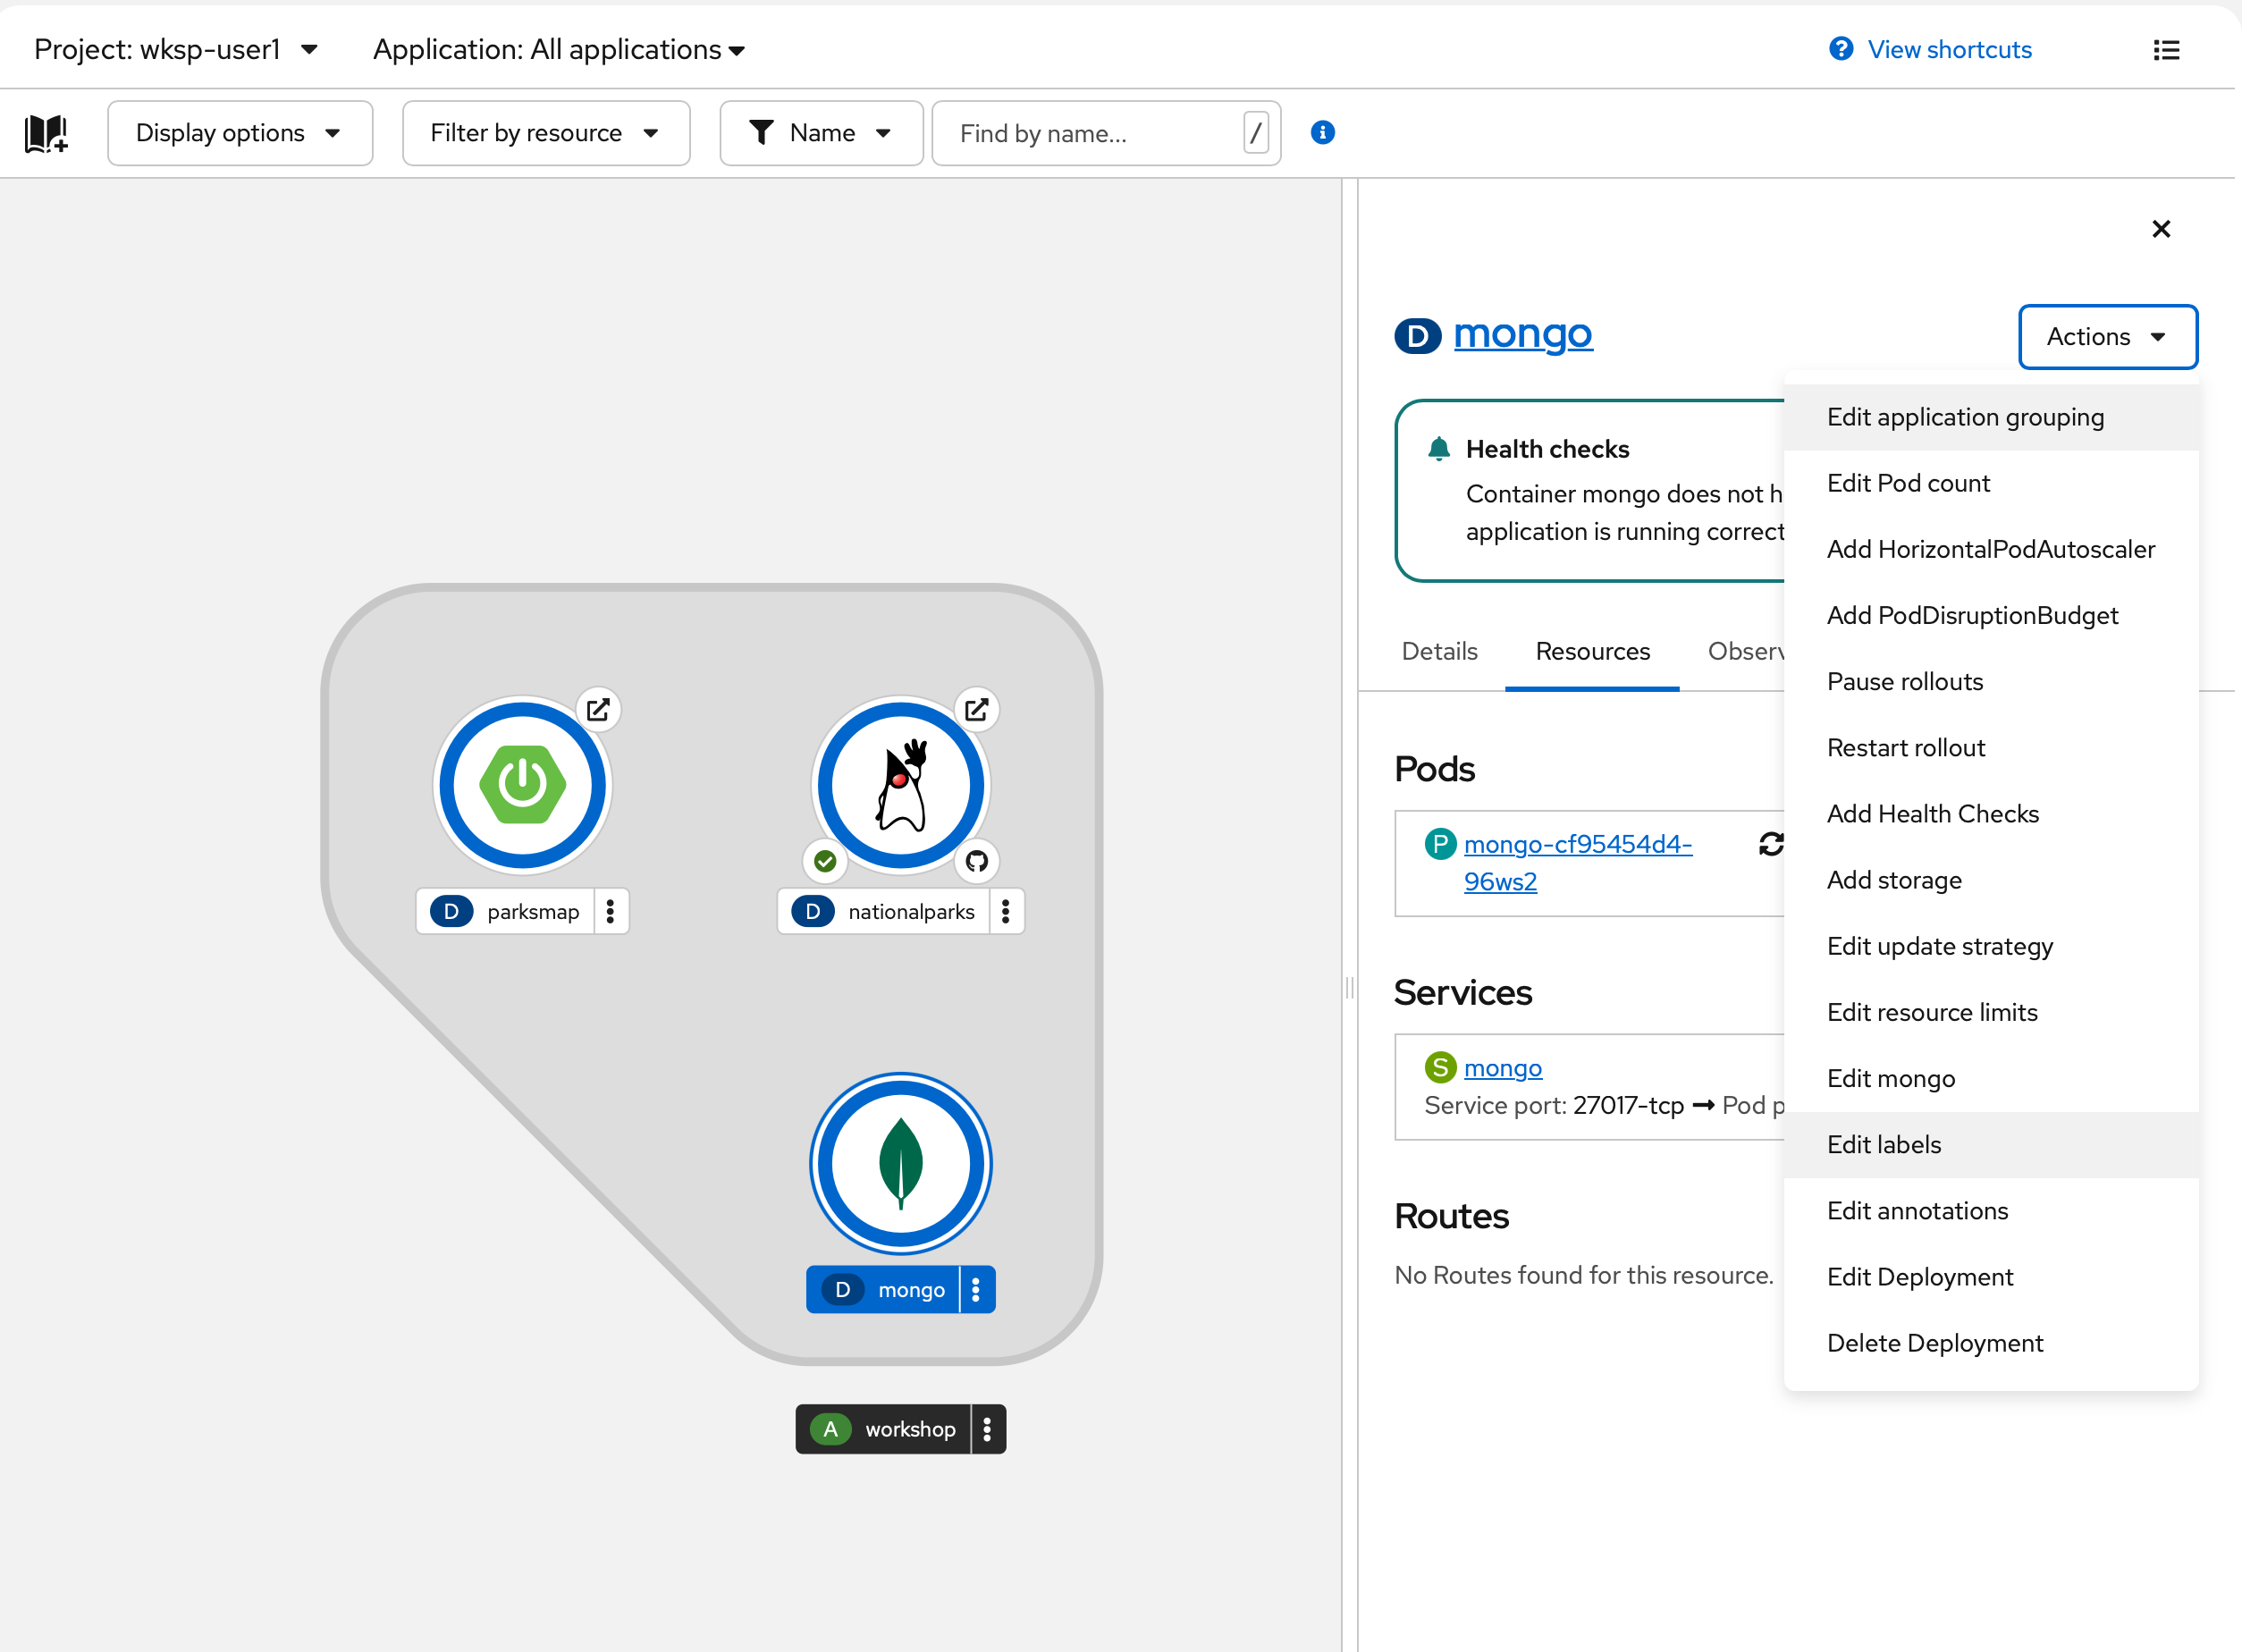
{ ok: 1 }With that, everything regarding the database is prepared and you can switch your focus back to the nationalparks application. Go back to the Topology view, click the nationalparks Deployment and choose Actions → Edit Deployment from the drop-down in the right view pane.
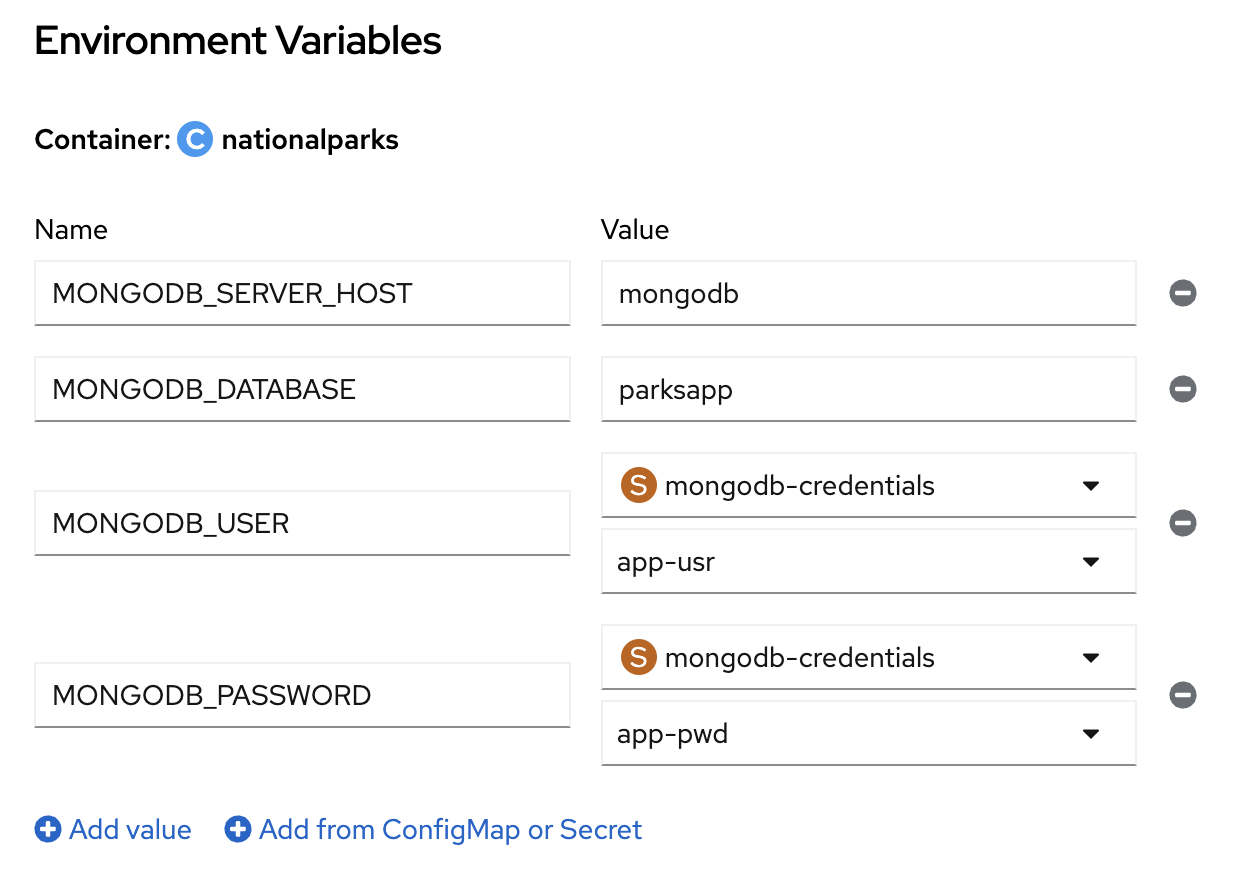
In the Edit Deployment dialog, scroll down to the Environment Variables section and add the following four entries. First, set the server host and the database:
-
MONGODB_SERVER_HOST:mongodb -
MONGODB_DATABASE:parksapp
The MONGODB_SERVER_HOST value of mongodb will be resolved to the MongoDB Service that was created when you deployed the MongoDB container image.
The other two are credentials are sourced from the mongodb-credentials Secret.
Click +Add from ConfigMap or Secret and enter MONGODB_USER as the name. For the value, choose mongodb-credentials as resource and app-usr as key.
Again, click +Add from ConfigMap or Secret and enter MONGODB_PASSWORD as the name. For the value, choose mongodb-credentials as resource and app-pwd as key.
Finally, click the Save button at the bottom of the dialog. This will trigger a rollout of a new version of the application, which will connect the MongoDB instance you just deployed.
|
You are probably wondering how the database connection magically started working? When deploying applications to OpenShift, it is always best to create environment variables using Secrets or ConfigMaps to define connection parameters to dependent systems. This allows for application portability across different environments without without modifying source code. The source file that performs the connection as well as creates the database schema can be viewed here: Notice that the applicaton catches the exception if the database connection is not defined? This is why you were able to deploy it without it crashing. |
Exercise: Adding Labels
Next, let’s fix the labels assigned to the MongoDB deployment. From the Topology view, select the MongoDB deployment and choose Actions → Edit Labels.
Like before, you’ll add 3 labels:
The name of the Application group:
app=workshopNext, the name of this deployment:
component=nationalparksAnd finally, the role this component plays in the overall application:
role=databaseExercise: Exploring OpenShift Magic
After updating the nationalparks Deployment with the database connection environment variables, some
magic happened. OpenShift rolled out a new version of the application that uses the new variables by upating the ReplicaSet. You
can verify this by looking at the output of oc get rs -l app=nationalparks:
NAME                       DESIRED   CURRENT   READY   AGE
nationalparks-58bd4758fc   0         0         0       4m58s
nationalparks-7445576cd9   0         0         0       6m42s
nationalparks-789c6bc4f4   1         1         1       41s
You can see the DESIRED and CURRENT number of instances for current a prior ReplicaSets. The desired and current number of the previous instances are 0. This means that OpenShift has gracefully replaced your previous application Pod with a new Pod that uses the new configuration.
Exercise: Data, Data, Everywhere
Now that you have a database deployed, you can again visit the nationalparks web
service to query for data:
https://nationalparks-wksp-userX.apps.cluster.example.com/ws/data/allAnd the result?
[]Where’s the data? Think about the process you went through. You deployed the application and then deployed the database. Nothing actually loaded data into the database, though.
The application provides an endpoint to do just that. Open this URL in your web browser to have make nationalparks application insert a sample dataset into MongoDB:
https://nationalparks-wksp-userX.apps.cluster.example.com/ws/data/loadAnd the result?
Items inserted in database: 2893If you then go back to /ws/data/all you will see tons of JSON data now.
| There are some errors reported with browsers like Firefox 54 that don’t properly parse the resulting JSON. It’s a browser problem, and the application is working properly. |
https://parksmap-wksp-userX.apps.cluster.example.comThere’s just one thing. The main map still isn’t displaying the parks. That’s because the frontend only tries to talk to services that have the right Label.
Exercise: Working With Labels
You explored how a Label is just a key-value pair earlier when looking at Services and Routes and Selectors. In general, a Label is simply an arbitrary key=value pair, for example:
-
pizza=pepperoni -
pet=dog -
openshift=awesome
In the case of the parksmap, the application is actually querying the OpenShift
API and asking about the Routes and Services in the project. If any of them have a
Label that is type=parksmap-backend, the application knows to contact
the endpoints to query for map data.
You can see the code that does this
in theRouteWatcher.java file.
Fortunately, the command line provides a convenient way for you to manipulate
labels. describe the nationalparks service:
oc describe route nationalparksName: nationalparks
Namespace: wksp-userX
Created: 2 hours ago
Labels: app=workshop
app.kubernetes.io/component=nationalparks
app.kubernetes.io/instance=nationalparks
app.kubernetes.io/name=java
app.kubernetes.io/part-of=workshop
app.openshift.io/runtime=java
app.openshift.io/runtime-version=11
component=nationalparks
role=backend
Annotations: openshift.io/host.generated=true
Requested Host: nationalparks-wksp-userX.apps.cluster.example.com
exposed on router router 2 hours ago
Path:
TLS Termination:
Insecure Policy:
Endpoint Port: 8080-tcp
Service: nationalparks
Weight: 100 (100%)
Endpoints: 10.1.9.8:8080 You can see that it already has some labels. Use oc label to add the label necessary for the RouteWatcher to discover the backend:
oc label route nationalparks type=parksmap-backendYou will see something like:
route.route.openshift.io/nationalparks labeledCheck your browser now by visiting the parksmap URL:
https://parksmap-wksp-userX.apps.cluster.example.com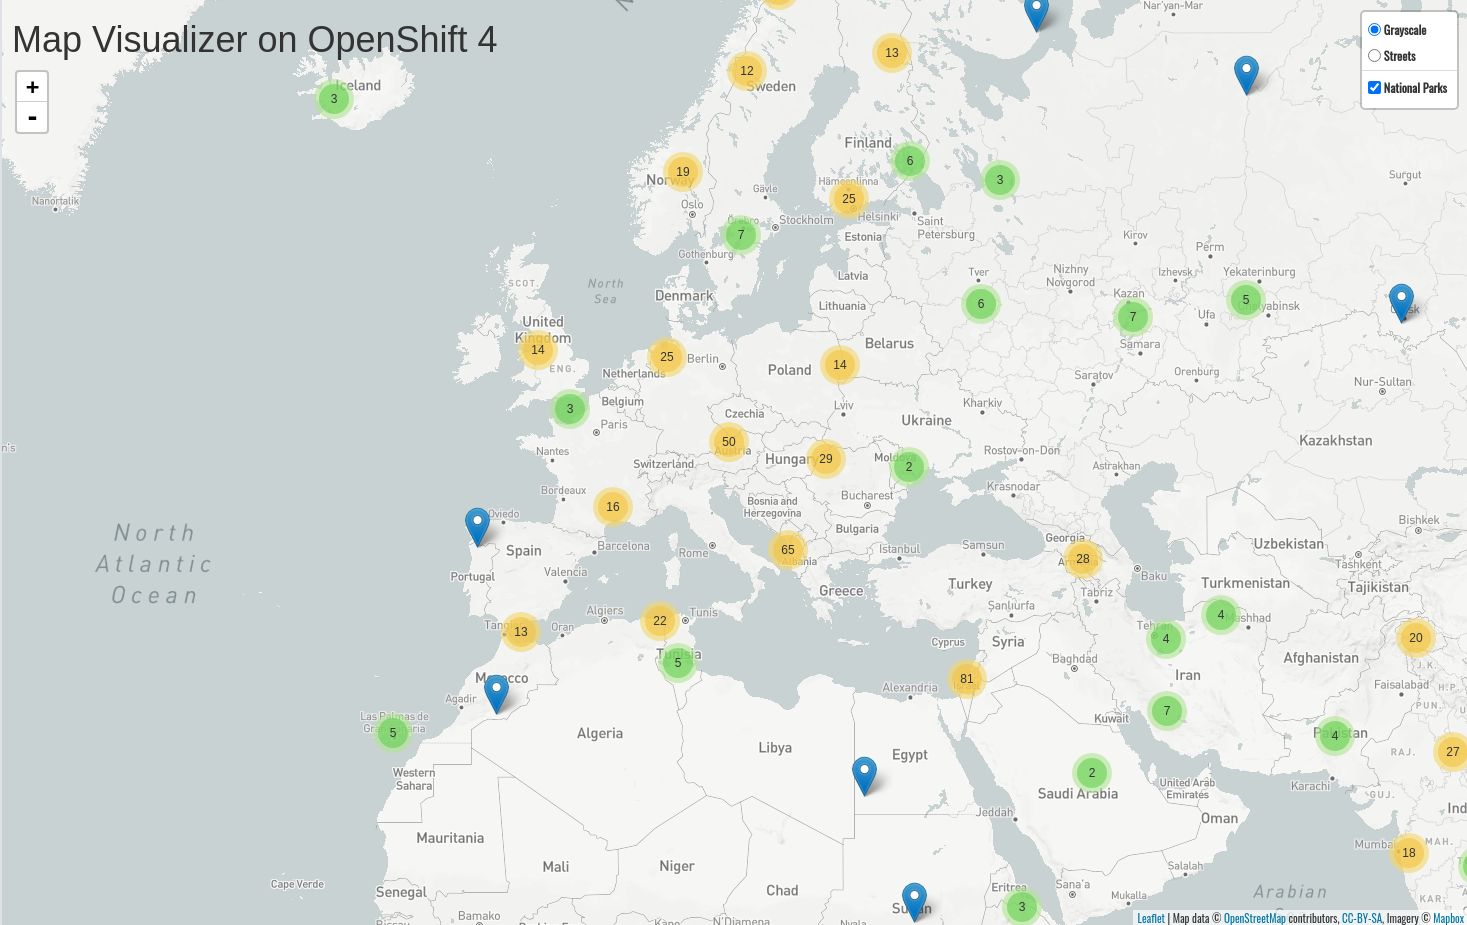
You’ll notice that the parks suddenly are showing up. That’s really cool!