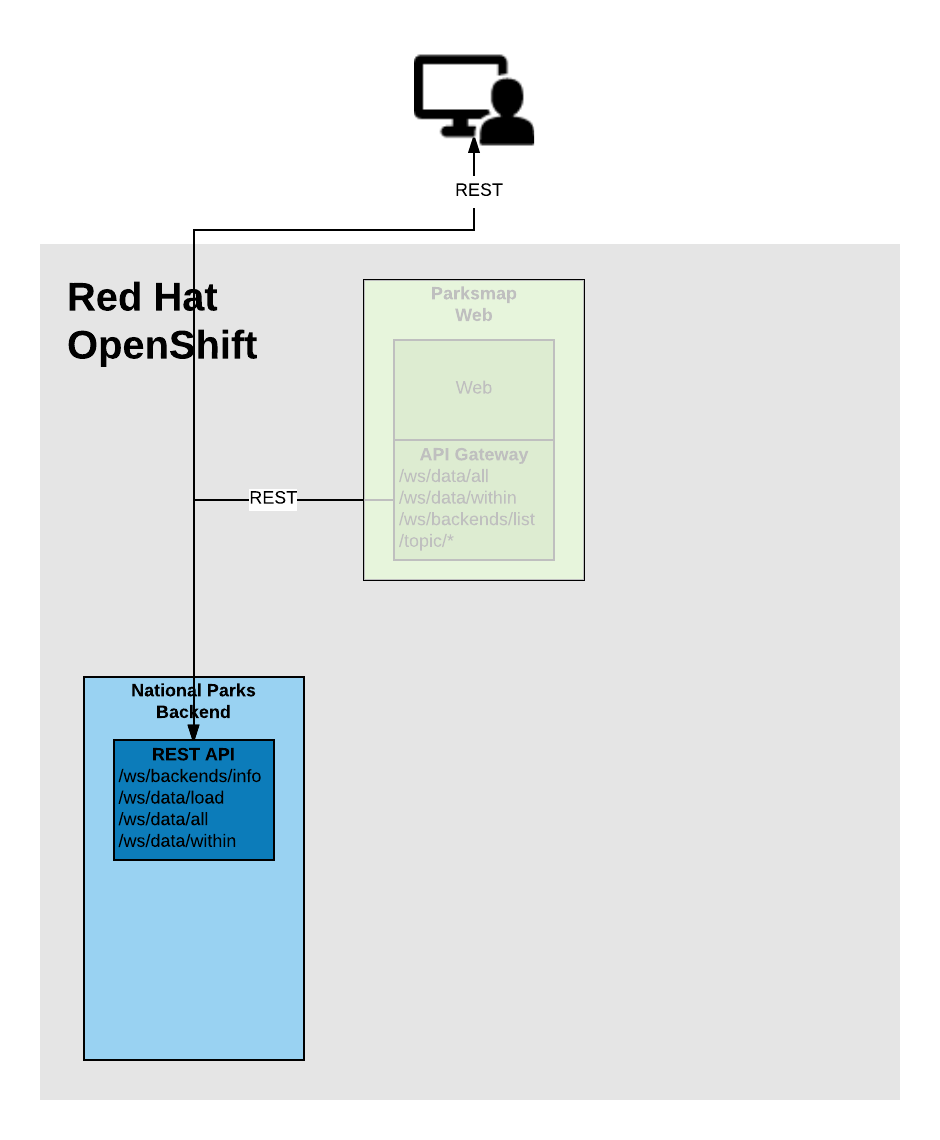
Nationalparks Backend App
In this section, you’re going to deploy a backend service that will expose 2 main REST endpoints to the visualizer
application (parksmap web component that was deployed in the previous workshop sections).
The application will query for each national park’s information (including its
coordinates) that are stored in a MongoDB database. This application will also
provide an external access point, so that the API can be directly used
by end users.
Background: Source-to-Image (S2I)
In a previous workshop section, you learned how to deploy a pre-existing container image. Now you will learn how OpenShift can build container images directly from source code in an existing Git repository. This is accomplished using the Source-to-Image project.
Source-to-Image (S2I) is an open source project sponsored by Red Hat that has the following goal:
Source-to-image (S2I) is a tool for building reproducible container images. S2I produces ready-to-run images by injecting source code into a container image and assembling a new container image which incorporates the builder image and built source. The result is then ready to use with docker run. S2I supports incremental builds which re-use previously downloaded dependencies, previously built artifacts, etc.
OpenShift can use S2I as one of its build mechanisms, in addition to building container images using instructions in a Dockerfile, and "custom" builds.
OpenShift runs the S2I process inside a special Pod, called a Build Pod, and thus builds are subject to quotas, limits, resource scheduling, and other aspects of OpenShift.
A full discussion of S2I is beyond the scope of this workshop, but you can find more information about it either in the OpenShift S2I documentation or on GitHub. The only key concept you need to remember about S2I is that it’s magic.
Exercise: Creating a Backend Application
The backend service that you will be deploying as part of this exercise is
called nationalparks. This is an application that performs 2D
geo-spatial queries against a MongoDB database to locate and return map
coordinates of all National Parks in the world. That was just a fancy way of
saying that you are going to deploy a web service that returns a JSON list of
places.
Add to Project
Because the nationalparks component is a backend to serve data that your
existing frontend (parksmap) will consume, you are going to build and deploy it inside the existing
project that you have been using so far.
Using Application Code on Git Server
OpenShift can work with any accessible Git repository. This could be GitHub, GitLab, or any other server that speaks Git. You can even register webhooks in your Git server to initiate OpenShift builds triggered by any update to the application code!
Later in the workshop, you will make a code change and then rebuild your application. Now, let’s take a look at deploying a backend service.
Deploying the Backend Service
Similar to how you used the + button before with an existing image, you can do the same for specifying a source code repository. Let’s use it with a simple Java S2I image.
In the Topology view, click the + button in the header, and select Import from Git.
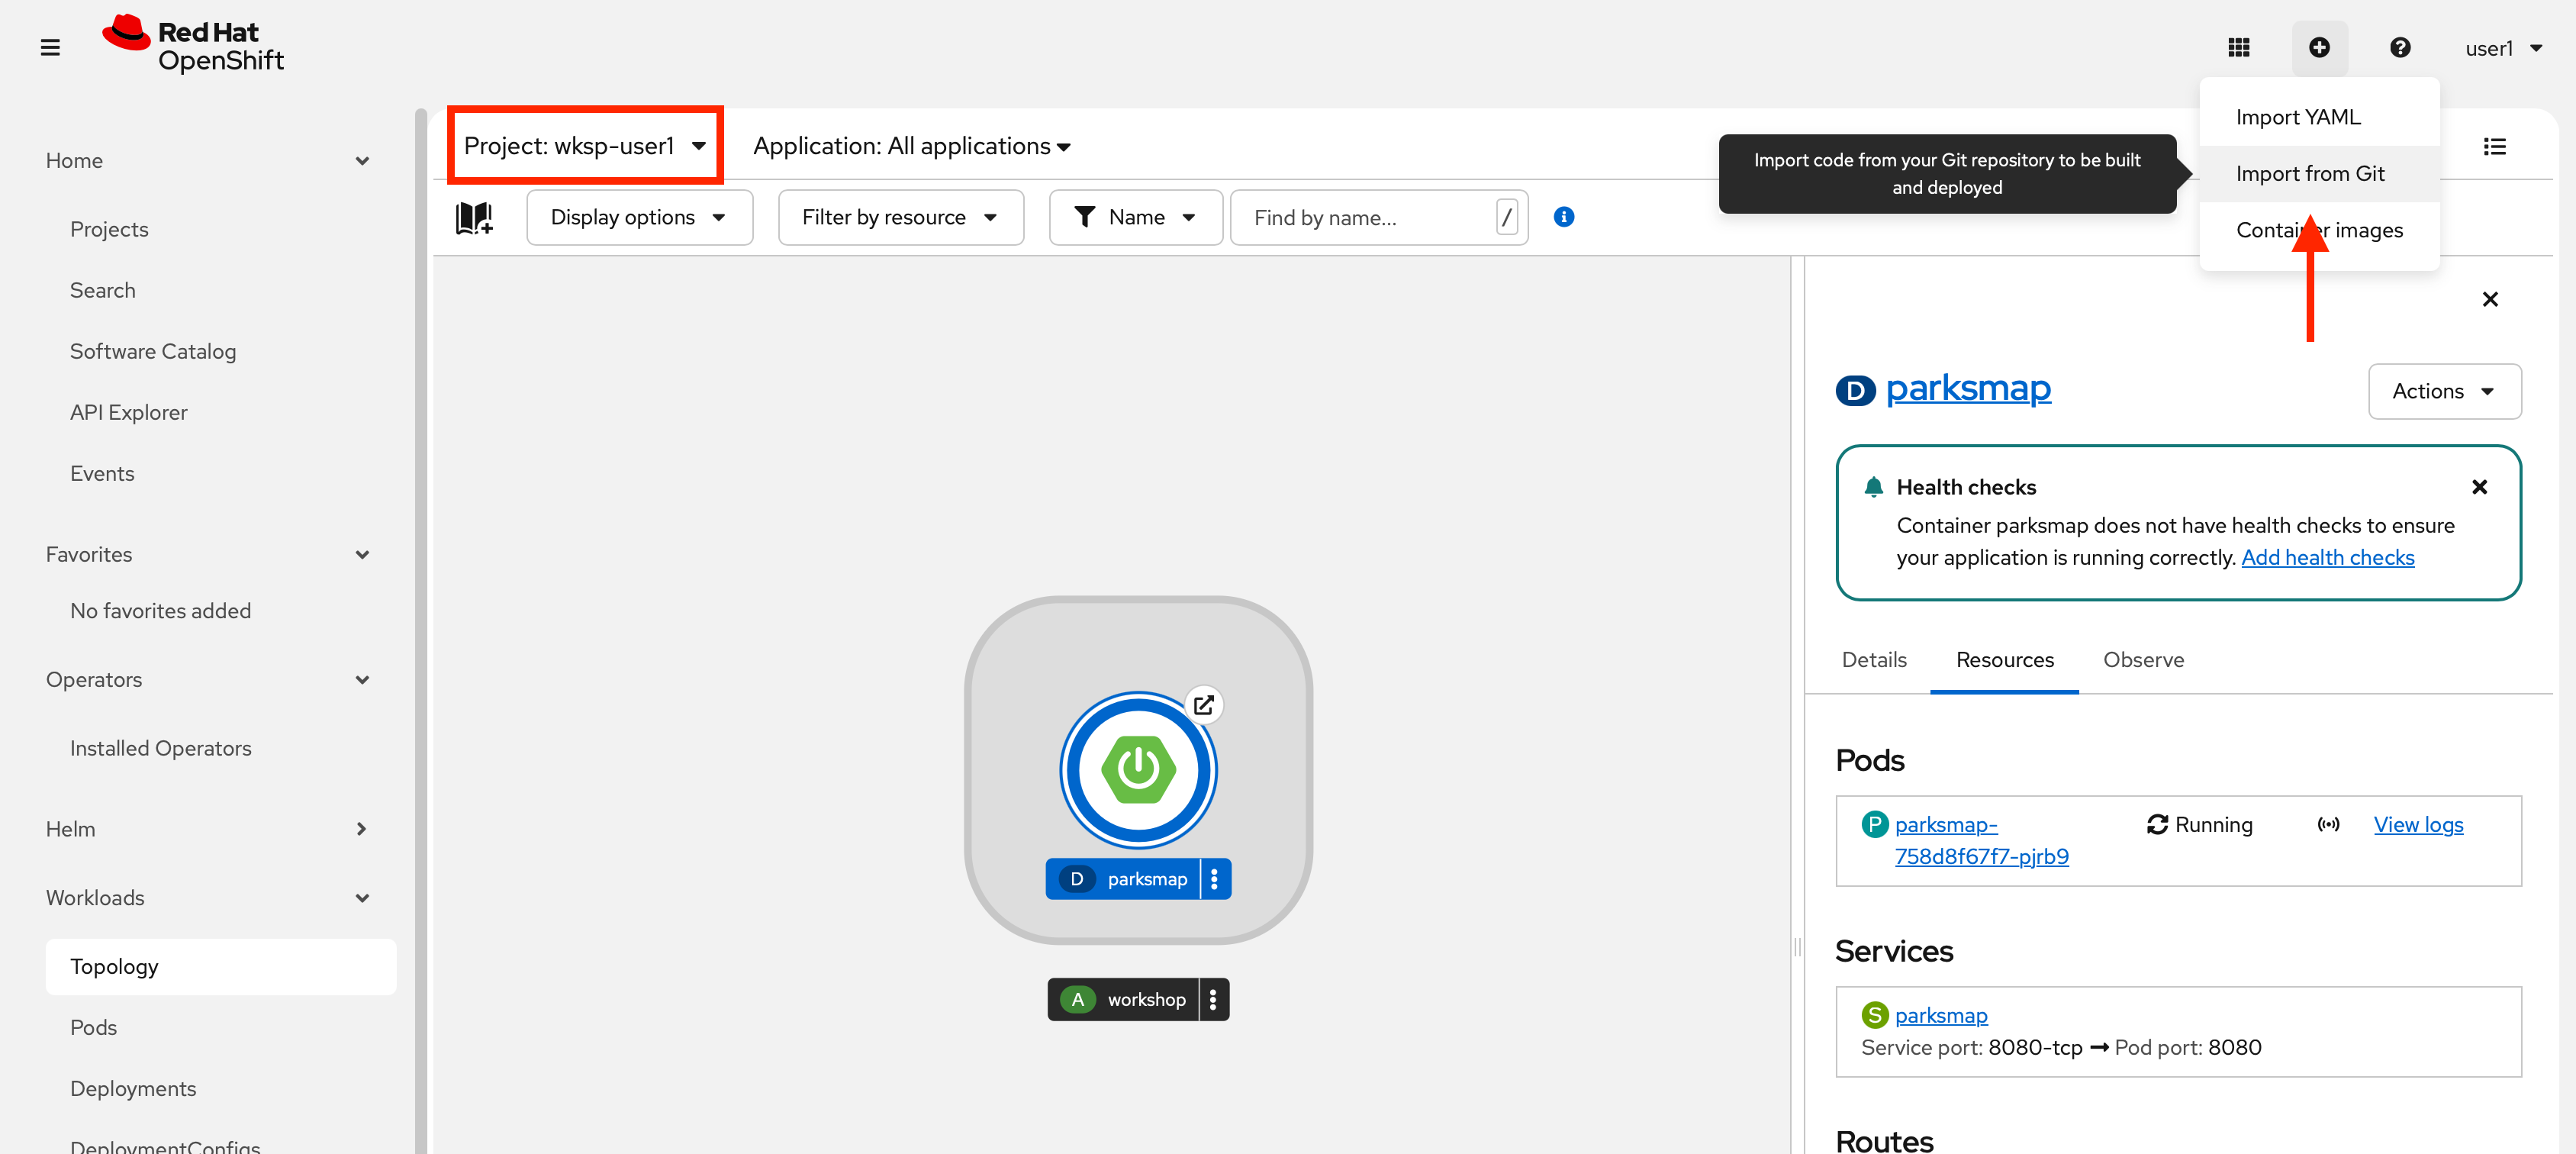
The Import from Git workflow will guide you through the process of deploying your app based on a few selections.
Enter the following for Git Repo URL:
https://github.com/openshift-roadshow/nationalparks.gitOpenShift will automatically determine the programming language used by the source code. You have the option to select an Import Strategy.
Click Edit Import Strategy.

You have three options:
-
Devfile: this will use devfile spec to create an application stack. The repository has to contain a file named
devfile.yamlin the devfile format. -
Dockerfile: this will create a container image from an existing Dockerfile in the source Git repository.
-
Builder Image: this will use a mechanism called Source-to-Image to automatically create a container image directly from the source code - no Dockerfile required.
Select Builder Image as you are going to create the container image from the source code, as discussed in the next section.
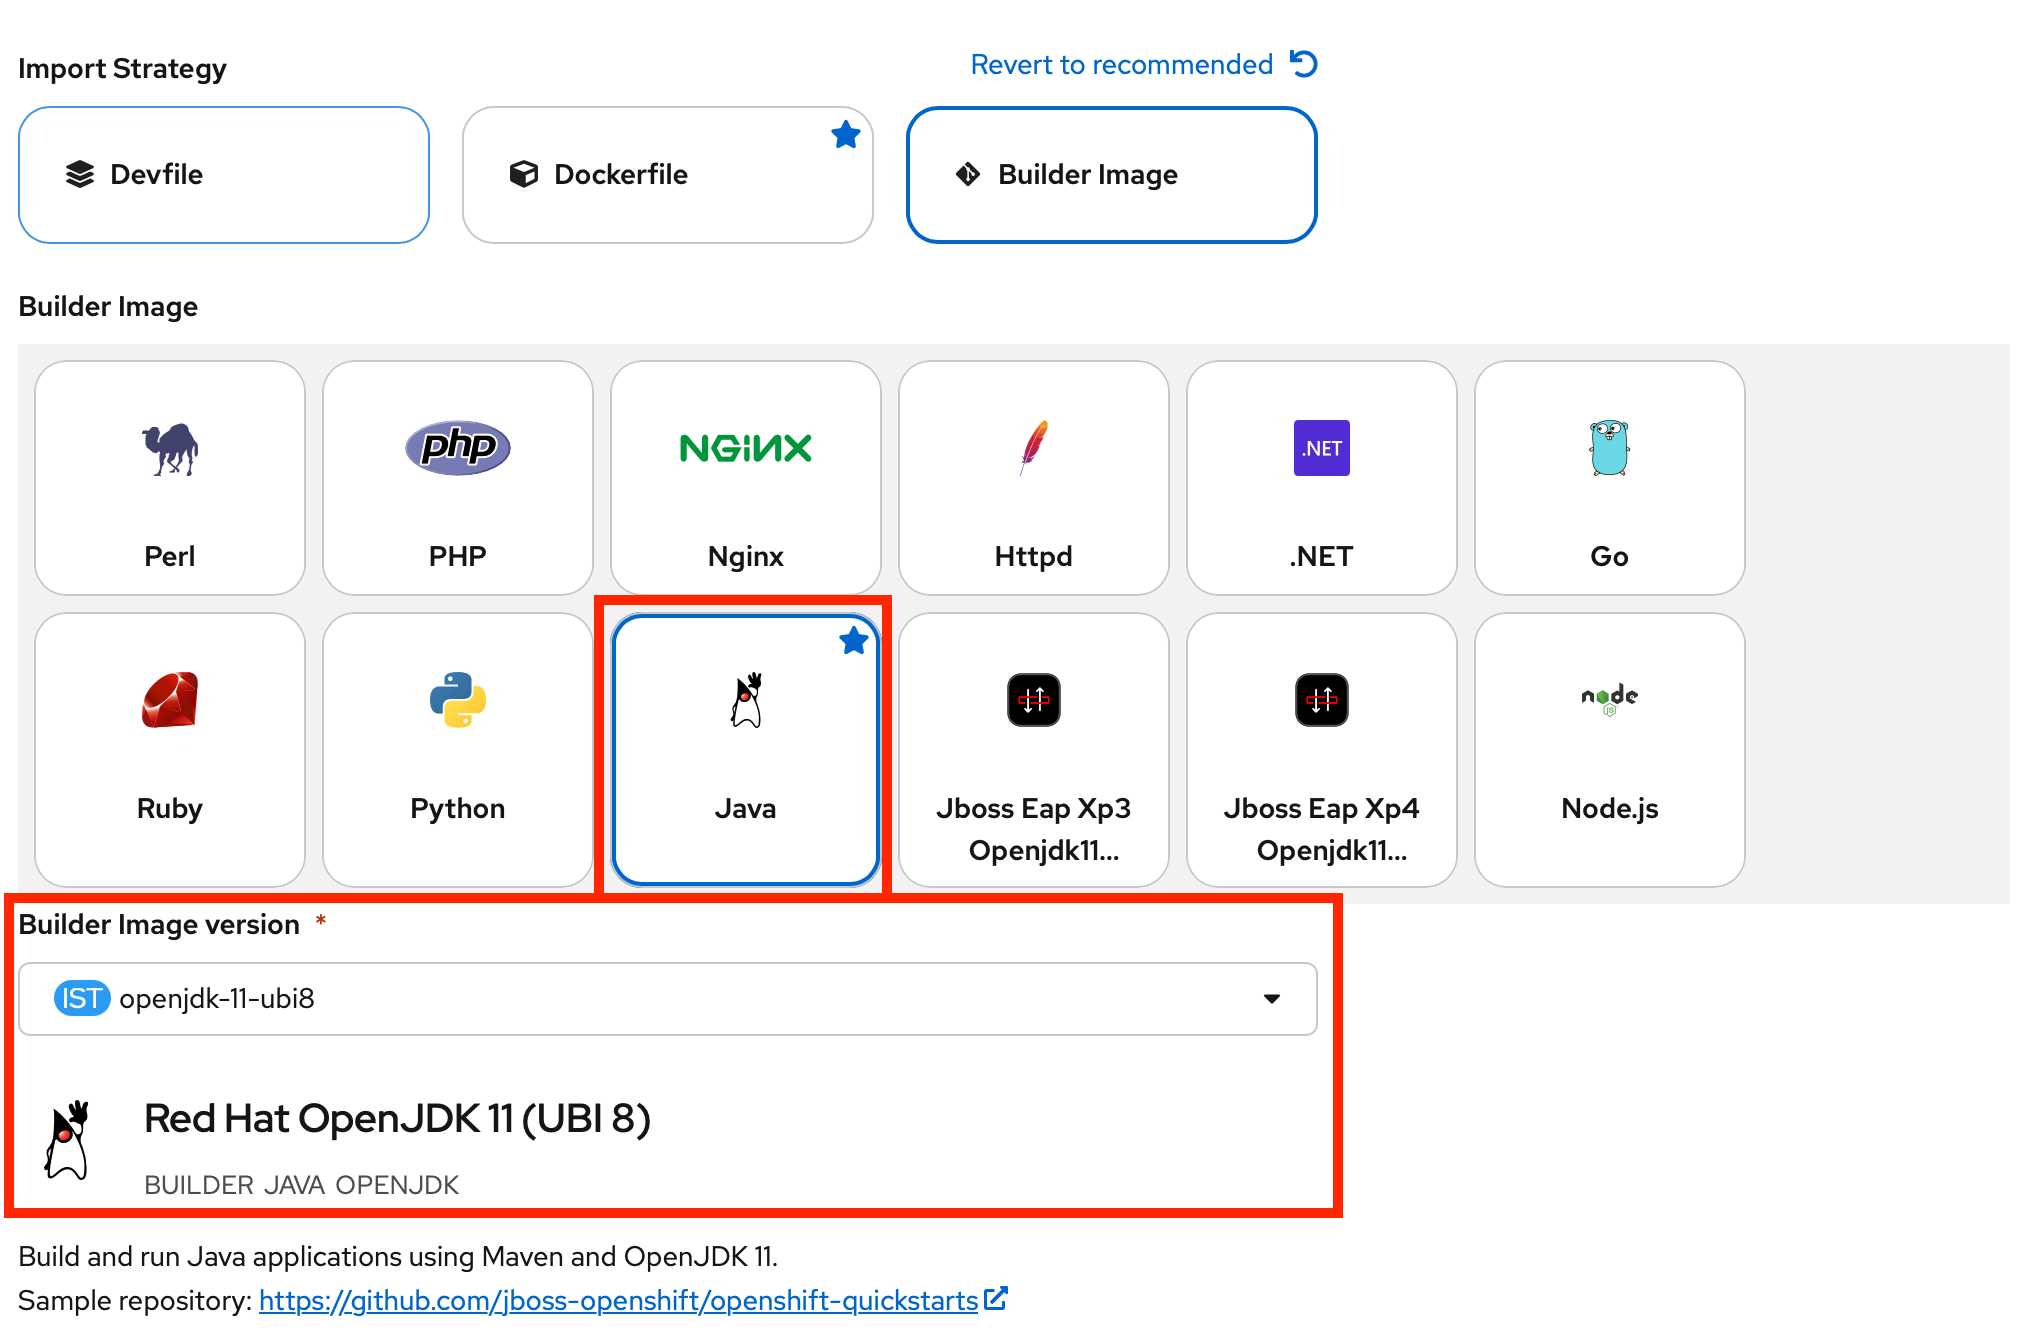
| You could also use Dockerfile, as the repo contains a multi-stage Dockerfile. The goal of this exercise is to experience the Builder Image feature in OpenShift. |
Verify that Java has been selected as your Builder Image, and be sure to select version openjdk-11-ubi8 to have OpenJDK 11.
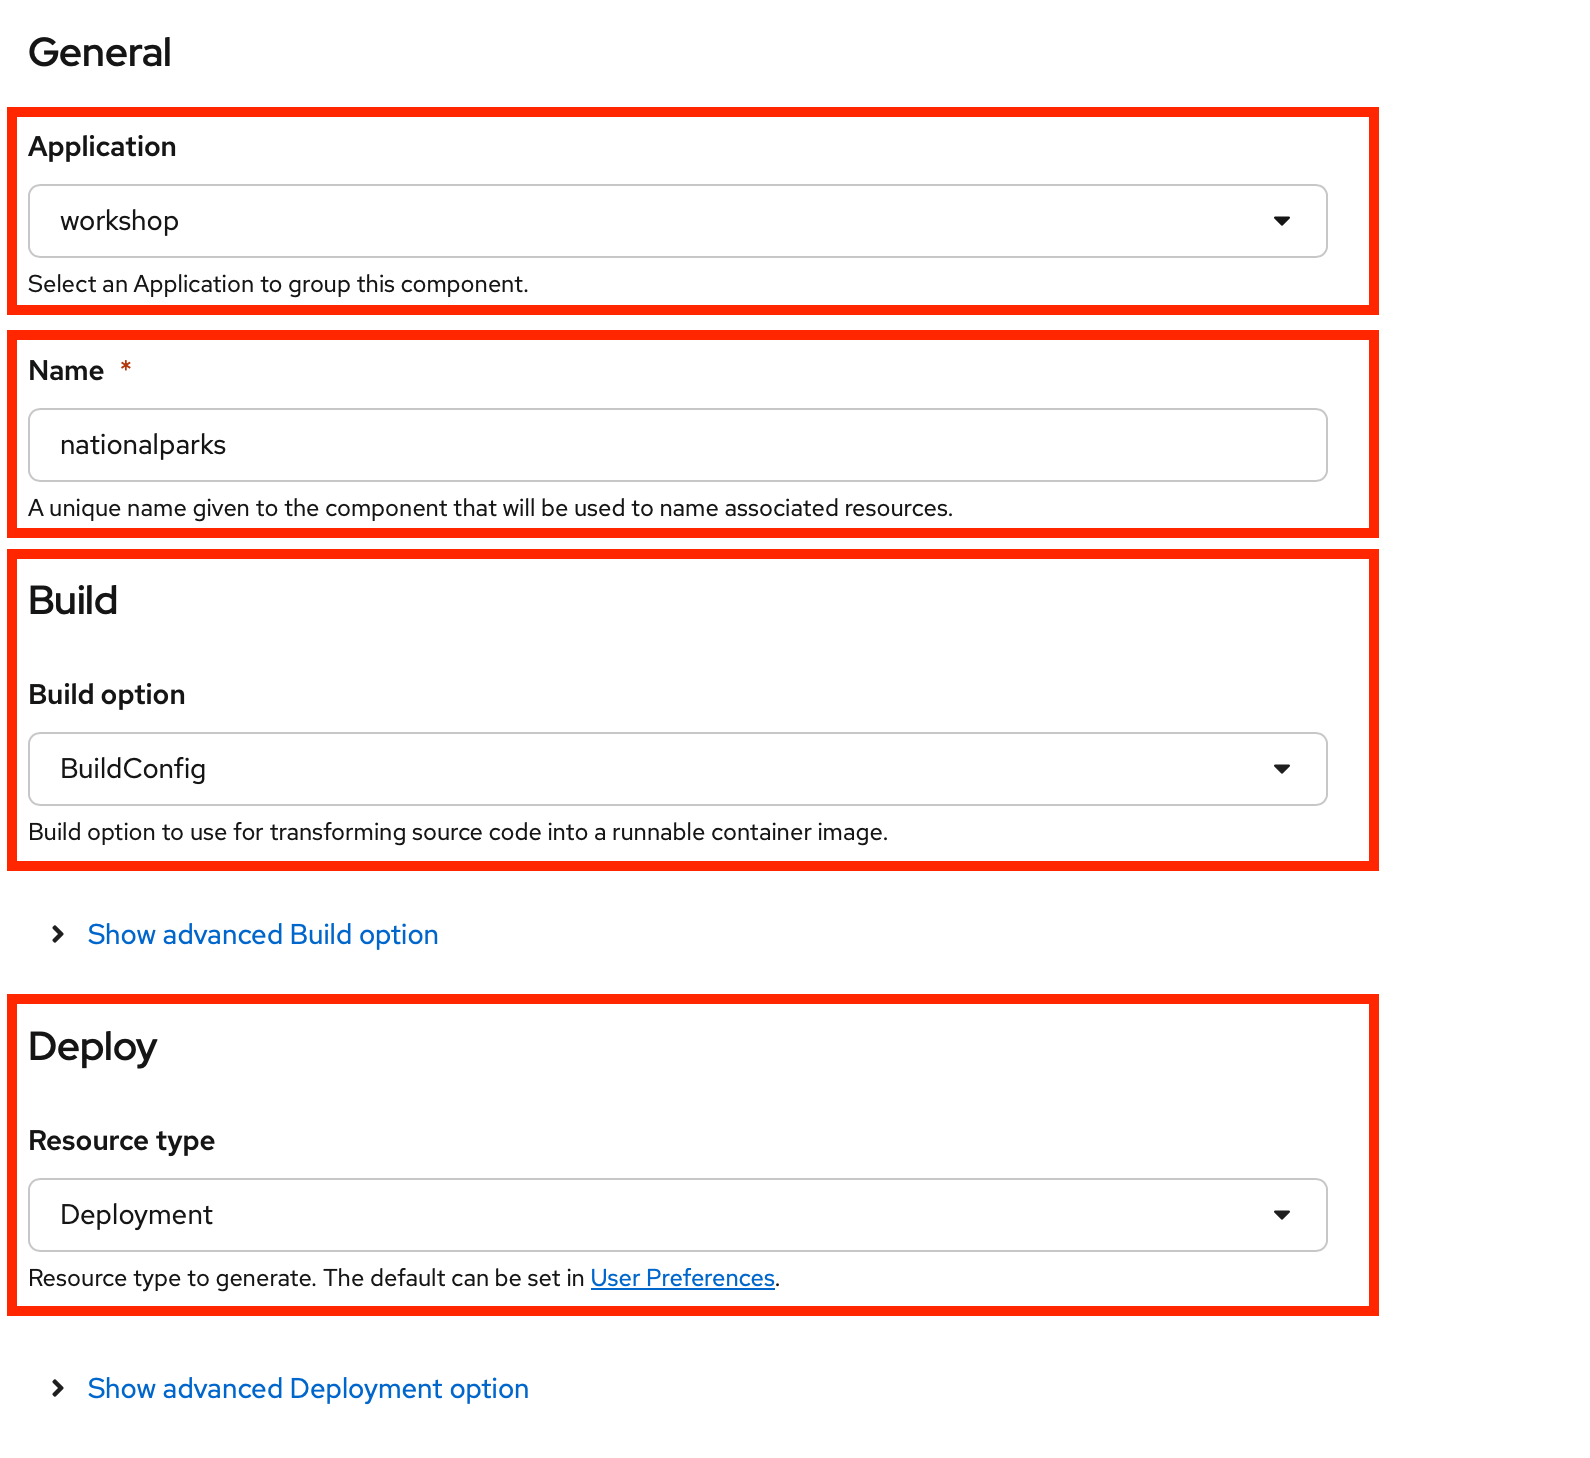
Scroll down to the General section. Add the following:
Application Name :
workshopName :
nationalparksIn the Build section, select BuildConfig.
In the Deploy section, select Deployment.
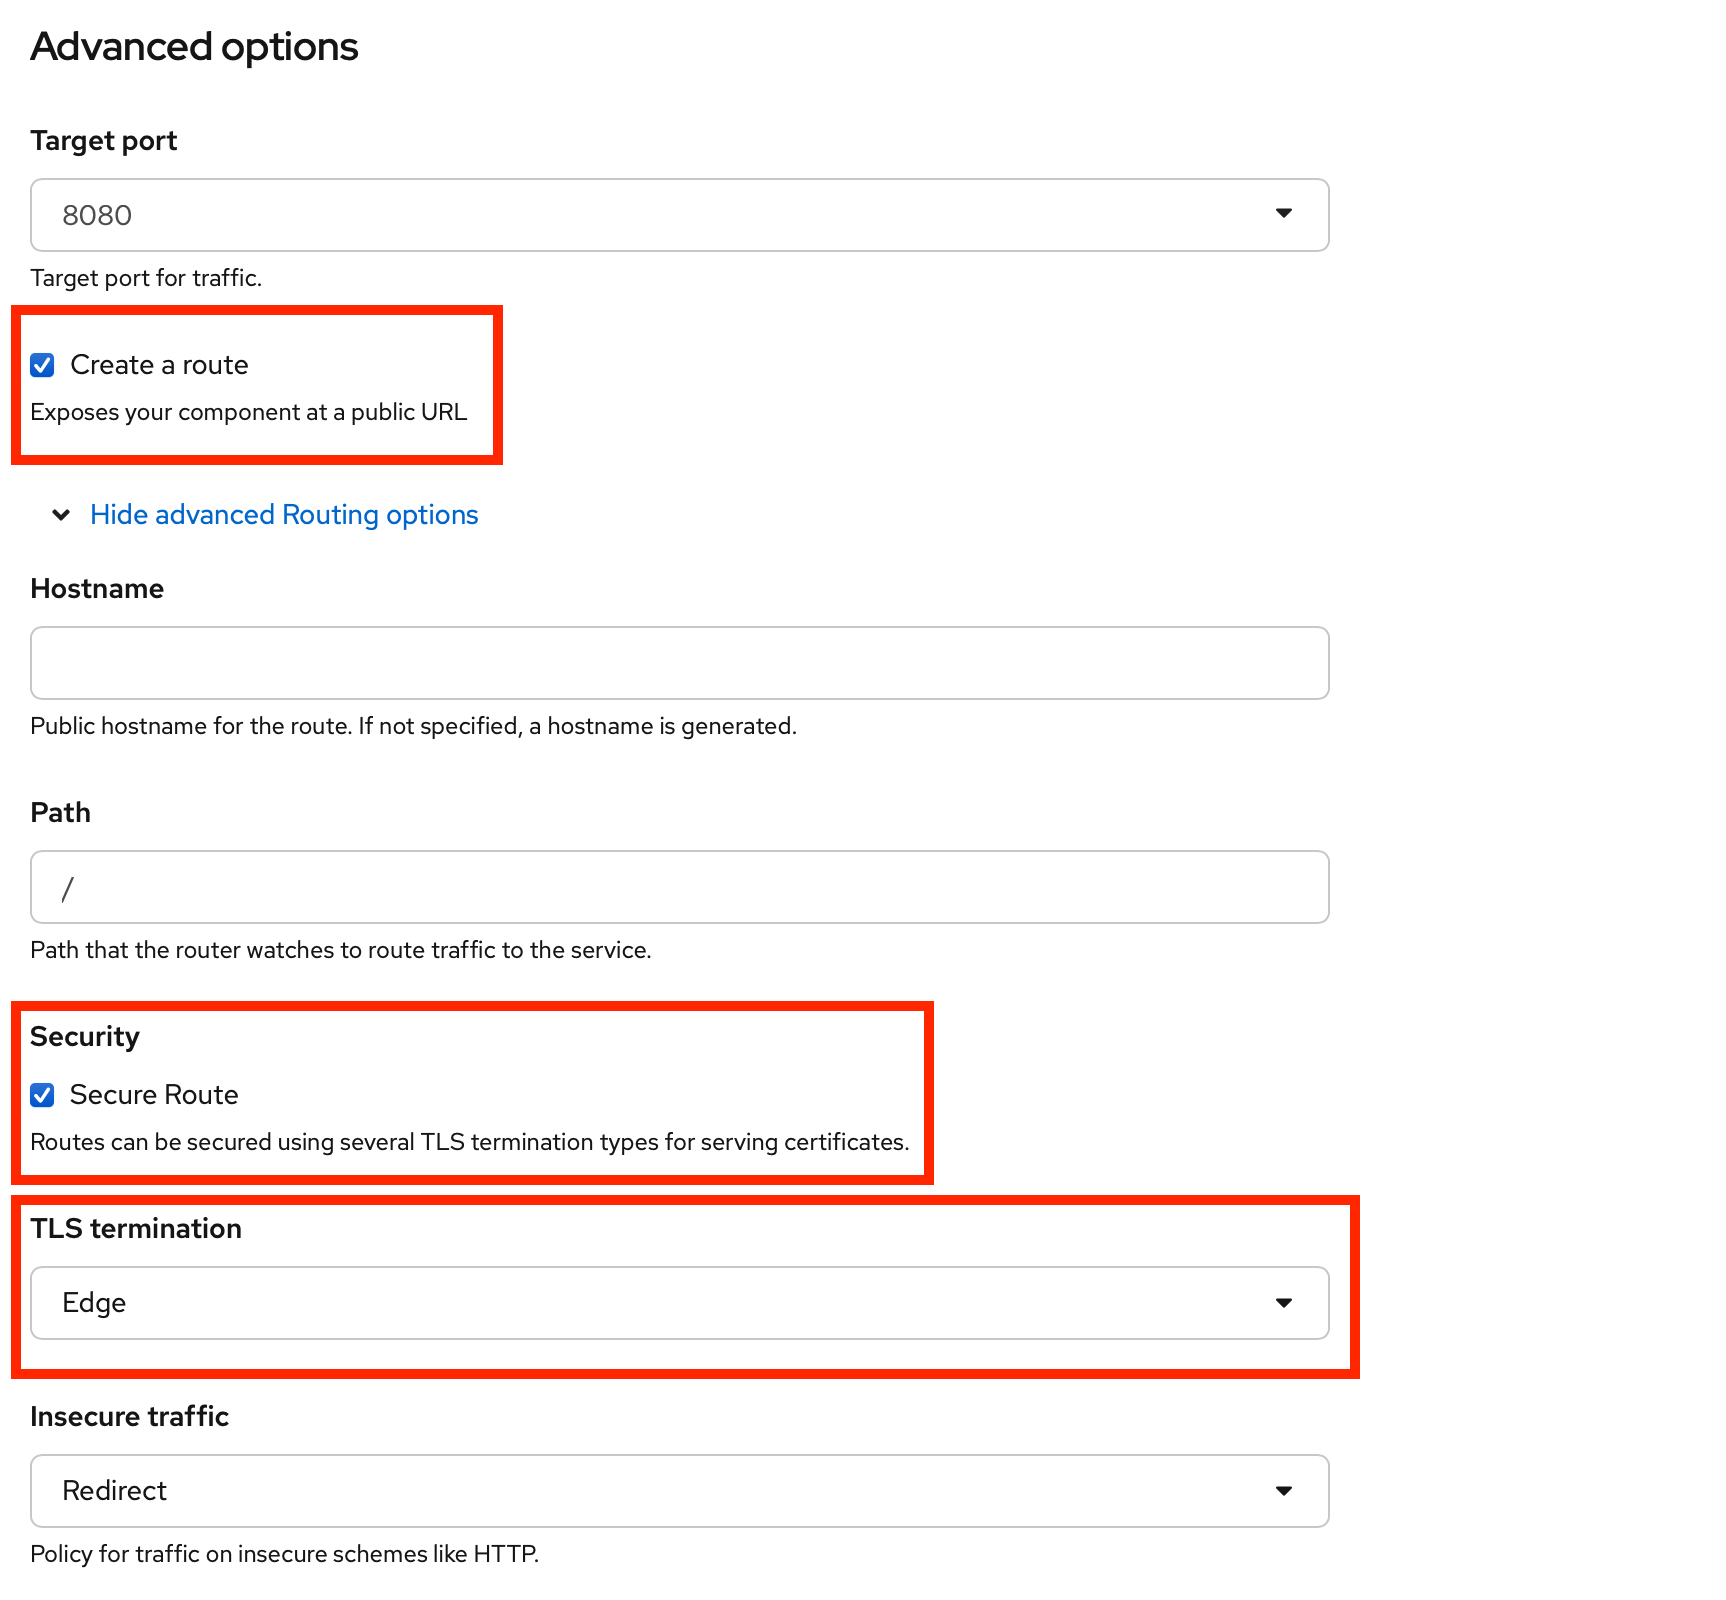
Under Advanced Options, ensure Create a route is checked. You are going to create another Secure Route, this time directly from this view.
Click Show advanced Routing options. Leave all default options, then go to the Security section. Check the Secure Route option. Under TLS termination, select Edge.
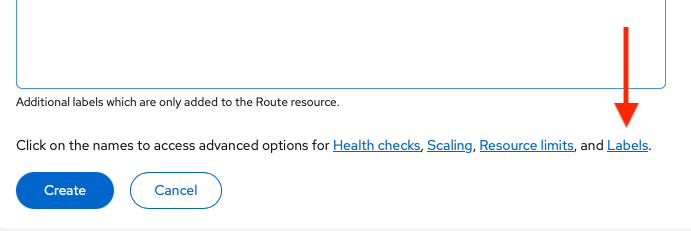
Scroll down and expand the Labels section to add 3 labels.
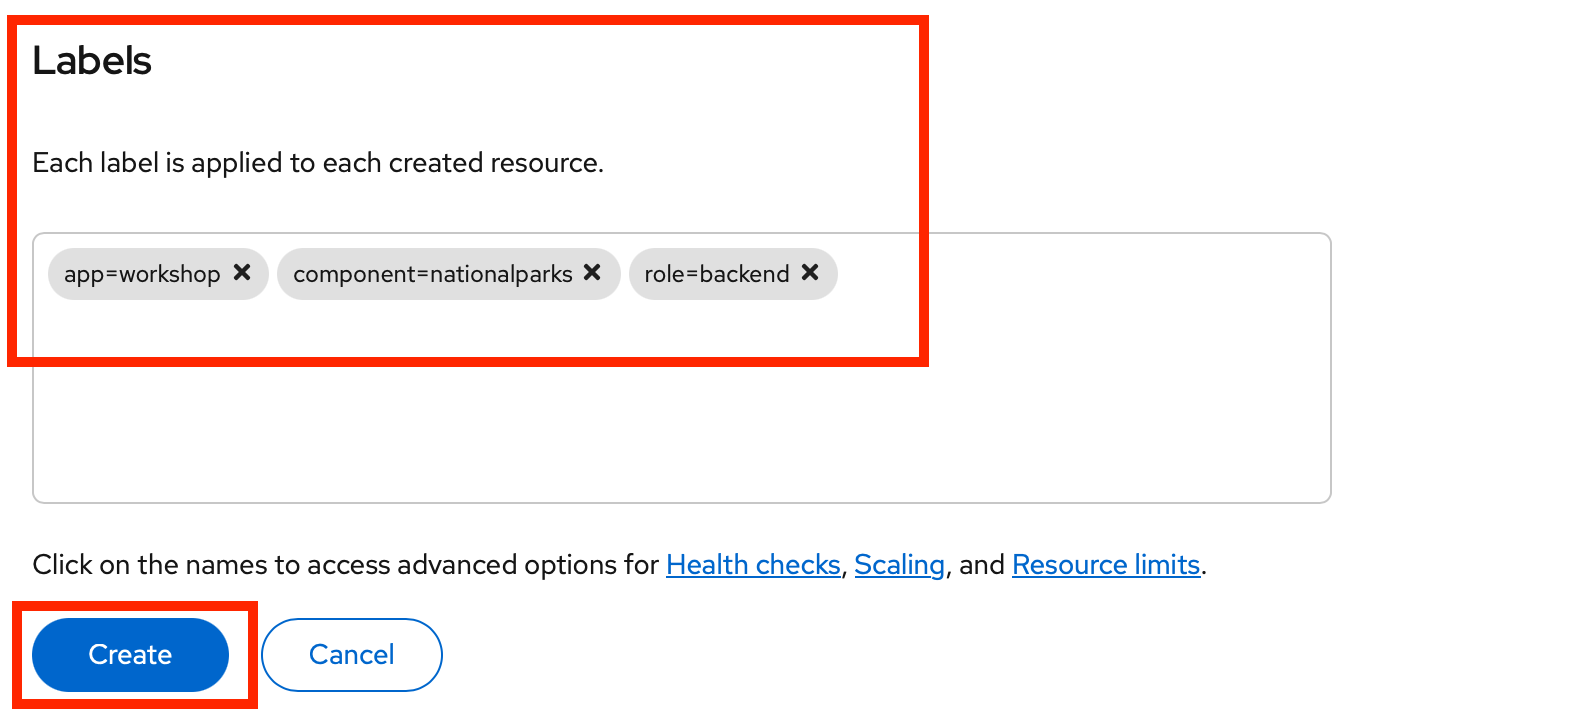
The name of the Application group:
app=workshopNext, the name of this deployment:
component=nationalparksAnd finally, the role this component plays in the overall application:
role=backendClick Create to submit.
Monitoring the Build
To see the build logs, in Topology view, click the nationalparks entry, then click on View Logs in the Builds section of the Resources tab.

Based on the application’s language, the build process will be different. However, the initial build will take a few minutes as the dependencies are downloaded. You can see all of this happening in real time!
From the command line, you can also see the Builds:
oc get buildsYou’ll see output like:
NAME              TYPE      FROM          STATUS     STARTED              DURATION
nationalparks-1   Source    Git@b052ae6   Running    About a minute ago   1m2s
You can also view the build logs with the following command:
oc logs -f builds/nationalparks-1After the build has completed successfully:
-
The S2I process will push the resulting image to the internal OpenShift image registry
-
The Deployment (D) will detect that the image has changed, and this will cause a new deployment to happen.
-
A ReplicaSet (RS) will be spawned for this new deployment.
-
The RS will detect no Pods are running and will cause one to be deployed, as the default replica count is just 1.
In the end, when issuing the oc get pods command, you will see that the build Pod
has finished (exited) and that an application Pod is in a ready and running state:
NAME                        READY     STATUS      RESTARTS   AGE
nationalparks-1-tkid3       1/1       Running     3          2m
nationalparks-1-build       0/1       Completed   0          3m
parksmap-57df75c46d-xltcs   1/1       Running     0          2h
Look again at the OpenShift web console. You will notice that the Route was created for you, since you enabled it when creating the application. You can see the URL in the web console, or via the command line:
oc get routesYou should see something like the following:
NAME            HOST/PORT                                                   PATH      SERVICES        PORT       TERMINATION       WILDCARD
nationalparks   nationalparks-wksp-userX.apps.cluster.example.com      nationalparks   8080-tcp        edge
parksmap        parksmap-wksp-userX.apps.cluster.example.com           parksmap        8080-tcp        edge        none
In the above example, the URL is:
https://nationalparks-wksp-userX.apps.cluster.example.comSince this is a backend application, it doesn’t actually have a web interface.
However, it can still be used with a browser. All backends that work with the parksmap
frontend are required to implement a /ws/info/ endpoint. To test, visit this URL in your browser:
| If the Pod is Running and the application is not available, please wait a few seconds and refresh the page, since you haven’t configured Health Checks for it yet. |
You will see a simple JSON string:
{"id":"nationalparks","displayName":"National Parks","center":{"latitude":"47.039304","longitude":"14.505178"},"zoom":4}Earlier in the workshop, you read that:
This is an application that performs 2D geo-spatial queries against a MongoDB database
But you don’t have a database. Yet.