Identity & Users
Module Overview
Duration: 55 minutes
Format: Hands-on identity provider configuration
Audience: Platform Engineers, Operations Teams, Security Administrators
Narrative Context:
You’ve verified the cluster is healthy. Now let’s configure enterprise user authentication by integrating with an LDAP directory.
As an operations team, you need to: - Integrate with existing identity management systems - Configure group-based access control - Manage user permissions across projects - Remove default administrative accounts for security
Learning Objectives
By the end of this module, you will be able to:
-
Understand OpenShift identity provider options (LDAP, OIDC, HTPasswd, GitHub)
-
Configure LDAP authentication with OAuth
-
Sync LDAP groups to OpenShift groups
-
Implement role-based access control (RBAC)
-
Test user authentication and permissions
-
Manage users and groups via CLI and console
-
Follow security best practices for production authentication
Understanding OpenShift Authentication
OpenShift uses an OAuth server for authentication. The OAuth server validates user credentials against configured identity providers and issues access tokens for API and console access.
Supported Identity Providers (OpenShift 4.20):
-
LDAP - Validate usernames and passwords against LDAPv3 servers (Active Directory, OpenLDAP, Red Hat Directory Server)
-
HTPasswd - Validate usernames and passwords against flat file using htpasswd
-
Keystone - Integrate OpenStack Keystone v3 server
-
GitHub - OAuth authentication with GitHub or GitHub Enterprise
-
GitLab - OAuth authentication with GitLab
-
Google - OAuth authentication with Google accounts
-
OpenID Connect - Integrate with OpenID Connect identity providers (Microsoft Entra ID, Okta, Keycloak, Red Hat SSO)
-
Request header - Proxy authentication for enterprise SSO systems
-
Basic authentication - Remote Basic authentication (not recommended for most use cases)
When to use each:
-
LDAP - Existing LDAP/Active Directory infrastructure (most common enterprise auth)
-
OpenID Connect - Modern SSO, cloud identity providers, SAML bridges
-
Request header - Front-end proxy doing authentication (Apache mod_auth_mellon, Keycloak Gatekeeper)
-
GitHub/GitLab - Developer self-service, public repositories
-
Google - Developer workstations, Google Workspace integration
-
HTPasswd - Demos, testing, proof-of-concept only
-
Keystone - OpenStack platform integration
This workshop uses LDAP as the hands-on example - it’s the most common enterprise authentication method and demonstrates group synchronization.
For complete identity provider details, see Understanding identity providers.
Step 1: Examine Default Authentication
Check the current OAuth configuration:
oc get oauth cluster -o yaml| You can also view this in the console at Administration > Cluster Settings > Configuration > OAuth — it shows the configured identity providers in a readable format. |
Look at the spec.identityProviders section. You’ll see that an htpasswd identity provider is already configured — this was set up during cluster provisioning to provide the admin account you’re using now.
|
In a fresh cluster, |
What about kubeadmin?
Fresh OpenShift clusters come with a kubeadmin bootstrap account stored as a Secret in kube-system. This account bypasses identity providers entirely — it’s meant for initial setup only. On this workshop cluster, kubeadmin has already been removed and replaced with the admin HTPasswd account you’re using now. That’s the correct production posture.
You can verify it’s gone:
oc get secret -n kube-system kubeadmin -o yamlExpected: not found — confirming the bootstrap account has been removed.
Step 2: Understand LDAP Structure
This lab environment provides LDAP with the following groups:
-
ose-user: Users with OpenShift access (all users must be in this group)
-
ose-normal-dev: Regular developers (normaluser1, teamuser1, teamuser2)
-
ose-fancy-dev: Senior developers with elevated privileges (fancyuser1, fancyuser2)
-
ose-teamed-app: Project collaboration team (teamuser1, teamuser2)
LDAP user credentials: All users have password Op#nSh1ft
Step 3: Configure LDAP Identity Provider
To configure LDAP authentication, we need:
-
Secret containing the LDAP bind password
-
ConfigMap containing the LDAP server CA certificate
-
OAuth configuration defining the LDAP identity provider
Create the LDAP bind password Secret:
oc create secret generic ldap-secret \
  --from-literal=bindPassword='b1ndP^ssword' \
  -n openshift-config
Extract the CA certificate chain from the LDAP server:
mkdir -p $HOME/support
echo | openssl s_client -connect ldap.jumpcloud.com:636 -showcerts 2>/dev/null | awk 'BEGIN{n=0} /BEGIN CERTIFICATE/{n++} n>=2{print}' > $HOME/support/ca.crt| This extracts the intermediate and root CA certificates directly from the LDAP server’s TLS handshake. This is more reliable than downloading a static CA file, which may not match the server’s current certificate chain. |
Create ConfigMap with CA certificate:
oc create configmap ca-config-map \
  --from-file=ca.crt=$HOME/support/ca.crt \
  -n openshift-config
Create the OAuth configuration file:
cat <<EOF > $HOME/support/oauth-cluster.yaml
apiVersion: config.openshift.io/v1
kind: OAuth
metadata:
  name: cluster
spec:
  identityProviders:
  - name: htpasswd
    mappingMethod: claim
    type: HTPasswd
    htpasswd:
      fileData:
        name: htpasswd
  - name: ldap                    # name shown on console login page
    mappingMethod: claim           # first identity provider to claim a username wins
    type: LDAP
    ldap:
      attributes:
        id: [dn]                   # LDAP field used as unique user ID
        email: [mail]
        name: [cn]                 # display name
        preferredUsername: [uid]    # what they type at the login prompt
      bindDN: "uid=openshiftworkshop,ou=Users,o=5e615ba46b812e7da02e93b5,dc=jumpcloud,dc=com"
      bindPassword:
        name: ldap-secret          # references the Secret created earlier
      ca:
        name: ca-config-map        # CA cert to validate LDAP server's TLS
      insecure: false              # always false in production — validates TLS
      url: "ldaps://ldap.jumpcloud.com/ou=Users,o=5e615ba46b812e7da02e93b5,dc=jumpcloud,dc=com?uid?sub?(memberOf=cn=ose-user,ou=Users,o=5e615ba46b812e7da02e93b5,dc=jumpcloud,dc=com)"
  tokenConfig:
    accessTokenMaxAgeSeconds: 86400  # tokens valid for 24 hours
EOF
Apply the OAuth configuration:
oc apply -f $HOME/support/oauth-cluster.yamlUnderstanding the OAuth configuration:
The oauth-cluster.yaml file configures the LDAP identity provider. Key elements:
Key parameters:
-
name: Unique identifier for this identity provider (can have multiple)
-
mappingMethod: claim: How usernames are assigned (first identity provider wins)
-
attributes: Maps LDAP fields to OpenShift user attributes
-
bindDN/bindPassword: Credentials for LDAP searches
-
ca: Certificate to validate LDAP server SSL
-
url: LDAP server location and search filter
For detailed LDAP configuration, see Configuring an LDAP identity provider.
Monitor the OAuth operator rollout:
oc rollout status deployment/oauth-openshift -n openshift-authenticationWait for: deployment "oauth-openshift" successfully rolled out
Verify OAuth pods are running:
oc get pods -n openshift-authenticationAll oauth-openshift pods should be Running and Ready 1/1.
The OAuth pods need a few moments after rollout to fully initialize their LDAP connections. Wait for them to be ready:
echo "Waiting for OAuth pods to initialize LDAP connections..."
sleep 30
echo "Ready to test LDAP authentication"
Step 4: Test LDAP Authentication
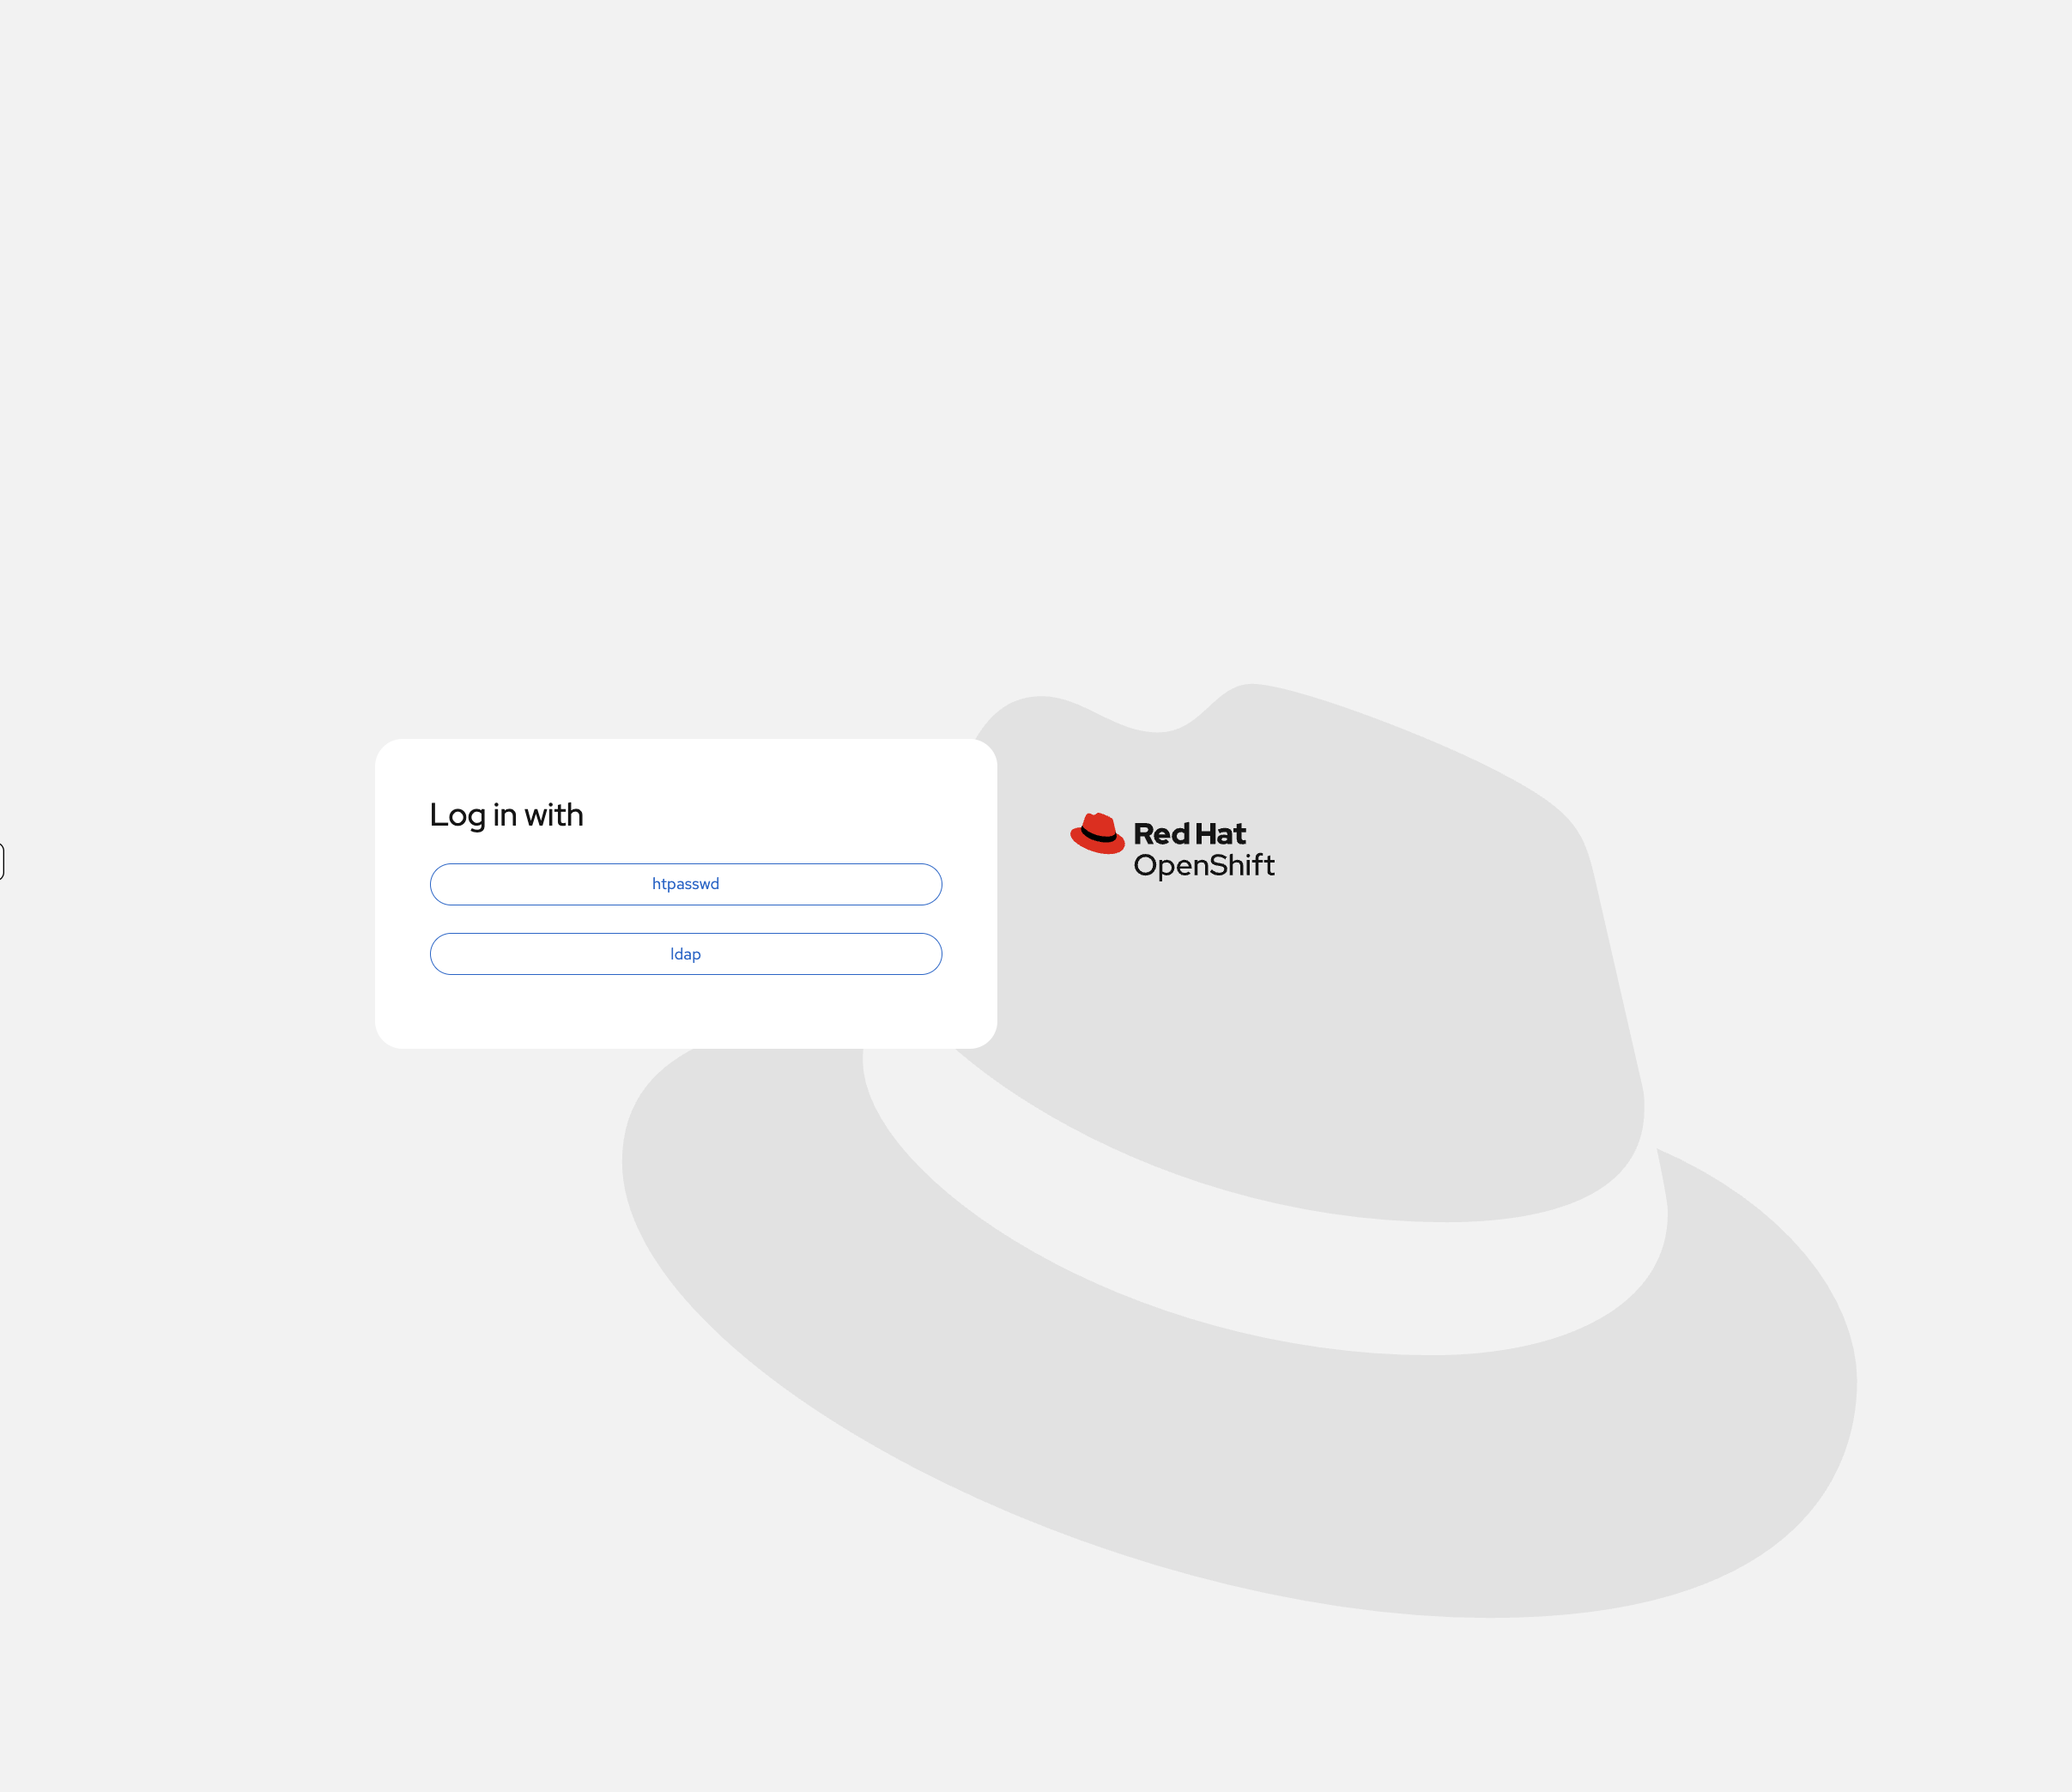
If you reload the OCP Console tab and log out, you’ll now see both identity providers on the login page:
First, capture the API server URL for login commands:
export OCP_SERVER=$(oc whoami --show-server)
echo "API Server: $OCP_SERVER"
Try logging in as a regular user:
oc login -u normaluser1 -p 'Op#nSh1ft' $OCP_SERVER --insecure-skip-tls-verifyYou should see Login successful. — the user was authenticated against the LDAP server.
Check your identity:
oc whoamiOutput: normaluser1
Check what you can do:
oc auth can-i create projectOutput: no (project self-provisioning is disabled in this environment - you’ll learn about this in the Governance module)
Notice the user was automatically created on first login. Log back in as admin to view the user object.
Log back in as cluster admin:
oc login -u {openshift_cluster_admin_username} -p {openshift_cluster_admin_password} --insecure-skip-tls-verifyView the auto-created user:
oc get usersYou’ll see normaluser1 was automatically created on first login.
Step 5: Sync LDAP Groups to OpenShift
LDAP group synchronization imports LDAP groups as OpenShift Groups, making RBAC management easier.
Create the group sync configuration:
cat <<EOF > $HOME/support/groupsync.yaml
kind: LDAPSyncConfig
apiVersion: v1
url: ldaps://ldap.jumpcloud.com
bindDN: uid=openshiftworkshop,ou=Users,o=5e615ba46b812e7da02e93b5,dc=jumpcloud,dc=com
bindPassword: b1ndP^ssword
rfc2307:
  groupsQuery:
    baseDN: ou=Users,o=5e615ba46b812e7da02e93b5,dc=jumpcloud,dc=com
    derefAliases: never
    filter: '(|(cn=ose-*))'
  groupUIDAttribute: dn
  groupNameAttributes:
  - cn
  groupMembershipAttributes:
  - member
  usersQuery:
    baseDN: ou=Users,o=5e615ba46b812e7da02e93b5,dc=jumpcloud,dc=com
    derefAliases: never
  userUIDAttribute: dn
  userNameAttributes:
  - uid
EOF
View the group sync configuration:
cat $HOME/support/groupsync.yamlThe configuration:
- Searches for LDAP groups matching ose-* pattern
- Creates OpenShift Groups with matching names
- Populates group membership from LDAP
Run the group sync:
oc adm groups sync --sync-config=$HOME/support/groupsync.yaml --confirmOutput shows created groups:
group/ose-fancy-dev
group/ose-user
group/ose-normal-dev
group/ose-teamed-app
View the synced groups:
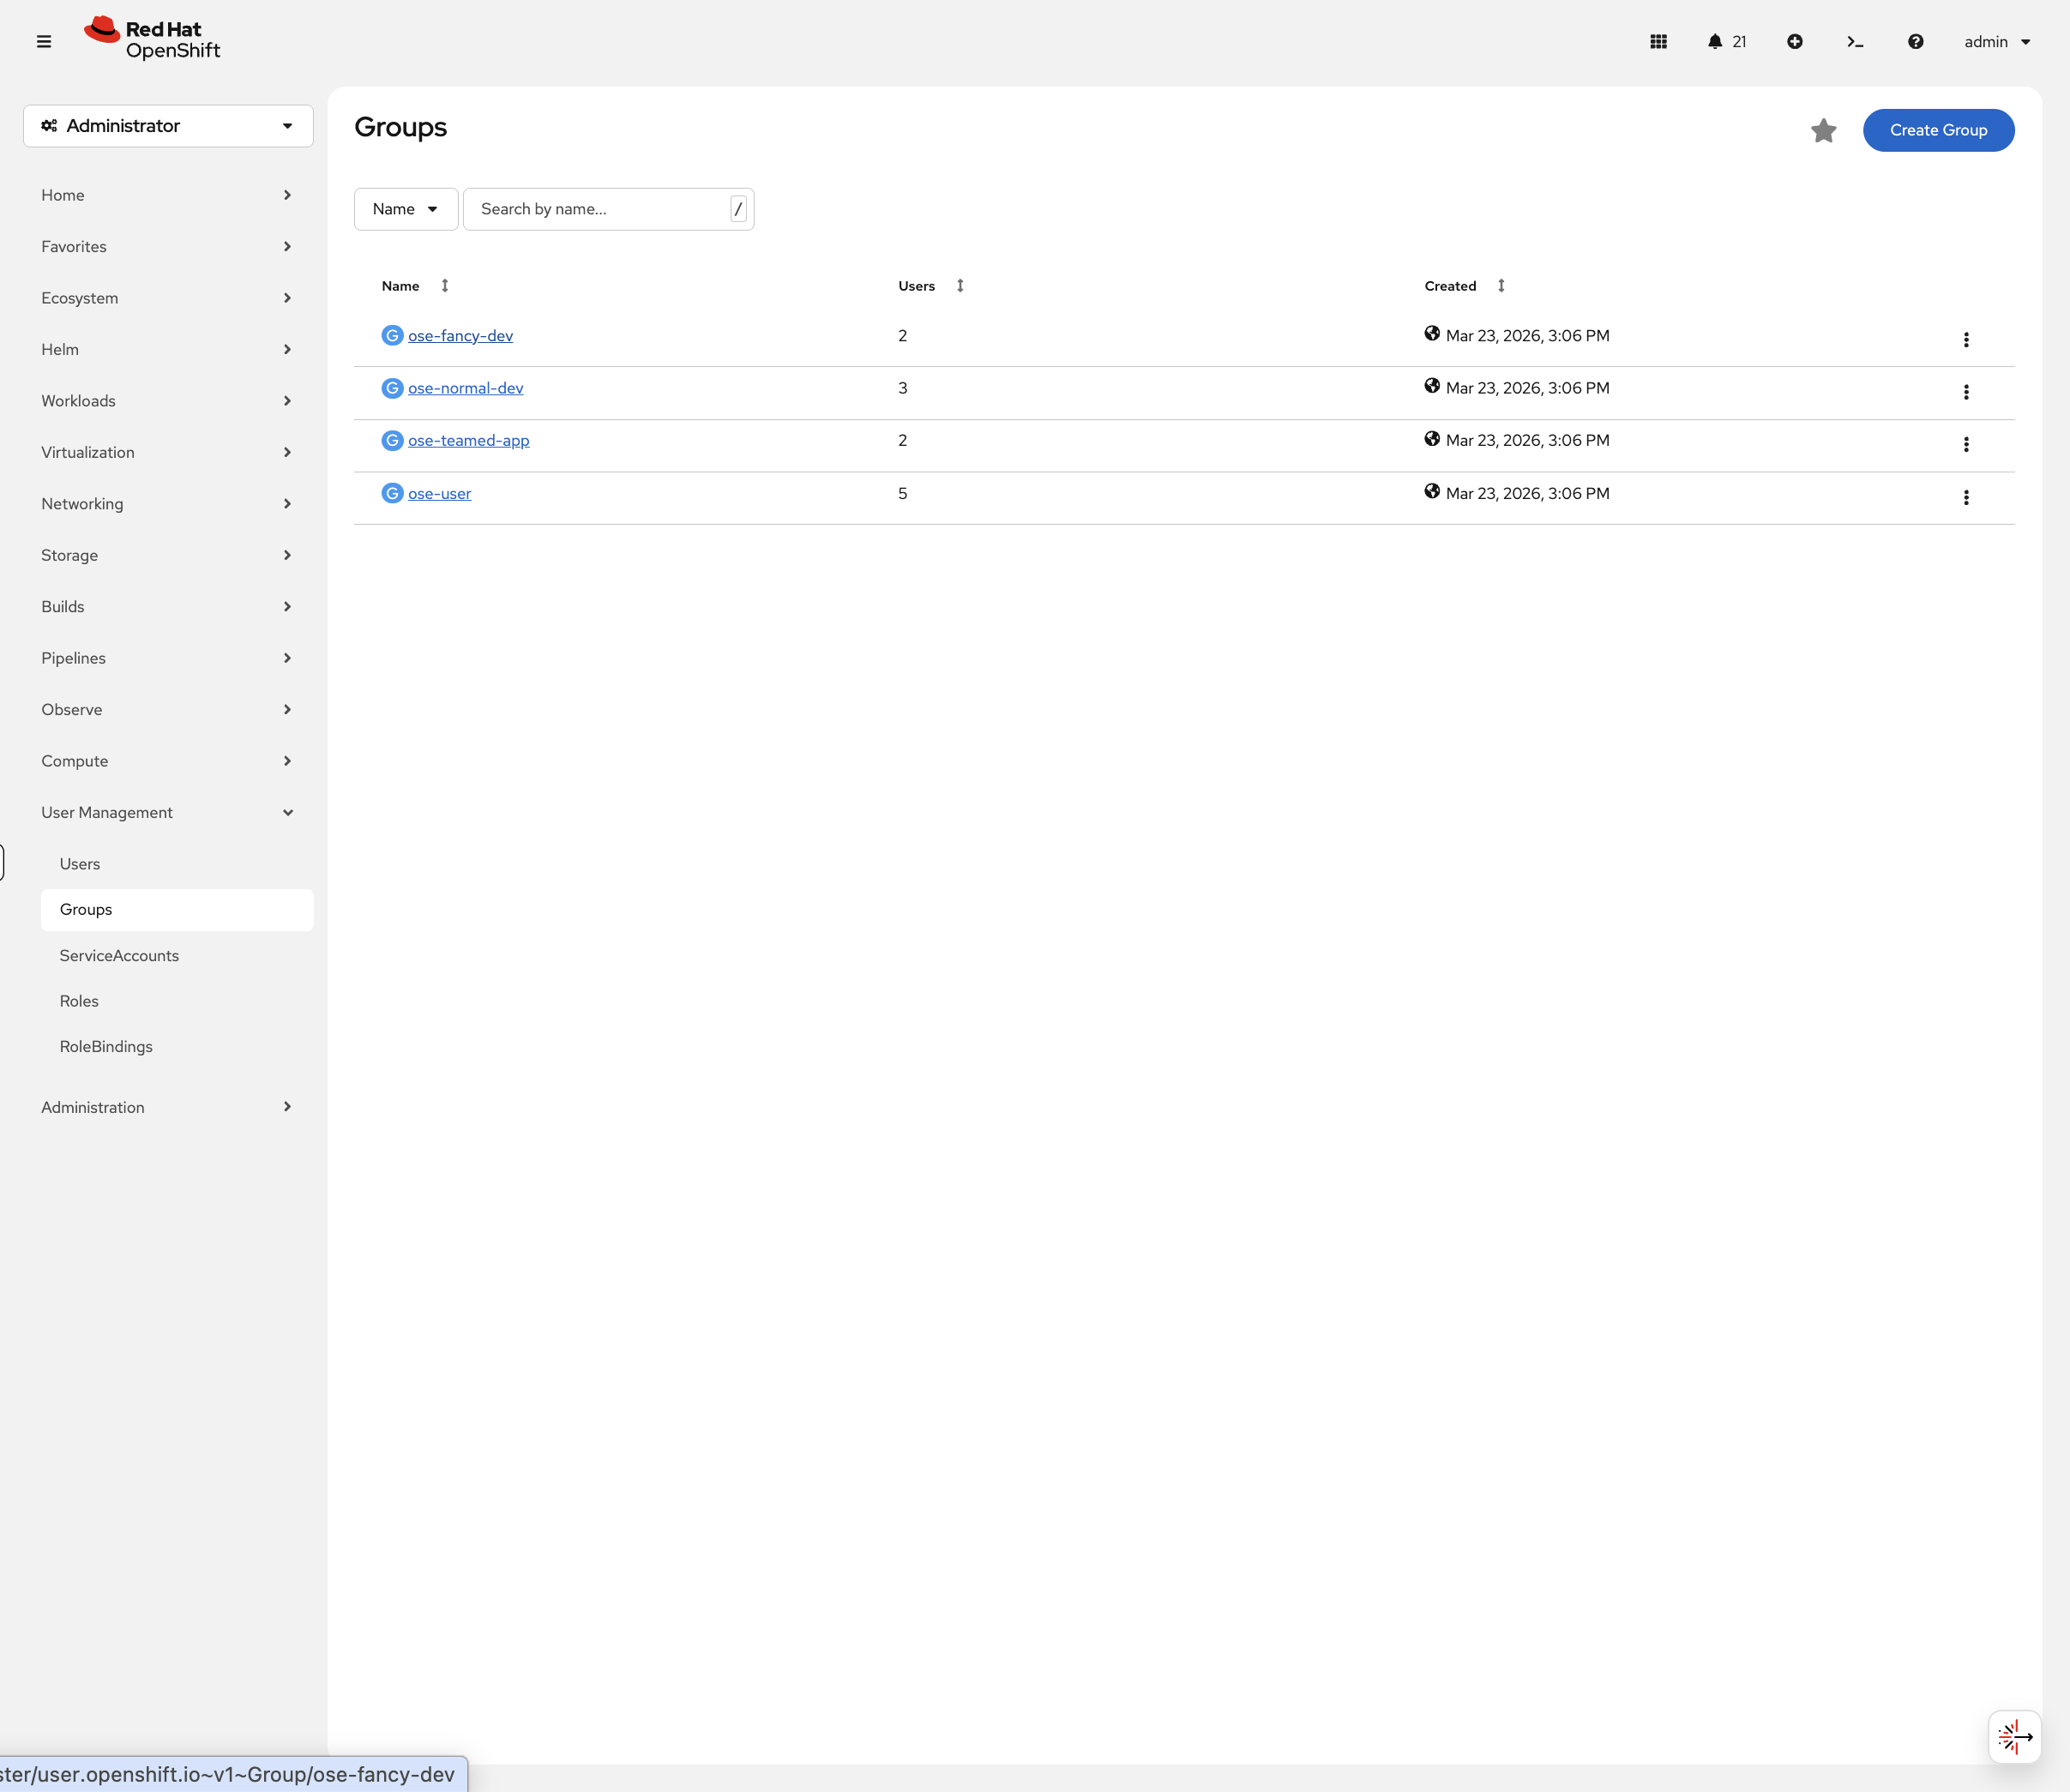
oc get groupsYou’ll see:
NAME             USERS
ose-fancy-dev    fancyuser1, fancyuser2
ose-normal-dev   normaluser1, teamuser1, teamuser2
ose-teamed-app   teamuser1, teamuser2
ose-user         fancyuser1, fancyuser2, normaluser1, teamuser1, teamuser2
Examine a specific group:
oc get group ose-fancy-dev -o yamlThe group includes: - LDAP metadata (sync time, LDAP DN, LDAP server) - List of users in the group
See this in the console too: Navigate to User Management → Groups in the OCP Console:
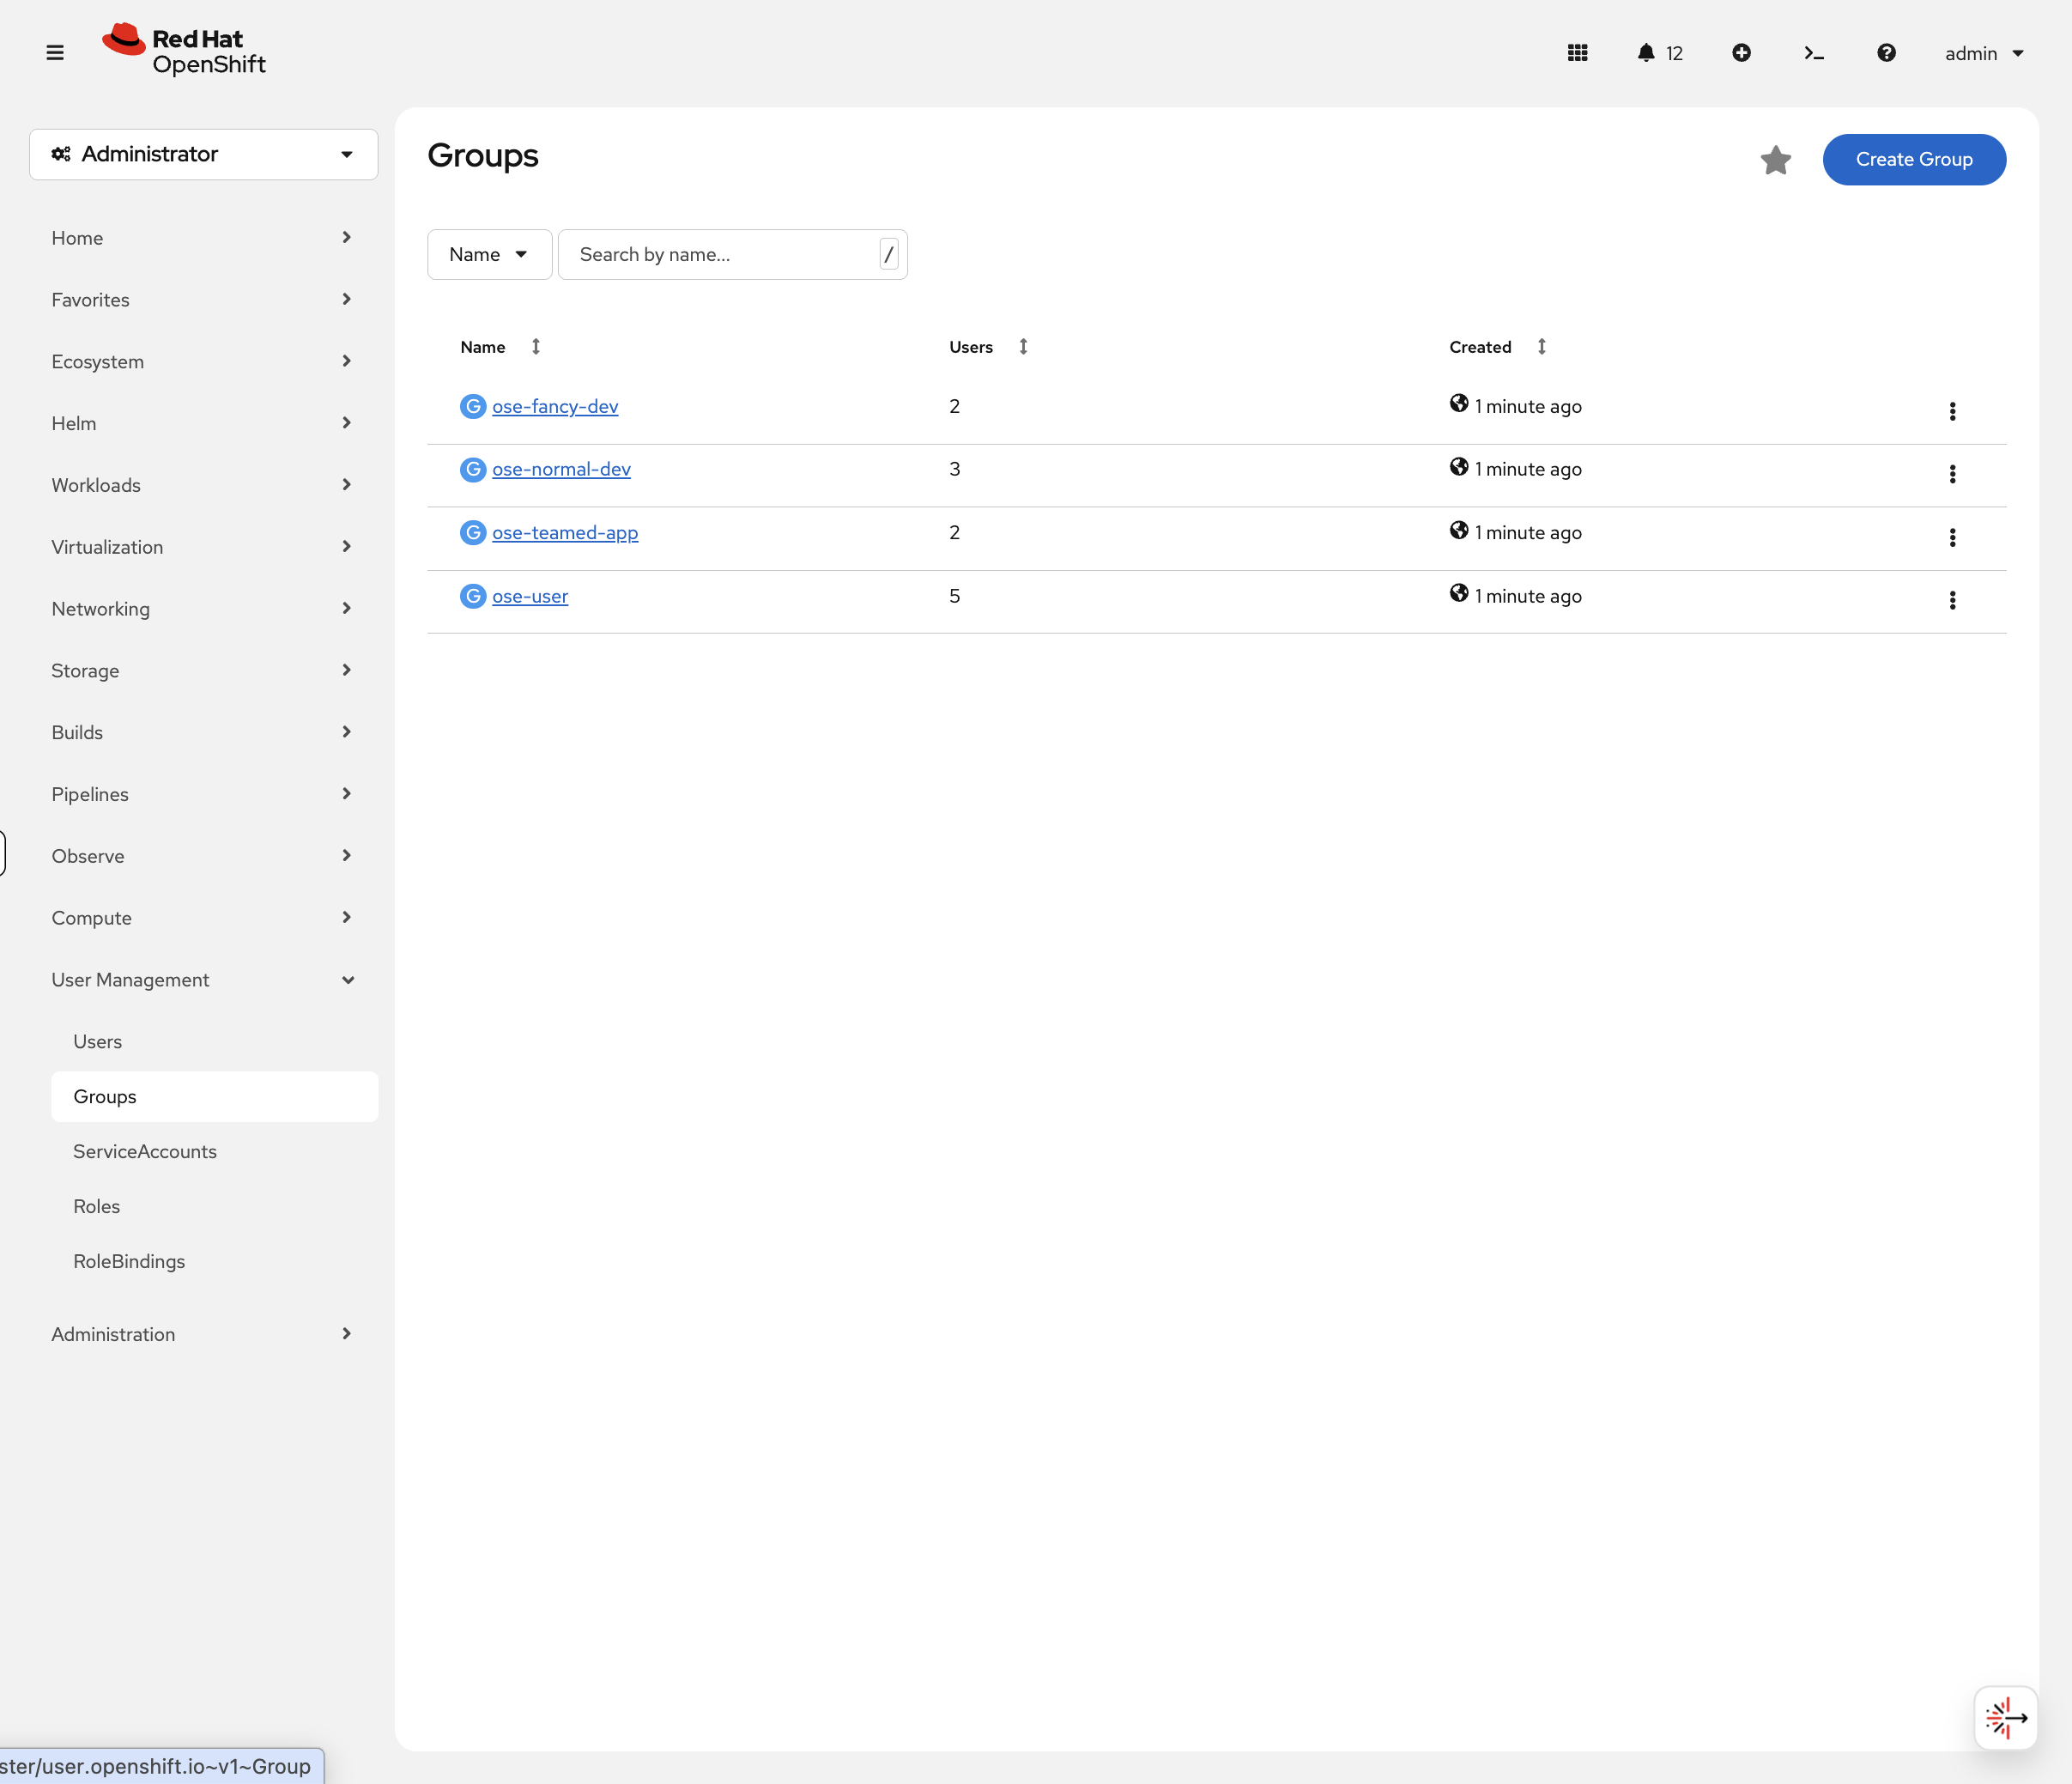
Click on ose-fancy-dev — you’ll see fancyuser1 and fancyuser2 listed as members. Now click User Management → Users:

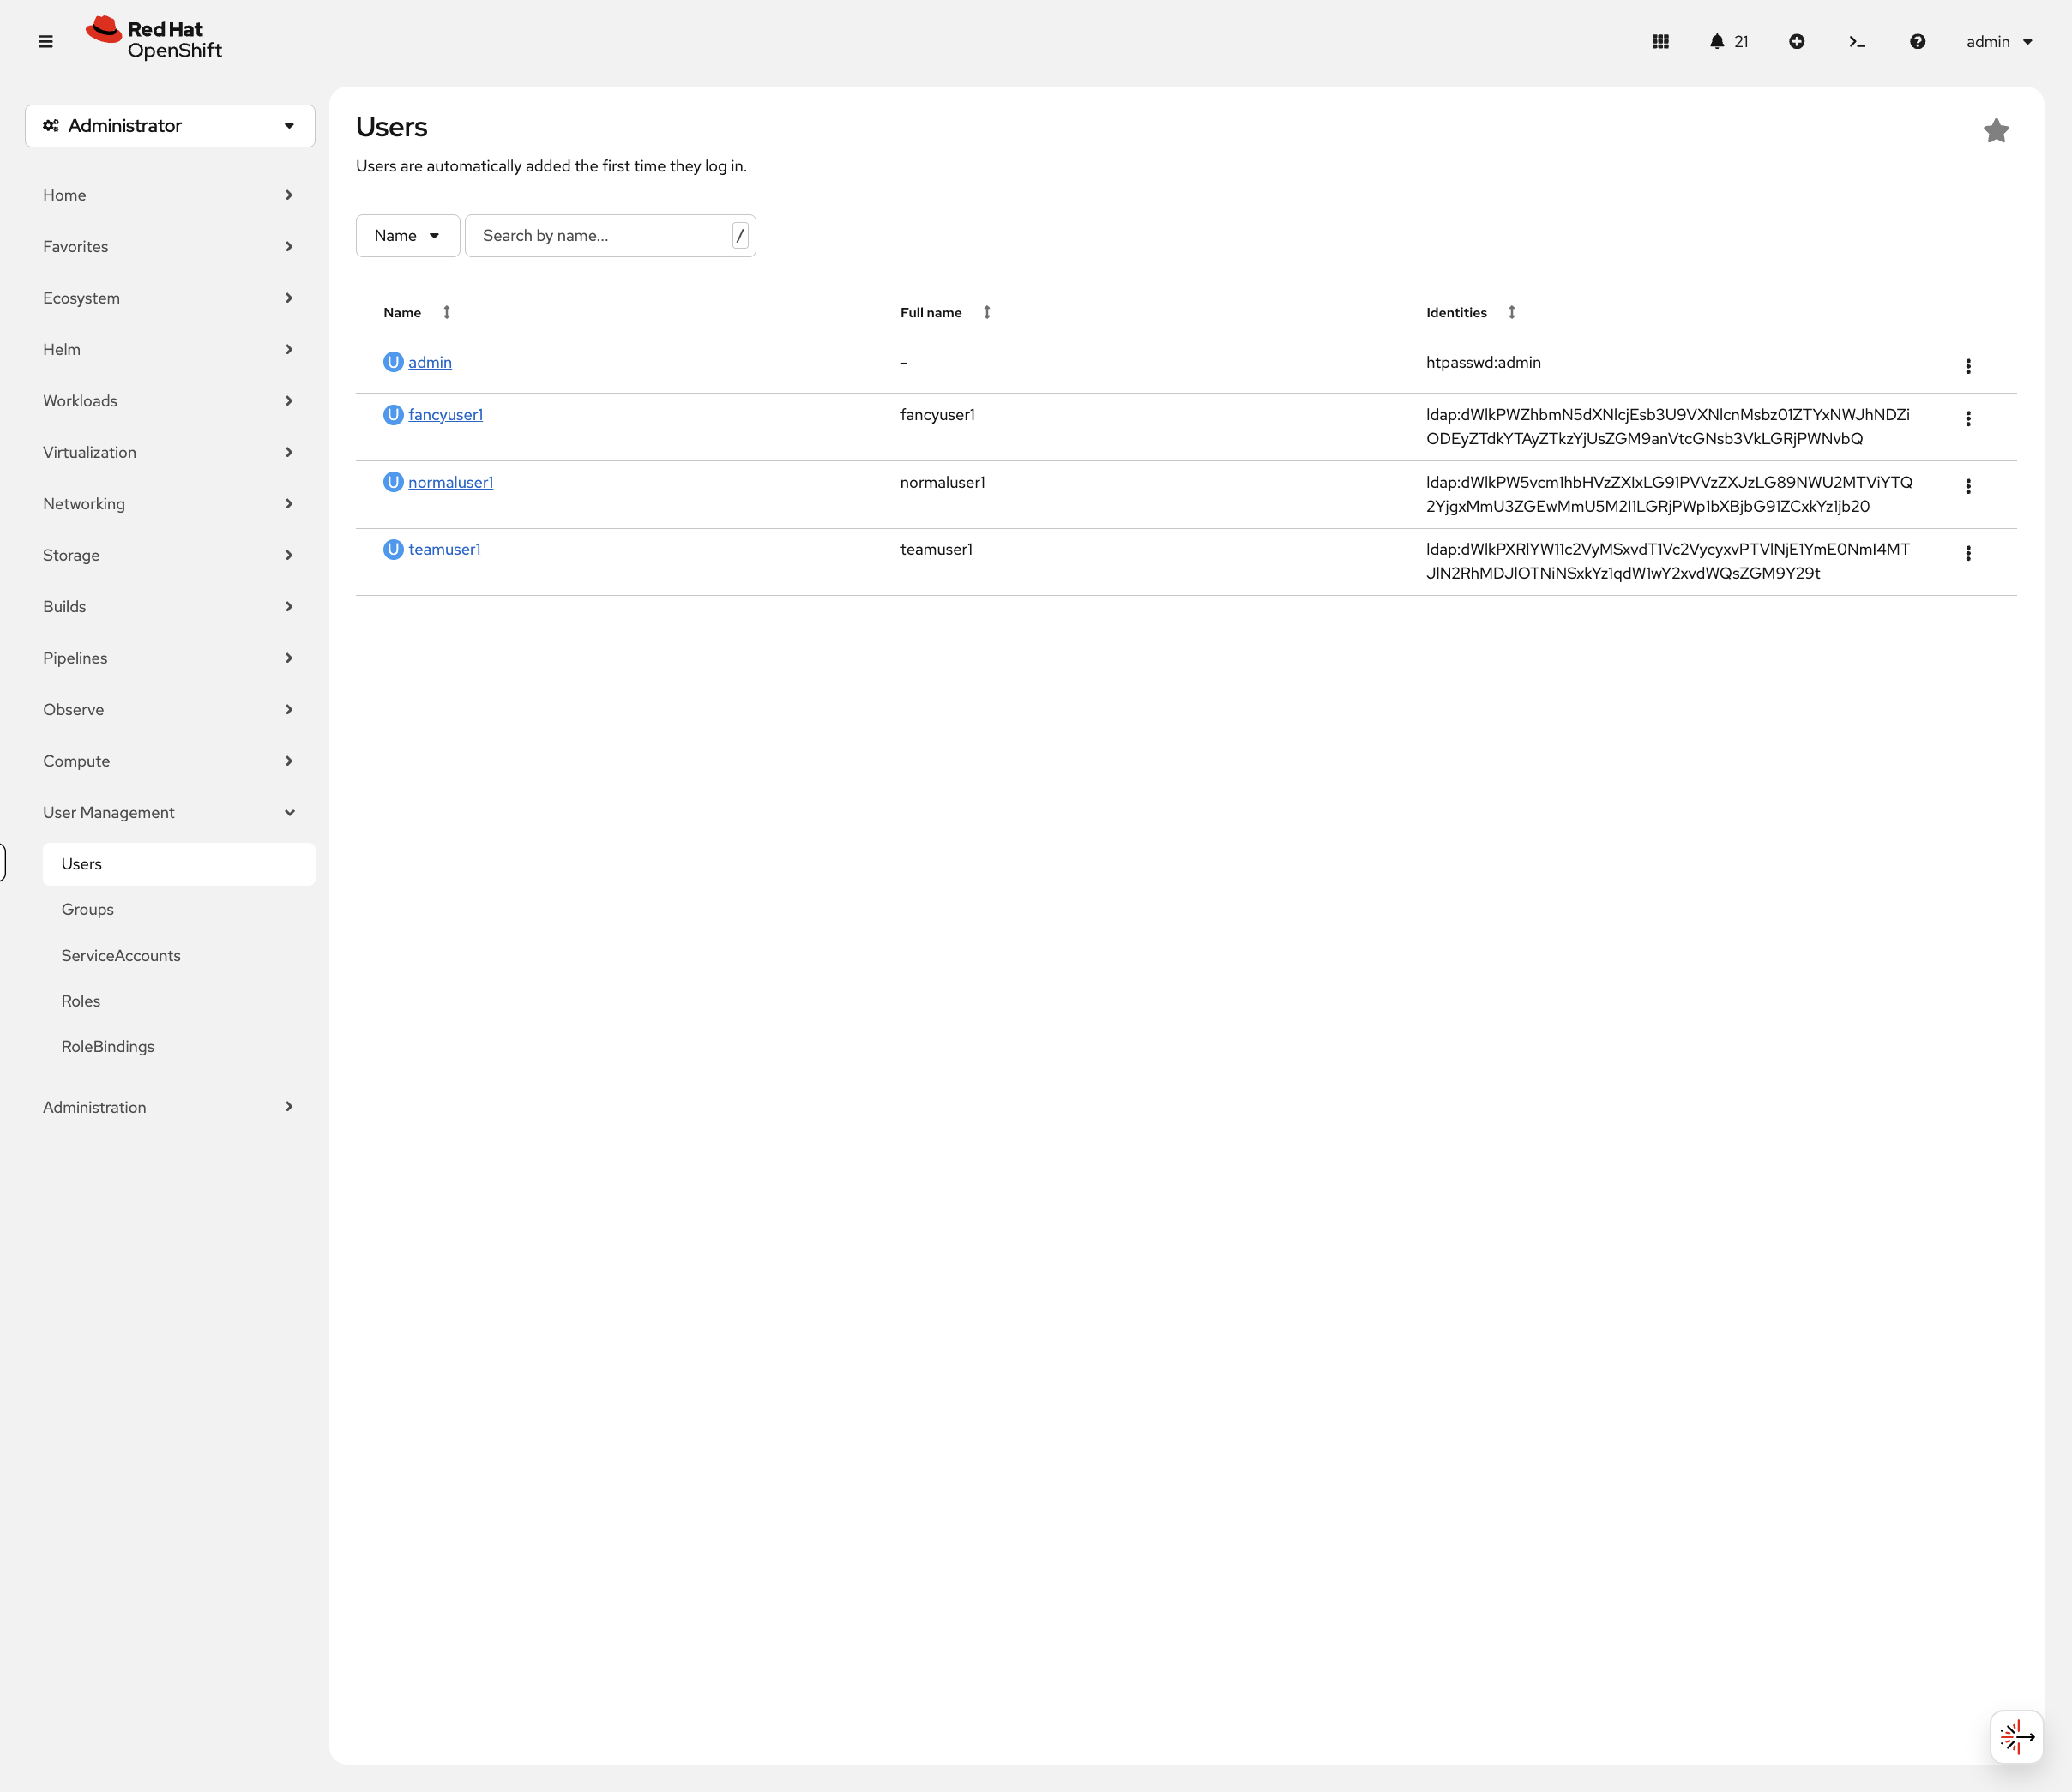
Notice only normaluser1 appears (and admin). The other users exist in LDAP groups but haven’t logged in yet, so OpenShift hasn’t created their User objects.
This is an important distinction: group membership is synced immediately, but User objects are created on first login. In production, you might see a group with 50 members but only 10 User objects — that just means 40 people haven’t logged in yet.
oc get usersConfirms the same thing via CLI — only users who have authenticated appear here.
Step 6: Configure RBAC with Groups
Grant the ose-fancy-dev group cluster-reader privileges to view cluster-wide resources:
oc adm policy add-cluster-role-to-group cluster-reader ose-fancy-devWhat is cluster-reader? A role that allows viewing administrative information (all projects, nodes, cluster settings) without edit permissions.
You can verify this in the console. Navigate to User Management → RoleBindings, switch the Kind filter to Cluster-wide RoleBindings, and search for cluster-reader:
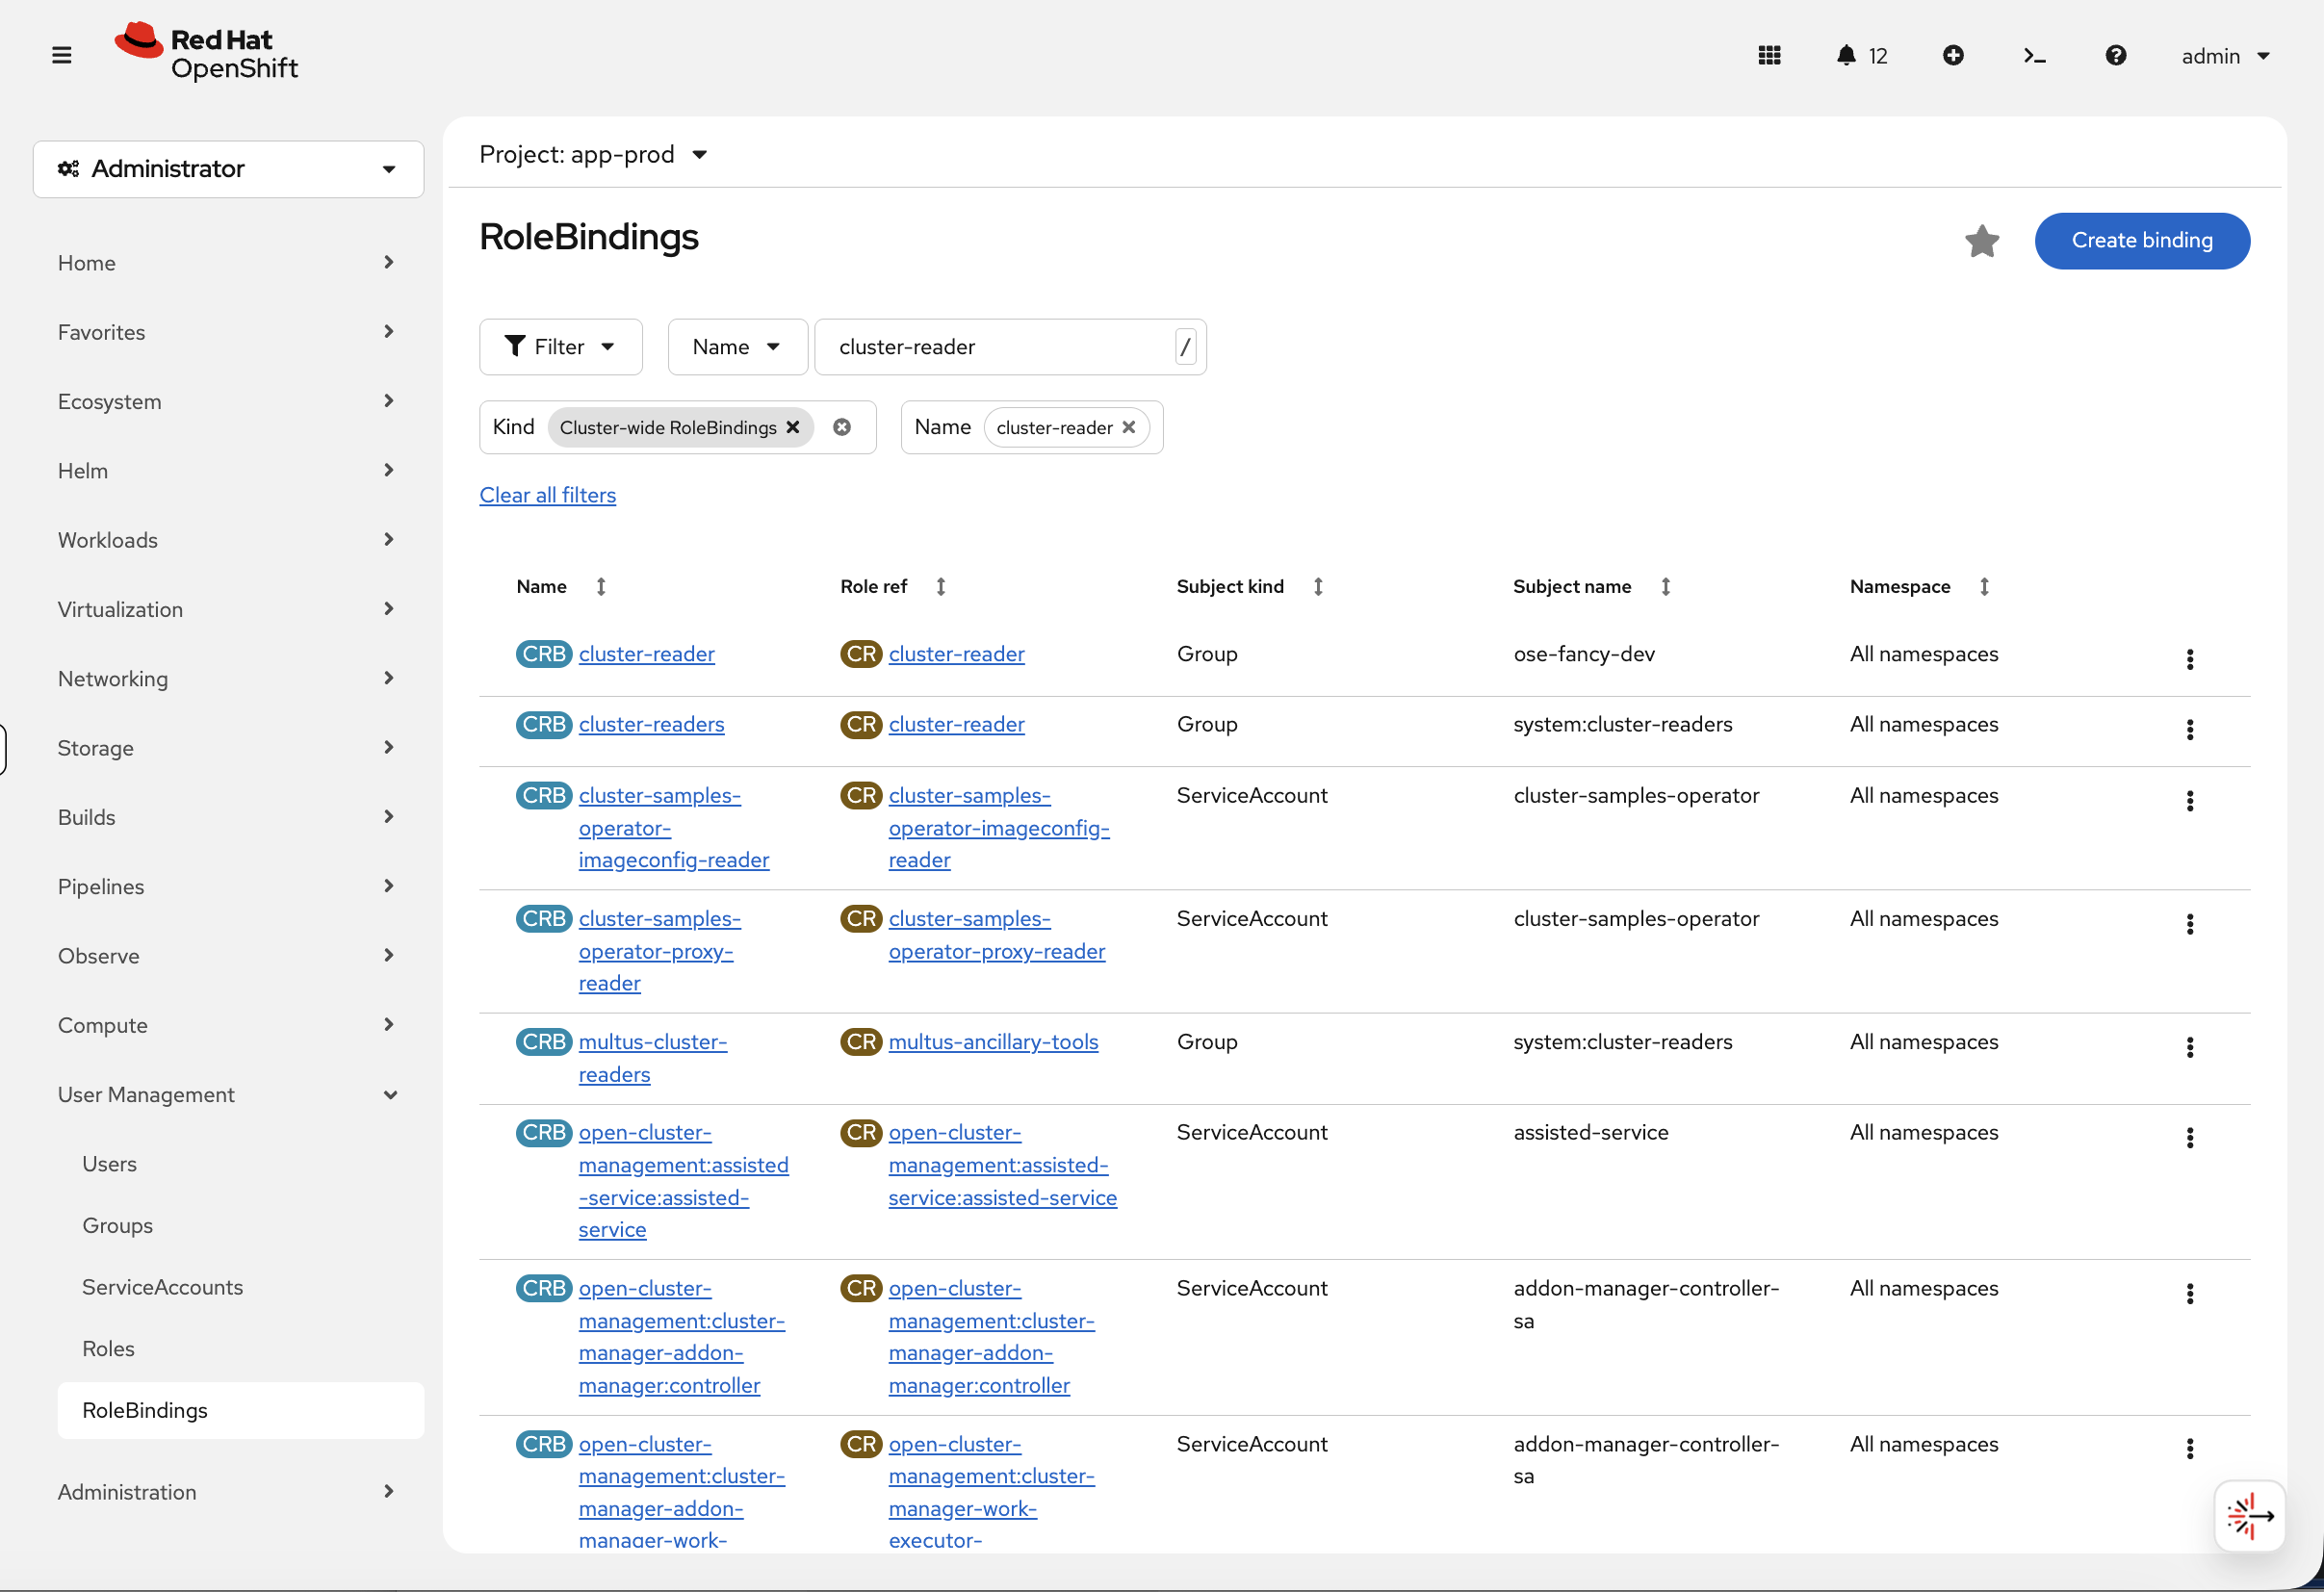
The first row shows ose-fancy-dev bound to cluster-reader across all namespaces — exactly what we just configured.
For more on roles, see Using RBAC to define and apply permissions.
Test as a regular user:
oc login -u normaluser1 -p 'Op#nSh1ft' $OCP_SERVER --insecure-skip-tls-verify
oc whoami
Verify oc whoami shows normaluser1. If it still shows admin, the login failed — wait 30 seconds and try again.
|
oc get projectsResult: No resources found. (Regular users can’t see all projects)
Test as a fancy developer:
oc login -u fancyuser1 -p 'Op#nSh1ft' $OCP_SERVER --insecure-skip-tls-verify
oc whoami
Now you see all projects in the cluster:
NAME                                     STATUS
default                                  Active
kube-system                              Active
openshift-authentication                 Active
openshift-monitoring                     Active
...
This demonstrates group-based RBAC working correctly.
Check current user and groups:
oc whoami
oc whoami --show-context
Step 7: Create Projects for Collaboration
Log back in as cluster admin:
oc login -u {openshift_cluster_admin_username} -p {openshift_cluster_admin_password} --insecure-skip-tls-verifyCreate a typical SDLC project structure:
oc adm new-project app-dev --display-name="Application Development"
oc adm new-project app-test --display-name="Application Testing"
oc adm new-project app-prod --display-name="Application Production"| These projects are now visible in the console project dropdown. Navigate to Home > Projects to see all three with their display names. |
Verify projects were created:
oc get projects | grep app-Step 8: Map Groups to Projects
Grant the ose-teamed-app group edit access to dev and test:
oc adm policy add-role-to-group edit ose-teamed-app -n app-dev
oc adm policy add-role-to-group edit ose-teamed-app -n app-test
Grant view access to production:
oc adm policy add-role-to-group view ose-teamed-app -n app-prodGrant ose-fancy-dev group edit access to production:
oc adm policy add-role-to-group edit ose-fancy-dev -n app-prodView role bindings for a project:
oc get rolebindings -n app-devDescribe a specific role binding:
oc describe rolebinding -n app-dev | grep -A 5 ose-teamed-appVerify in the console. Navigate to User Management → RoleBindings, select project app-dev, and filter by Namespace RoleBindings:
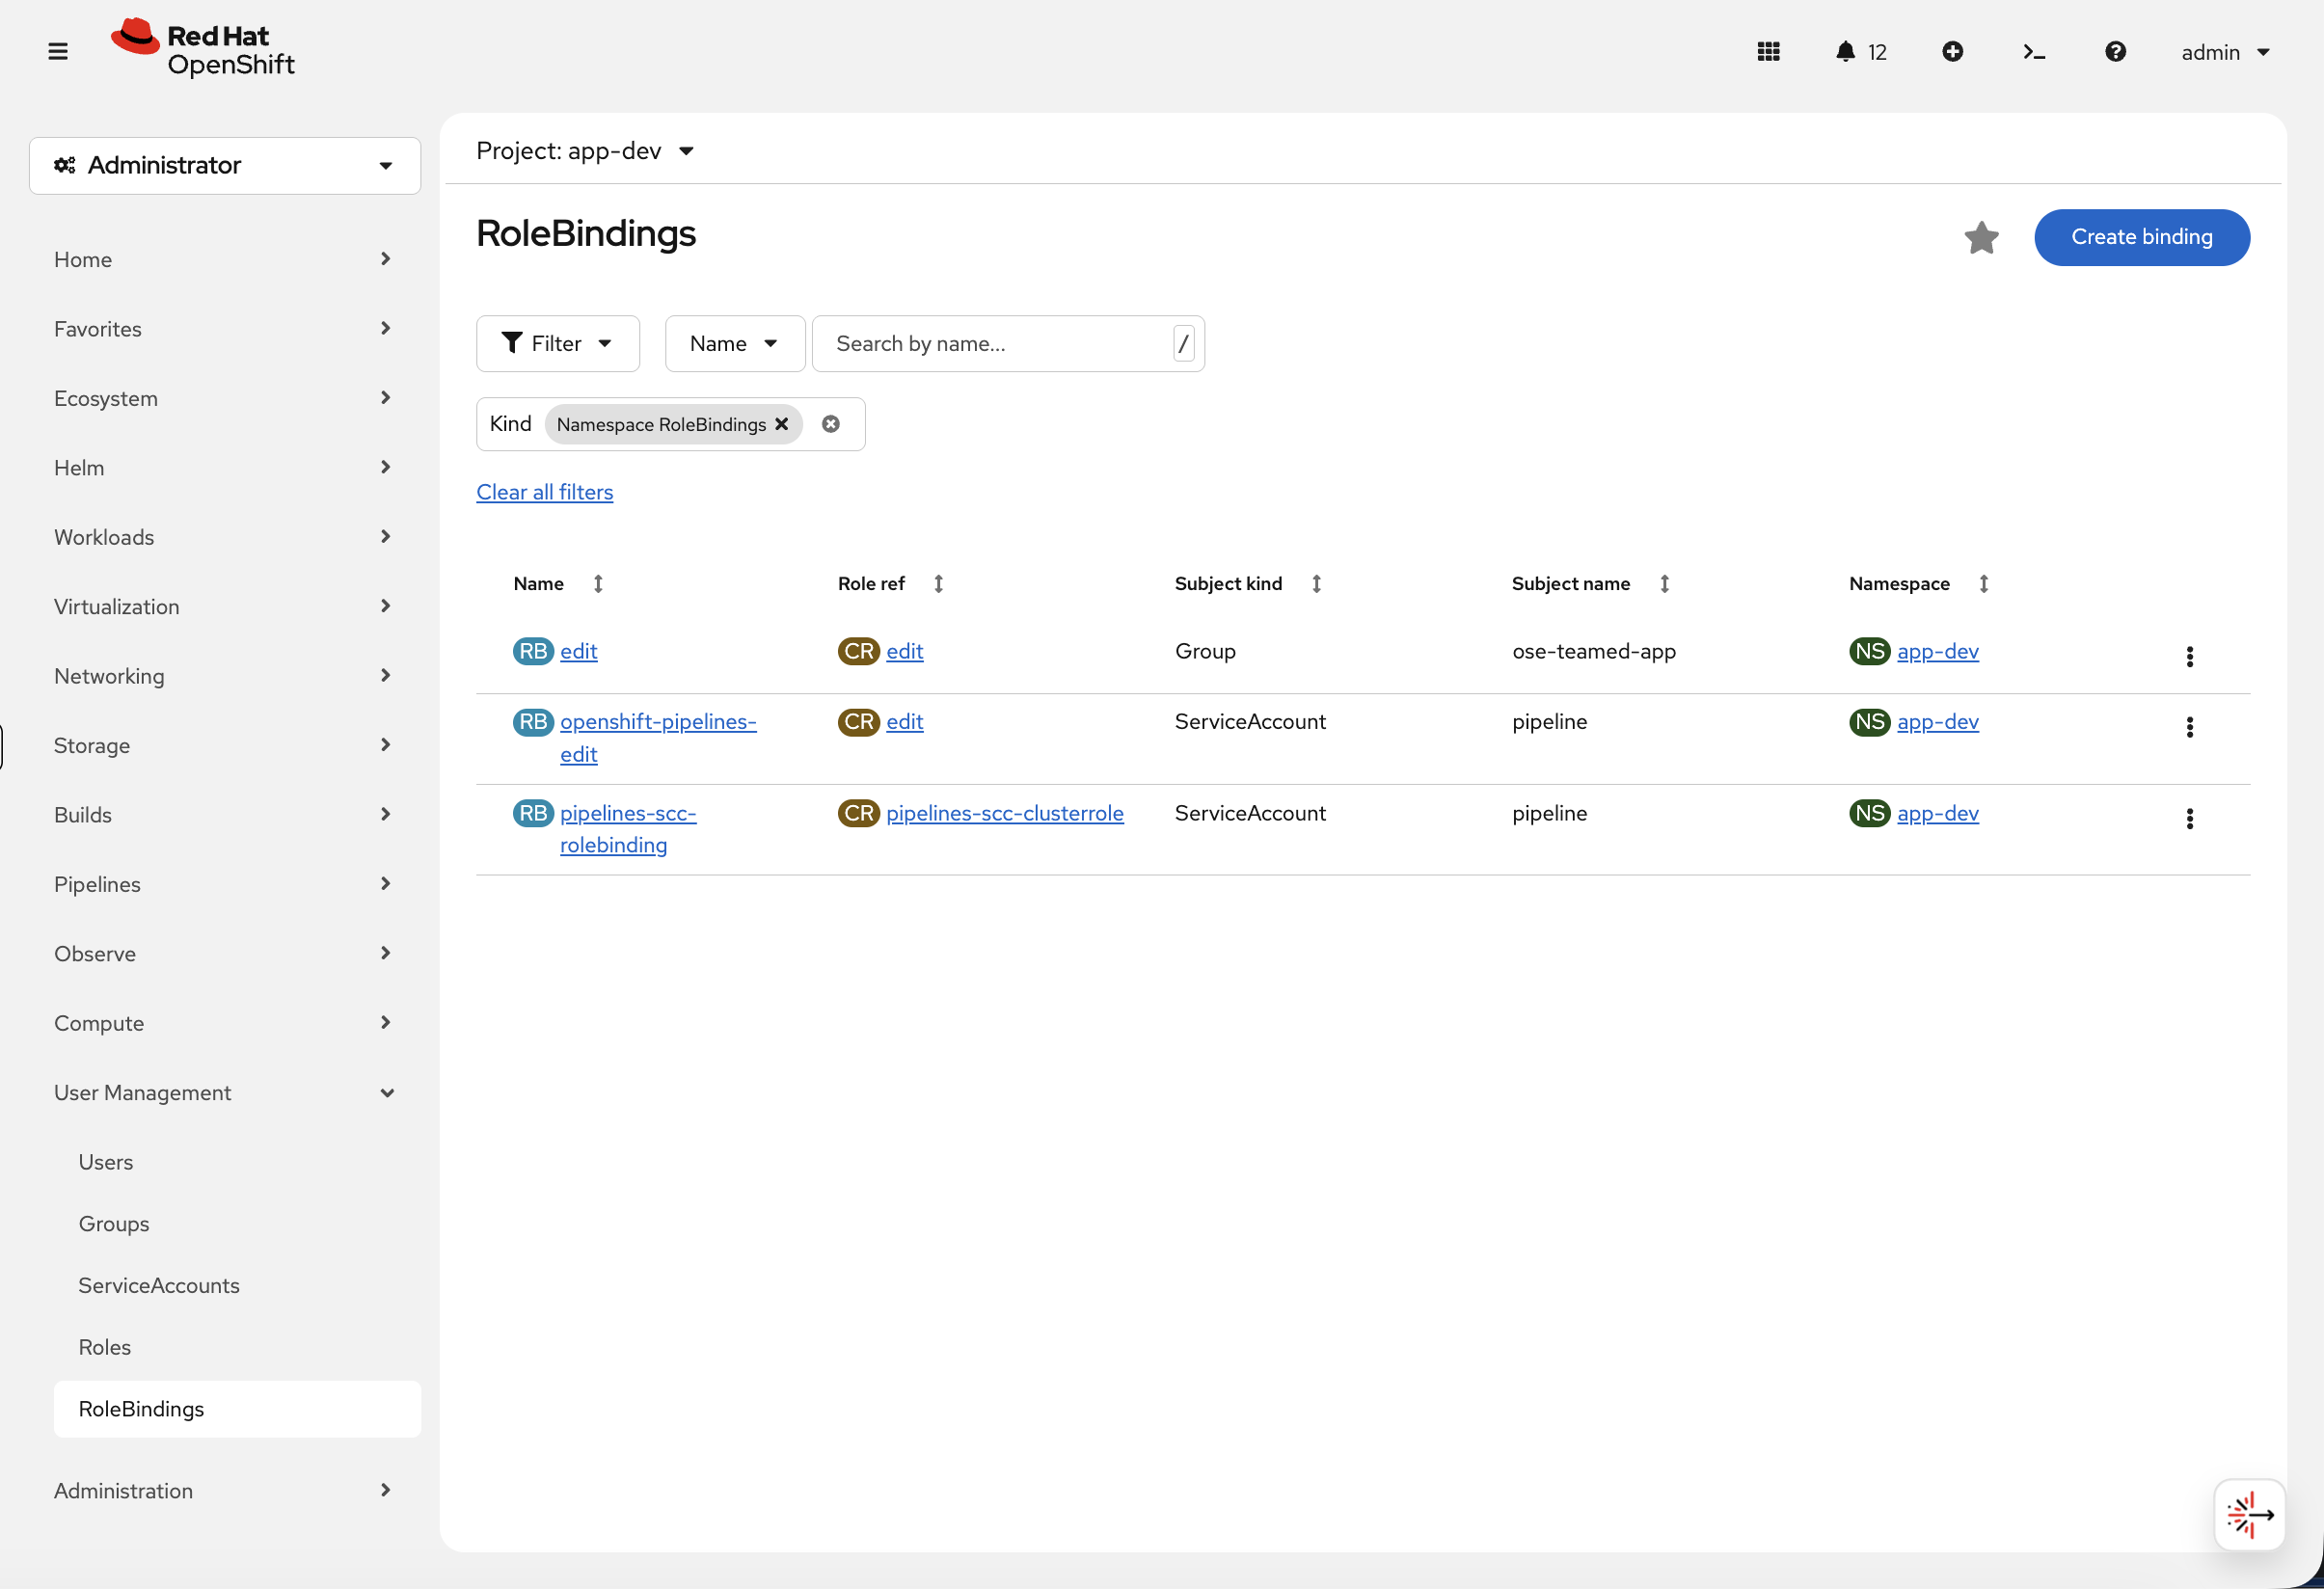
You can immediately see that ose-teamed-app has the edit role in app-dev. Now switch the project to app-prod:
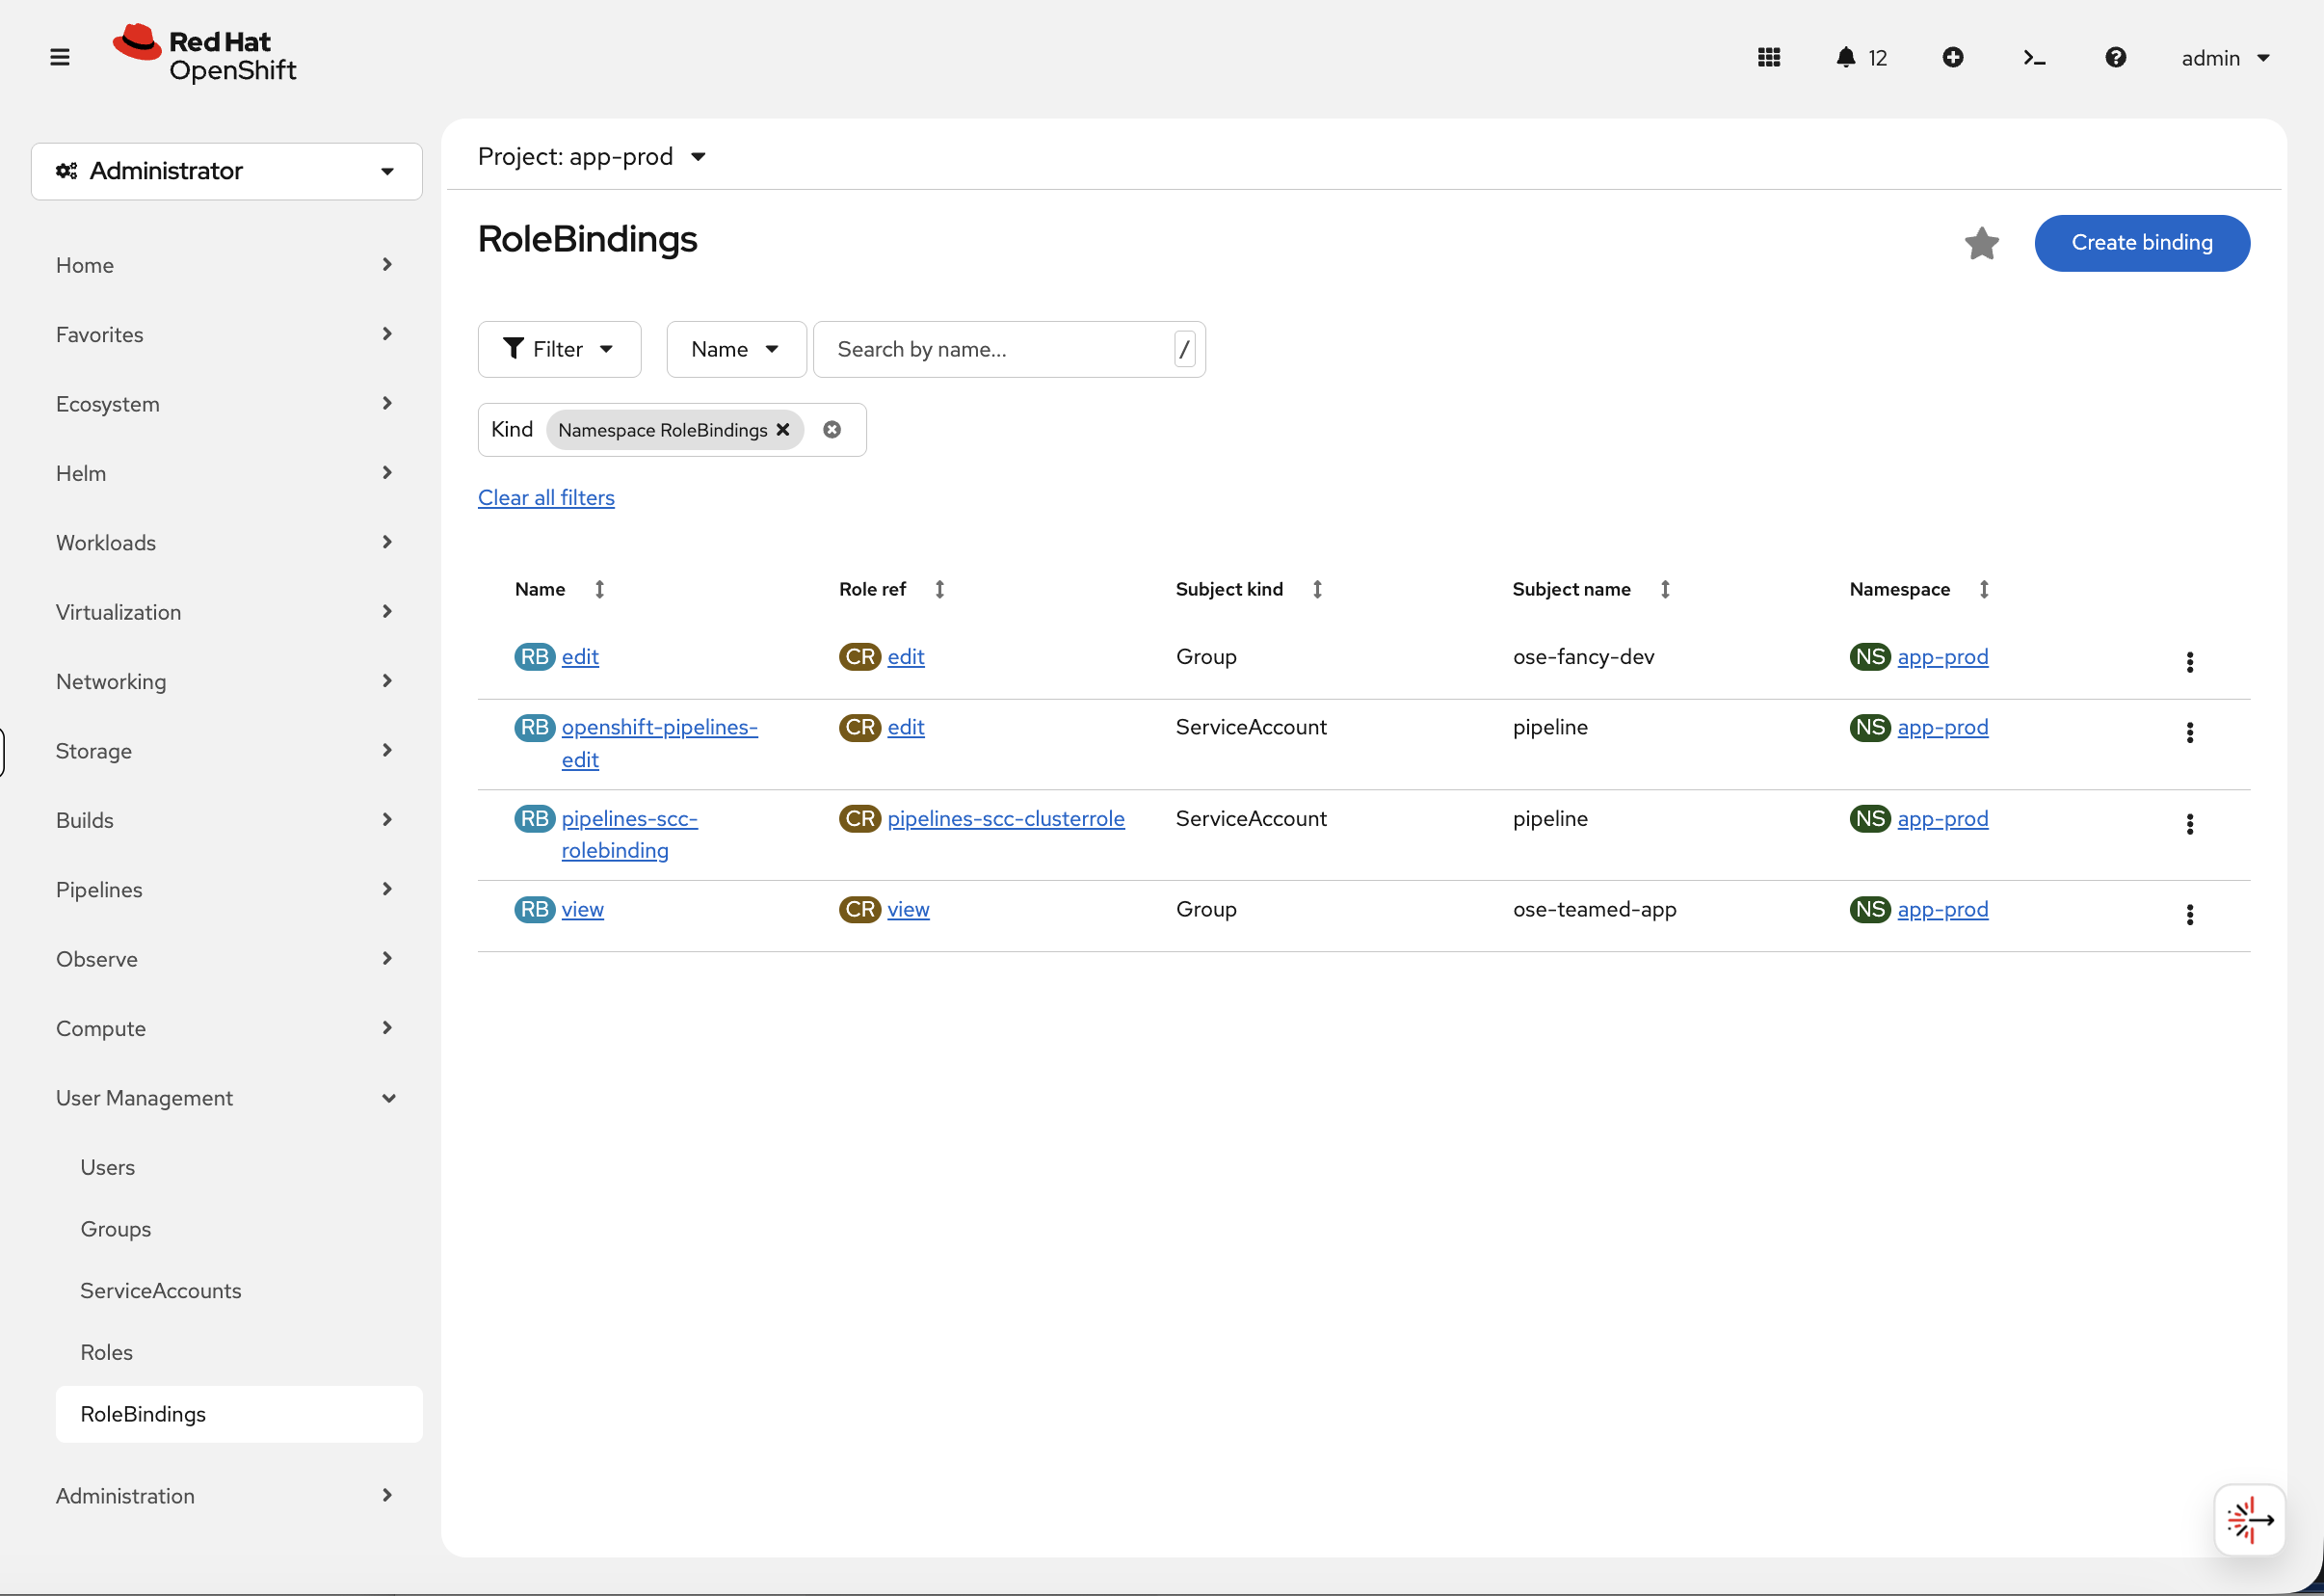
Notice the separation of privileges at a glance — ose-fancy-dev has edit access to production while ose-teamed-app only has view. This is the kind of access review that the console makes much faster than parsing CLI output.
Step 9: Test Project Permissions
Test as normaluser1 (no group access):
oc login -u normaluser1 -p 'Op#nSh1ft' $OCP_SERVER --insecure-skip-tls-verify
oc whoami
oc get projects | grep app-Result: No app- projects visible. This user is not in any project-specific groups.
Test as teamuser1 (ose-teamed-app member):
oc login -u teamuser1 -p 'Op#nSh1ft' $OCP_SERVER --insecure-skip-tls-verify
oc whoami
oc get projects | grep app-Now you see:
NAME       DISPLAY NAME              STATUS
app-dev    Application Development   Active
app-prod   Application Production    Active
app-test   Application Testing       Active
Verify permissions in development (edit access):
oc auth can-i create deployment -n app-dev
oc auth can-i create pod -n app-dev
oc auth can-i create service -n app-dev
All should return: yes (teamuser1 has edit role in app-dev)
Verify permissions in production (view-only access):
oc auth can-i create deployment -n app-prod
oc auth can-i create pod -n app-prod
Both should return: no (teamuser1 only has view role in app-prod)
Check what view access allows:
oc auth can-i get pods -n app-prod
oc auth can-i list deployments -n app-prod
Both return: yes (view role allows read operations)
Perfect! This demonstrates how operations teams verify RBAC is correctly configured without creating test resources.
Step 10: Manage Users and Groups in Console
The web console provides a graphical interface for user and group management.
|
Make sure you’re logged into the OpenShift console as admin (not an LDAP user) to access User Management. Regular users don’t have permission to view cluster-wide user and group information. |
View users in console:
Navigate to: User Management → Users
You’ll see all users who have logged in, their identities, and associated groups.
View groups in console:
Navigate to: User Management → Groups
Shows all synced LDAP groups and their members.
View role bindings in console:
Navigate to: User Management → RoleBindings
Filter by project to see who has access to what.
Console advantages: - Visual overview of all users/groups - Easy role binding management - Quick access review - No need to remember YAML syntax
Step 11: Security Best Practices
Ensure kubeadmin is removed after configuring identity provider:
oc login -u {openshift_cluster_admin_username} -p {openshift_cluster_admin_password} --insecure-skip-tls-verifyFirst, grant cluster-admin to a real user:
oc adm policy add-cluster-role-to-user cluster-admin fancyuser1Verify it works:
oc login -u fancyuser1 -p 'Op#nSh1ft' $OCP_SERVER --insecure-skip-tls-verify
oc auth can-i '*' '*'
Output: yes
In production, always remove kubeadmin:
After verifying your identity provider works and granting cluster-admin to at least one LDAP/OIDC user, delete the kubeadmin secret from the kube-system namespace. This removes the bootstrap account and ensures all cluster access goes through your enterprise identity provider. On this workshop cluster, kubeadmin has already been removed — you’re using the admin HTPasswd account instead.
Automate LDAP group sync with CronJob:
Instead of running group sync manually, production environments typically create a Kubernetes CronJob that runs the sync operation automatically (for example, every hour). This ensures LDAP group membership changes are reflected in OpenShift without manual intervention.
The CronJob would:
- Run on a regular schedule (e.g., */60 * * * * for hourly)
- Use a service account with appropriate permissions
- Mount the group sync configuration from a ConfigMap
- Execute oc adm groups sync with the --confirm flag
For complete implementation details, see the official documentation on automating LDAP sync.
For this lab, manual group sync is sufficient for learning purposes.
Summary
What you configured:
✅ LDAP Identity Provider - Integrated enterprise LDAP authentication
✅ Group Synchronization - Imported LDAP groups to OpenShift
✅ RBAC with Groups - Granted cluster-reader and project-specific roles
✅ Project Collaboration - Created dev/test/prod projects with team access
✅ Permission Testing - Verified users have correct access levels
✅ Security Hardening - Understood kubeadmin removal and group sync automation
Key takeaway: OpenShift authentication integrates with existing identity management (LDAP, OIDC, HTPasswd, GitHub, and others) and uses group-based RBAC for scalable permission management.
Production recommendations:
-
Use LDAP/OIDC, never HTPasswd
-
Remove kubeadmin bootstrap account after configuring real identity provider
-
Automate group sync with CronJob
-
Use groups for RBAC, not individual users
-
Follow least-privilege principle (view over edit, edit over admin)
-
Regular access reviews using console User Management
Additional Resources
-
Authentication and Authorization Guide: Official documentation
-
Identity Providers Overview: Understanding identity providers
-
LDAP Configuration: Configuring LDAP identity provider
-
RBAC Documentation: Using RBAC
-
Group Sync: Syncing LDAP groups
Cleanup
Restore the cluster to its original authentication state before proceeding to other modules:
# Log back in as admin
oc login -u {openshift_cluster_admin_username} -p {openshift_cluster_admin_password} --insecure-skip-tls-verify

# Restore OAuth to htpasswd only (remove LDAP provider)
cat <<'CLEANUP' | oc apply -f -
apiVersion: config.openshift.io/v1
kind: OAuth
metadata:
  name: cluster
spec:
  identityProviders:
  - name: htpasswd
    mappingMethod: claim
    type: HTPasswd
    htpasswd:
      fileData:
        name: htpasswd
CLEANUP

# Remove LDAP secrets and config
oc delete secret ldap-secret -n openshift-config --ignore-not-found
oc delete configmap ca-config-map -n openshift-config --ignore-not-found

# Remove LDAP users, identities, and groups
oc delete user normaluser1 fancyuser1 fancyuser2 teamuser1 teamuser2 --ignore-not-found
oc delete identity --all --ignore-not-found
oc delete group ose-fancy-dev ose-normal-dev ose-teamed-app ose-user --ignore-not-found

# Remove RBAC bindings
oc adm policy remove-cluster-role-from-user cluster-admin fancyuser1 2>/dev/null || true
oc adm policy remove-cluster-role-from-group cluster-reader ose-fancy-dev 2>/dev/null || true

# Remove test projects and wait for OAuth rollout in the background
(
  oc delete project app-dev app-test app-prod --ignore-not-found
  oc rollout status deployment/oauth-openshift -n openshift-authentication --timeout=120s
) &>/dev/null &
echo "Cleanup running in background — OAuth restoring to htpasswd only. You can continue to the next module."