OpenShift Virtualization
Module Overview
Duration: 35 minutes
Audience: Infrastructure Architects, IT Operations
Your organization has workloads running on VMs that can’t be containerized yet — databases, middleware, Windows services. OpenShift Virtualization lets you run those VMs alongside containers on the same platform using KubeVirt — a CNCF project built on RHEL KVM. Same scheduler, same networking, same monitoring, same RBAC, same oc commands.
What this means for your organization:
-
One platform — VMs and containers managed with the same tools and skills
-
Migrate at your pace — run VMs today, containerize when ready. The Migration Toolkit for Virtualization (MTV) handles VM migration with network and storage mapping
-
Production-ready — live migration, snapshots, SVVP-certified Windows support, bare-metal performance
Common use cases:
-
Consolidate virtualization platforms — bring VMs from existing hypervisors onto the same platform as your containers. One set of tools, one team, one support contract instead of managing separate stacks
-
Legacy applications — that Oracle database, the .NET Framework app, the RHEL 6 middleware server — run them as VMs alongside your modern containerized services
-
Windows workloads — run SVVP-certified Windows Server VMs for Active Directory, SQL Server, IIS, or any Windows-dependent application
-
Dev/test environments — clone production VMs in seconds to create isolated test environments without separate infrastructure
-
Lift and shift — use the Migration Toolkit for Virtualization (MTV) to migrate VMs with their networks and storage mappings, then modernize at your own pace
Learning Objectives
-
Create a VM from the console using InstanceTypes
-
See how VMs are just pods under the hood
-
Live migrate a running VM between nodes
-
Clone a VM for rapid provisioning
-
Take snapshots for backup/rollback
Prerequisites Check
OpenShift Virtualization should already be installed. Verify:
oc get csv -n openshift-cnv | grep kubevirtExpected output shows Succeeded:
kubevirt-hyperconverged-operator.v4.20.x OpenShift Virtualization 4.20.x Succeeded
Create a VM
First, create a project for this module:
oc new-project vm-demoNow create a VM using the console — the same cloud-style experience your teams get in AWS or Azure.
Step 1: Open the Create Wizard
-
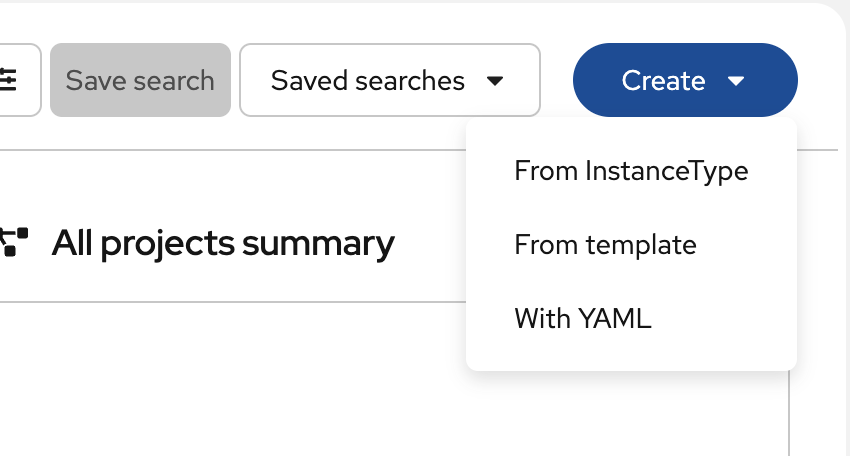
In the OpenShift console, switch to the Fleet Virtualization perspective from the top-left dropdown
-
Click the Create dropdown and select From InstanceType
Step 2: Select InstanceType and Boot Source
OpenShift Virtualization provides InstanceTypes — predefined compute profiles similar to cloud instance families:
| Series | Use case |
|---|---|
U (Universal) |
General-purpose workloads |
O (Overcommitted) |
Dev/test with CPU overcommit |
CX (Compute) |
CPU-intensive workloads |
M (Memory) |
Memory-intensive (databases, caching) |
N (Network) |
Network-intensive workloads |
-
Under Select InstanceType, choose Red Hat provided → General Purpose → medium: 1 CPUs, 4 GiB Memory
-
Select the Red Hat Enterprise Linux 9 boot source from the volume list above
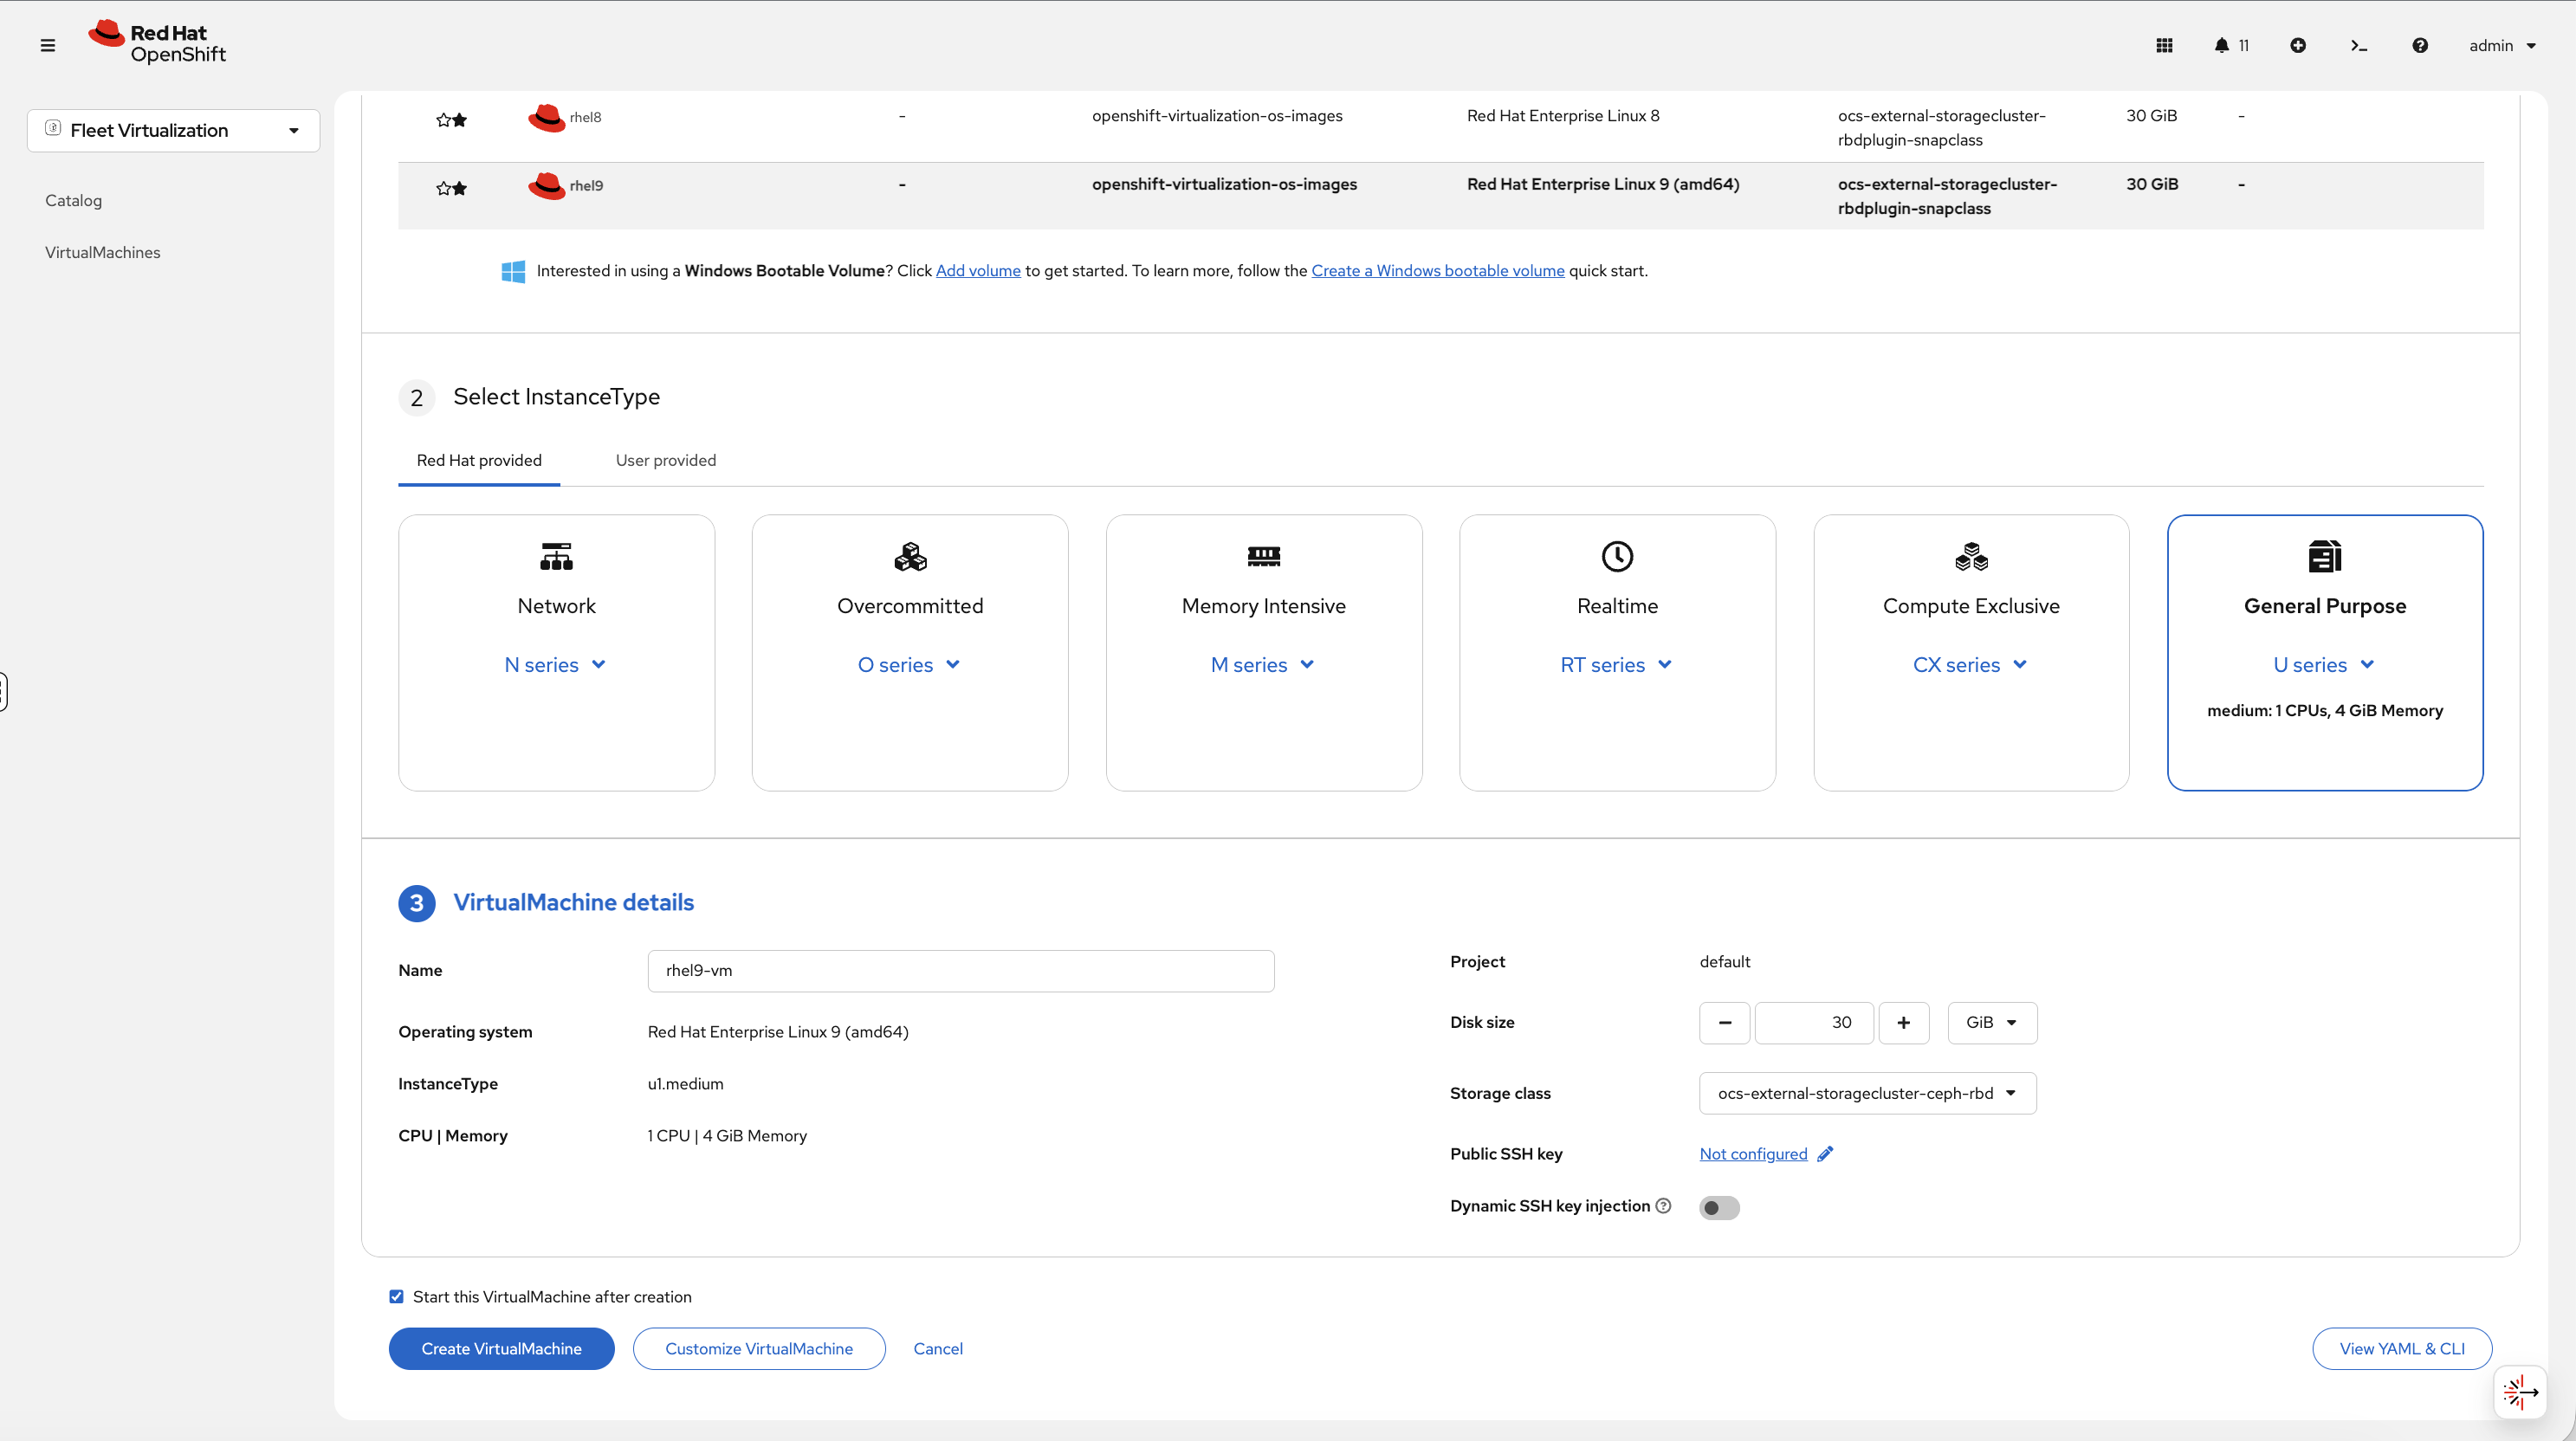
Step 3: Configure and Create
In the VirtualMachine details section:
-
Change the Name to
rhel9-vm -
Verify Project shows
vm-demo(if not, go back and select thevm-demoproject before entering the wizard) -
Leave defaults: 30 GiB disk, default storage class
-
Leave Start this VirtualMachine after creation checked
-
Click Create VirtualMachine
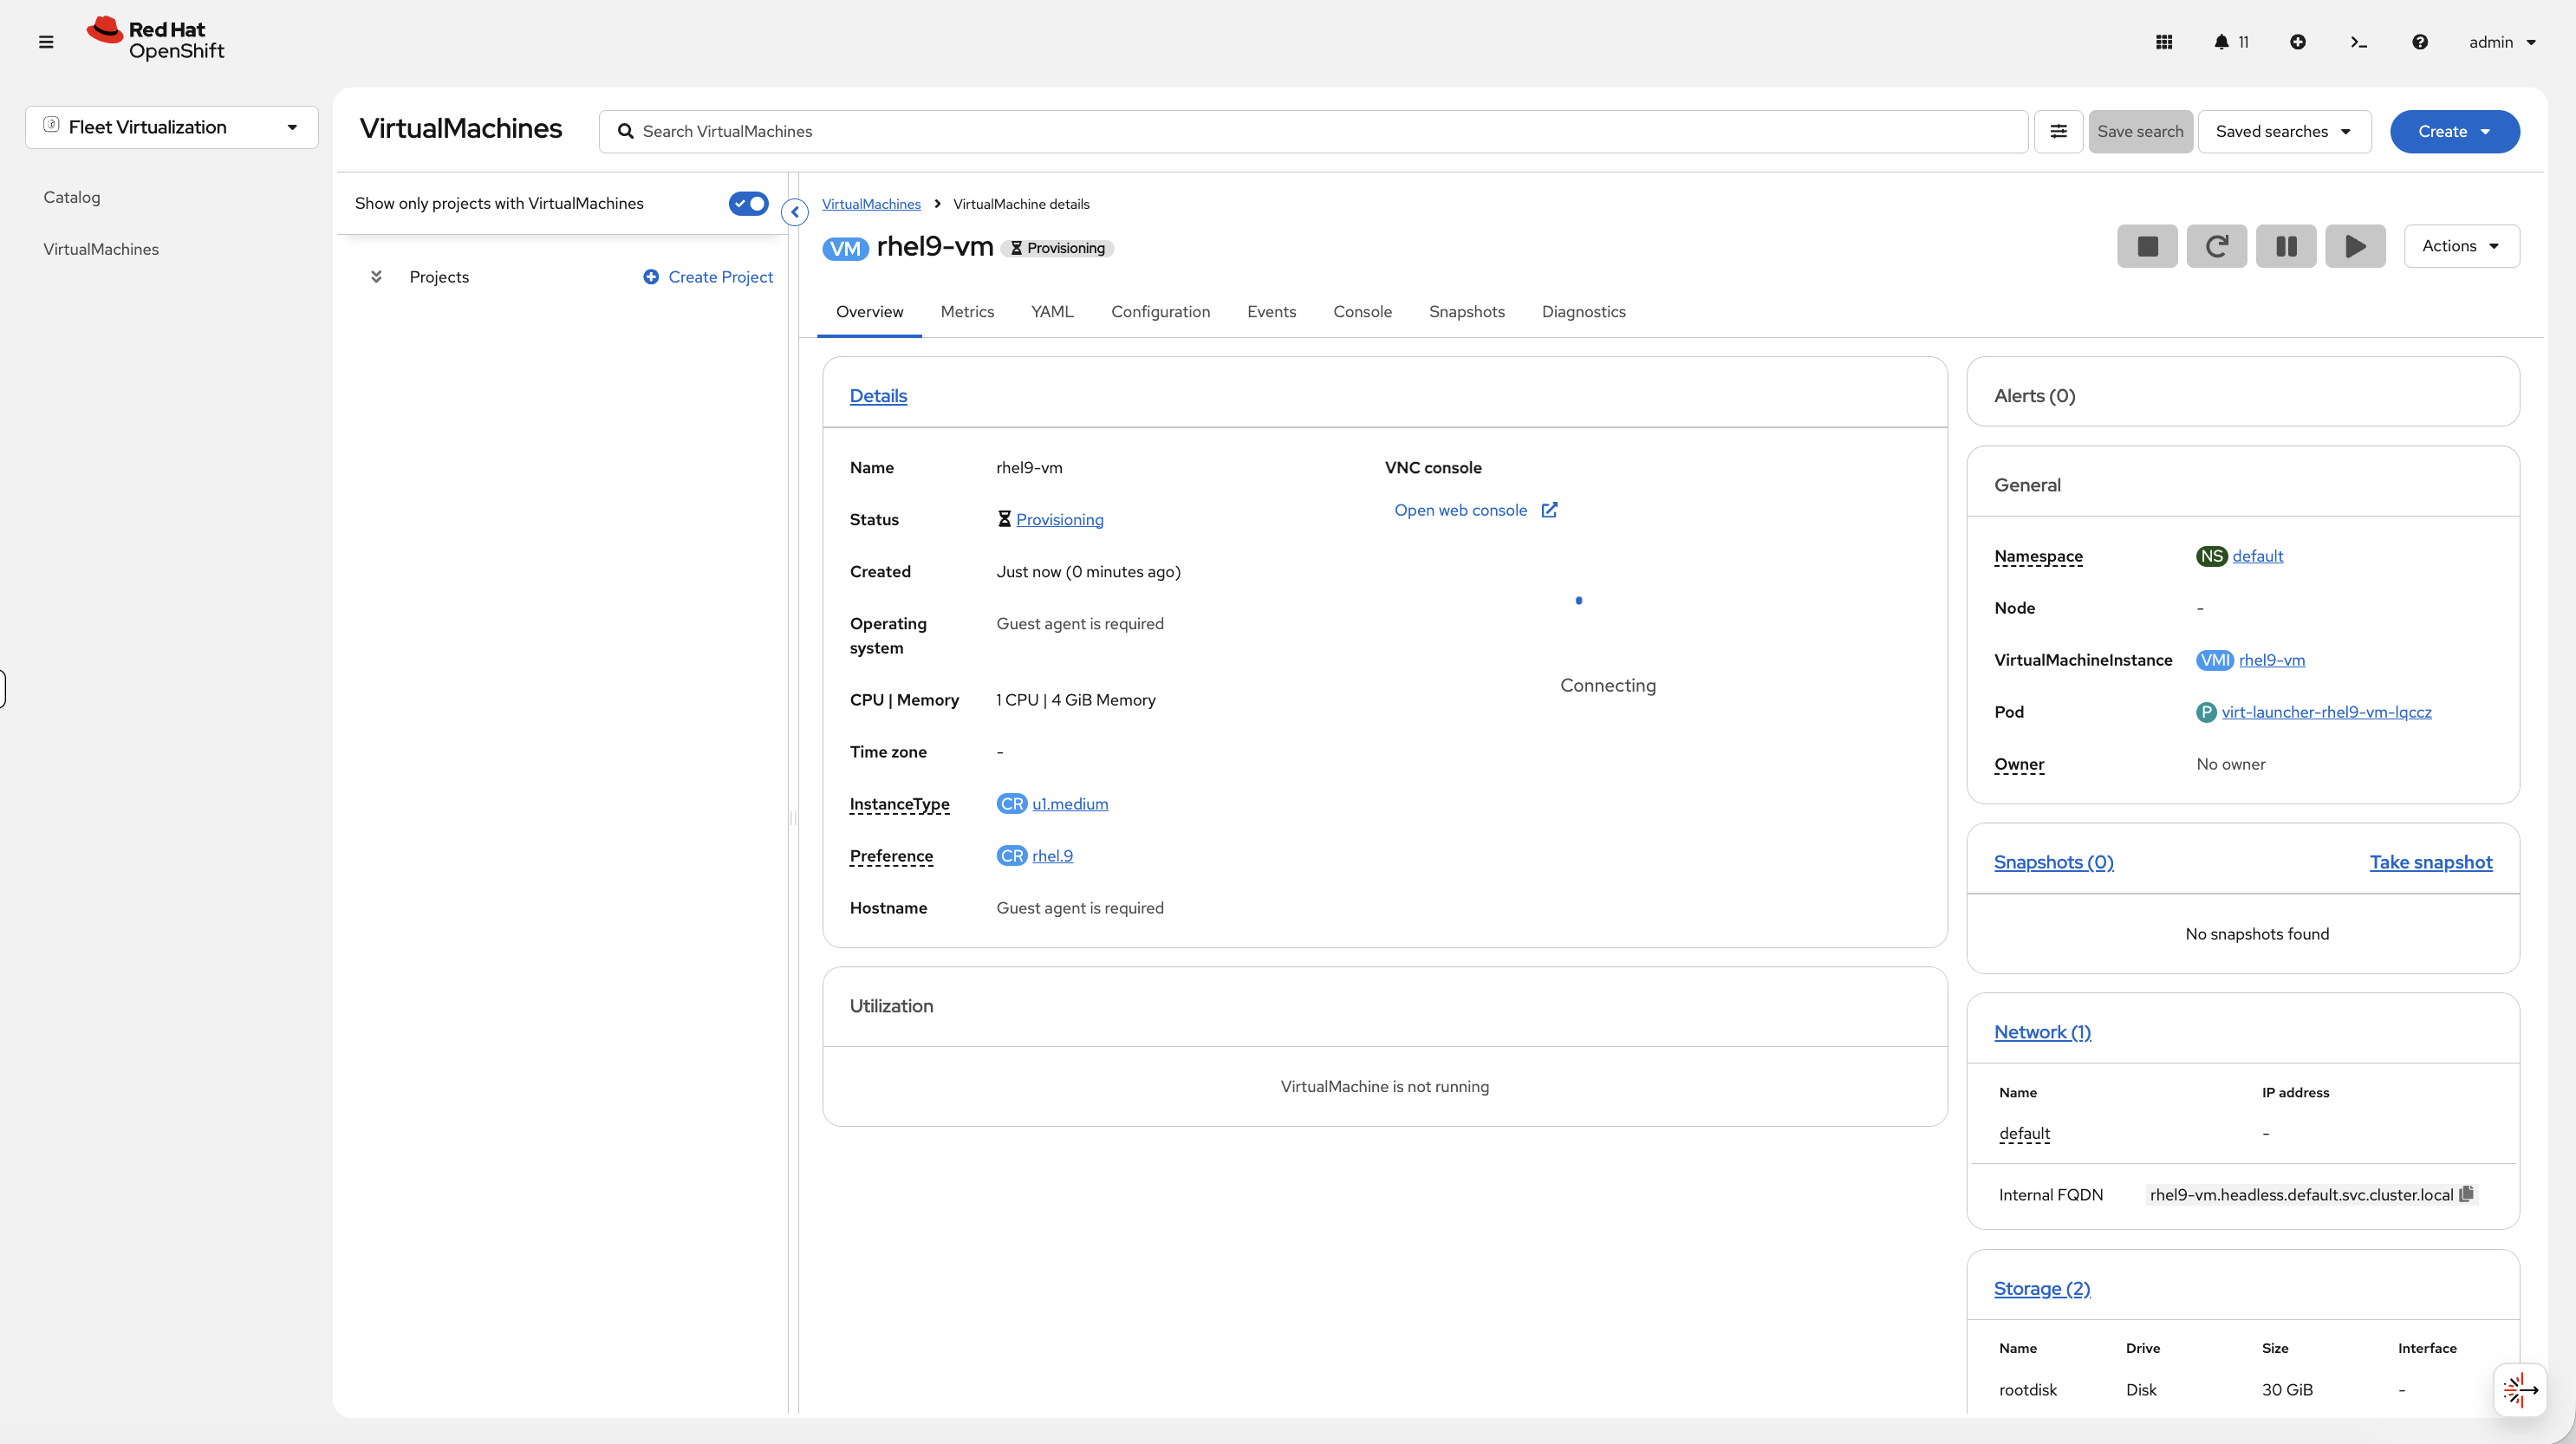
The VM details page opens. You’ll see the status change from Provisioning to Running as the VM boots:
Step 4: Access the VM Console
Once the VM is running, click the Console tab. You’ll see the VNC console with the VM’s boot output:
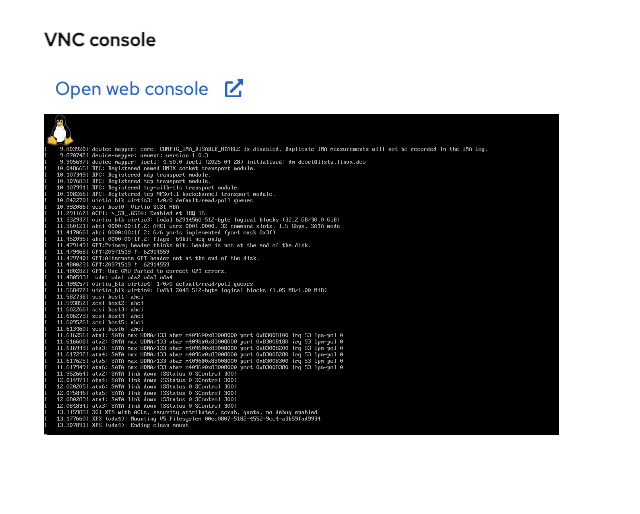
Click Open web console to open the VM console in a new window:

The Guest login credentials are displayed at the top of the console — use these to log in:
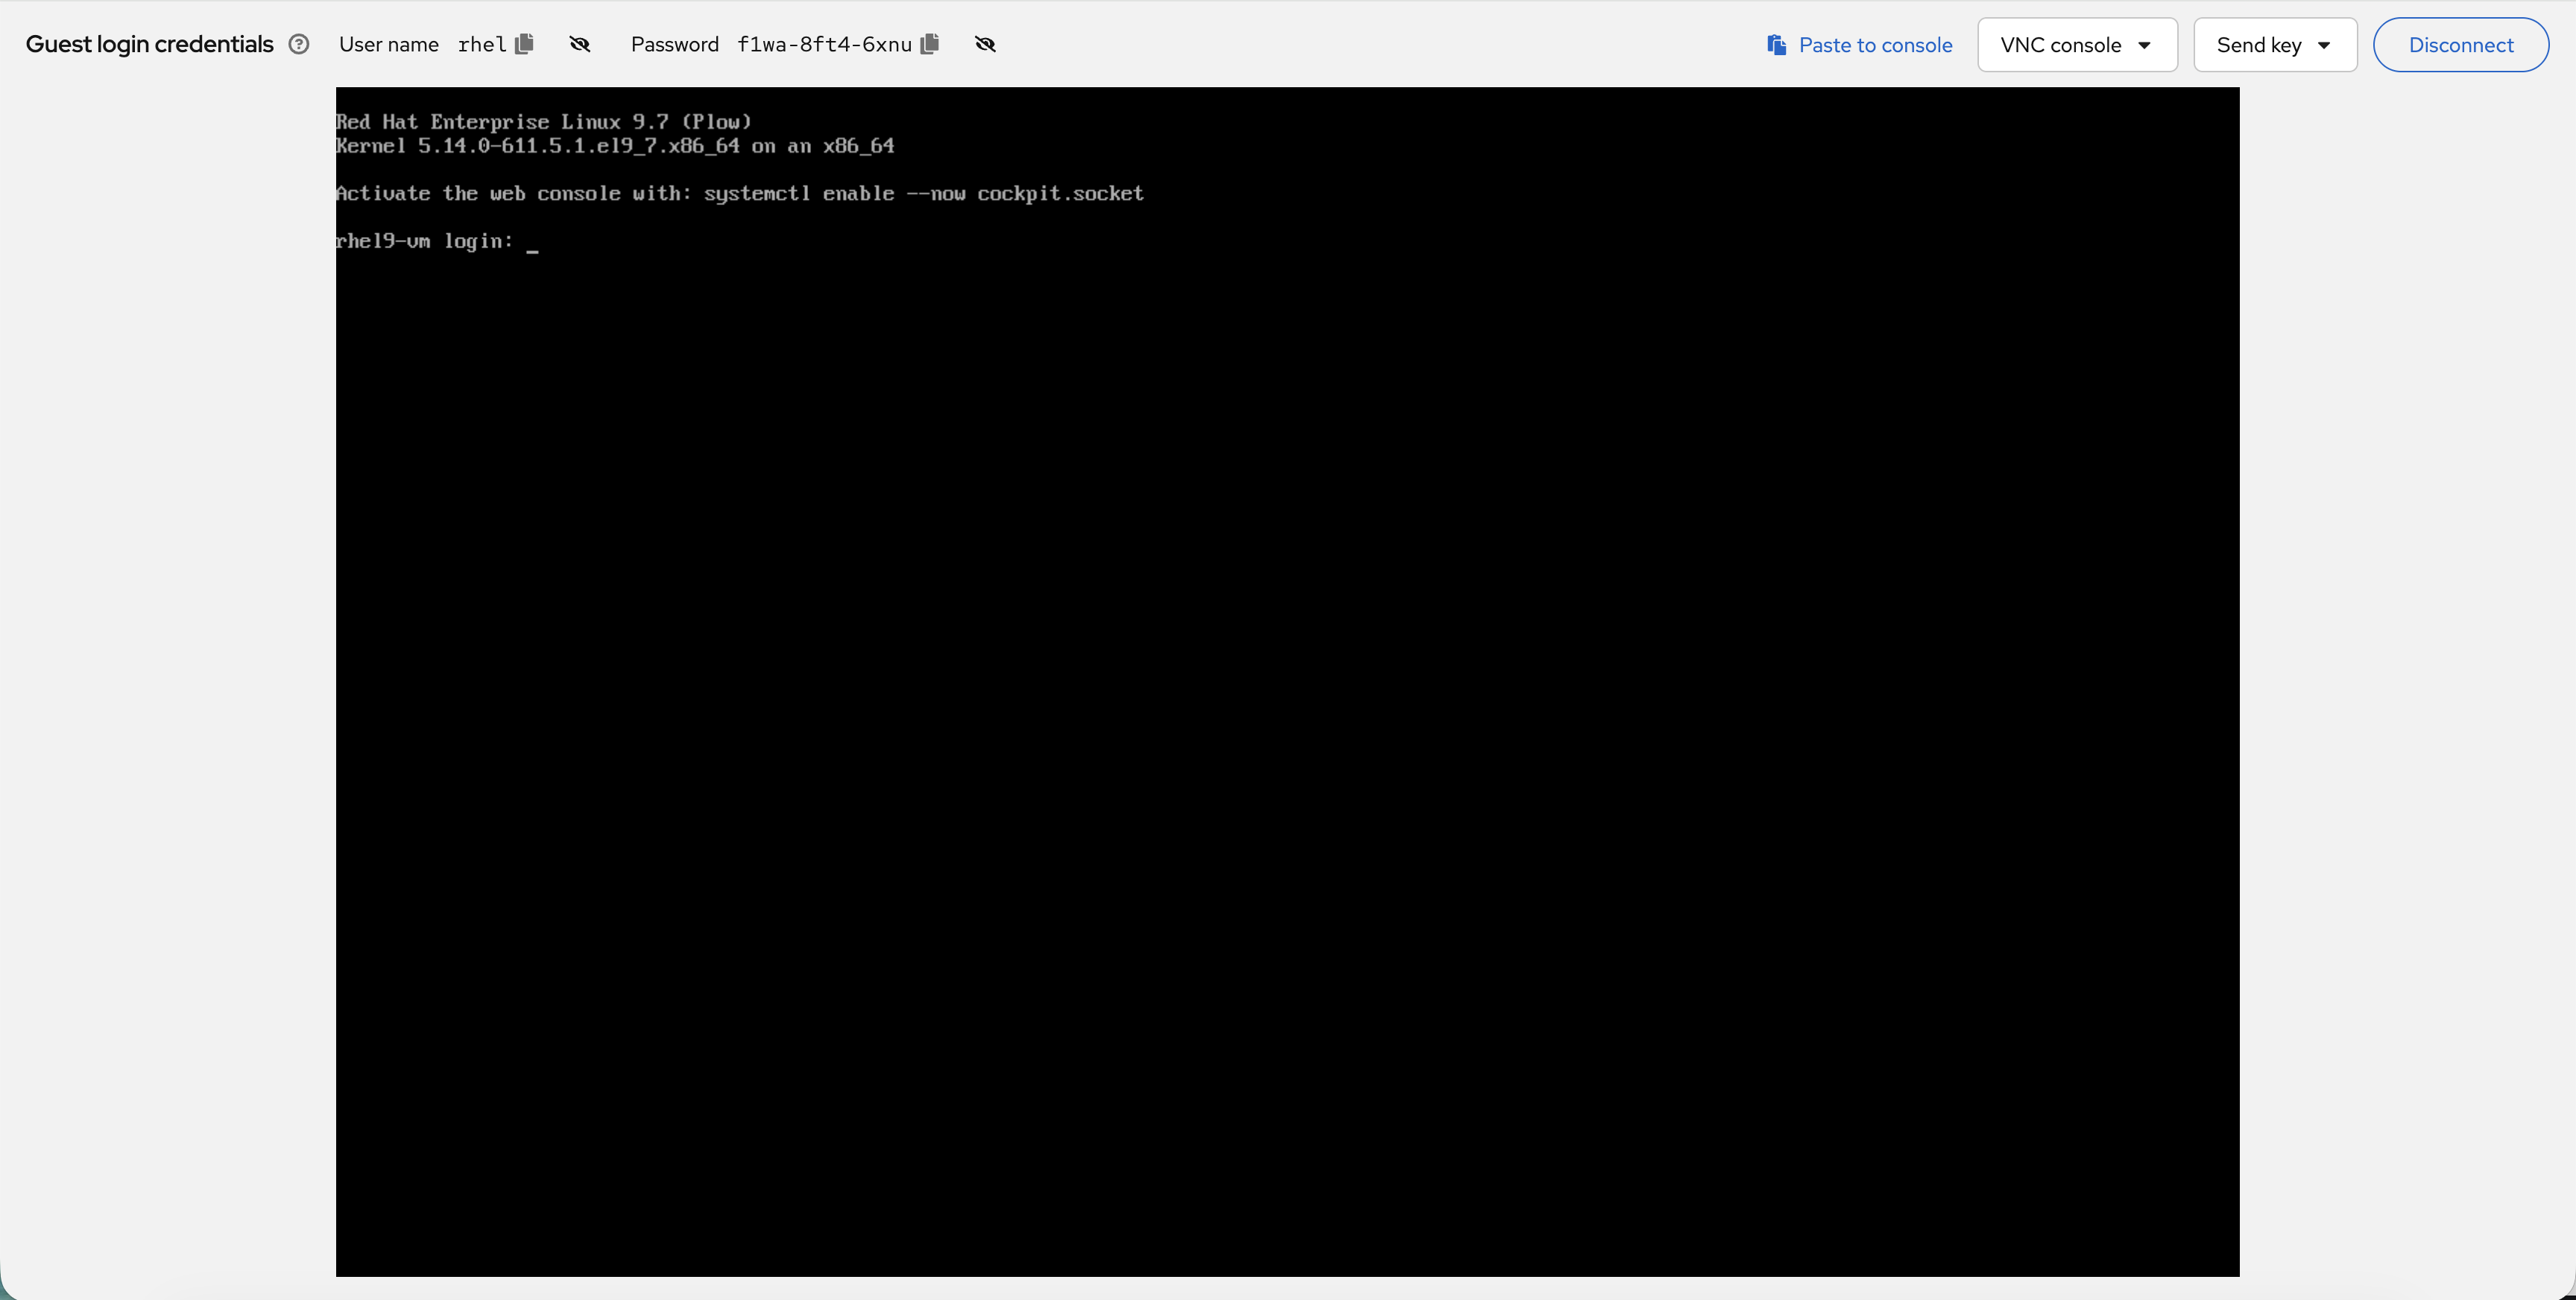
Pick a size, pick a boot image, deploy. No YAML needed.
It’s Just a Pod
This is the key insight for operations teams. Your VM runs inside a virt-launcher pod — which means everything you already know about managing pods applies to VMs. Same scheduler, same RBAC, same resource quotas, same oc commands. You don’t need separate tools, separate teams, or separate runbooks for VMs vs containers:
oc get pods -n vm-demoYou’ll see:
NAME                          READY   STATUS    RESTARTS   AGE
virt-launcher-rhel9-vm-xxxxx   2/2     Running   0          3m
That’s your VM. It’s a pod. The same oc commands work:
oc describe pod -l kubevirt.io/vm=rhel9-vm -n vm-demo | tail -10Unified Monitoring
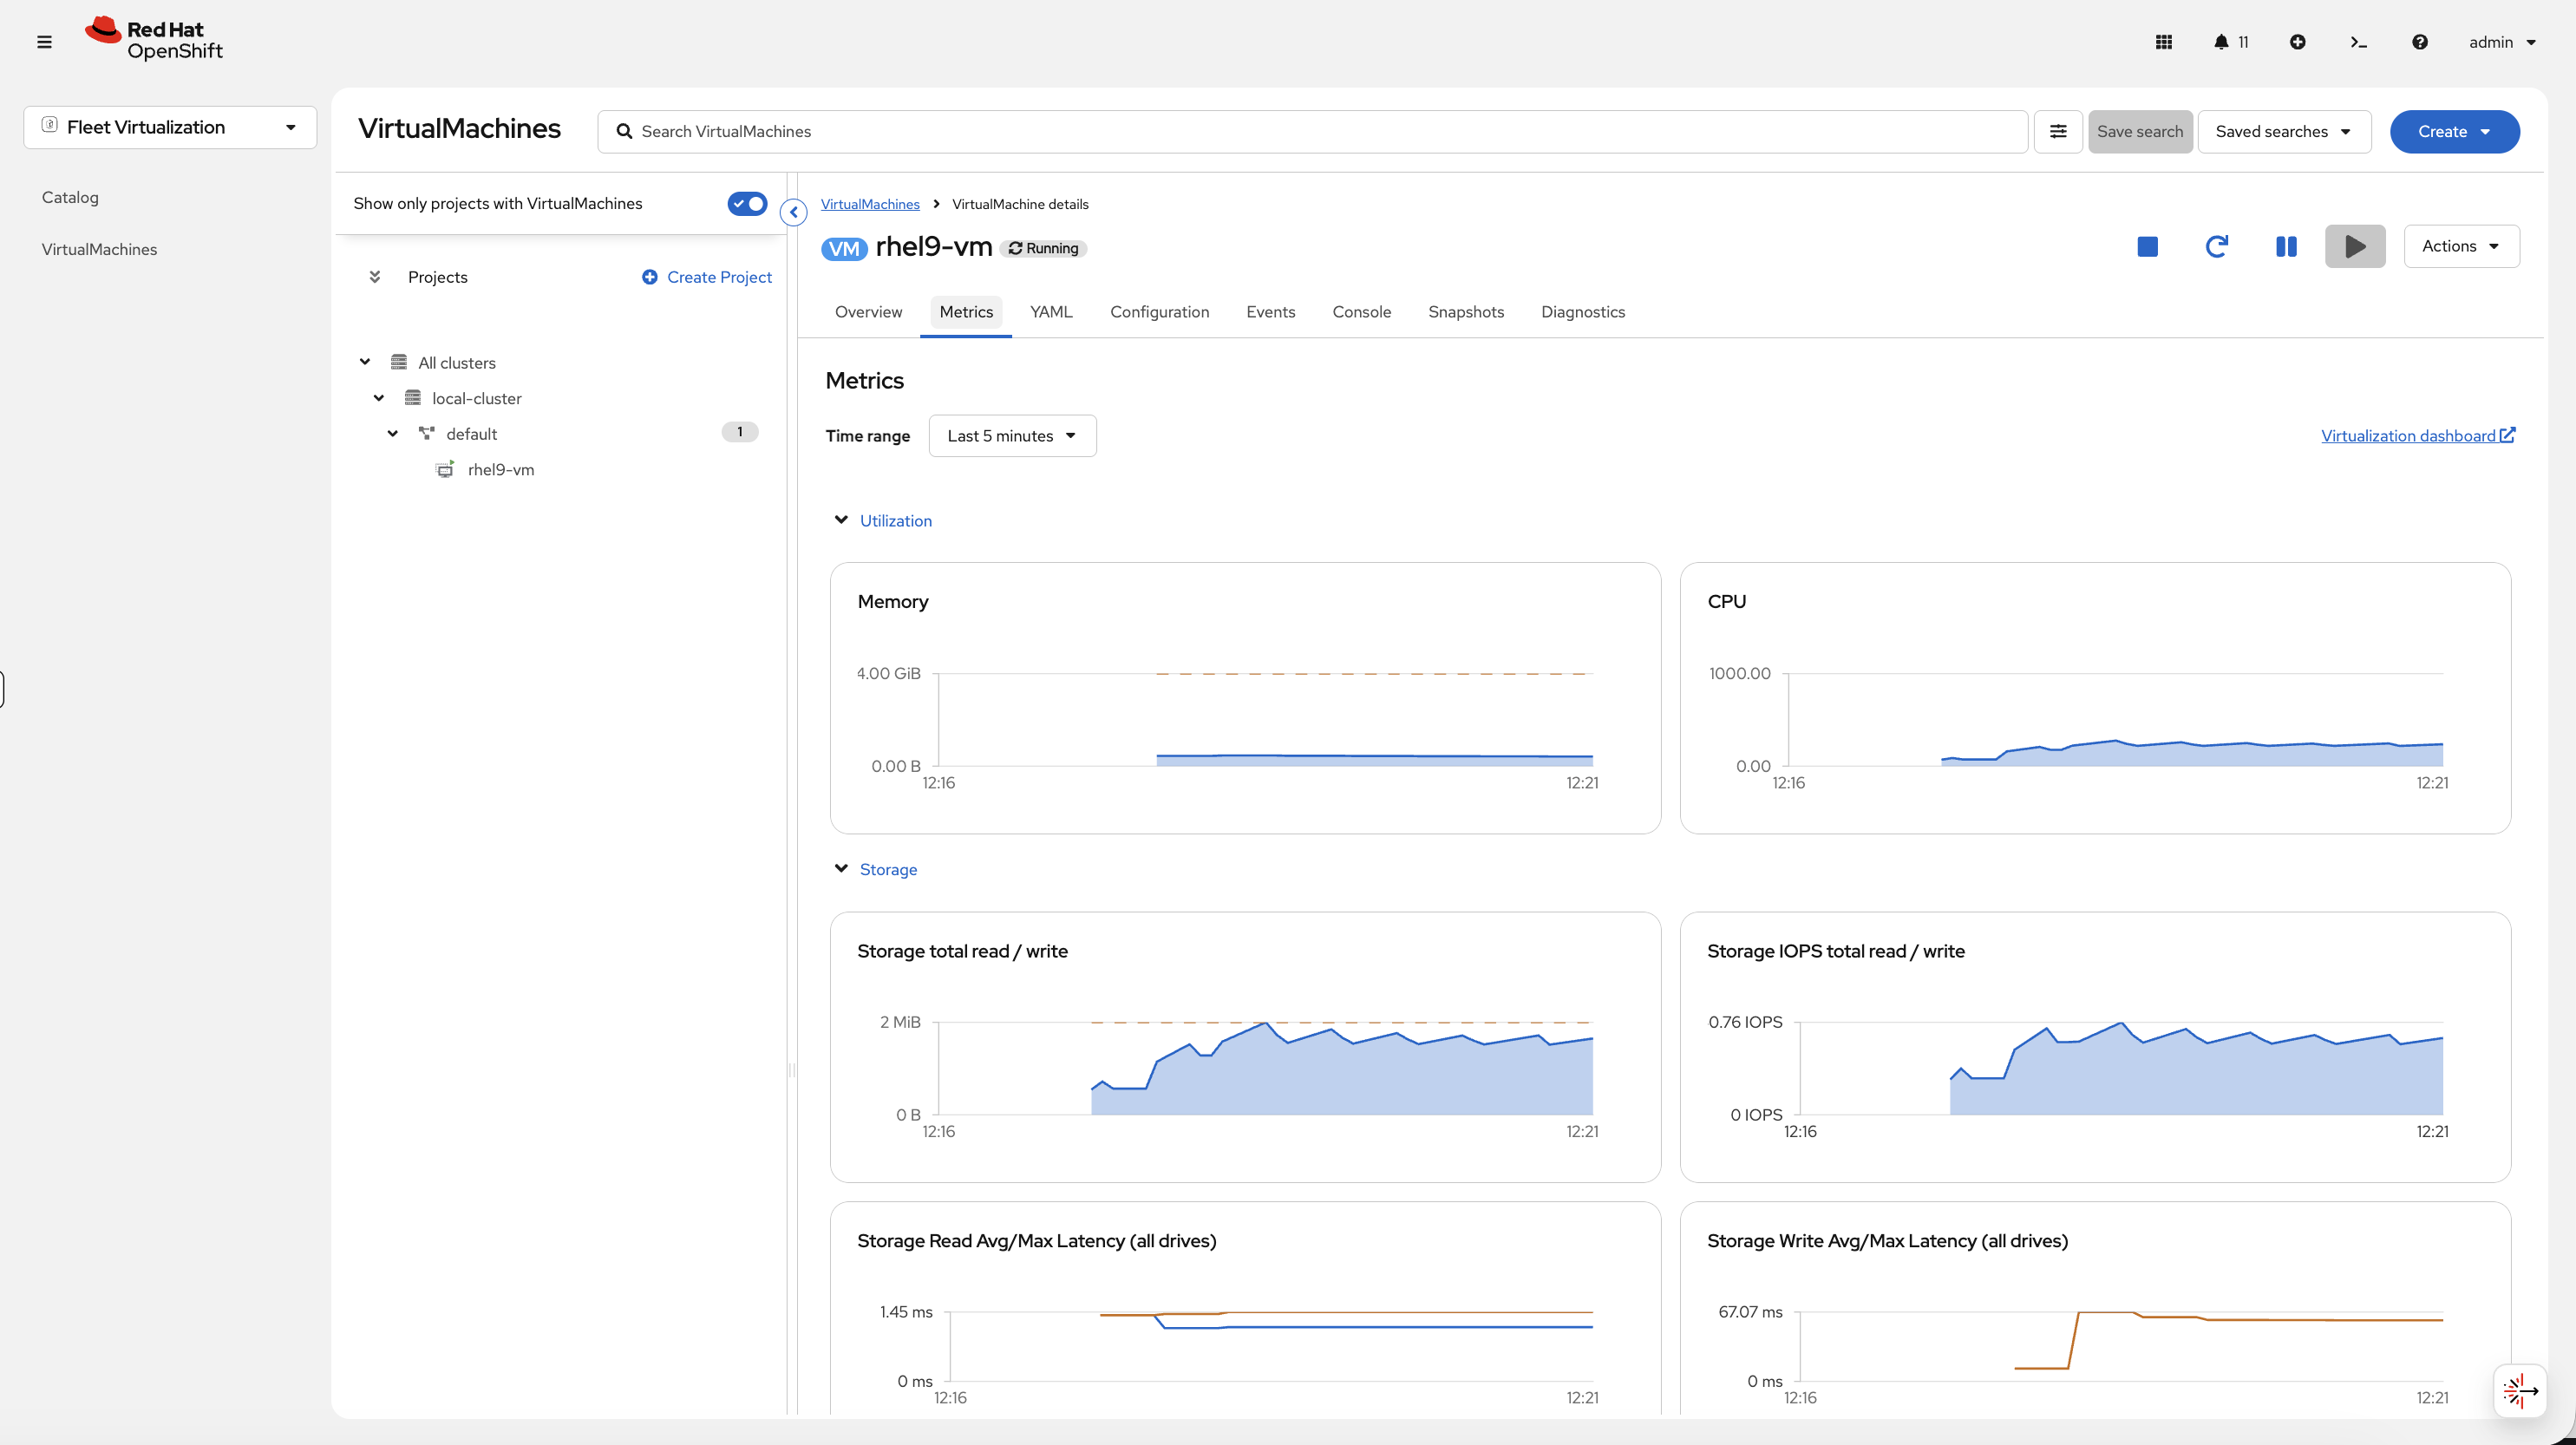
VM metrics flow into the same Prometheus stack as your containers — one dashboard for everything. No need for a separate monitoring tool for your VMs.
On the VM details page, click the Metrics tab to see:
-
Memory usage over time
-
CPU usage over time
-
Storage total read/write
-
Storage IOPS
-
Storage latency
Or query from CLI — the VM uses resources just like any pod:
oc adm top pods -n vm-demoExpose the VM (Same Networking as Containers)
VMs get pod IPs on the same SDN as containers — same Services, same Routes, same NetworkPolicies. One networking model for VMs and containers:
oc get vmi rhel9-vm -o jsonpath='{.status.interfaces[0].ipAddress}' && echo ""Create a Service pointing to the VM:
oc apply -f - <<EOF
apiVersion: v1
kind: Service
metadata:
  name: rhel9-vm-ssh
  namespace: vm-demo
spec:
  selector:
    kubevirt.io/vm: rhel9-vm
  ports:
  - port: 22
    targetPort: 22
EOF
oc get svc rhel9-vm-ssh -n vm-demoThe VM is now reachable via the service — the same way you’d expose a container. Same label selectors, same service types, same networking model.
For VMs running web applications (Apache, IIS, Tomcat), you’d create a Service on port 80/443 and a Route with TLS edge termination — the same workflow you use for containers. When migrating multi-tier applications, move the VMs with MTV, wire them up with Services and Routes, and they’re live on OpenShift without changing the application.
Live Migration
This is the feature that makes OpenShift Virtualization production-ready. When you need to patch a node, upgrade the OS, or replace hardware, you drain the node. Containers reschedule automatically, and VMs live migrate automatically too. oc adm drain handles both. Zero downtime during maintenance windows.
Step 1: Note the Current Node
On the VM details page (Overview tab), look at the Node field in the General section and note which node the VM is running on.
Step 2: Trigger the Migration
-
Click the Actions dropdown in the top-right corner
-
Hover over Migration to expand the submenu
-
Select Compute — this migrates the VM’s running state (CPU/memory) to a different node
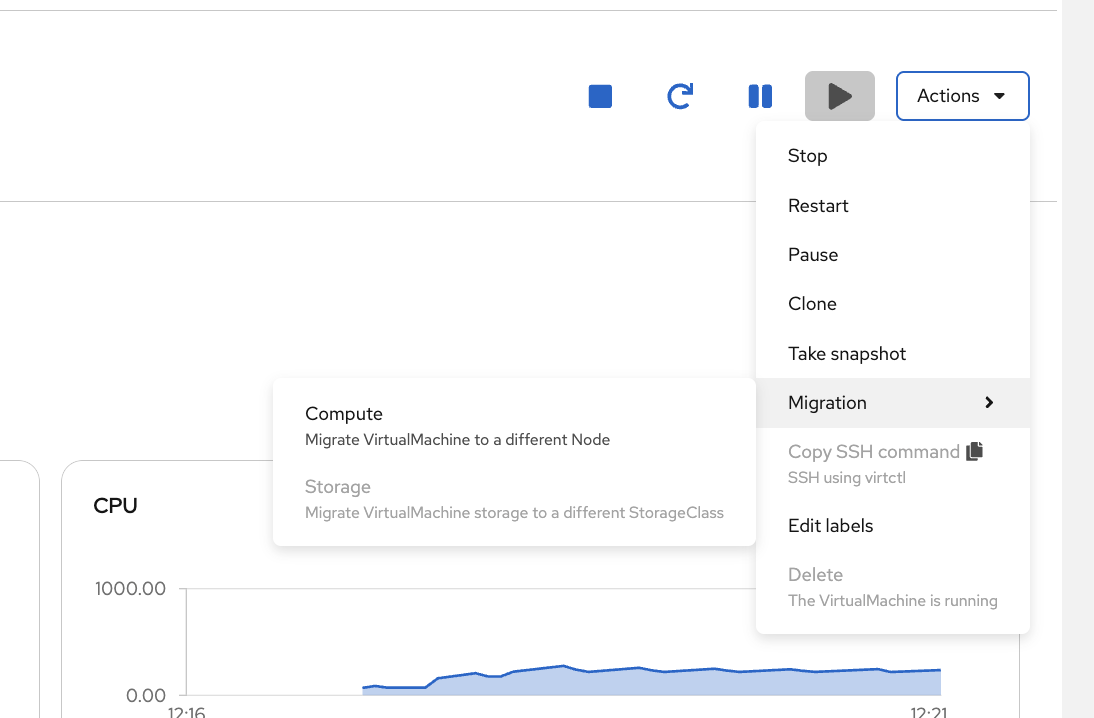
-
In the migration dialog, leave Automatically selected Node selected and click Migrate VirtualMachine

Step 3: Watch the Migration
The VM status changes to Migrating while the live migration is in progress:
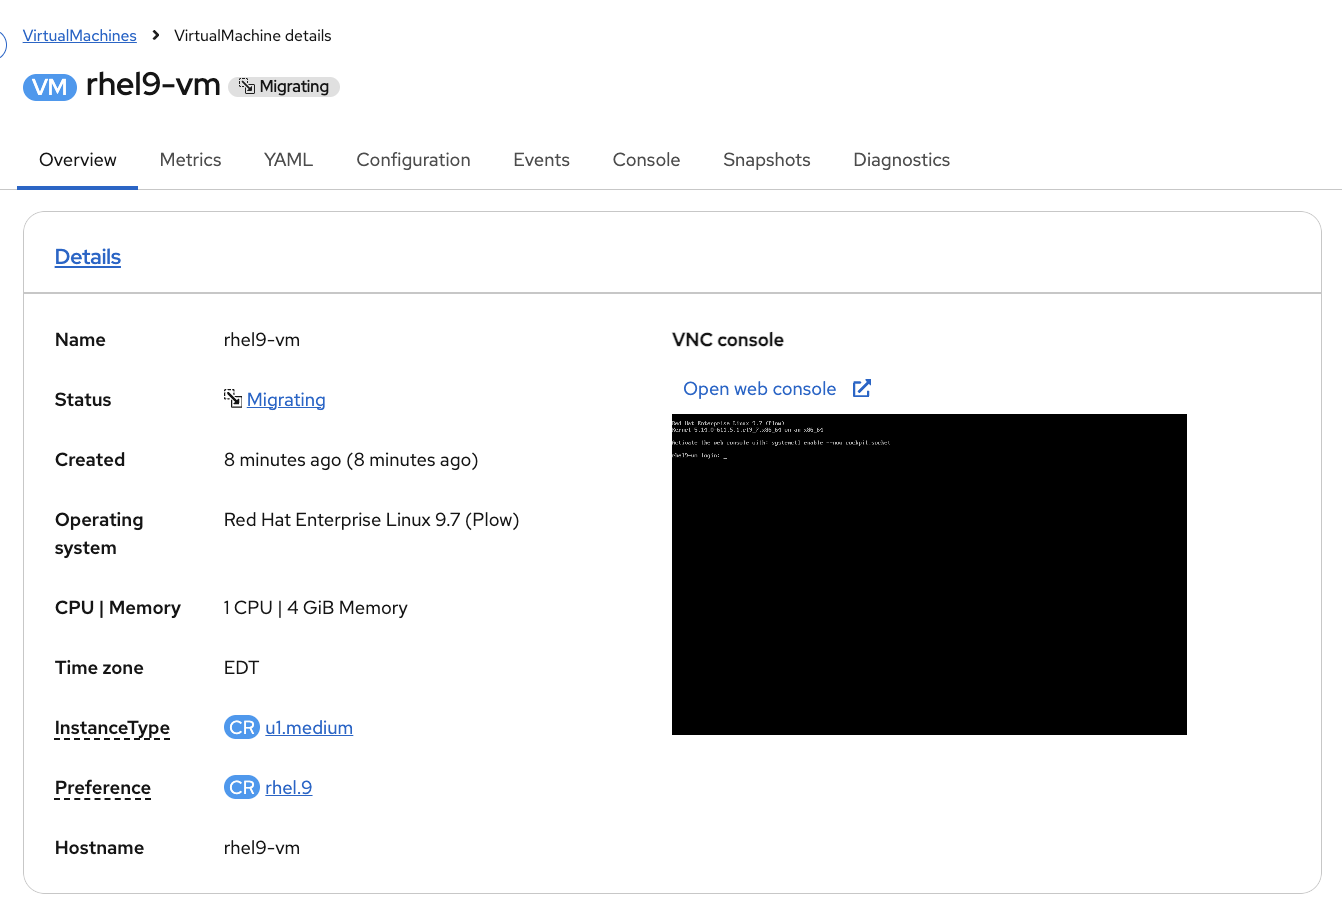
The migration completes quickly — typically within a few seconds. Once the status returns to Running, check the Node field — it now shows a different node. The VM moved while still running. No downtime, no reconnection needed.
Clone a VM
Need another copy of a VM — for testing, dev environments, or scaling out? Clone it. This creates a full copy of the VM’s disk and configuration.
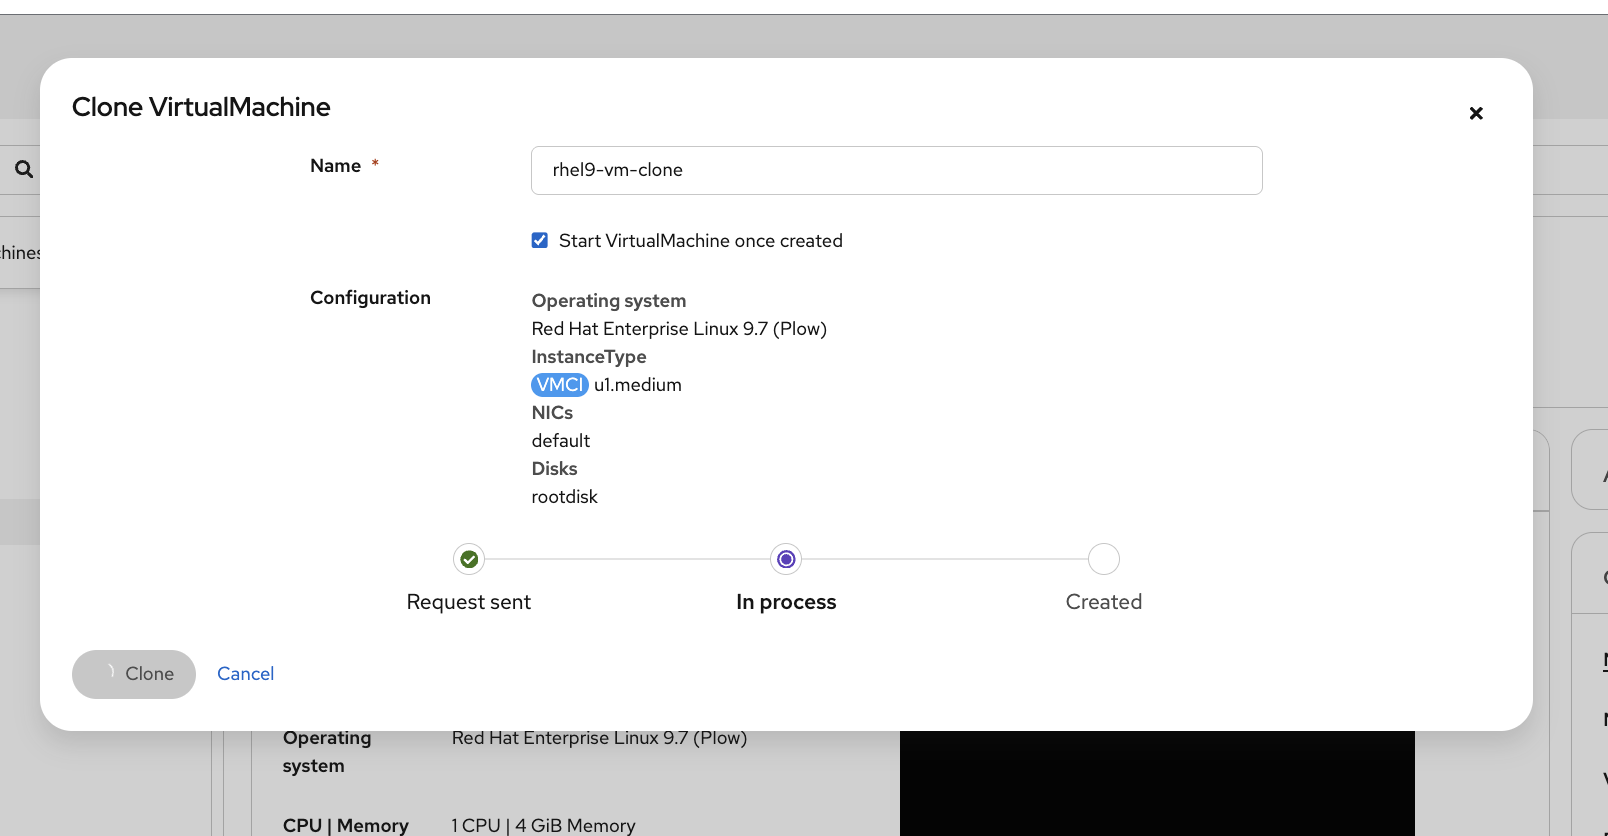
Step 1: Start the Clone
-
On the rhel9-vm details page, click Actions → Clone

-
Change the name to
rhel9-vm-clone -
Leave Start VirtualMachine once created checked
-
Click Clone

Step 2: Watch the Clone Progress
The dialog shows the clone progress: Request sent → In process → Created:
Once complete, the console navigates to the clone’s details page. You’ll see both VMs in the left sidebar:
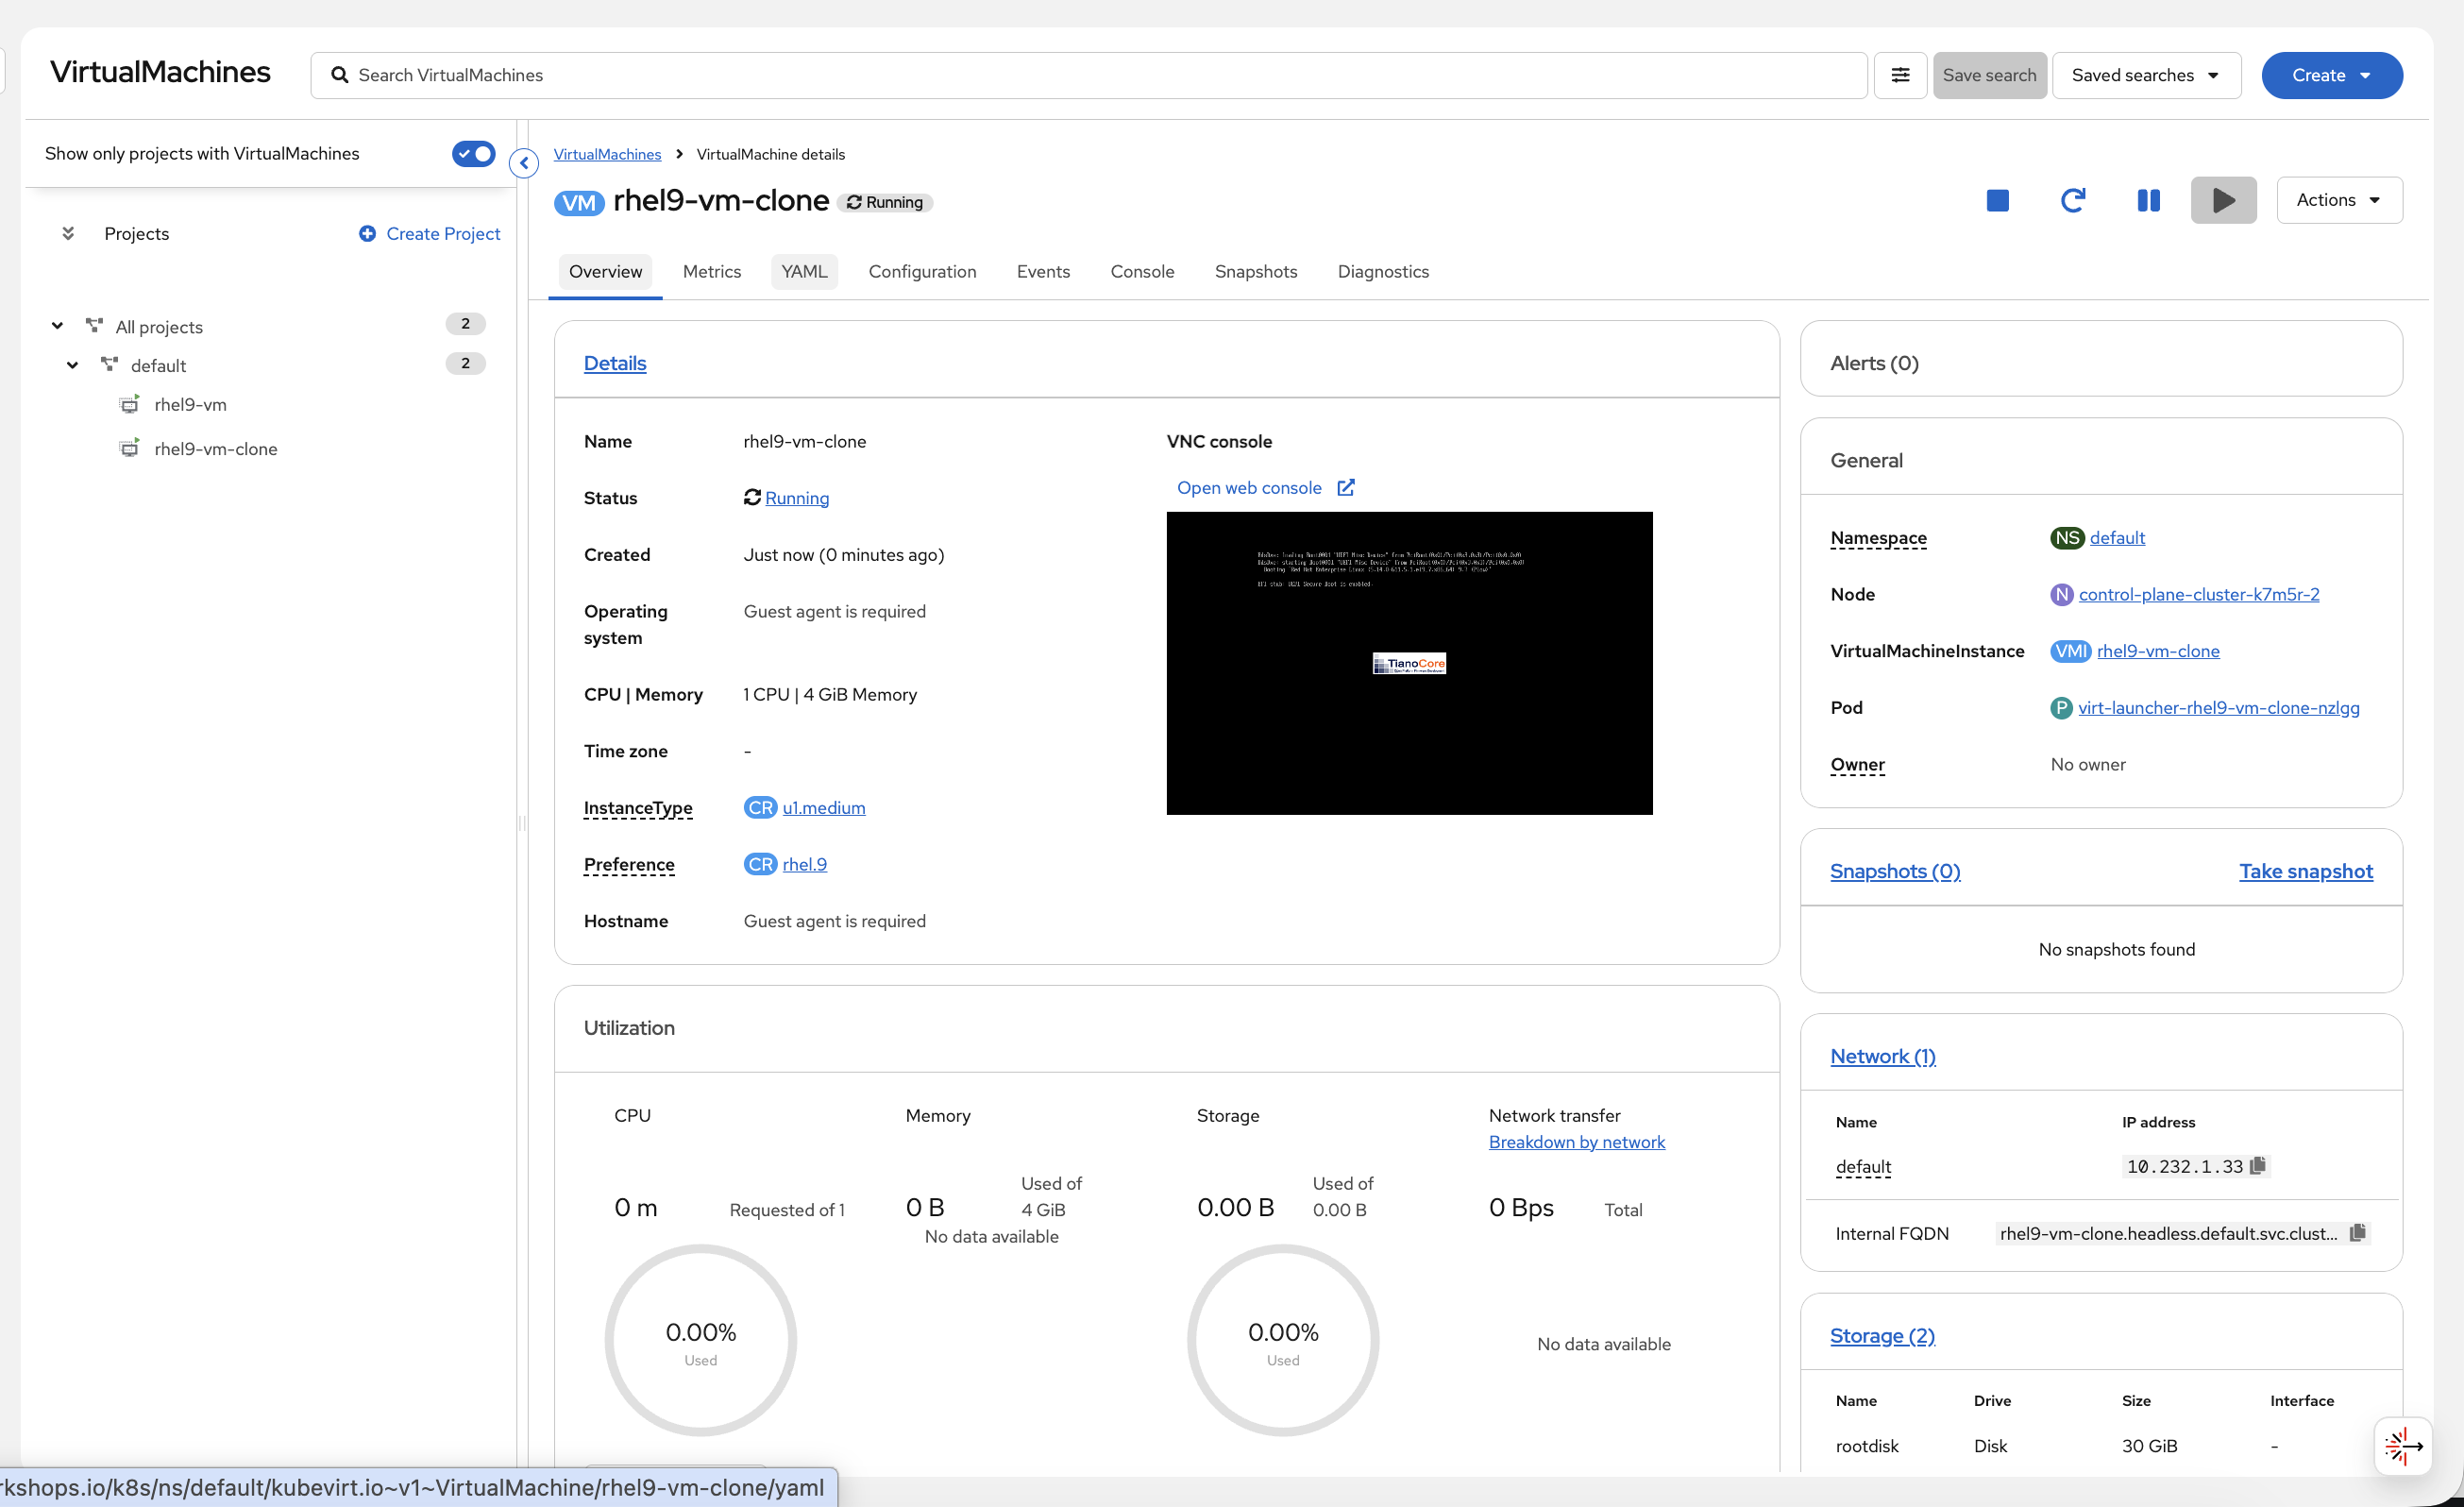
The clone has its own independent disk — changes to one don’t affect the other. This is how you’d create golden images: configure a VM exactly how you want it, then clone it for each environment.
| Click back to rhel9-vm in the left sidebar before continuing. The next steps (snapshot and restore) should be done on the original VM, not the clone. |
Snapshots
Every operations team has been burned by a patch that broke something. Snapshots give you a safety net — capture the VM’s disk and configuration before a change, and roll back in seconds if it goes wrong.
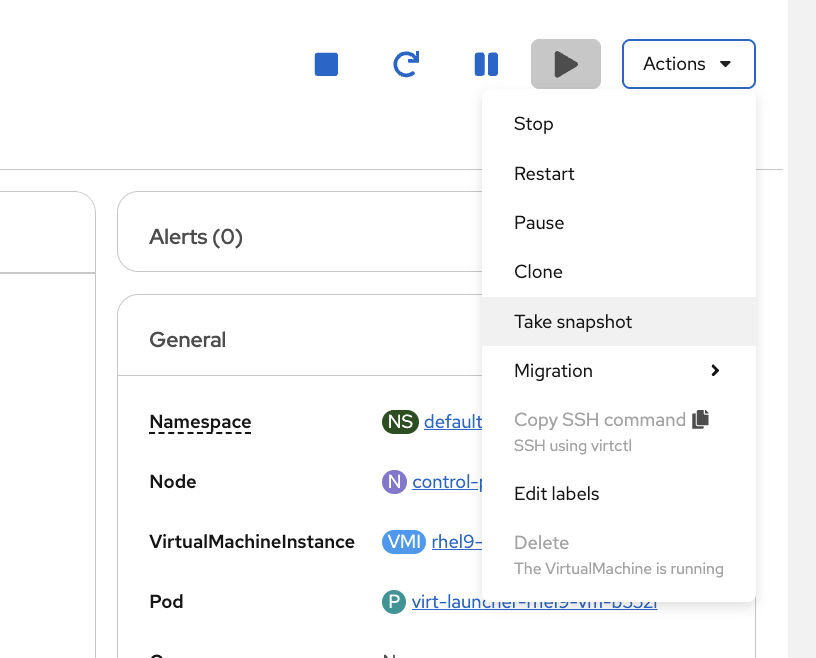
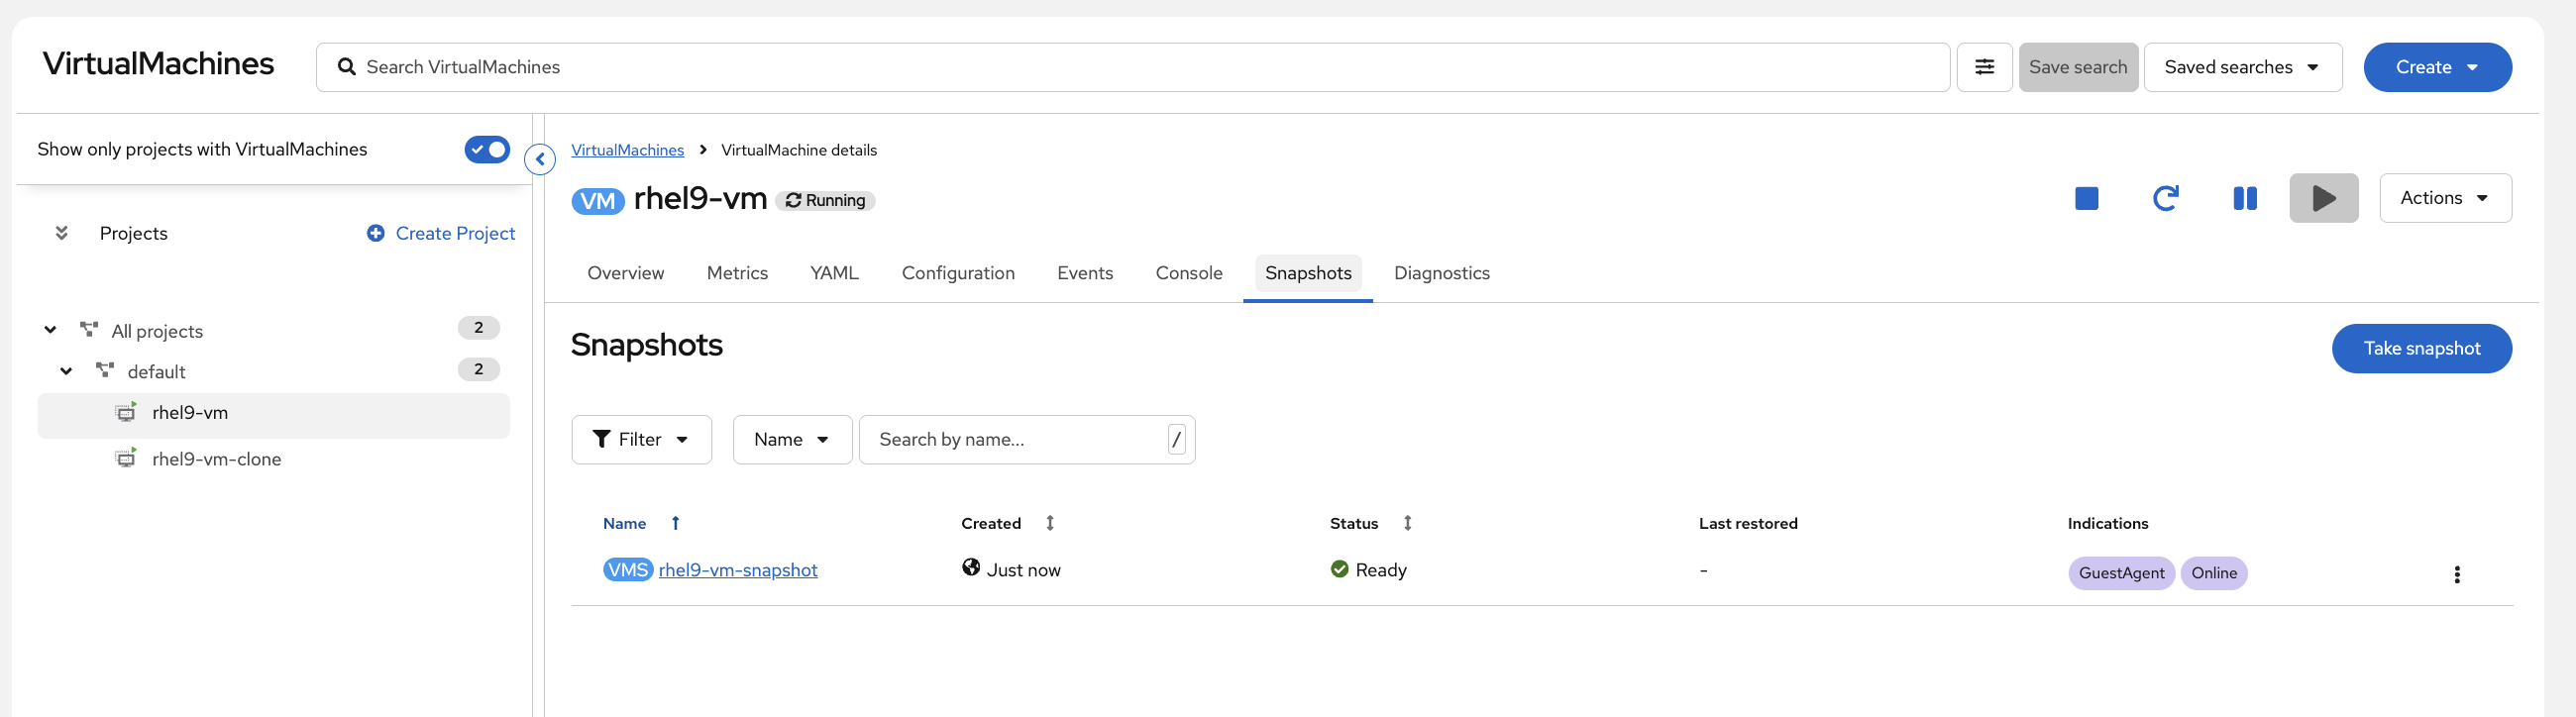
Step 1: Take a Snapshot
-
On the rhel9-vm details page, click Actions → Take snapshot
-
Leave the default name (
rhel9-vm-snapshot) and click Save
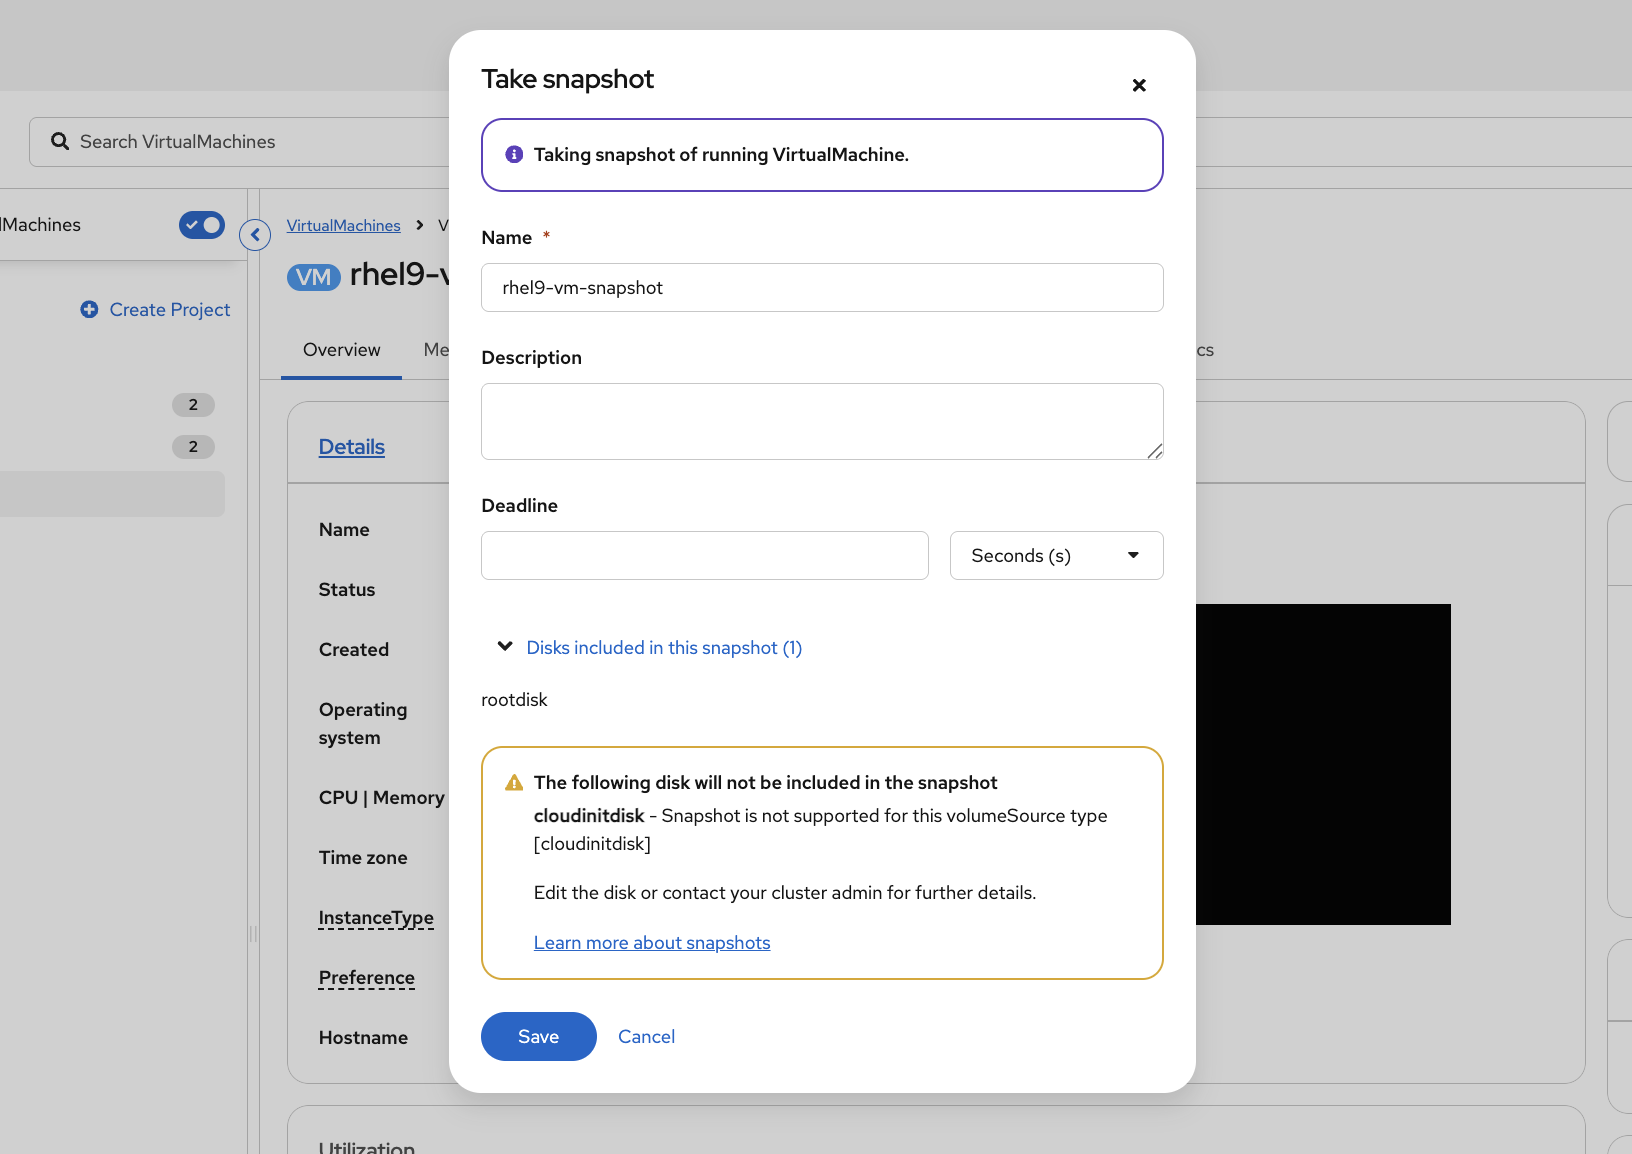
The warning about cloudinitdisk not being included is expected — cloud-init only runs on first boot and doesn’t need to be captured.
|
Step 3: Restore from Snapshot
The scenario: Imagine you’ve just applied an OS patch or a configuration change and something broke. Instead of spending hours troubleshooting or rebuilding from scratch, you restore to the snapshot you took before the change. The VM comes back exactly as it was.
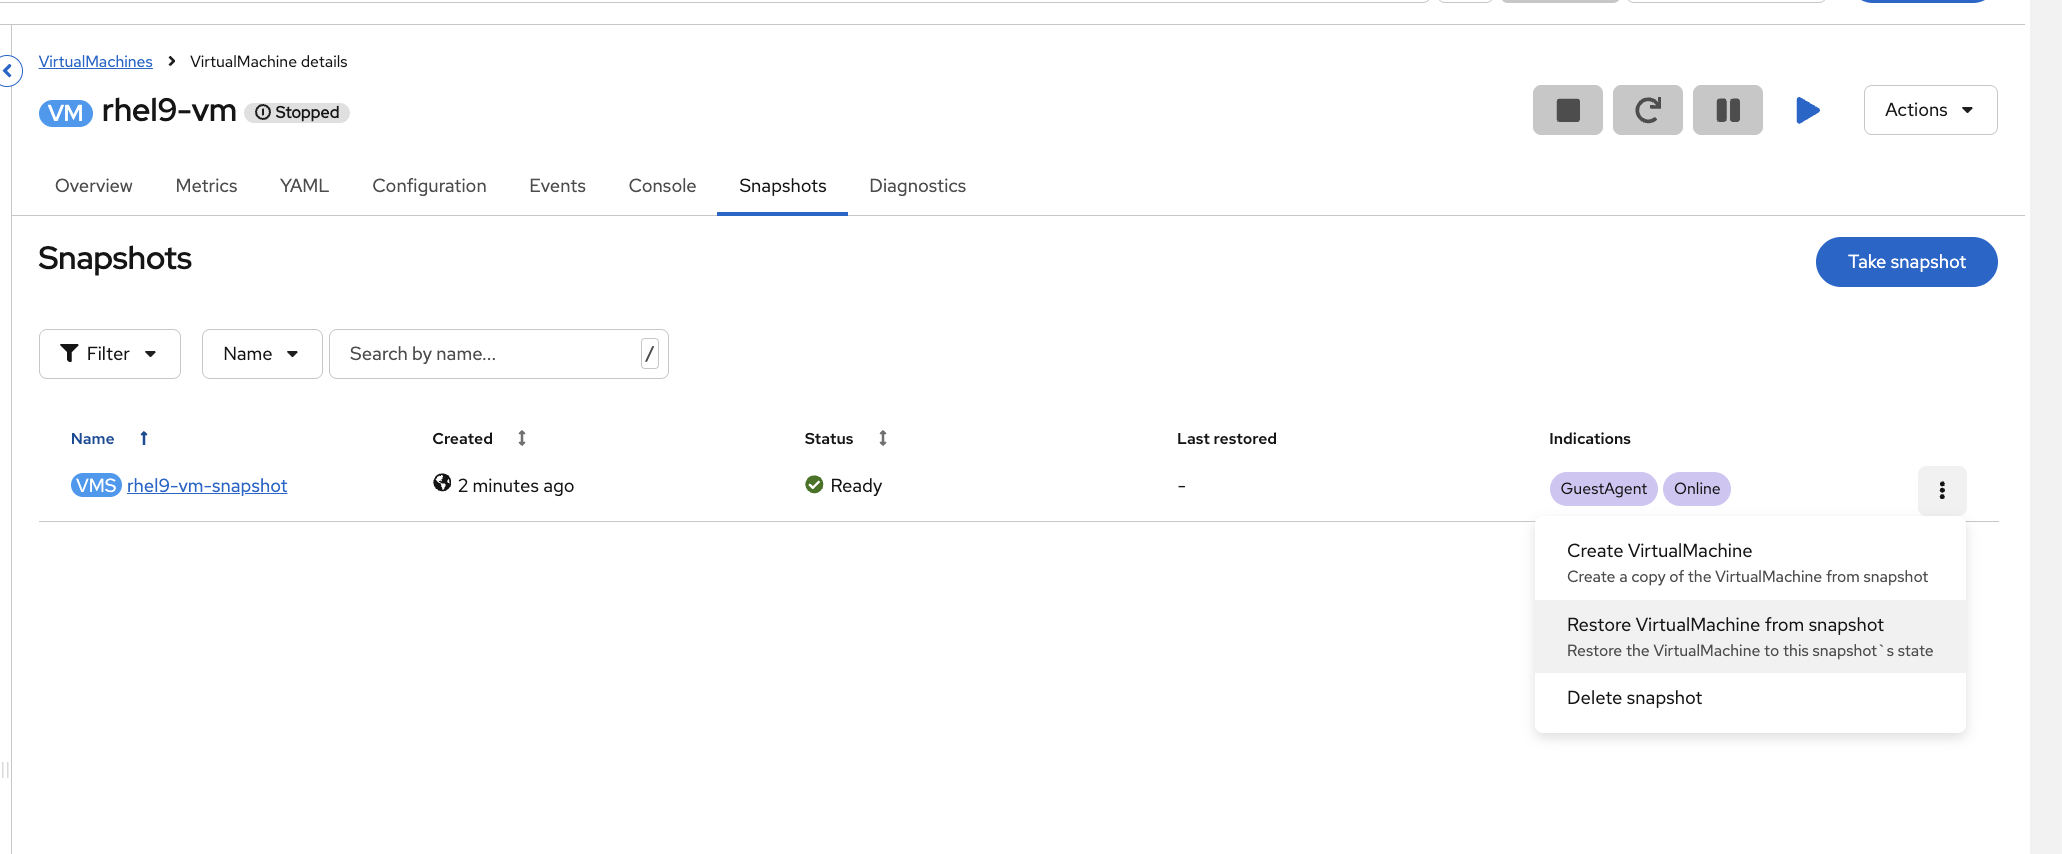
-
First, stop the VM — click the Stop button (square icon) in the top-right action buttons
-
Once the VM shows Stopped, go to the Snapshots tab, click the kebab menu (three dots) next to the snapshot, and select Restore VirtualMachine from snapshot
-
Click Restore to confirm
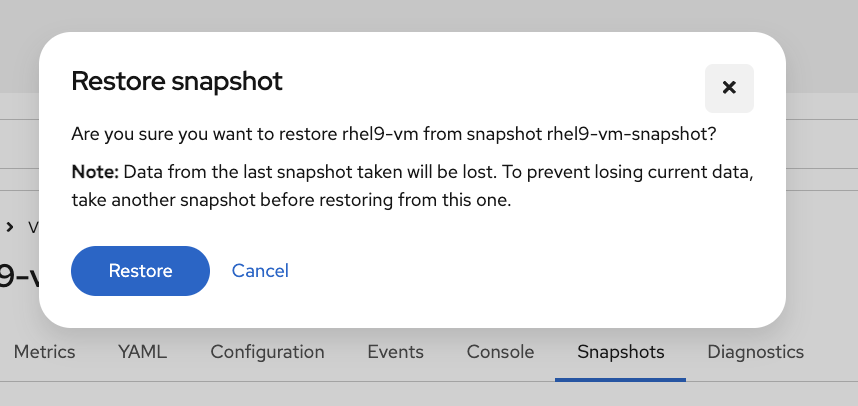
-
Start the VM again by clicking the Start button (play icon). The VM’s disk and configuration are now back to the exact state they were in when you took the snapshot. This is how you’d roll back a failed OS patch or a broken config change — without rebuilding the VM from scratch.
Summary
| Feature | What it means for ops |
|---|---|
VMs are pods |
Same |
InstanceTypes |
Cloud-style provisioning — pick a size, pick an image, deploy |
Same networking |
Services and Routes work for VMs and containers |
Same monitoring |
Prometheus dashboards show VM and container metrics together |
Live migration |
Drain nodes for maintenance without VM downtime |
Cloning |
Rapid provisioning from golden images for dev/test/staging |
Snapshots |
Point-in-time rollback before patches or upgrades |
The value: Run VMs and containers side-by-side on one platform. One set of tools, one set of skills. Migrate existing VMs with MTV when ready, or run them indefinitely — OpenShift supports both. Windows Server is SVVP-certified, and RHEL/Fedora/CentOS boot from pre-cached images in seconds.
Cleanup
Deleting VM disks and namespaces takes a couple of minutes. This runs in the background so you can move on to the next module immediately.
(
  virtctl stop rhel9-vm -n vm-demo 2>/dev/null || true
  virtctl stop rhel9-vm-clone -n vm-demo 2>/dev/null || true
  sleep 10
  oc delete namespace vm-demo --ignore-not-found --wait=false
) &>/dev/null &
echo "Cleanup running in background — you can continue to the next module"
Additional Resources
-
OpenShift Virtualization: Virtualization documentation
-
virtctl Reference: virtctl commands
-
Live Migration: Live migration documentation
-
VM Snapshots: Backup and restore documentation