Wrap Up
This is the final challenge where you put most of what you have learned together. Your operations and application development teams want to use Ansible automation controller in their environment with specific requirements around web content staging and role-based access.
Let’s set the stage
The teams have put together these requirements:
-
All webservers (
node01,node02andnode03) should go in one group. -
As the webservers can be used for development purposes or in production, there has to be a way to flag them accordingly as "stage dev" or "stage prod".
-
Currently
node01andnode03are used as a development system andnode02is in production.
-
-
Of course the content of the world famous application "index.html" will be different between dev and prod stages.
-
There should be a title on the page stating the environment
-
There should be a content field
-
-
The content writer
wwebshould have access to a survey to change the content for dev and prod servers.
The Git Repository
All code is already in place - this is a automation controller lab after all. Check out the Workshop Project git repository at https://github.com/ansible-tmm/RHEL-workshop-examples. There you will find the playbook apache/webcontent.yml, which calls the role role_webcontent.
Compared to the previous Apache installation role there is a major difference: there are now two versions of an index.html template, and a task deploying the template file which has a variable as part of the source file name:
dev_index.html.j2
<body>
<h1>This is a development webserver, have fun!</h1>
{{ dev_content }}
</body>
prod_index.html.j2
<body>
<h1>This is a production webserver, take care!</h1>
{{ prod_content }}
</body>
main.yml
[...]
- name: Deploy index.html from template
  template:
    src: "{{ stage }}_index.html.j2"
    dest: /var/www/html/index.html
  notify: apache-restart
Prepare Inventory
Navigate to Automation Execution → Infrastructure → Inventories. Select 'Workshop Inventory' and complete the following:
-
Go to the Groups tab, click the Create group button, and create a new group labeled
Webserver. -
Within the Variables textbox define a variable labeled
stagewith the valuedev.stage: dev -
Click Create group.
-
Within the
Webservergroup, click the Hosts tab, then click Add existing host. Selectnode01,node02,node03as the hosts to be part of theWebservergroup. -
Within Automation Execution → Infrastructure → Inventories, select the
Workshop Inventory. Click on the Hosts tab and click onnode02. Select Edit host, and within the Variables textbox define a variable labeledstagewith the value ofprodand click Save host.
stage: prod|
This overrides the inventory variable due to order of operations of how the variables are accessed during playbook execution. |
Create the Template
Within Automation Execution → Templates, click the Create template dropdown and select Create job template. Fill as follows:
| Parameter | Value |
|---|---|
Name |
Create Web Content |
Job Type |
Run |
Inventory |
Workshop Inventory |
Project |
Workshop Project |
Playbook |
apache/webcontent.yml |
Execution Environment |
Default execution environment |
Credentials |
Workshop Credential | Machine |
Variables |
dev_content: "default dev content" |
Options |
✓ Privilege Escalation |
Click Create job template.
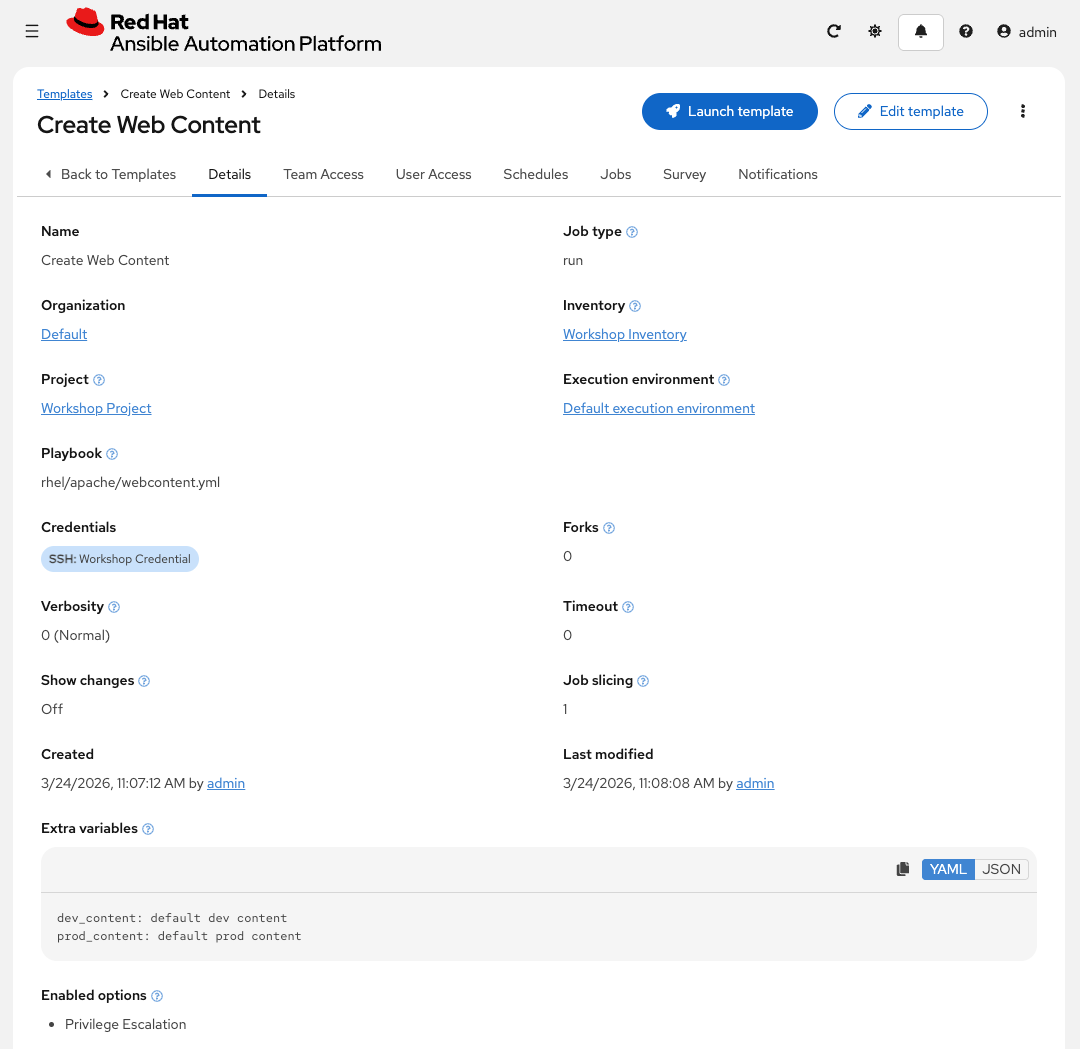
Run the template by selecting Launch template from the template’s kebab menu (⋮) on the Templates list.
Check the Results
Use AAP’s Run Command feature to verify the web content on each node.
-
Go to Automation Execution → Infrastructure → Inventories → Workshop Inventory and open the Hosts tab.
-
Select
node01,node02, andnode03, then click Run Command. -
In the Details window, set Module to
commandand Arguments tocurl http://localhost. Click Next. -
In the Execution Environment window, select Default execution environment. Click Next.
-
In the Credential window, select Workshop Credential. Click Next.
-
Review your inputs and click Finish.
You should see each node return its respective HTML content — development nodes will show "This is a development webserver" and the production node will show "This is a production webserver".
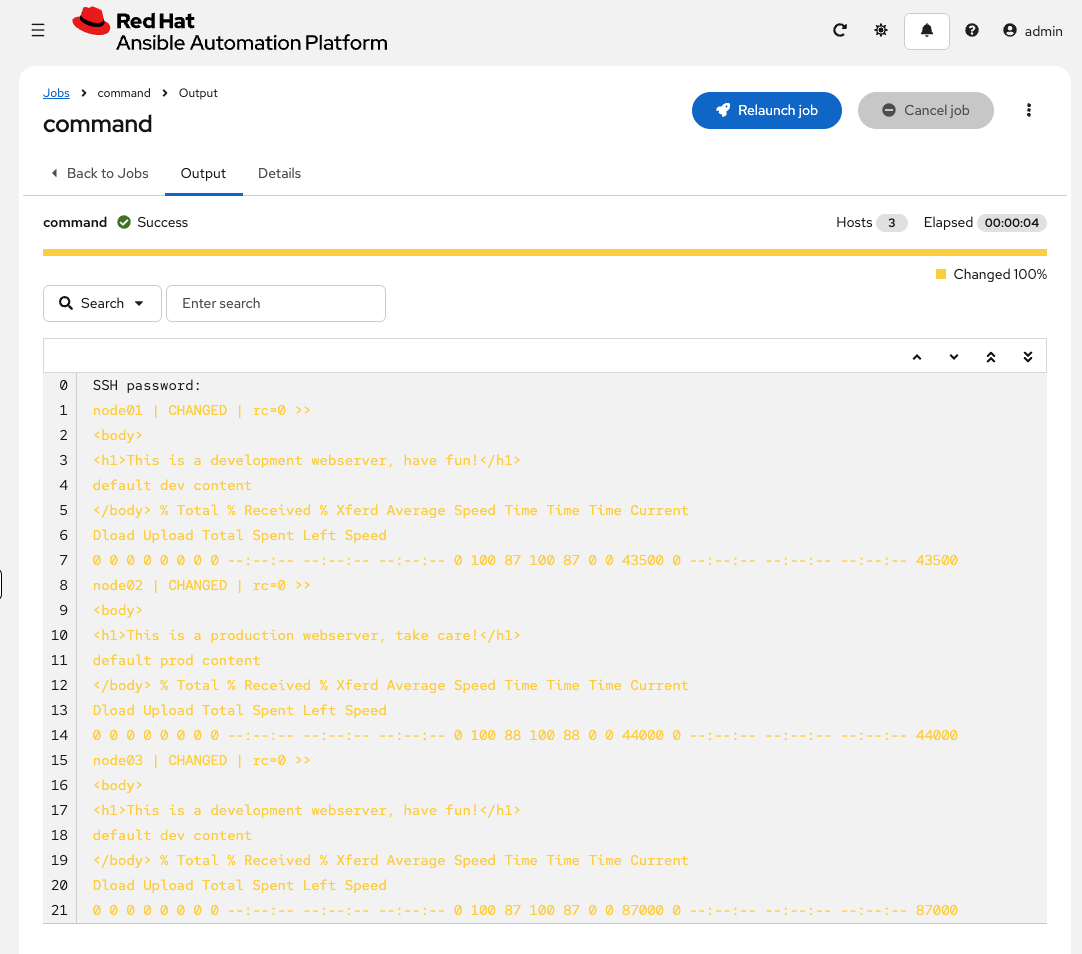
Add Survey
Add a Survey to the template to allow changing the variables dev_content and prod_content.
In the Template, click the Survey tab, then click the kebab menu (⋮) next to the Survey enabled toggle and select Create survey question.
Fill out the following information:
| Parameter | Value |
|---|---|
Question |
What should the value of dev_content be? |
Answer Variable Name |
dev_content |
Answer Type |
Text |
-
Click Create survey question
In the same fashion add a second Survey Question
| Parameter | Value |
|---|---|
Question |
What should the value of prod_content be? |
Answer Variable Name |
prod_content |
Answer Type |
Text |
-
Click Create survey question
-
Enable the survey by toggling the Survey enabled switch to the on position.
-
Add permissions to the team
Web Contentso the template Create Web Content can be executed bywweb. -
Within Automation Execution → Templates, click Create Web Content, select the User Access tab, and click Assign users.
-
Select user(s) → check the box for
wweb, click Next. -
Select roles to apply → check the box for JobTemplate Execute and click Next.
-
Review → click Finish.
-
-
Run the survey as user
wweb-
Logout of the user
adminof your Ansible automation controller. -
Login as
wweband go to Automation Execution → Templates and run the Create Web Content template.
-
Once the job completes, log back in as admin and verify the results using Run Command:
-
Go to Automation Execution → Infrastructure → Inventories → Workshop Inventory and open the Hosts tab.
-
Select
node01,node02, andnode03, then click Run Command. -
In the Details window, set Module to
commandand Arguments tocurl http://localhost. Click Next. -
In the Execution Environment window, select Default execution environment. Click Next.
-
In the Credential window, select Workshop Credential. Click Next.
-
Review your inputs and click Finish.
Verify that the updated survey content is reflected in the output for each node.
Congratulations
You finished your labs! We hope you enjoyed your first encounter with Ansible automation controller as much as we enjoyed creating the labs.
Summary
In this exercise you:
-
Created a Webserver inventory group with dev/prod staging variables
-
Built a job template using stage-aware templates for web content
-
Verified dev and prod content was deployed correctly to the right hosts
-
Added a survey for dynamic content input and configured RBAC for the wweb user