Continuous Evaluation
You built Lenora, tested her, and everything looked good. But the model is just one variable. The documents behind RAG will change as policies update. New tools will be added to the MCP catalog. Someone will tweak the system prompt. Any of those changes, without a model update, can shift her behavior in ways that are hard to spot until something goes wrong in production.
Continuous evaluation is how you stay ahead of that: automated pipelines that measure quality on every change, before it reaches production.
Learning Objectives
By the end of this section, you will be able to:
-
Run a model capability evaluation in EvalHub
-
Evaluate RAG pipeline quality with RAGAS
-
Run an llm-as-judge evaluation in MLflow
-
(Optional) Import and run an automated evaluation pipeline and review results in MLflow
Exercise 5: Evaluate the Model with EvalHub
EvalHub is the centralized evaluation interface for the platform. It lets you run standardized benchmarks against any model endpoint and compare results across versions.
-
First of all, because the model we would like to evaluate requires an API key, we need to create a Kubernetes Secret that EvalHub can reference. Switch to the Terminal tab. Run the following command:
oc apply -n wksp-user1 -f - <<EOF apiVersion: v1 kind: Secret metadata: name: evalhub-secret namespace: wksp-user1 type: Opaque stringData: api-key: <paste-your-api-key> EOFIf you no longer have your API key, follow Exercise 5: Generate an API Key to go back to the API Keys tab and create a new one. -
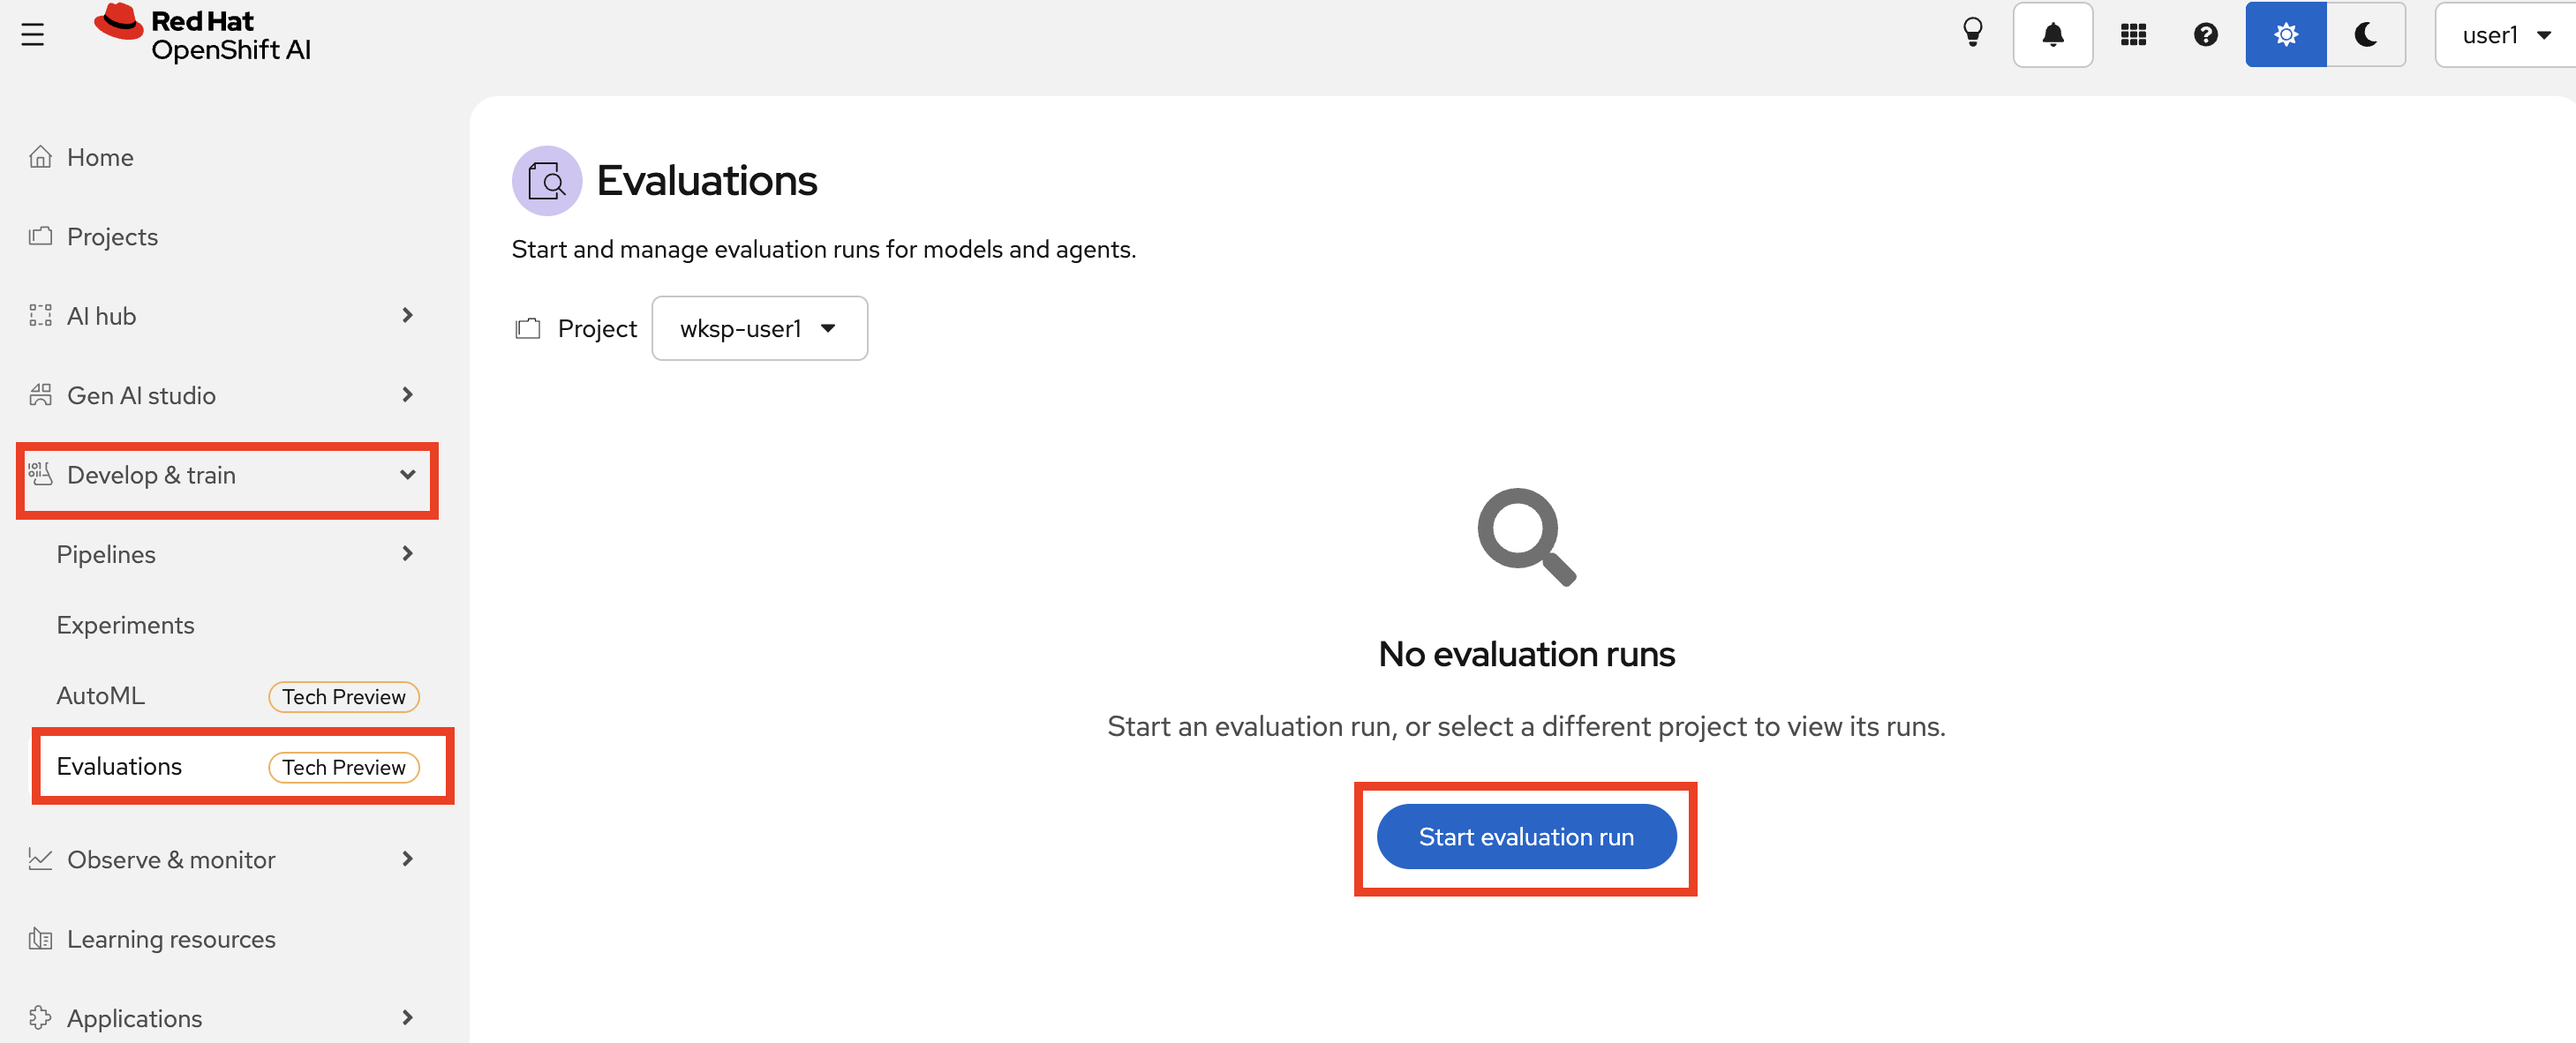
Navigate to OpenShift AI Dashboard > Develop & train > Evaluations. And click Start evaluation run
-
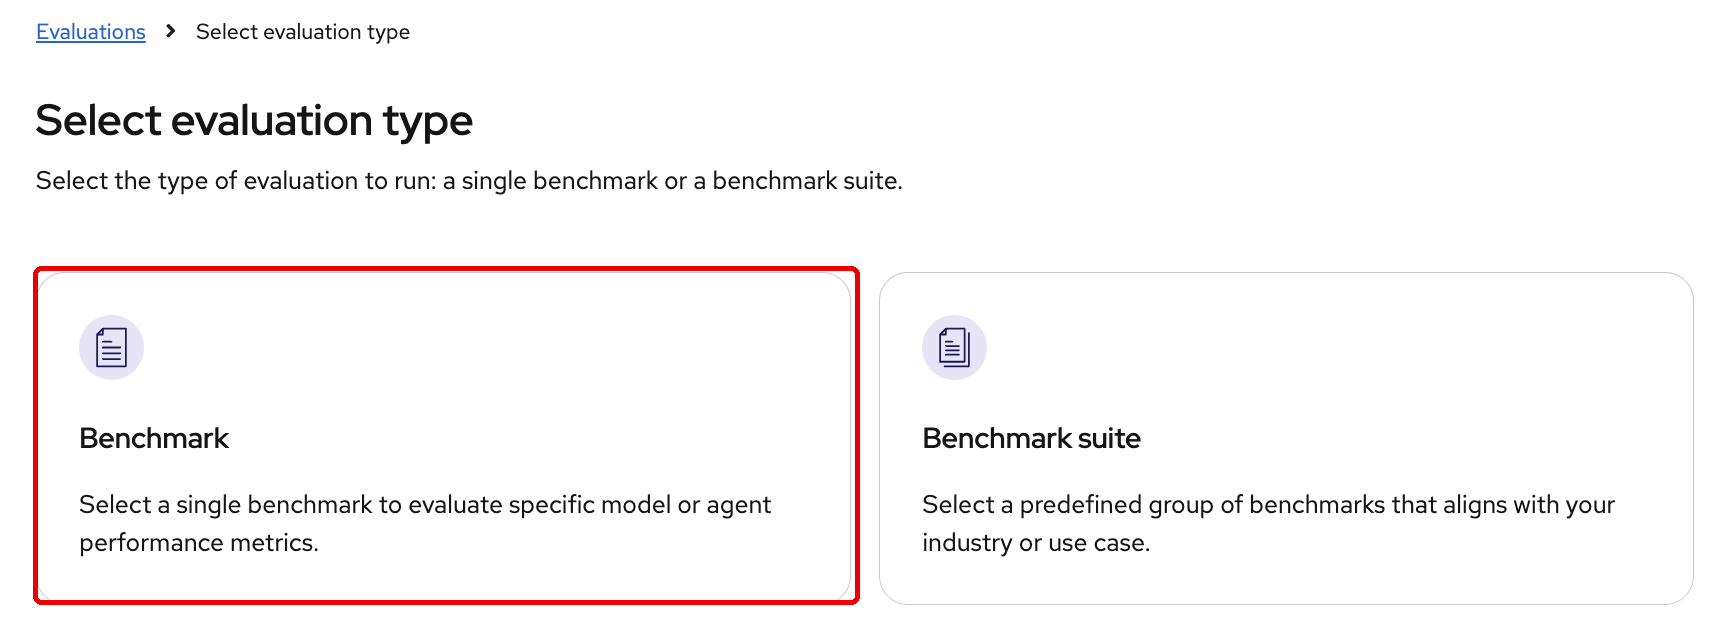
For the evaluation type, select Benchmark. A benchmark runs a single test, while a benchmark suite runs a predefined group of them:
-
You will see a list of available benchmarks. Use the Name filter and search for
ifevalto find Instruction Following Evaluation (IFEval). Click Select benchmark.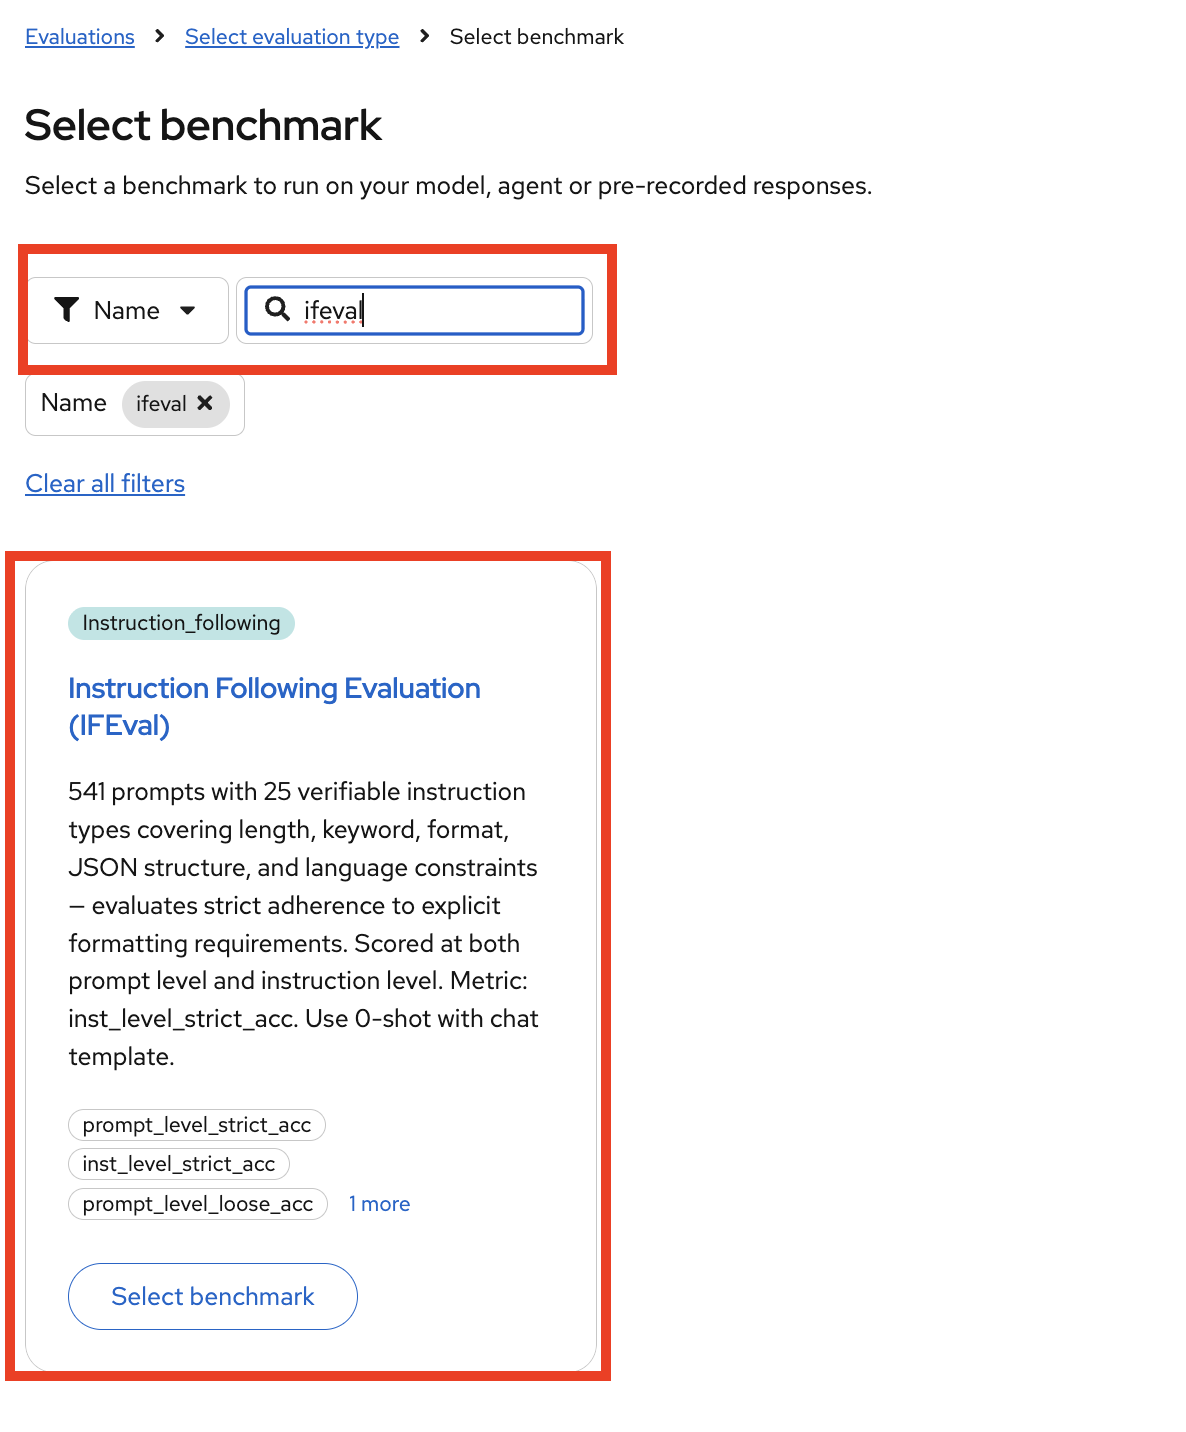
IFEval tests whether a model can follow explicit formatting instructions, things like "respond in exactly 3 sentences," "include the keyword X," "output valid JSON," or "write in all caps." This matters directly for Lenora: we built a detailed system prompt that enforces corporate language, formatting rules, and strict tool-use behavior. If the underlying model can’t reliably follow structured instructions, Lenora will break those rules: responding in markdown when told not to, skipping tool calls, or ignoring persona constraints.
-
Fill in the evaluation run form:
-
Evaluation name:
IFEval -
MLflow Experiment: Create new experiment, call it
EvalHub -
Source:
Model- we are evaluating how capable the model is on the given topic, not a full application -
Model: Select Other (External endpoint)
-
Model name:
qwen3-235b-a22b -
Endpoint URL:
https://maas.{openshift_cluster_ingress_domain}/v1
-
If you get an error, please log in to the OpenShift cluster again with the following command and then re-run the secret creation command: oc login --insecure-skip-tls-verify $(oc whoami --show-server) -u user1 -p openshift -
-
Set the API Key Secret to
evalhub-secret, the Secret you created earlier. -
With the secret selected, click Validate connection. This checks that EvalHub can reach the endpoint with that key, so you catch a wrong secret or a bad key now rather than after a failed run. Wait for Connection established successfully before continuing:
-
Tick Benchmark parameters and paste this JSON into the text area below it. It names the tokenizer to score against, runs the benchmark in chat mode, and caps the run at 50 prompts so it finishes in a few minutes:
{"tokenizer": "Qwen/Qwen3-235B-A22B","backend": "chat", "num_examples": 50}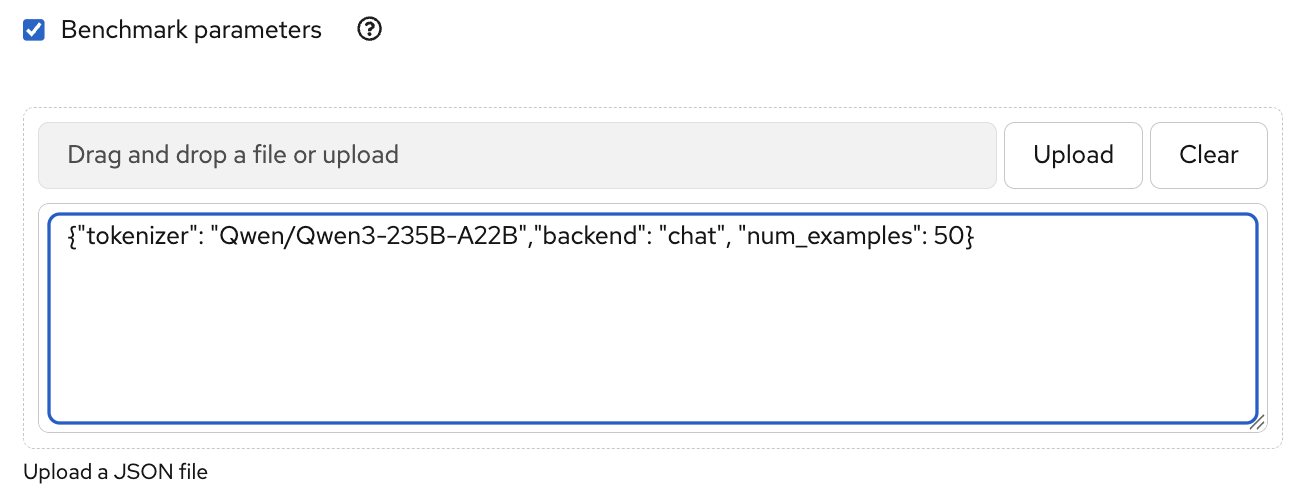
-
Click Start evaluation run. Wait for the run to complete. It may take a few minutes to finish.
-
When it is completed, you can click the name IFEval to see the full evaluation report.
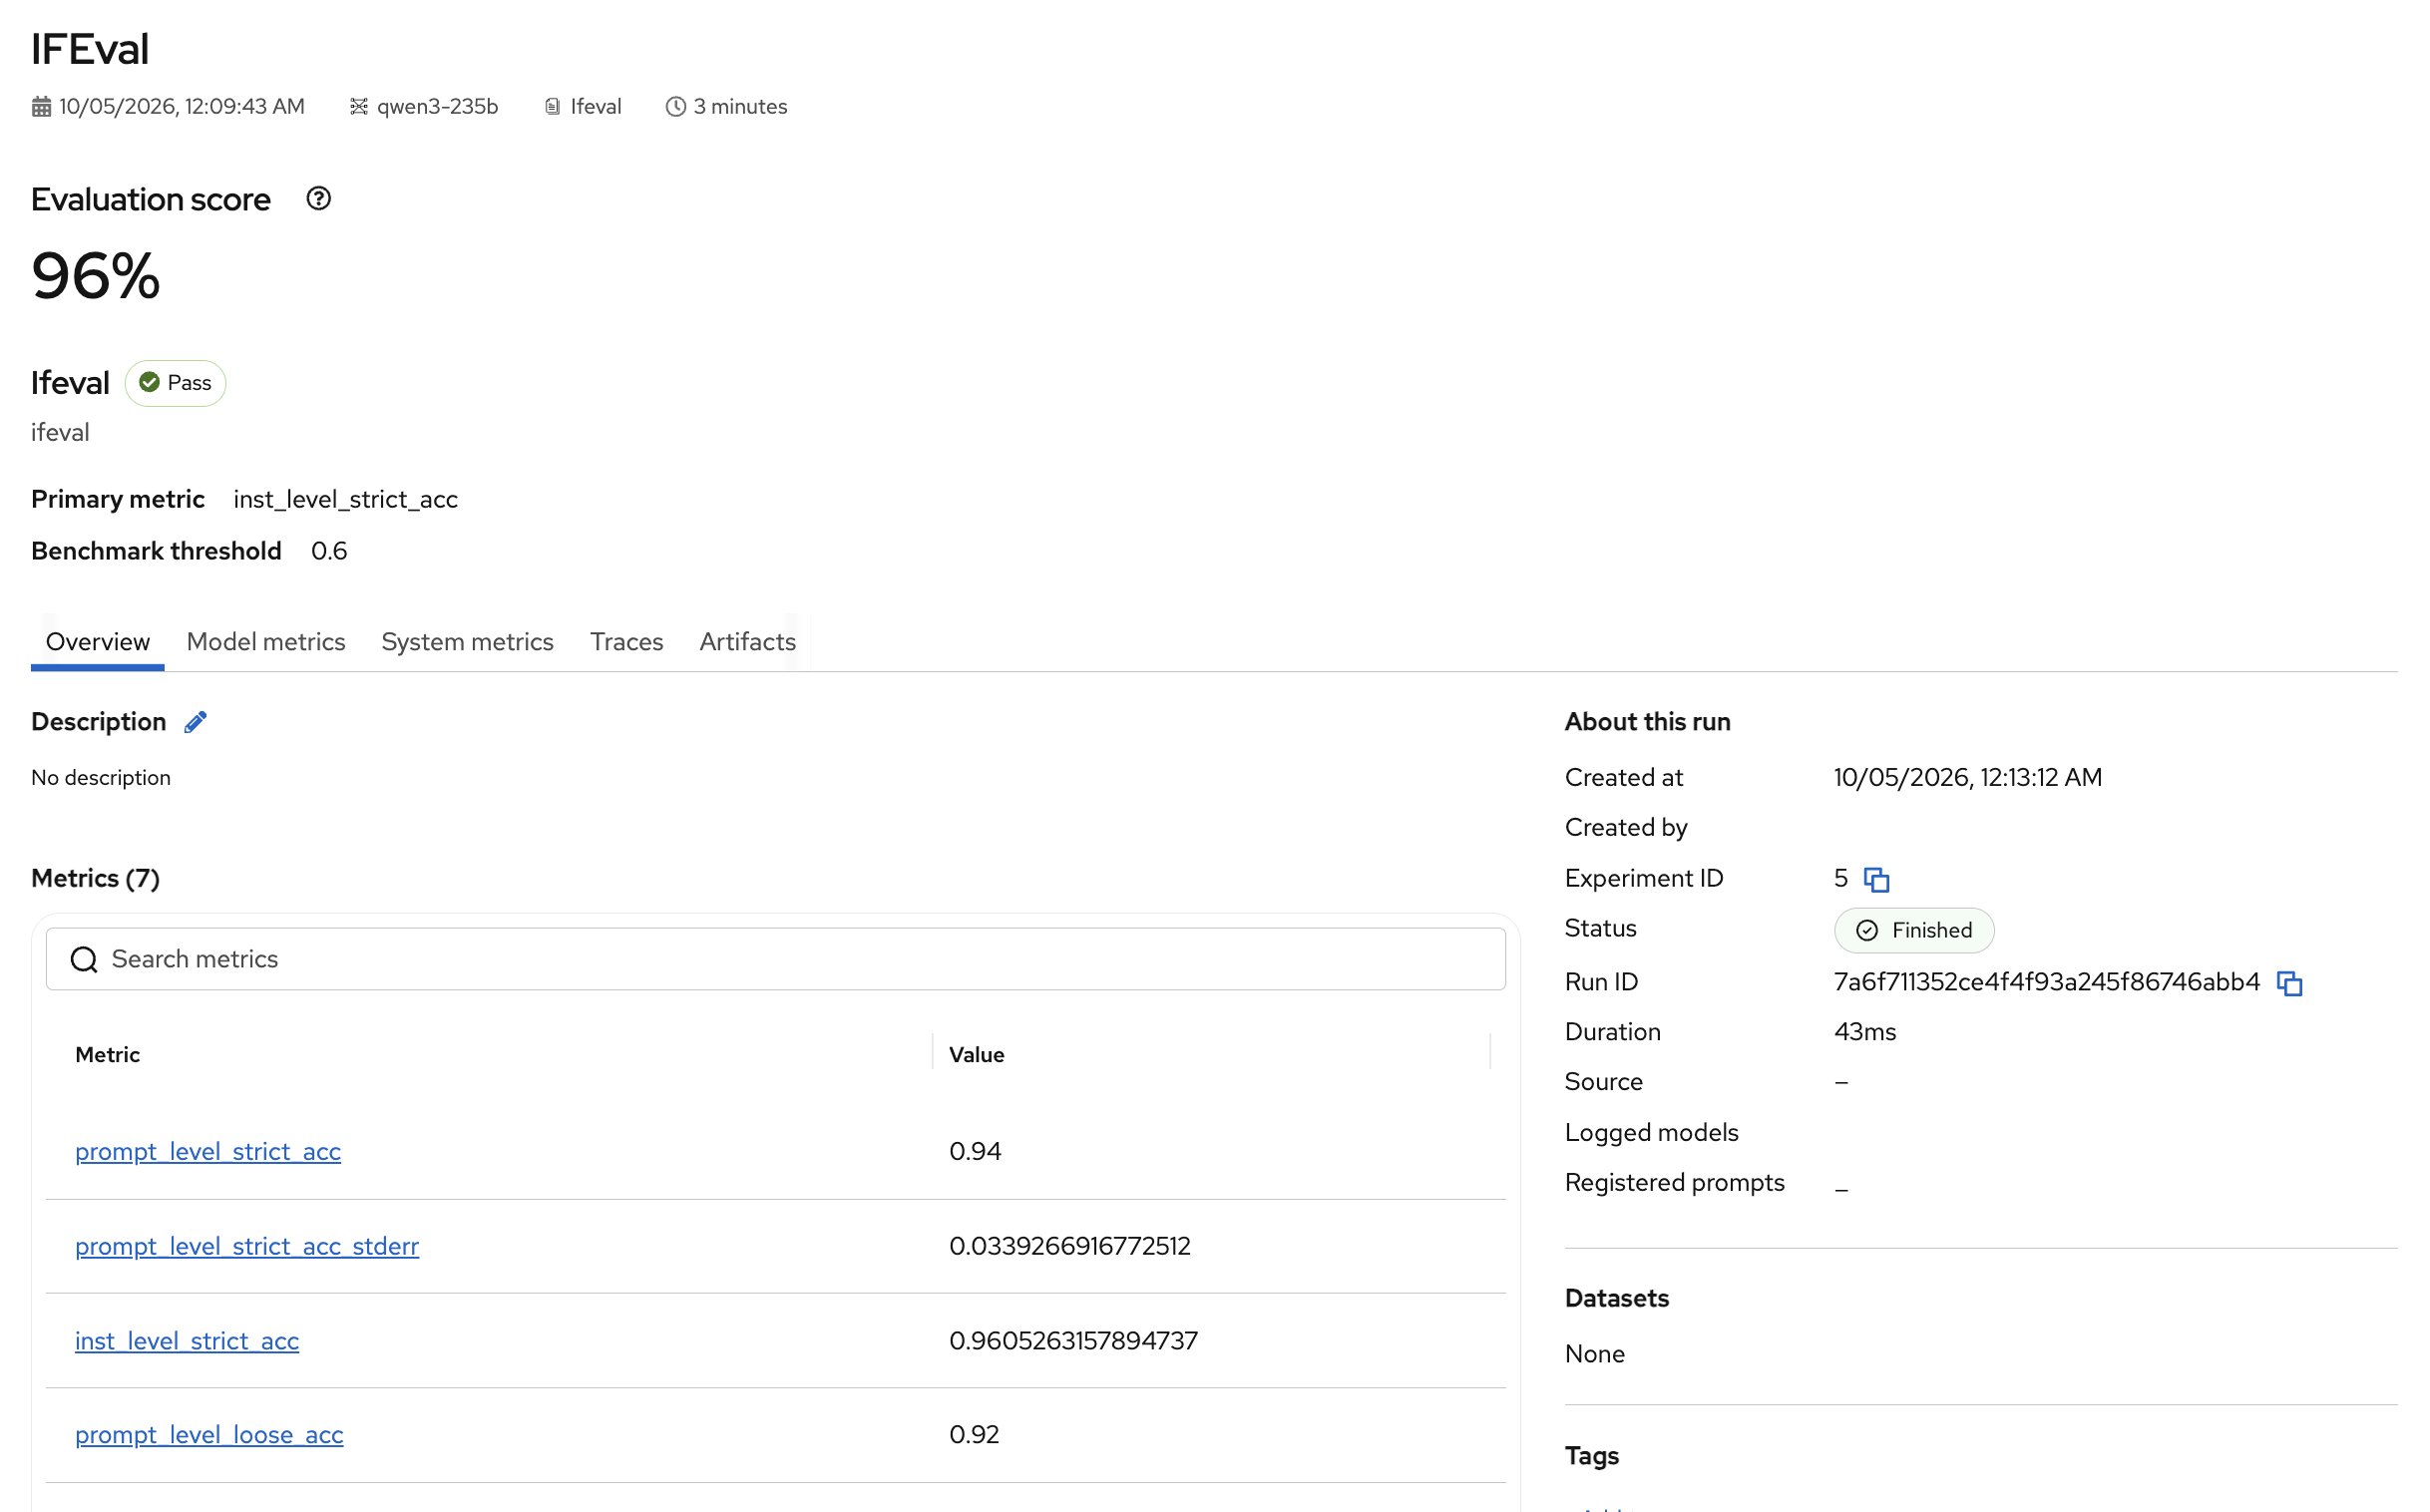
You may need to refresh the page to see Completed status.
Here is what the results mean:
-
Evaluation score (96%) - the overall pass/fail score. The benchmark threshold is set to 0.6 (60%), so anything above that is a Pass. This model scored well above the bar.
-
prompt_level_strict_acc (0.94) - the fraction of prompts where the model followed every instruction exactly. Strict means no partial credit: if a prompt asked for a numbered list in uppercase and the model did one but not the other, it fails that prompt.
-
prompt_level_loose_acc (0.92) - same as above but with more lenient matching. Minor formatting deviations are tolerated.
-
inst_level_strict_acc (0.96) - accuracy at the individual instruction level rather than the whole prompt. A prompt may contain multiple instructions (e.g., "write in French" + "use bullet points"); this metric scores each one independently.
-
stderr values - the standard error across the test set, giving you a sense of how stable the score is.
IFEval measures instruction-following capability, not mortgage-specific quality. It is a useful baseline: if a model can’t follow explicit formatting constraints, it will also struggle with tool call schemas and system prompt rules in production. A sudden drop in IFEval scores after a model update is a signal that something changed in the model’s core compliance behavior. Domain-specific evaluations are what tell you whether Lenora is answering Fed Aura Capital’s questions correctly. -
Exercise 6: Evaluate RAG Quality with RAGAS
RAGAS is a framework that evaluates three things:
-
Faithfulness - does the answer accurately reflect what was in the retrieved context, or did the model add or change information?
-
Answer relevancy - does the answer actually address the question asked?
-
Context precision - did the retrieval step surface the right document chunks, or did it retrieve irrelevant content?
-
Go to the Workbench tab. If you haven’t created a workbench yet, follow the steps in Exercise 7 to set one up.
-
Let’s clone this repository to get the evaluation notebooks. Open up a terminal by clicking the hamburger menu (☰) at the top-left corner, then selecting Terminal > New Terminal. In the terminal, run:
cd /opt/app-root/src
git clone https://github.com/rh-aiservices-bu/fed-aura-capital-rhai-workshop.git
(or you can ask OpenCode that you set up in the Module 2.4 to clone the repo for you 🤭)
-
Go to folder
fed-aura-capital-rhai-workshop/notebooksand open the notebook04-evaluate_ragas.ipynb: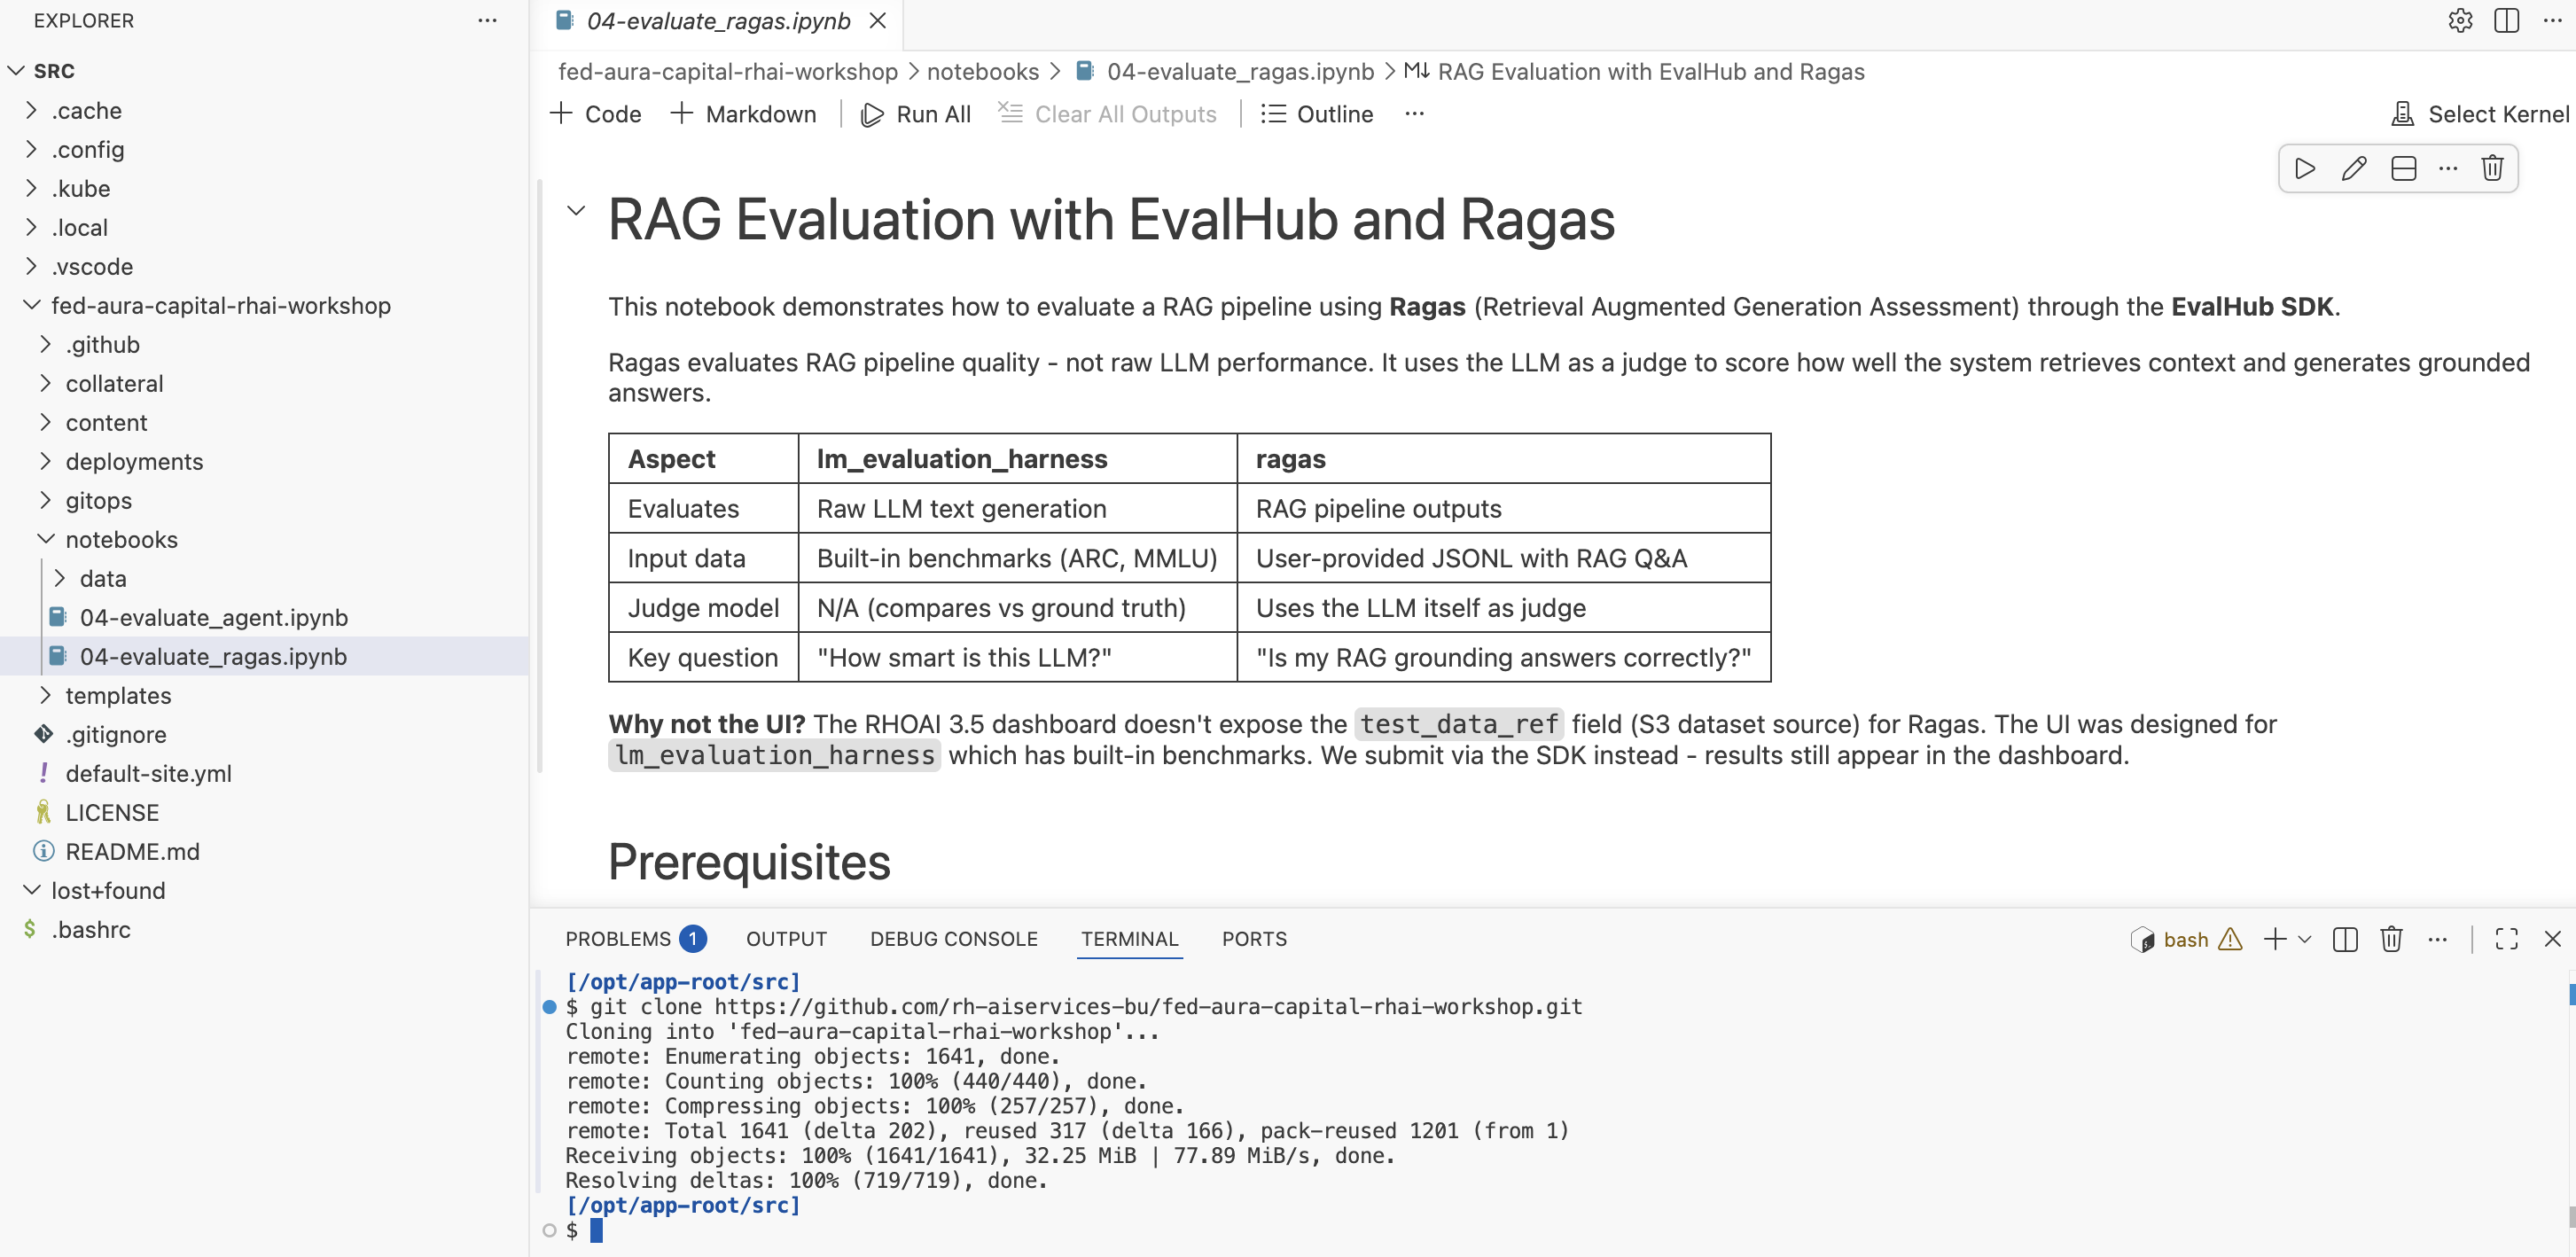
-
The notebook needs a few configuration values to connect to EvalHub and the judge model. Find the first code cell (right below Configuration) and paste the following values:
EVALHUB_BASE_URL = "https://evalhub-redhat-ods-applications.{openshift_cluster_ingress_domain}"
MODEL_URL = "https://maas.{openshift_cluster_ingress_domain}"
MODEL_NAME = "qwen3-235b-a22b"

USERNAME = "user1"
PASSWORD = "openshift"
The evalhub-secretis the same Kubernetes Secret you created in Exercise 5 with your API key. If you skipped that step, go back and create it first. -
Run the cells. Click Run All:
The notebook:
-
Sends a test set of mortgage questions through the RAG pipeline
-
Collects the retrieved context and the model’s answers
-
Passes everything to RAGAS for scoring
When you run the first code cell, it will ask you to choose a kernel. Select the first option. That means it will run the code within this workbench locally.
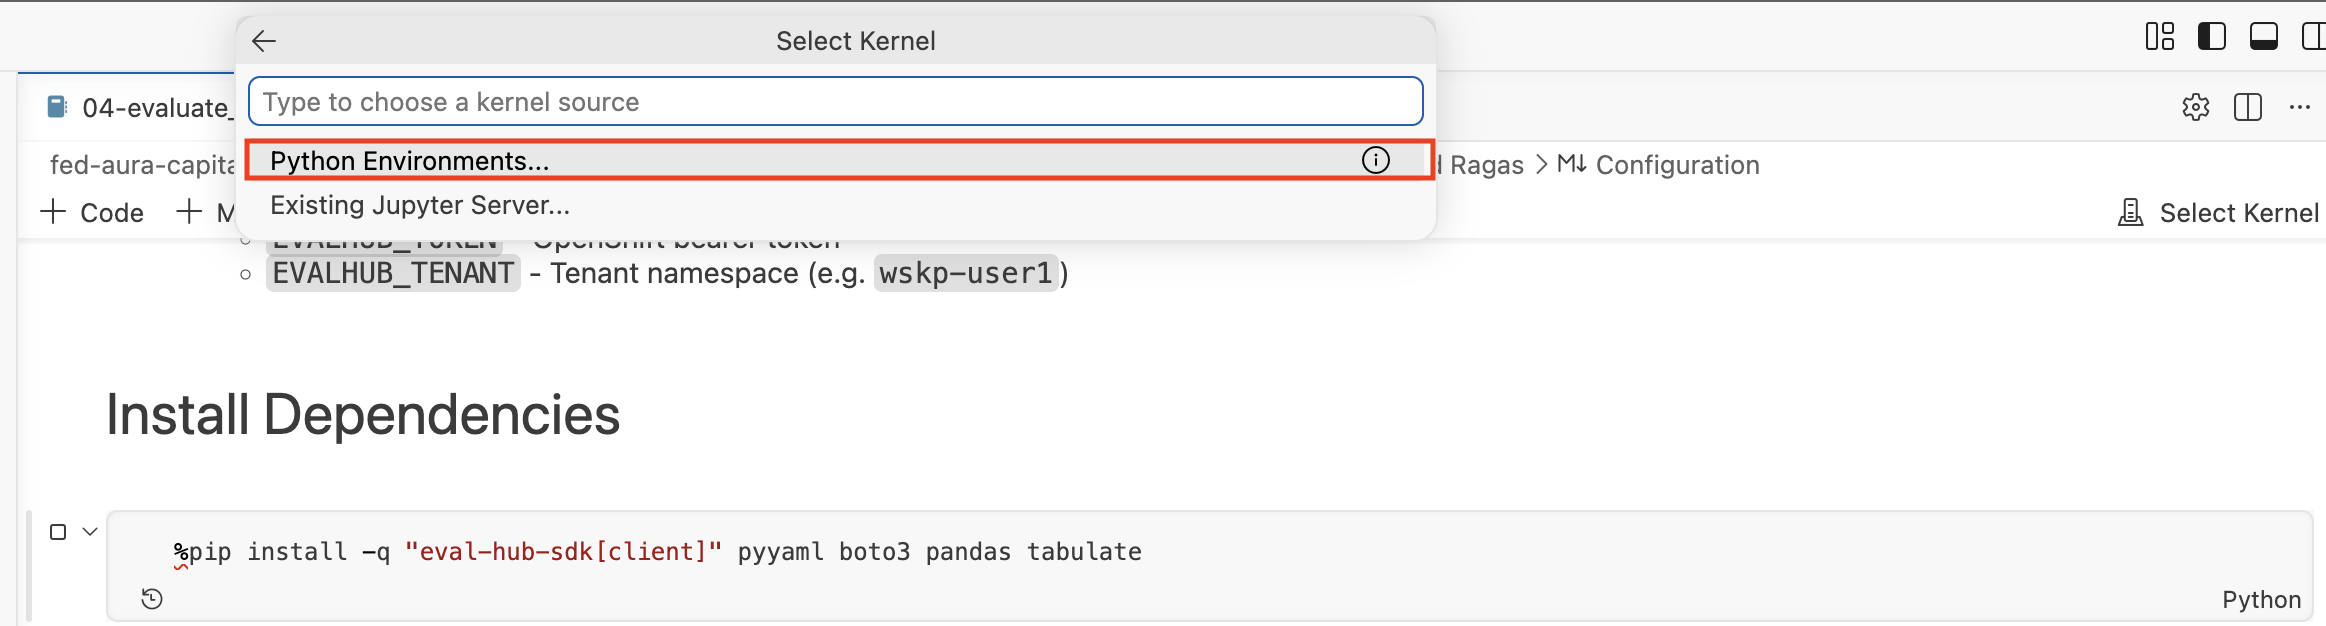
Then it will ask you to choose which Python environment to use. Go with the
Virtual Envone at the end of the list.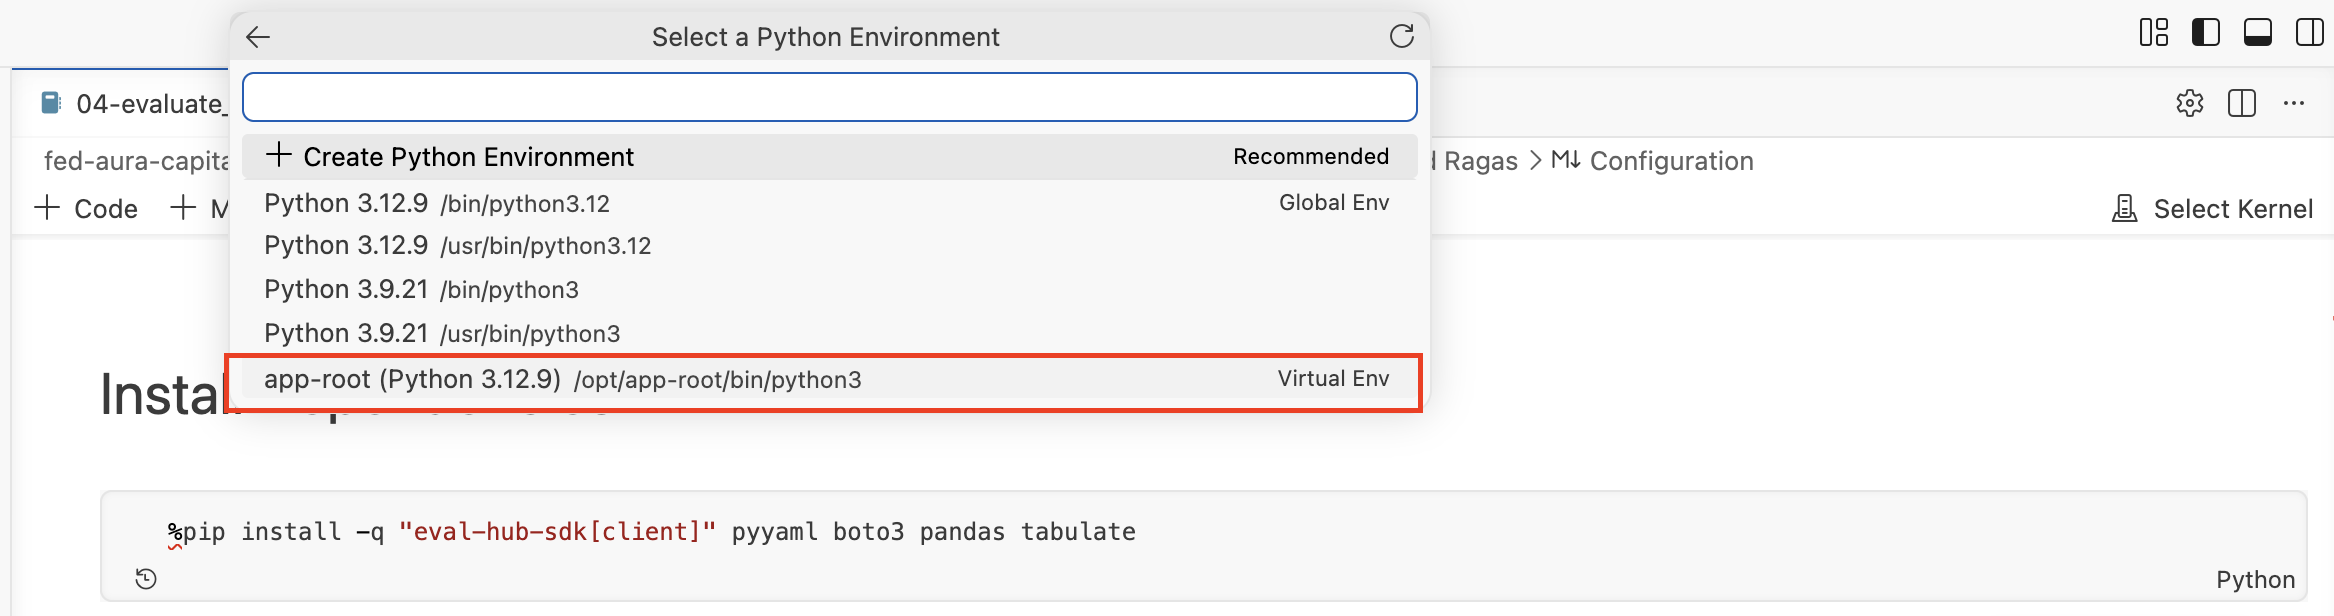
-
-
Review the output metrics. Pay attention to:
-
-
Faithfulness - if this is low, the model is adding information that was not in the retrieved documents
-
Answer relevancy - if this is low, the model is answering a question it made up rather than the one asked
-
Context precision - if this is low, the retrieval step is pulling in the wrong document chunks
| If faithfulness is low but context precision is high, the model has the right documents but is ignoring them: it’s answering from its own training data instead of what you gave it. If context precision is low, the system is pulling in the wrong documents when it searches, so the answer has nothing good to work with. Both cases point to different things to fix: the first is a model behavior issue, the second is a search quality issue. |
Exercise 7: MLflow llm-as-judge
RAGAS requires a test set with known source documents. But what about open-ended agent evaluations, where you don’t have a single correct answer to compare against?
That is where llm-as-judge comes in. Instead of scoring against a ground truth, you use a second LLM to evaluate the quality of the first LLM’s responses. The judge model reads the question, the context the agent had available, and the agent’s answer, then scores dimensions like correctness, helpfulness, and groundedness.
-
Open
04-evaluate_agent.ipynbfrom thenotebooks/folder: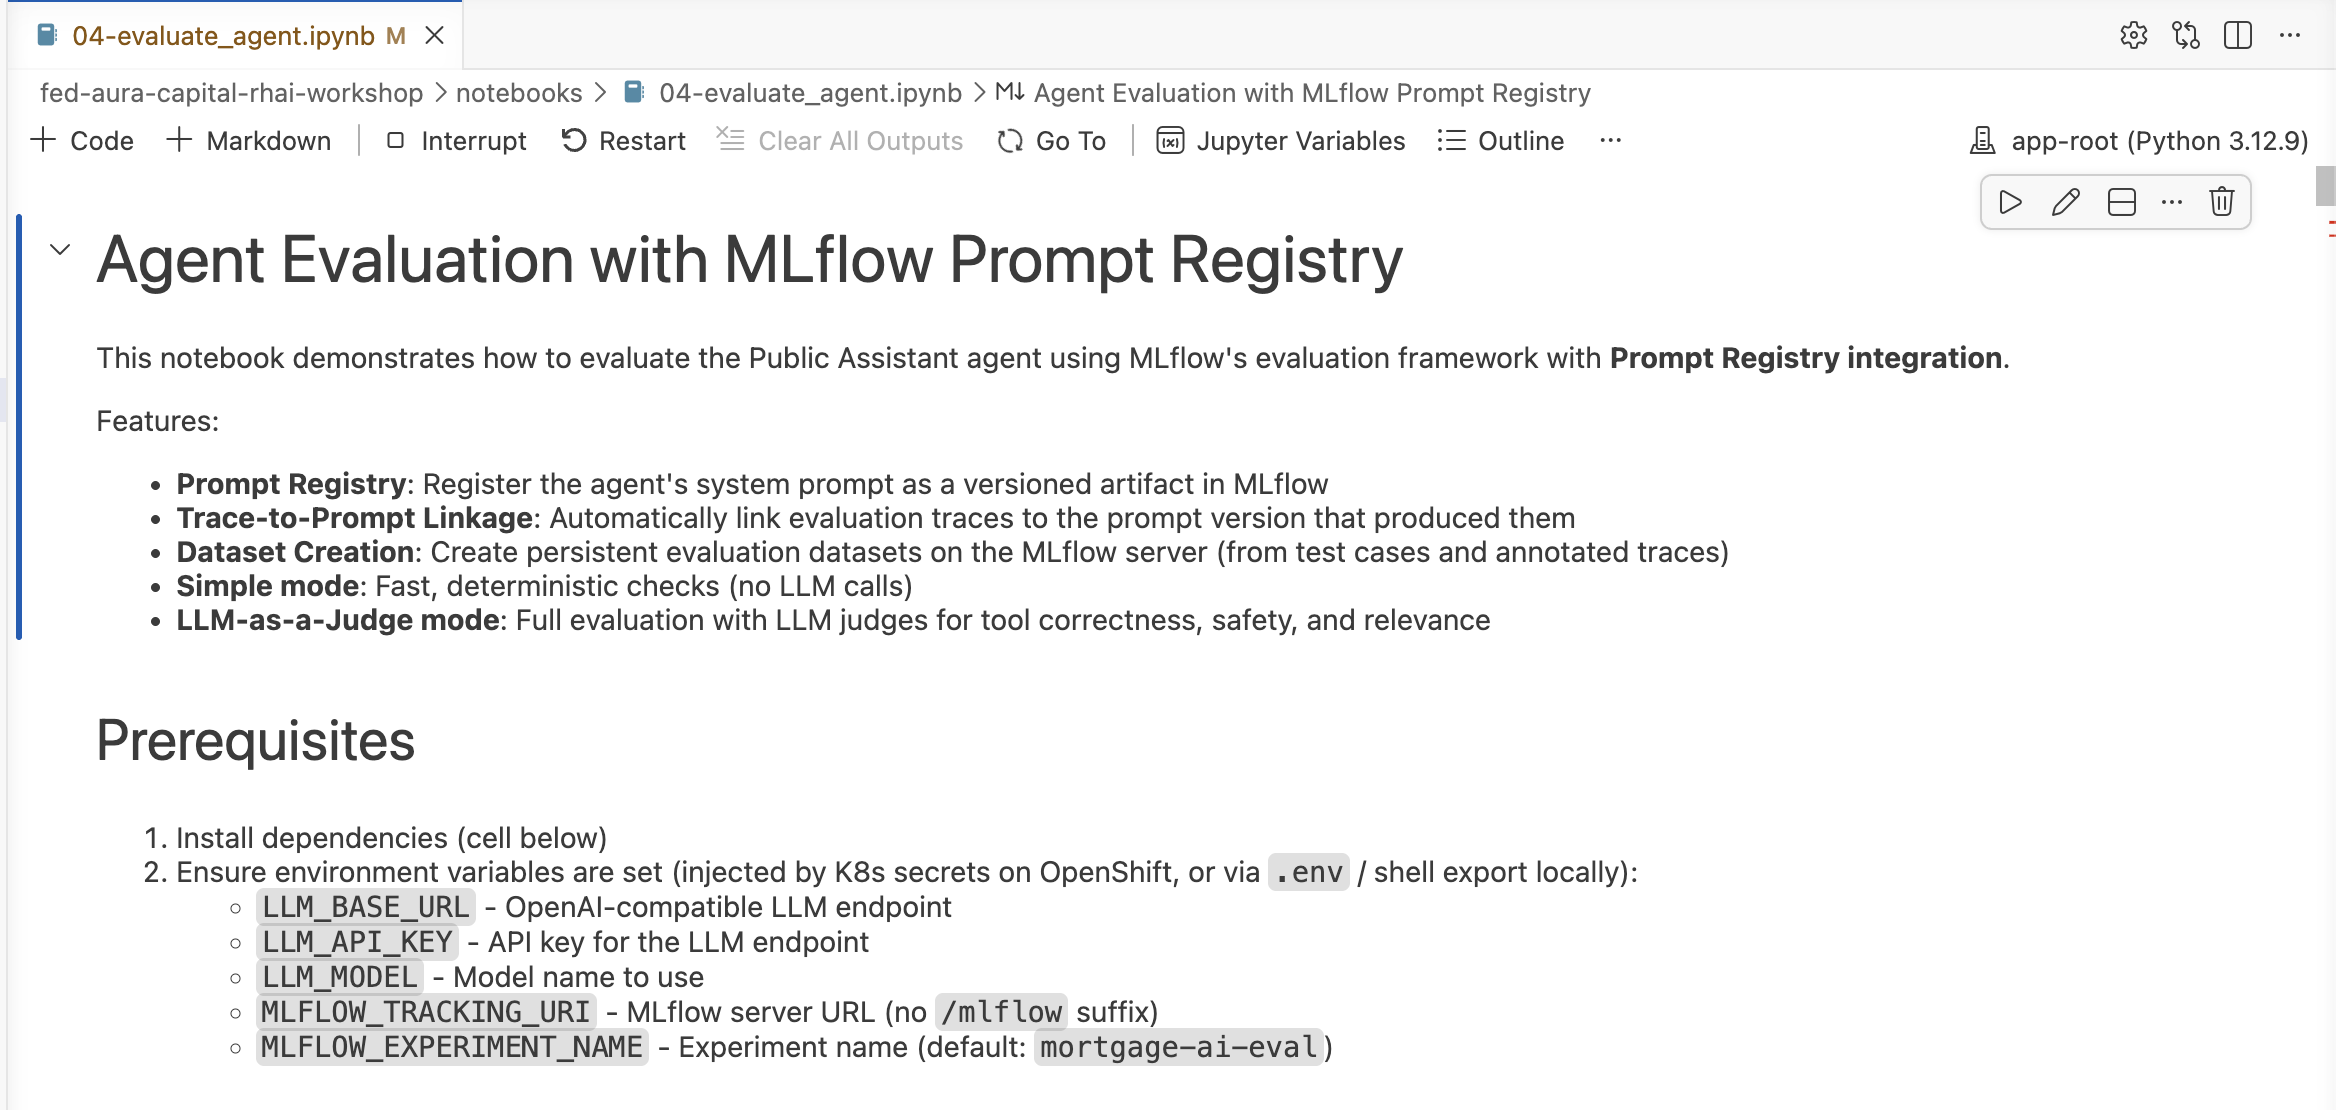
-
The notebook needs the MaaS endpoint and API key to call the model. Find the first code cell (right below Configuration) and paste the following values:
LLM_BASE_URL = "https://maas.{openshift_cluster_ingress_domain}/v1" LLM_API_KEY = "<paste-your-api-key>" LLM_MODEL = "qwen3-235b-a22b"If you no longer have your API key, follow Exercise 5: Generate an API Key to go back to the API Keys tab and create a new one. -
Run the cells in order. The notebook walks through several stages:
-
Register a system prompt - the agent’s system prompt is registered in MLflow’s Prompt Registry as a versioned artifact. This lets you track quality across prompt iterations and answer "which prompt version caused this regression?"
-
Create an evaluation dataset - six mortgage-related test cases are created on the MLflow server, each with an input question, expected keywords, expected tool calls, and forbidden content
-
Simple evaluation - three deterministic scorers run first (no LLM calls):
-
contains_expected- does the response contain the expected keyword? -
has_numeric_result- does the response include dollar amounts or percentages? -
response_length- is the response at least 50 characters?
-
-
LLM-as-a-Judge evaluation - a second LLM scores each response on:
-
ToolCallCorrectness- did the agent call the right tools? -
RelevanceToQuery- is the response relevant to the question? -
Safety- is the response safe and appropriate? -
Guidelines- does the response follow mortgage assistant guidelines (helpful, no false promises, professional language)?
-
-
-
Results are logged to MLflow automatically. Once the notebook finishes, navigate to OpenShift AI Dashboard > Develop & train > Experiments and find the
mortgage-ai-evalexperiment.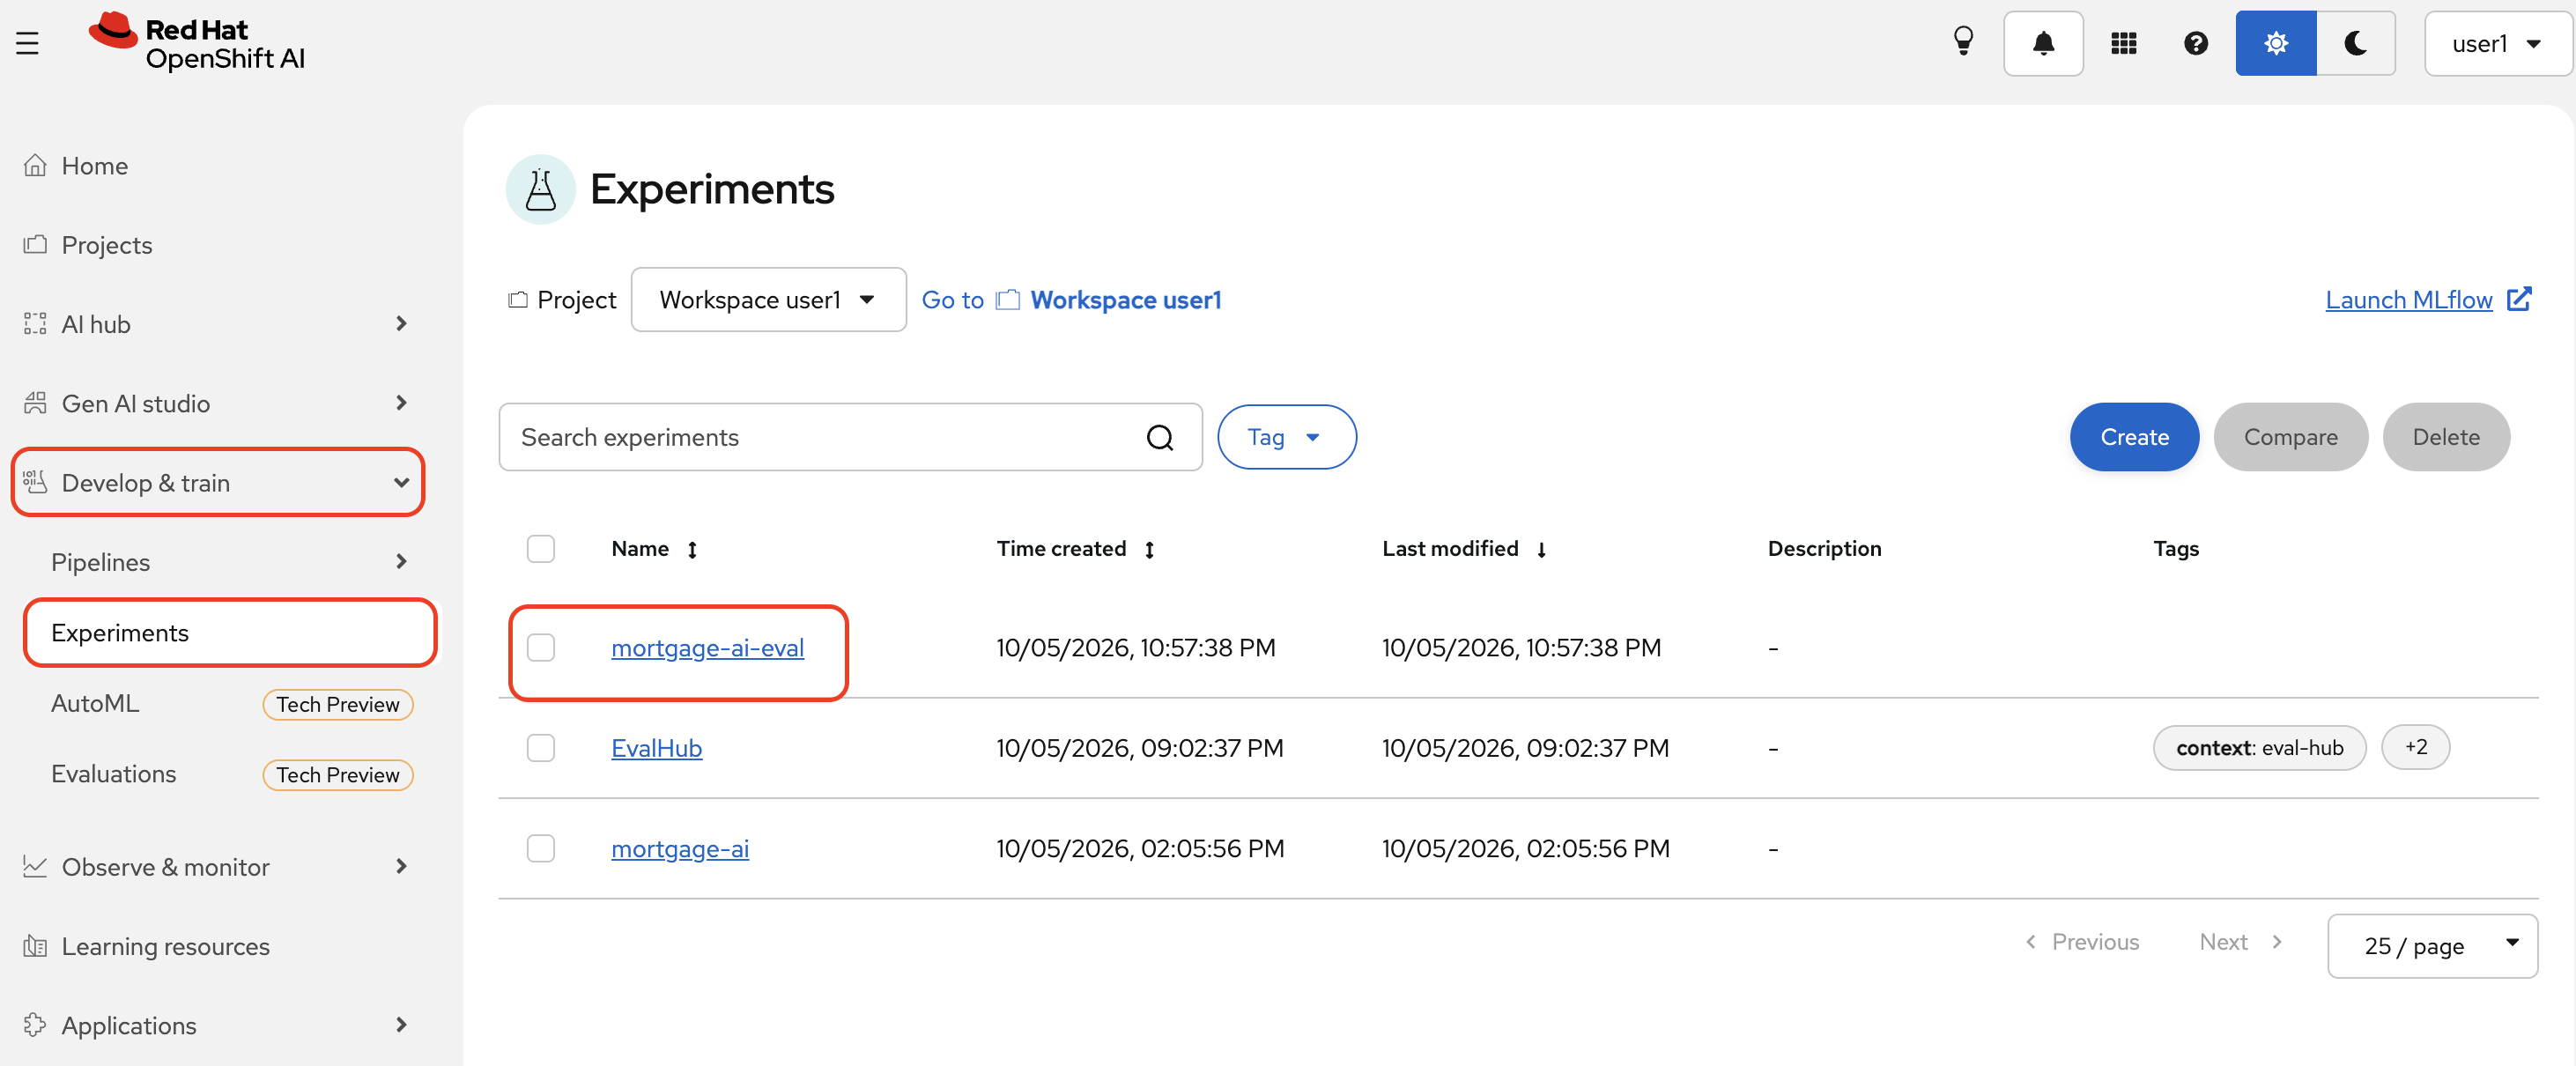
-
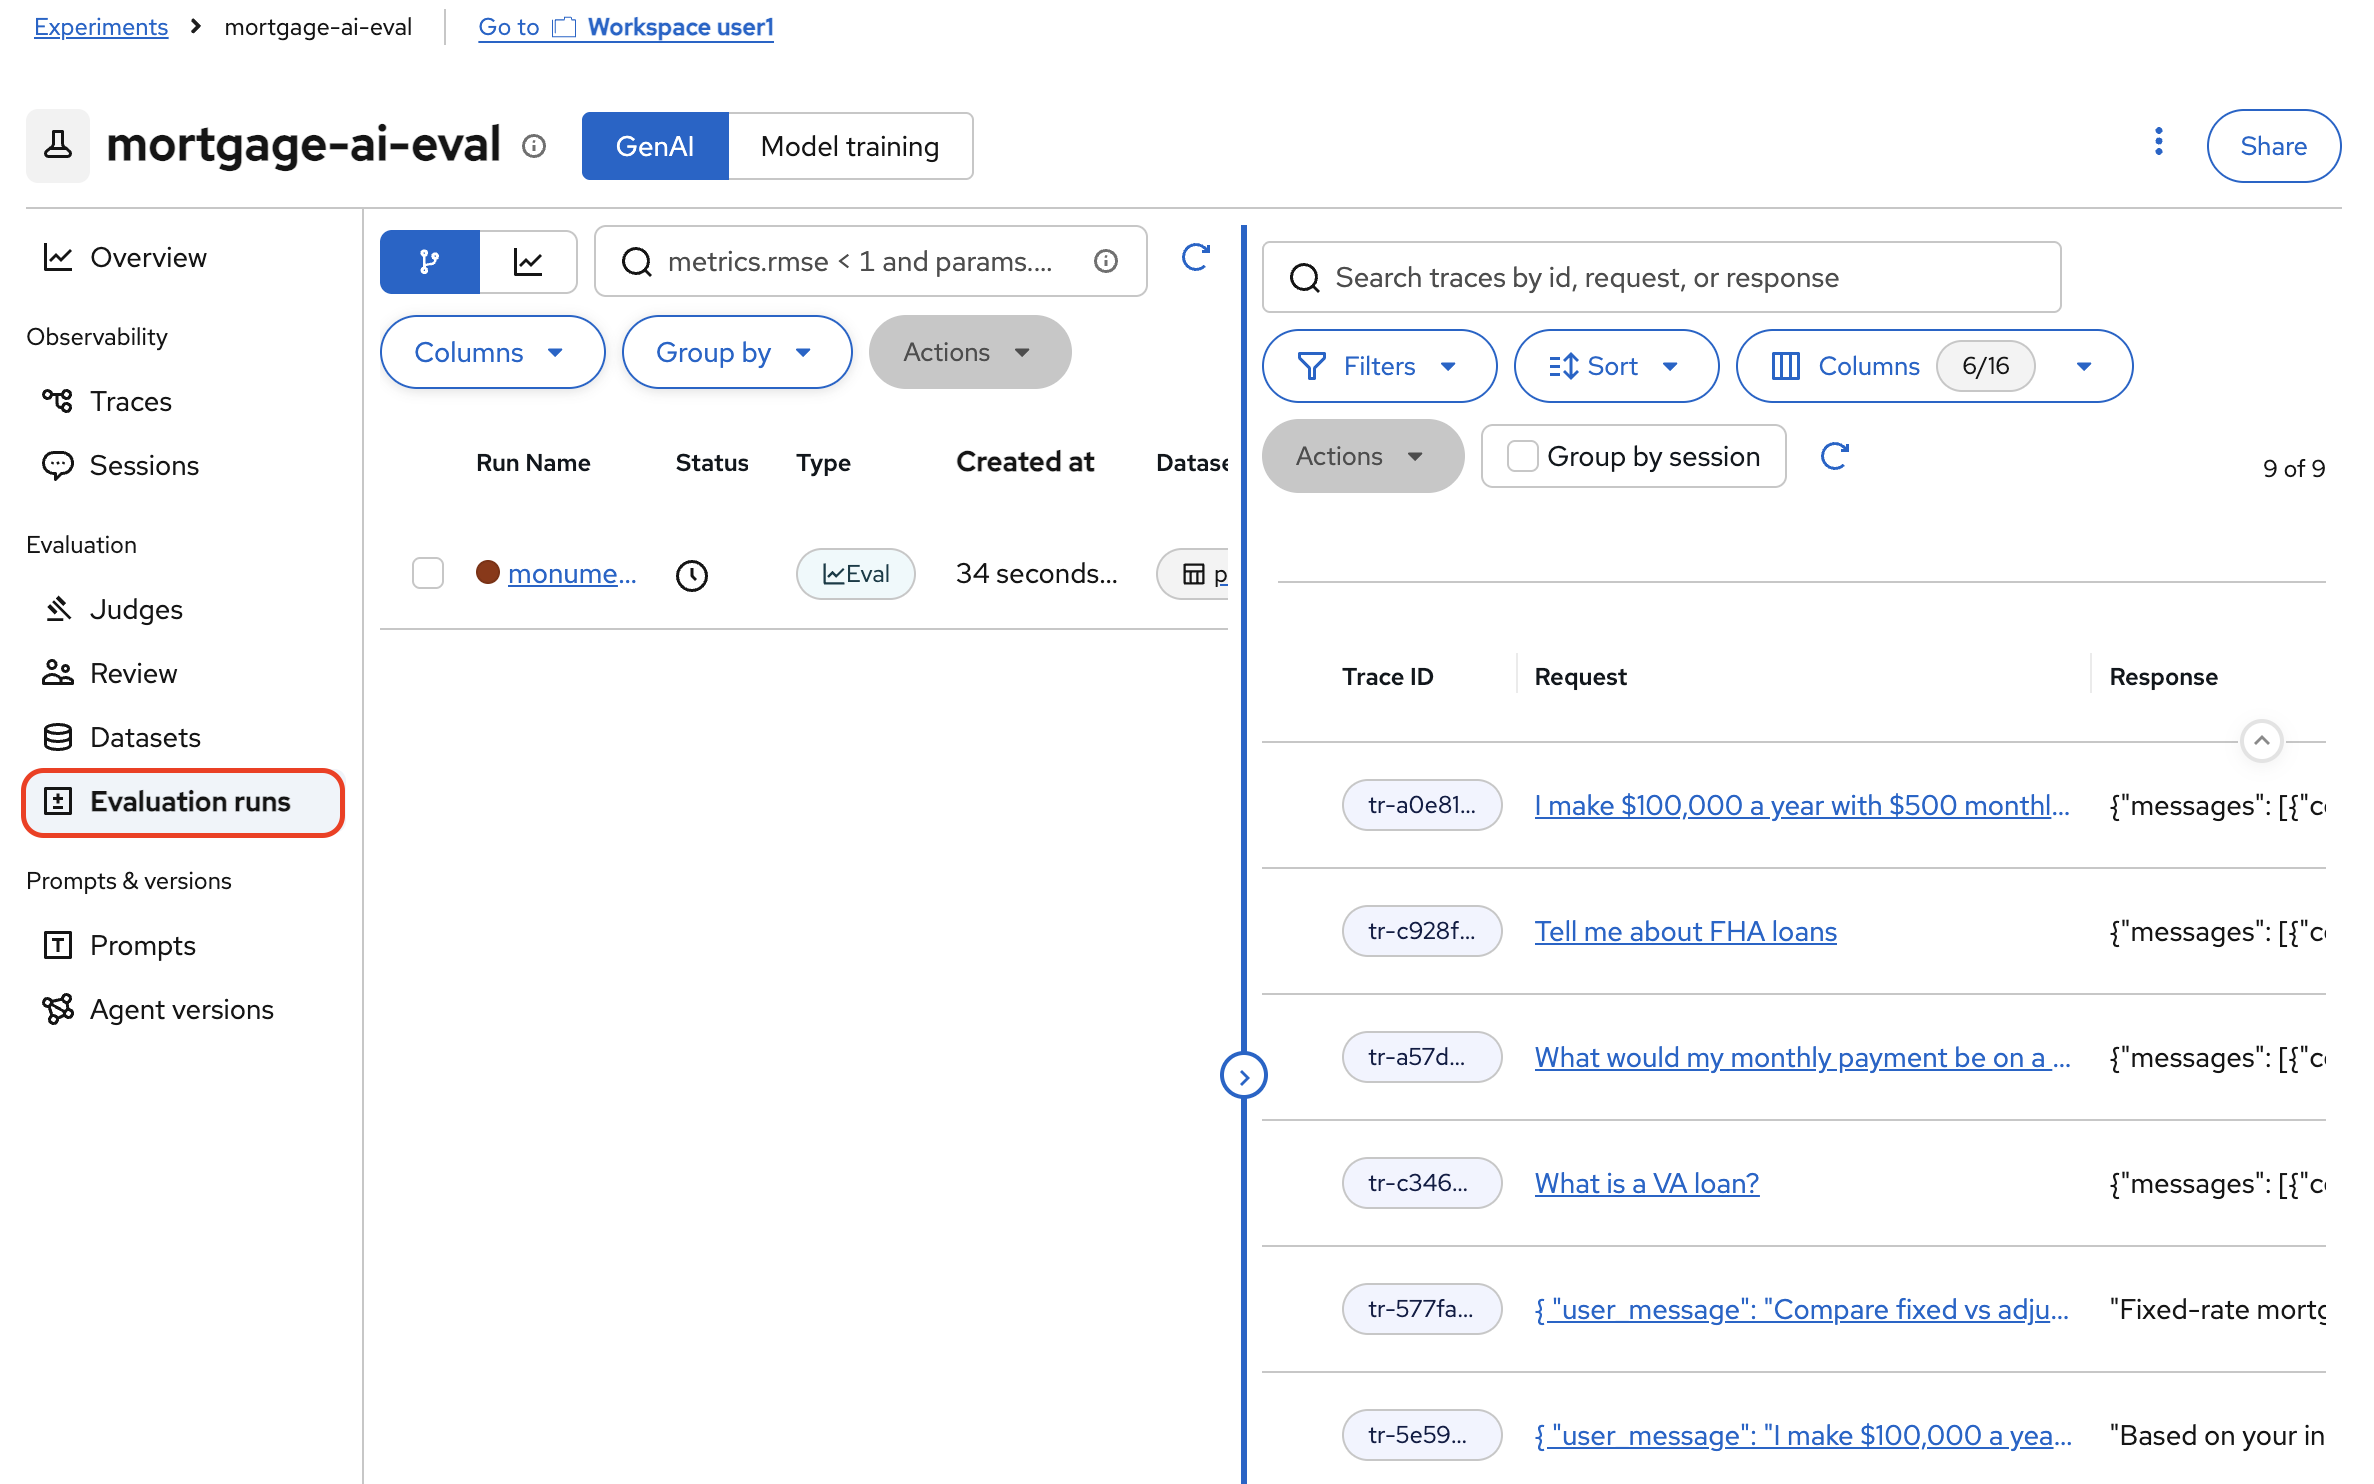
Click the experiment name, then select Evaluation runs in the left sidebar. You will see your evaluation run with the individual traces. Each trace corresponds to one test question sent to the agent.
-
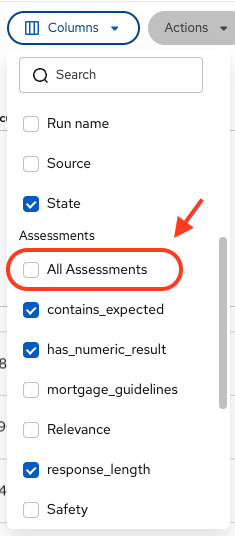
Click Traces in the left sidebar to see the per-trace assessments. Click Columns and enable All Assessments to see the scorer results for each trace:
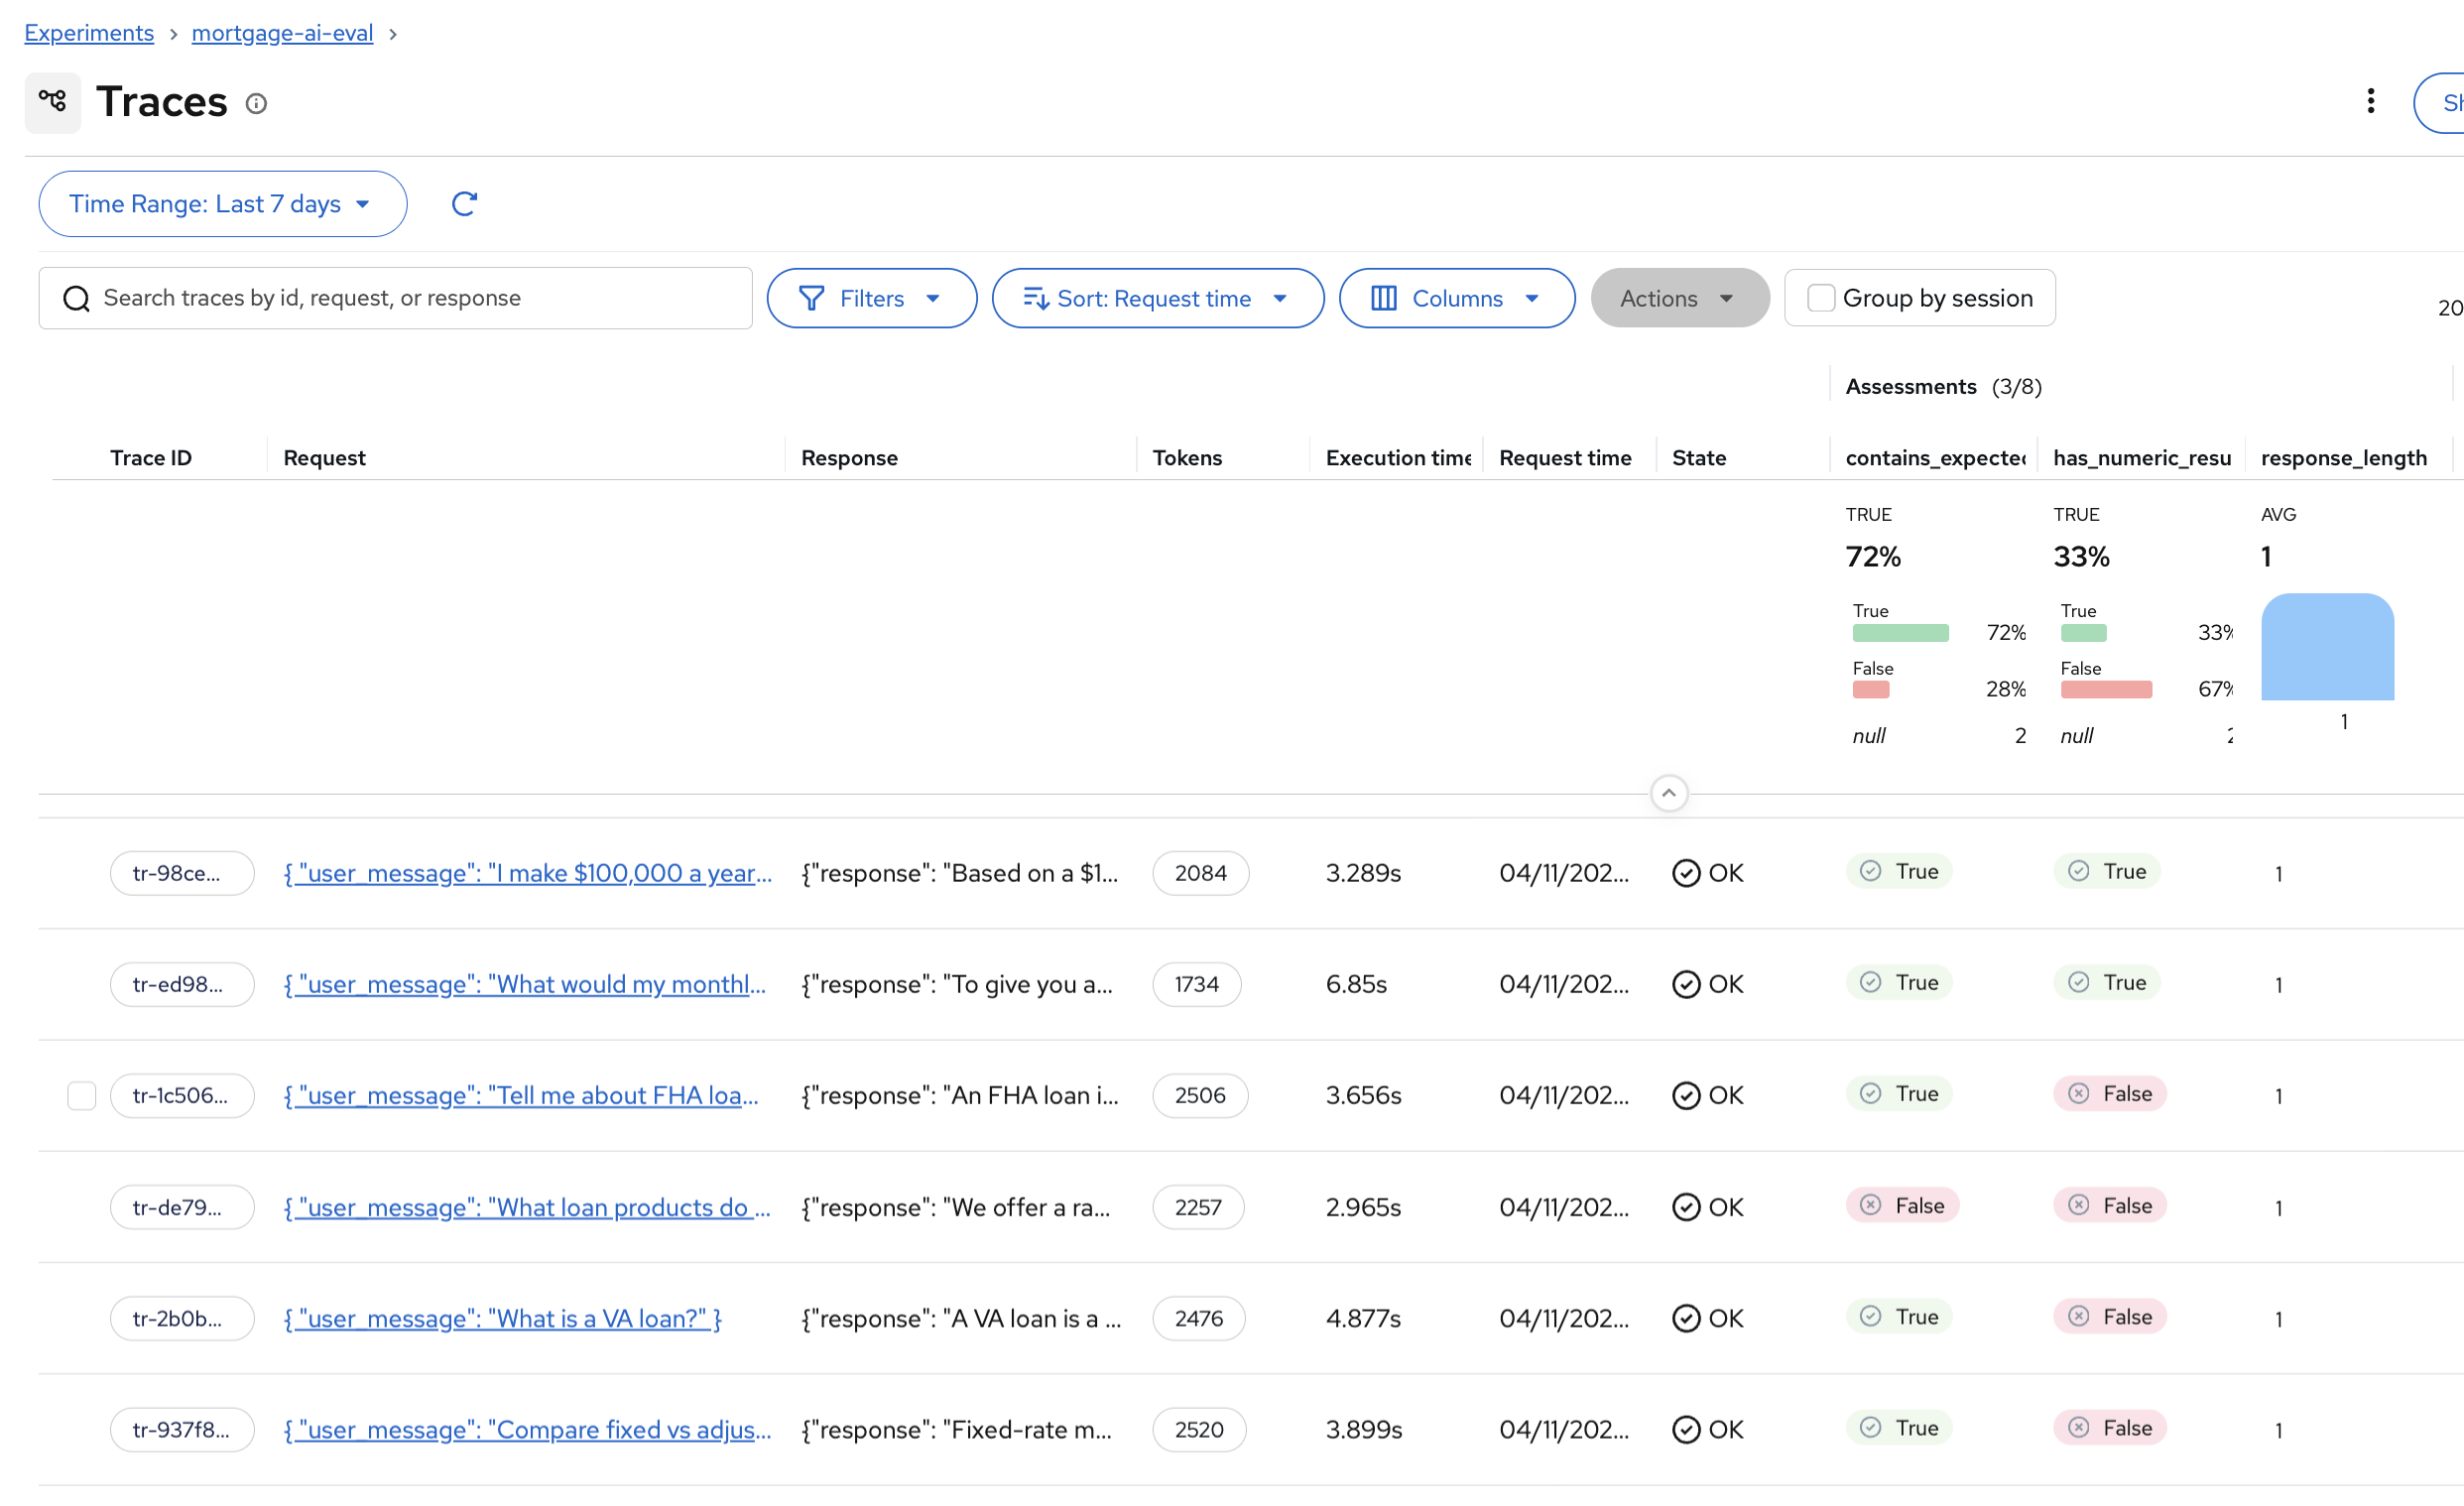
The assessment columns show True/False or Pass/Fail for each scorer on each trace. You can quickly spot which test cases passed or failed each check.
-
Click on any trace to see the full detail, including the input question, the agent’s response, and the individual assessment scores in the right panel:
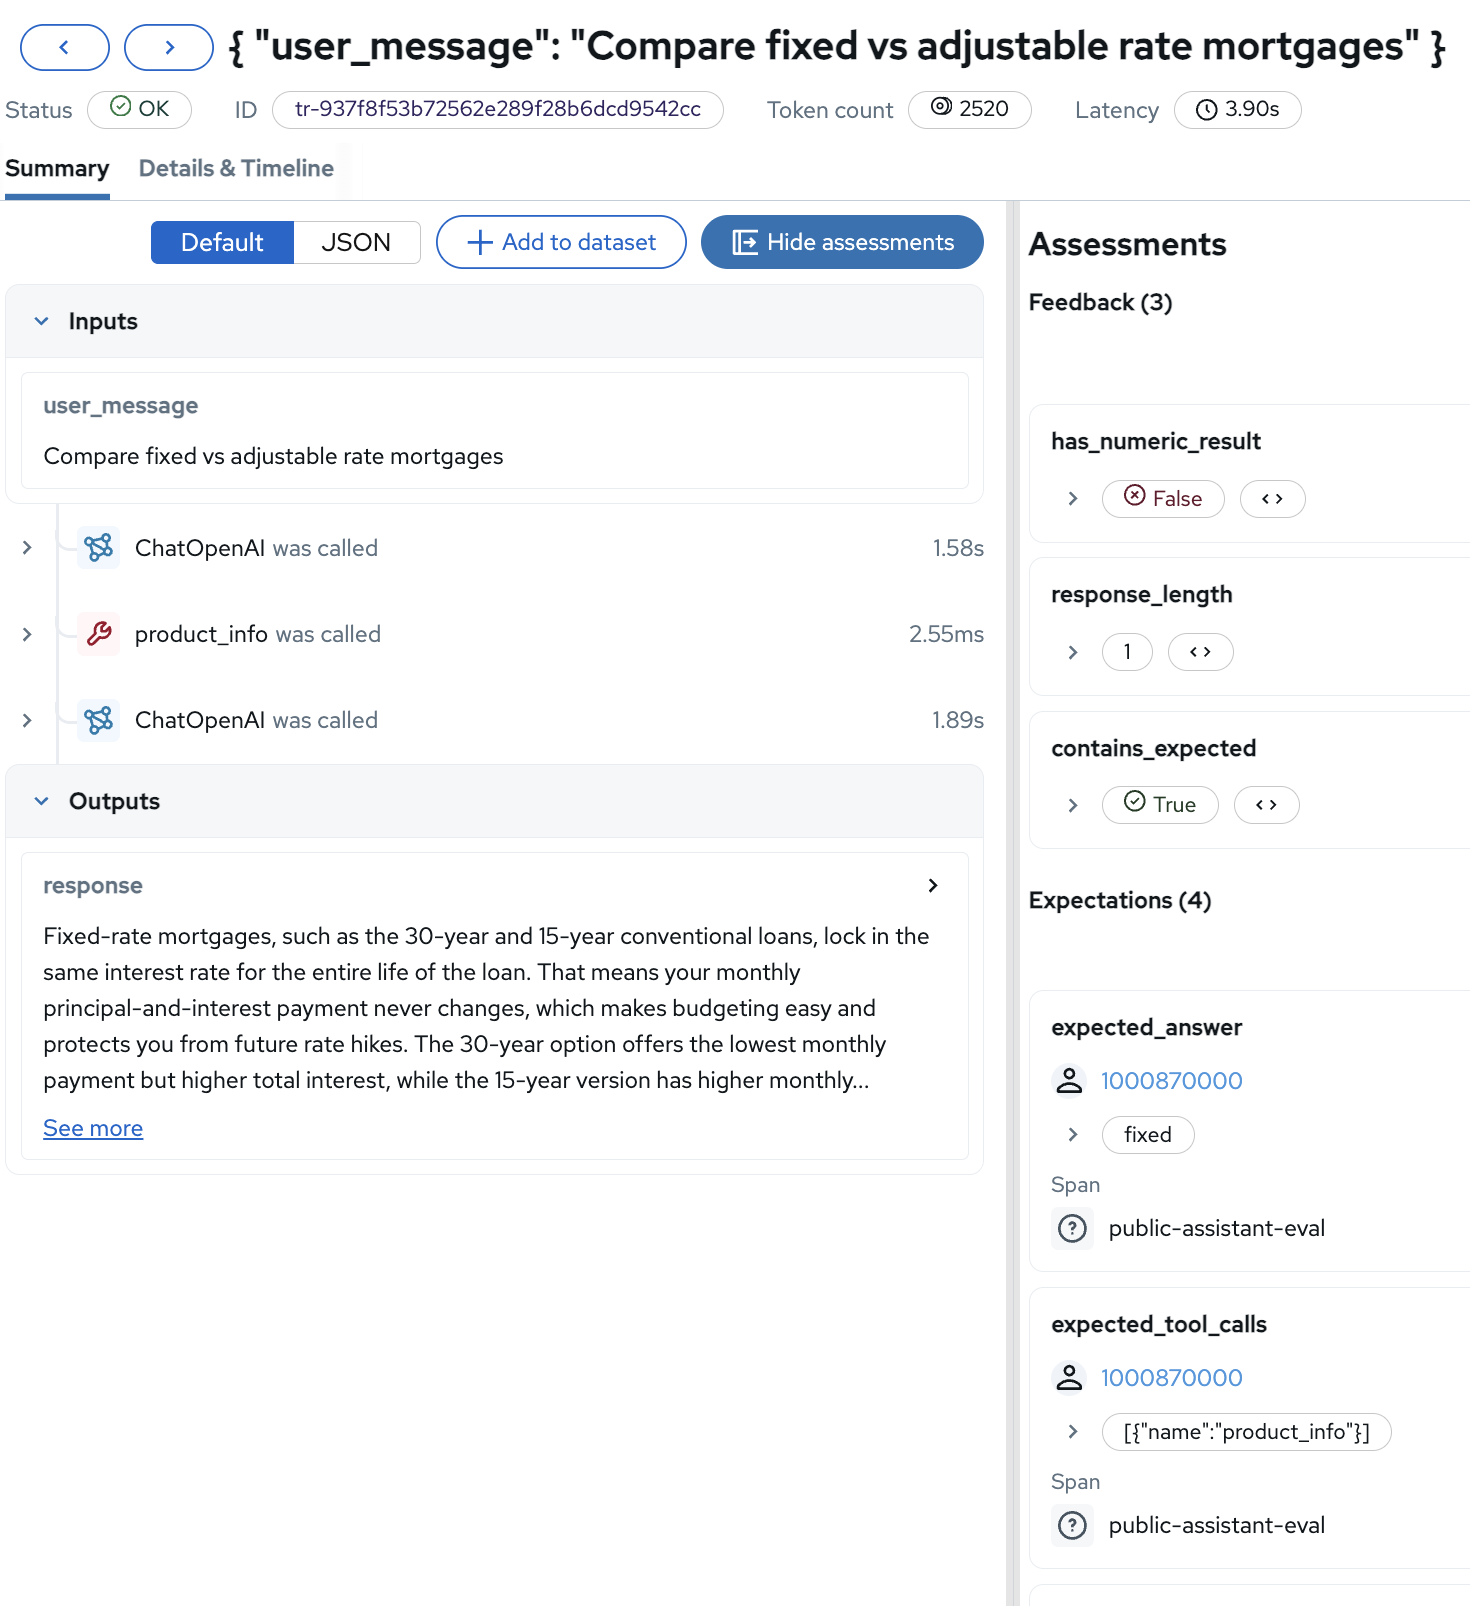
The Feedback section shows scorer results (
contains_expected: True,response_length: 1), while the Expectations section shows what the dataset expected (e.g.,expected_answer: 30-year,expected_tool_calls: product_info). -
You can also navigate to Prompts in the left sidebar to see the registered system prompt and all traces linked to it. Every evaluation trace is automatically linked to the prompt version that produced it. When you update the system prompt and register a new version, future evaluations will link to that new version, letting you compare quality across prompt iterations side by side.
| llm-as-judge is not infallible. The judge model has its own biases and limitations. It is most useful for catching obvious regressions (a response that stopped following the persona, a tool call that produced a wrong calculation) rather than for fine-grained quality comparison. |
Exercise 8 (Optional): Run an Evaluation Pipeline
The notebook-based evaluations above are great for exploration. For production, you want evaluation running automatically as a scheduled pipeline, not something a person has to trigger manually. This is the same evaluation you ran in Exercise 7, but packaged as a pipeline that can run without a notebook, on a schedule, in its own container.
| This exercise requires a few extra minutes. Skip it if you are short on time and continue to the Section Summary. |
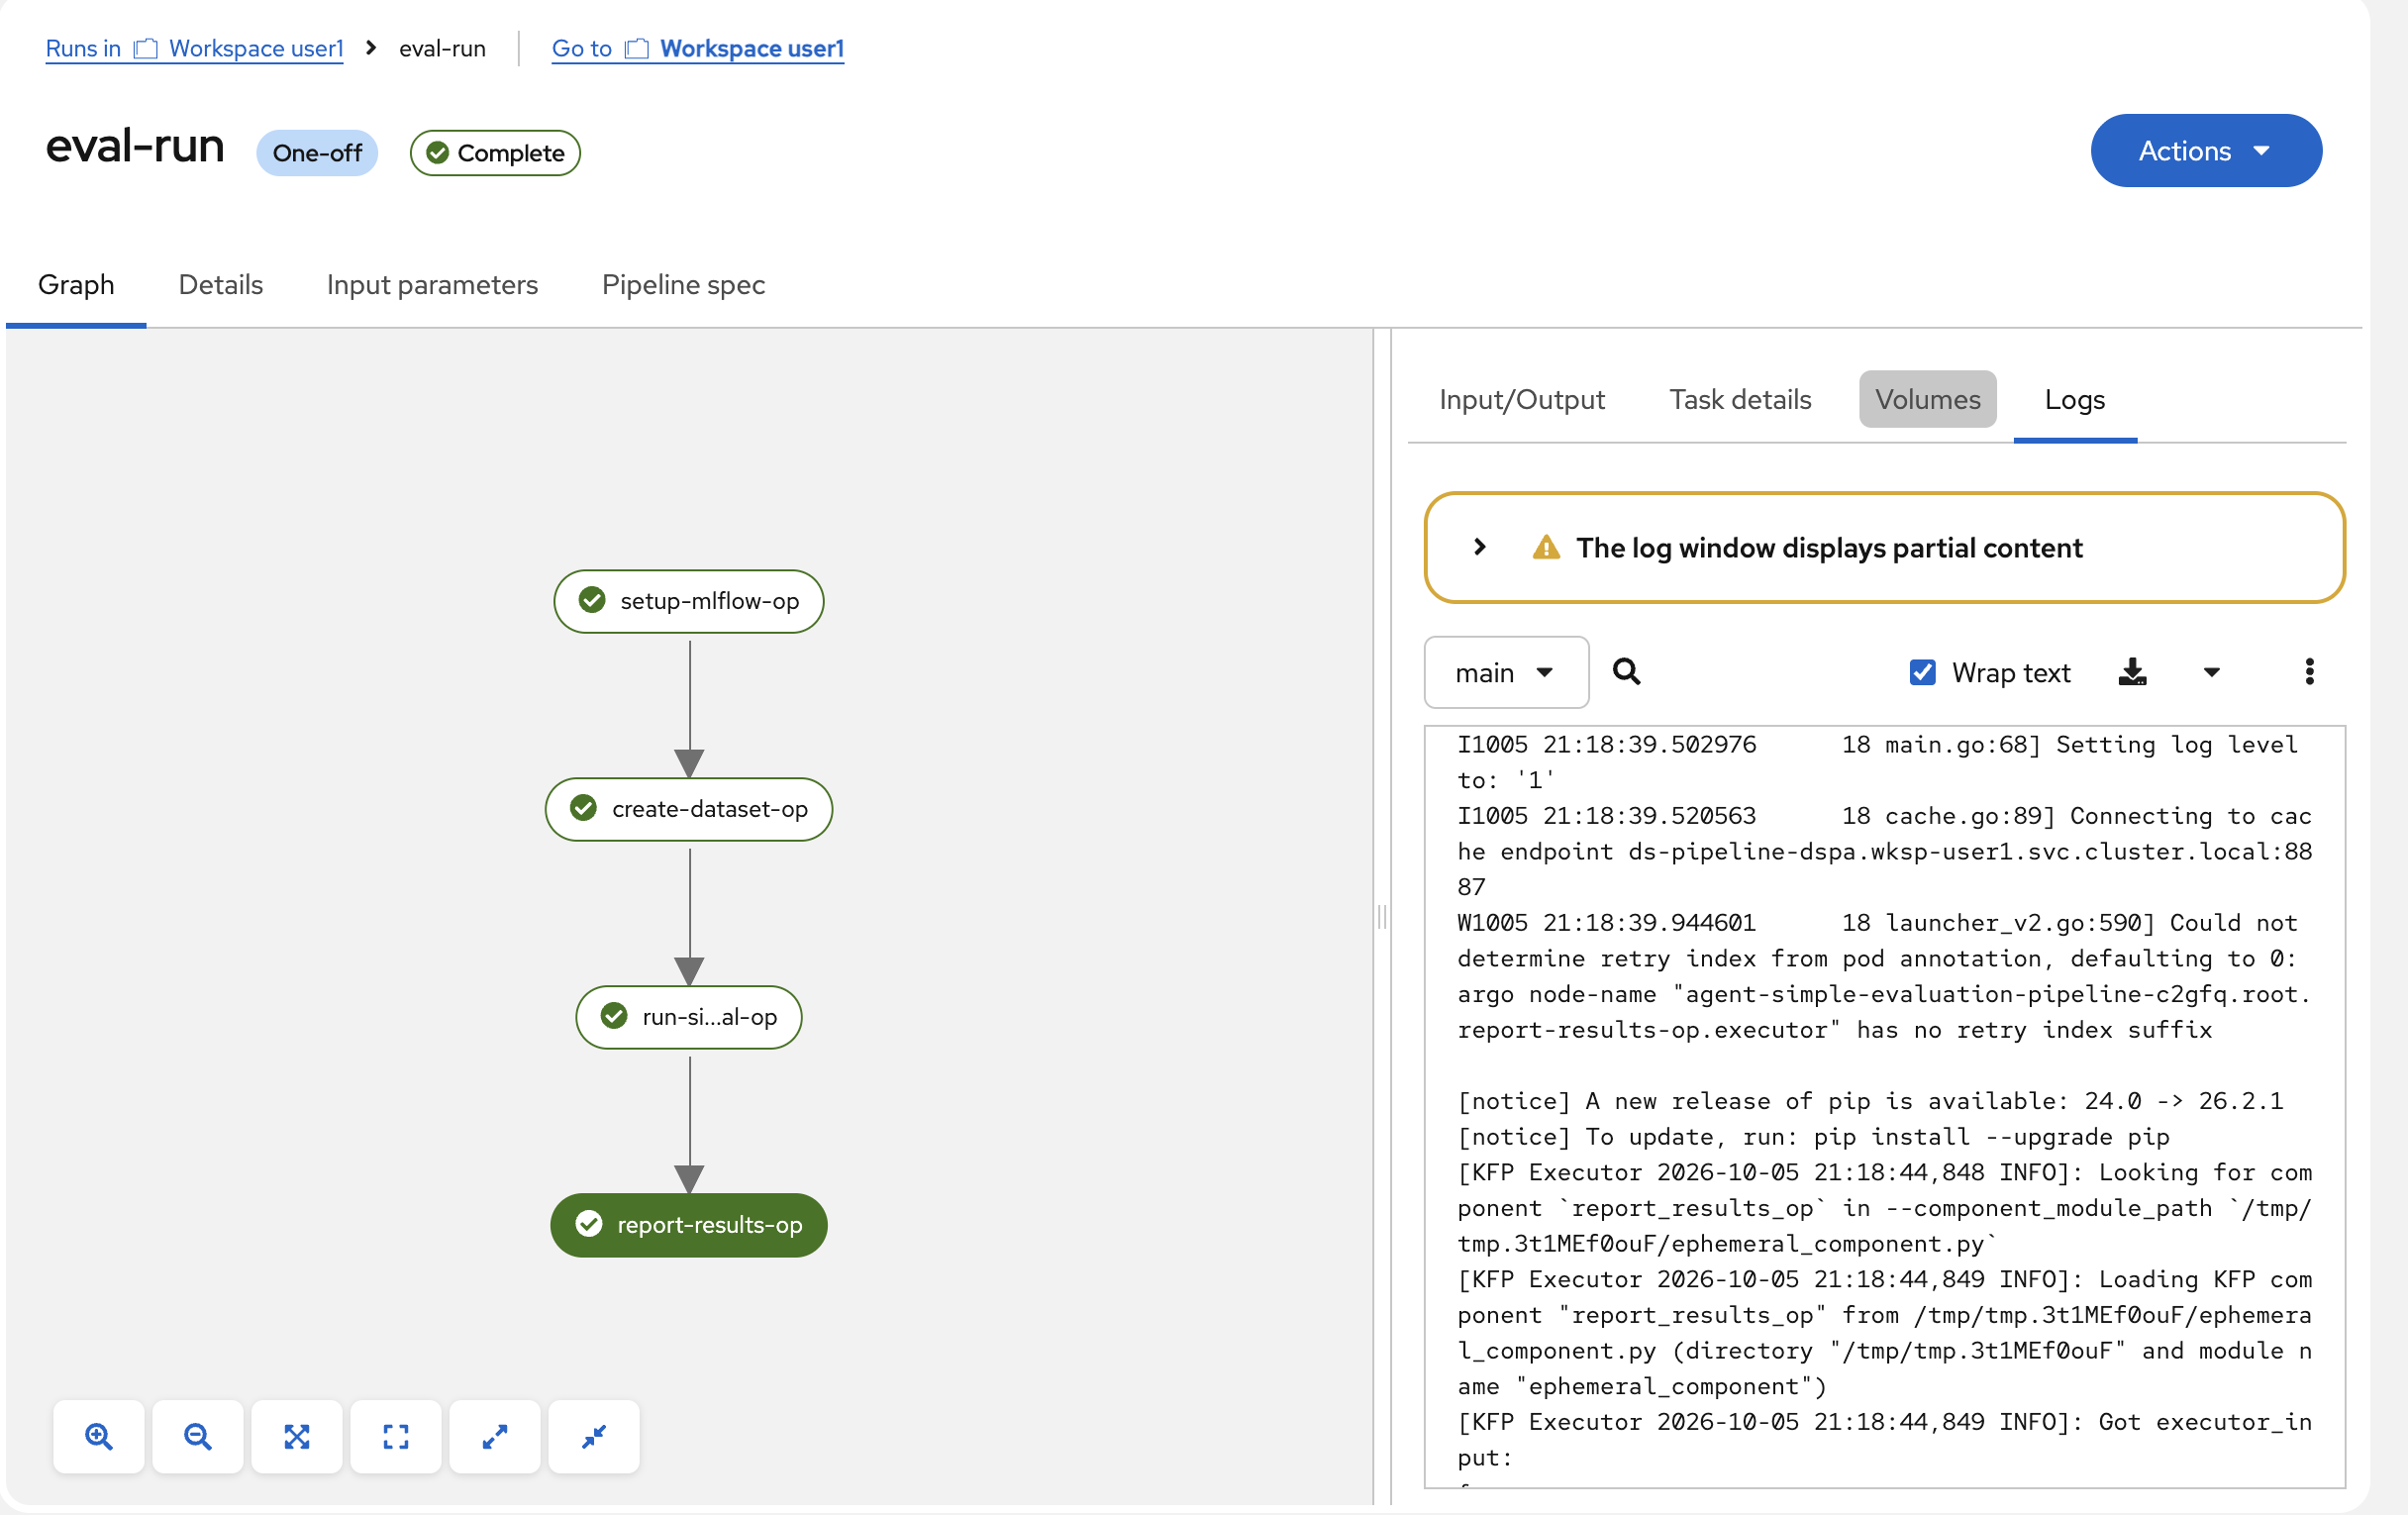
The pipeline packages the simple evaluation into four automated steps:
-
setup-mlflow-op - configures the MLflow tracking URI, workspace, and experiment
-
create-dataset-op - creates the evaluation dataset on the MLflow server (the same 6 test cases from Exercise 7)
-
run-simple-eval-op - runs the three deterministic scorers (
contains_expected,has_numeric_result,response_length) -
report-results-op - prints the evaluation summary and logs results
-
First, right-click and Save Link As the pipeline definition file to your local machine.
-
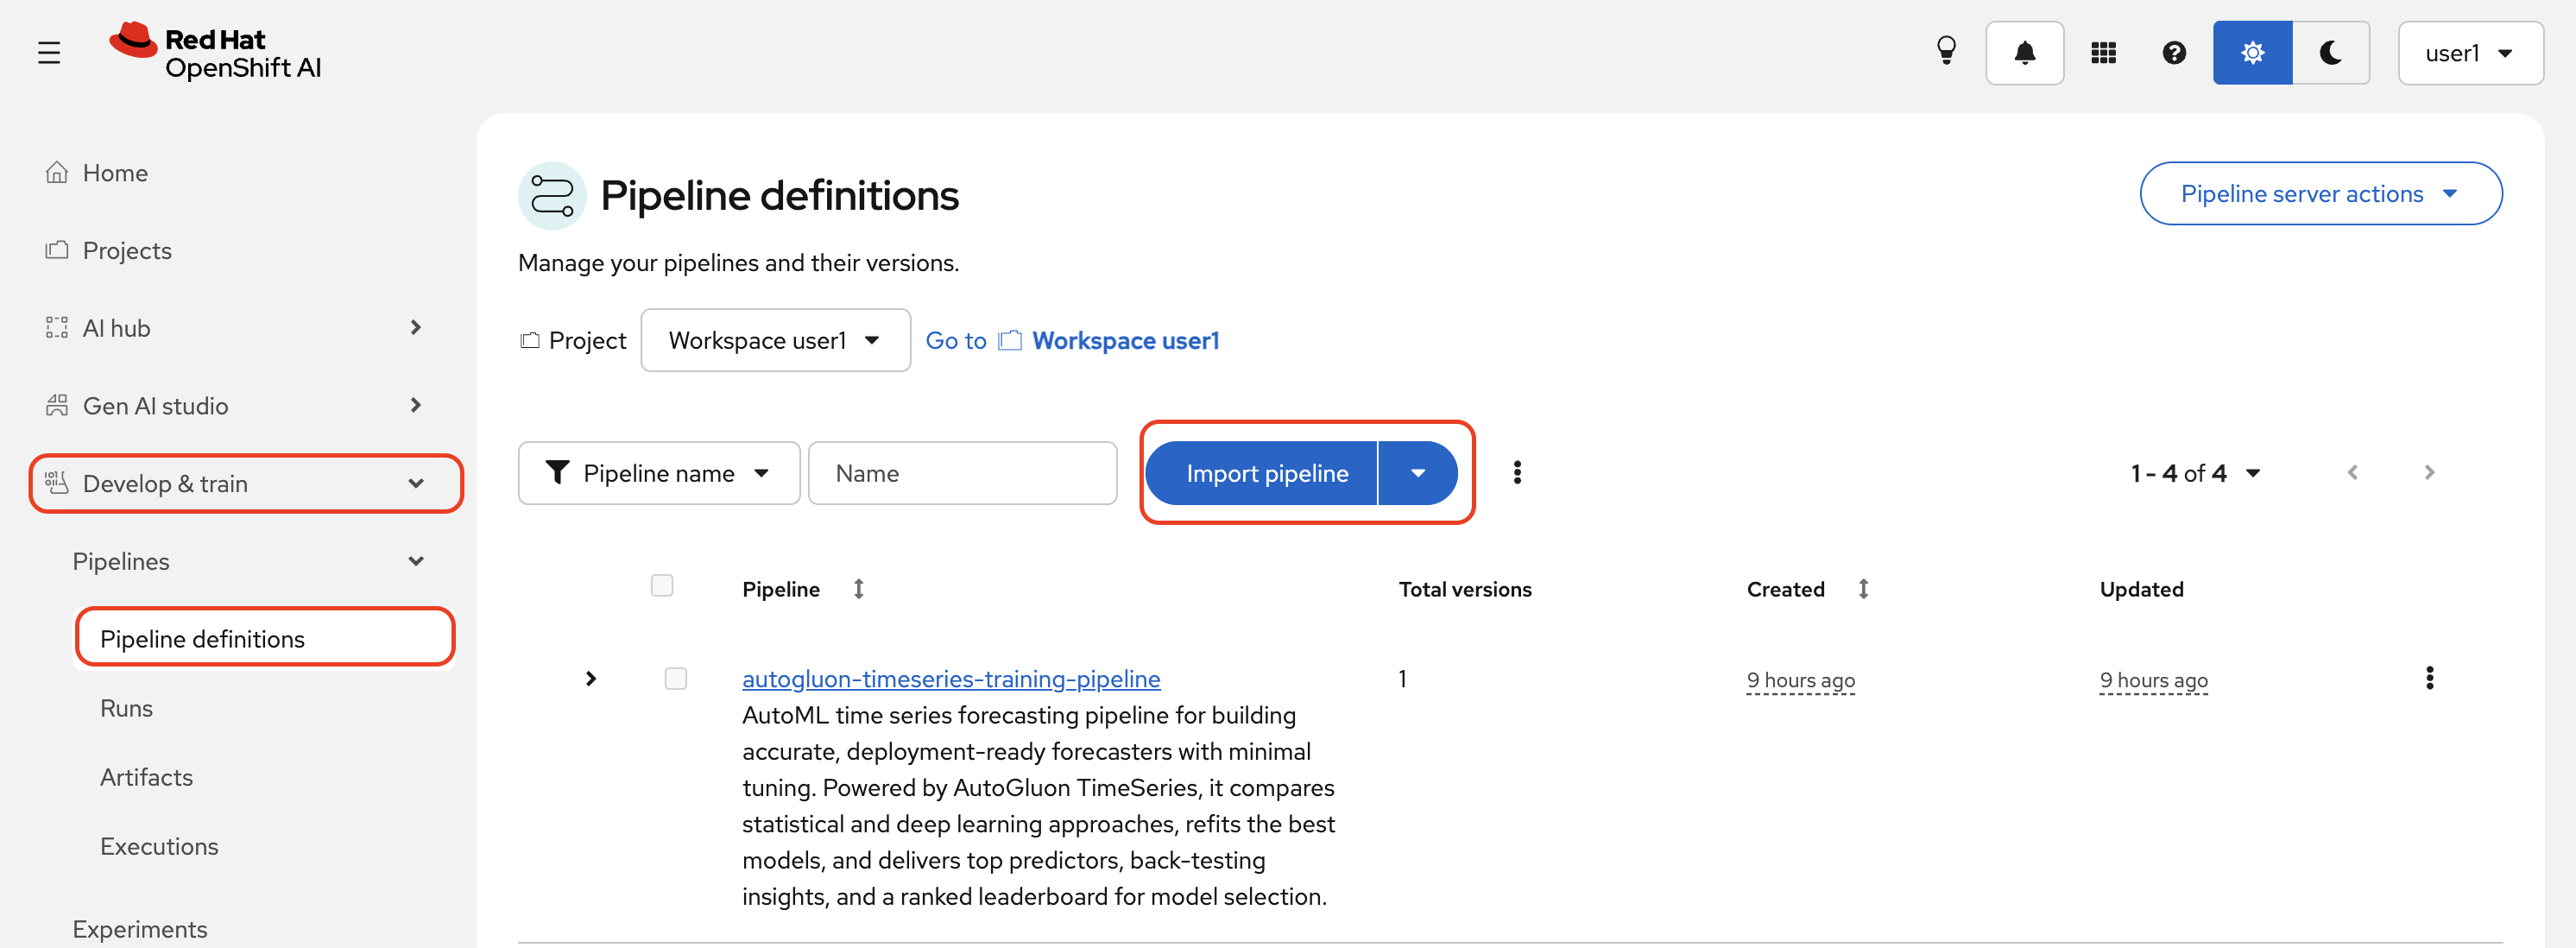
Navigate to OpenShift AI Dashboard > Develop & train > Pipelines > Pipeline definitions. Click Import pipeline.
-
In the import dialog, select Upload a file and upload the
eval-pipeline.yamlfile you downloaded. Name the pipelineagent-simple-evaluation-pipeline. Click Import pipeline.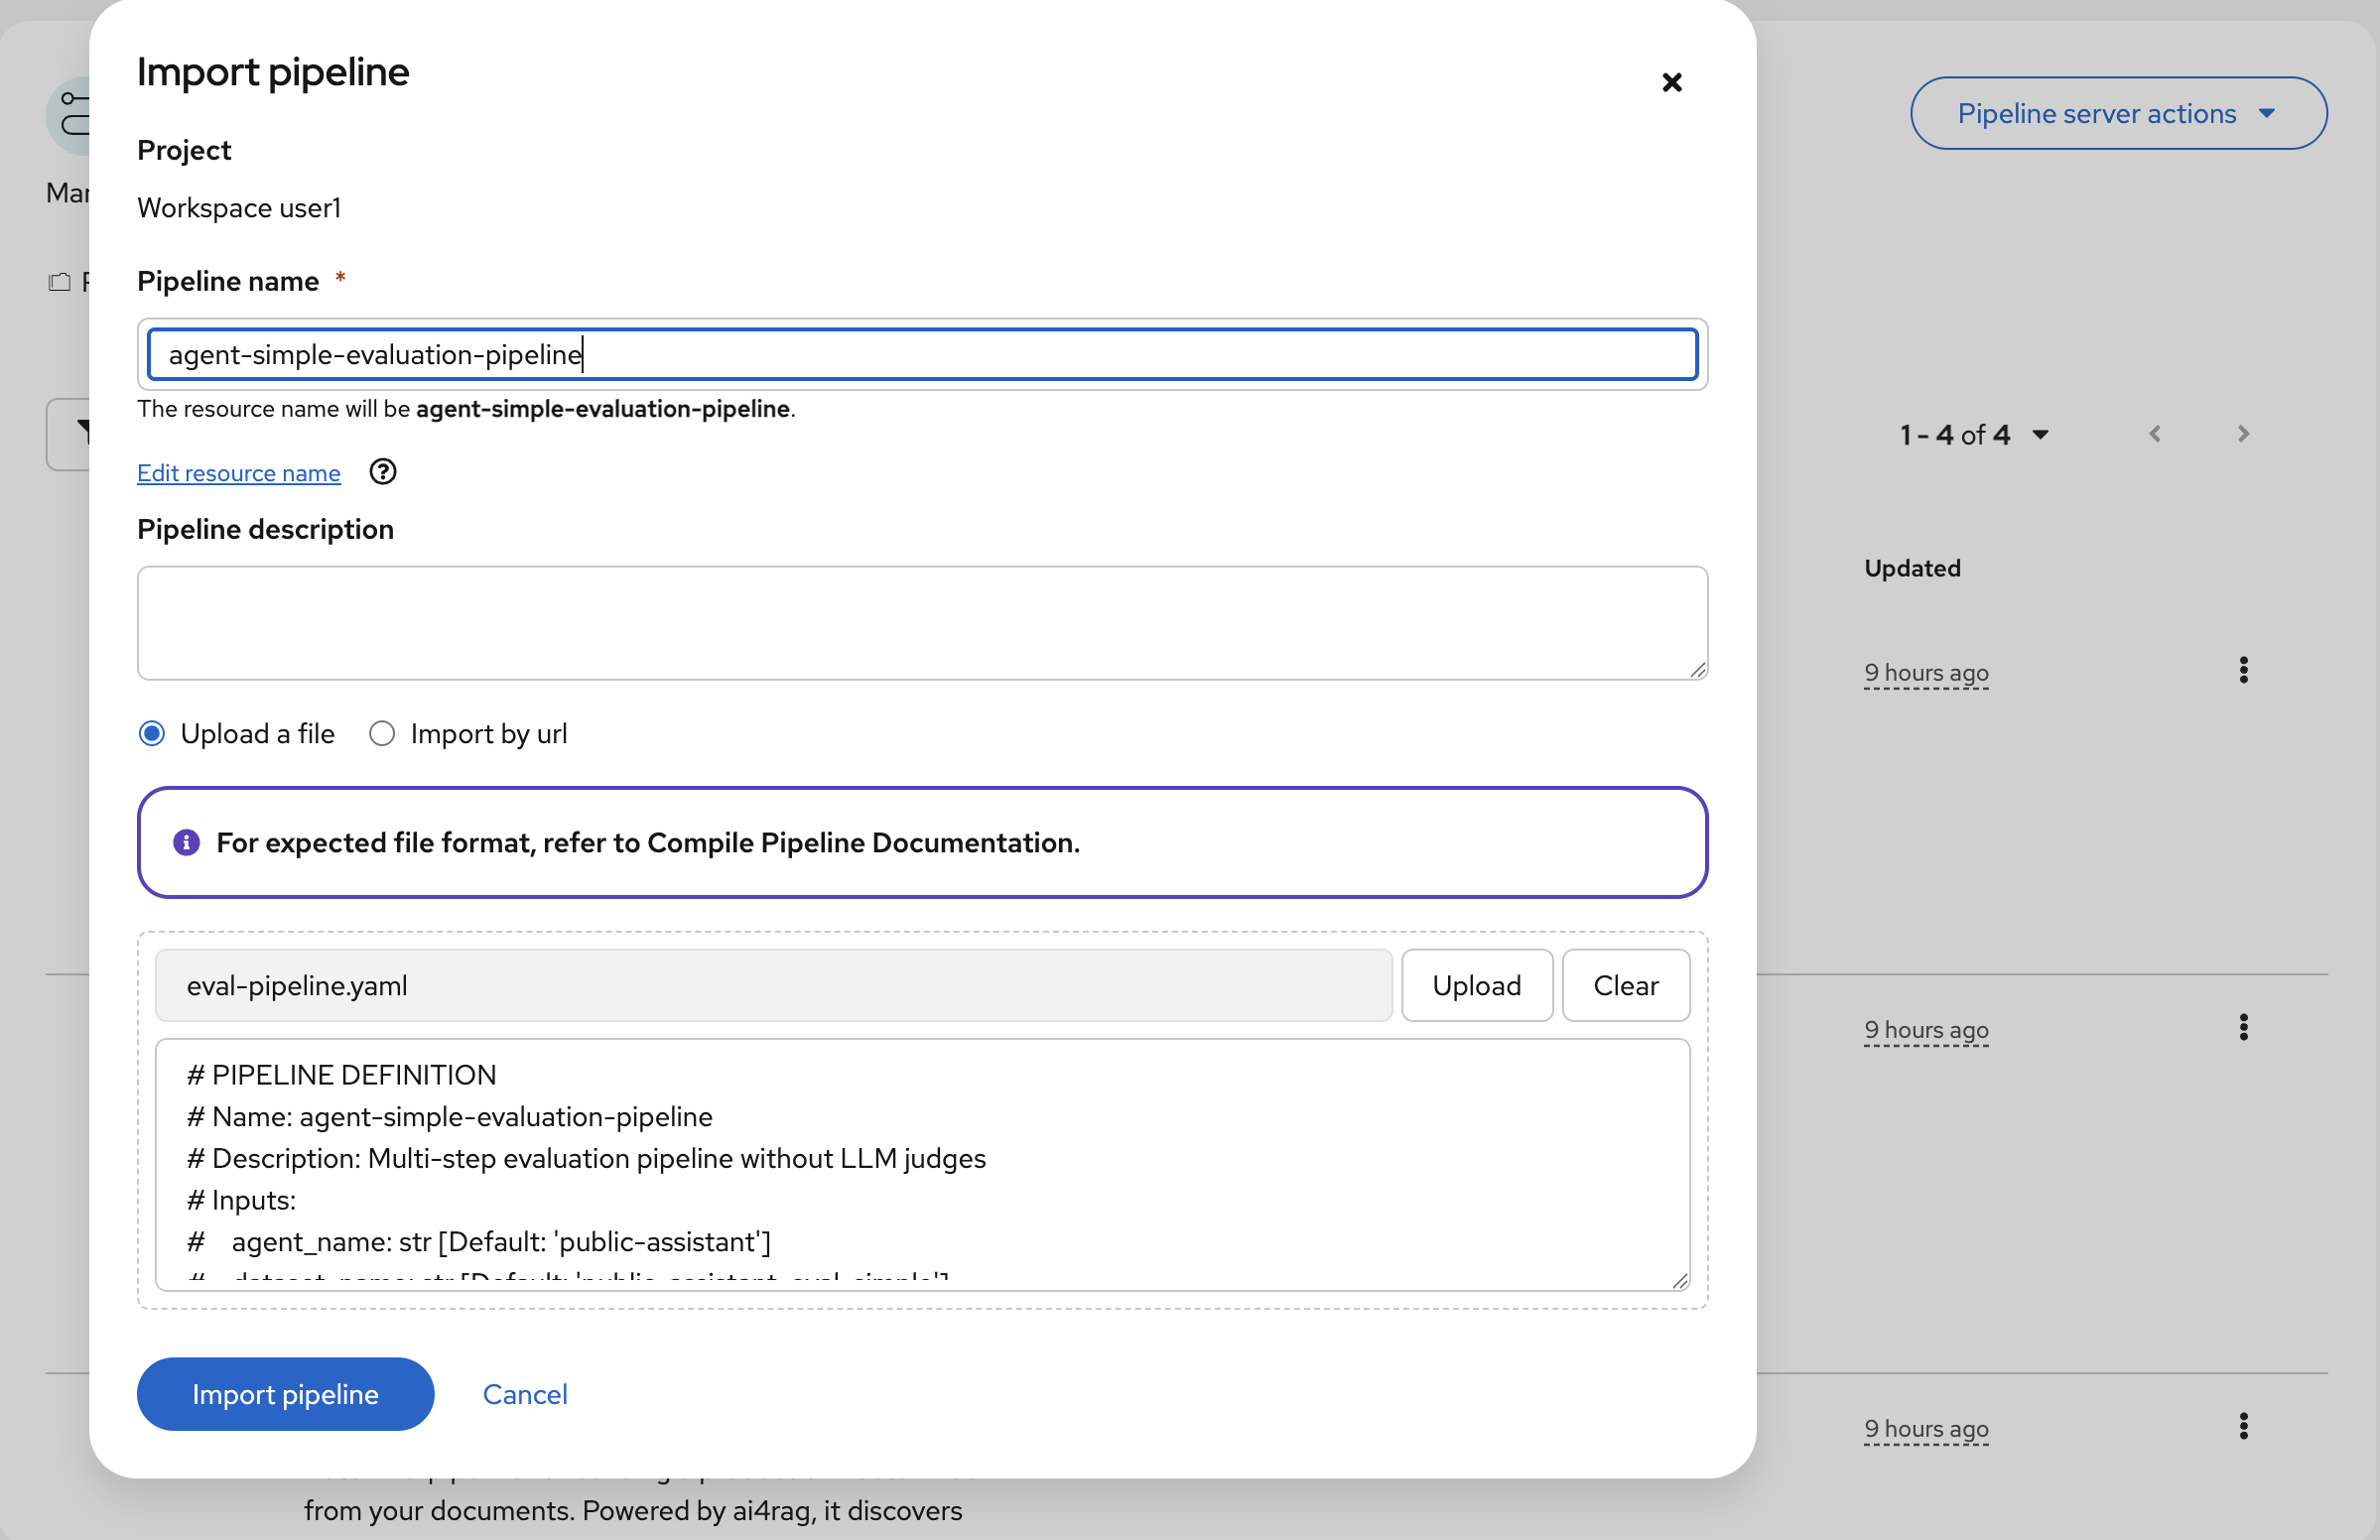
-
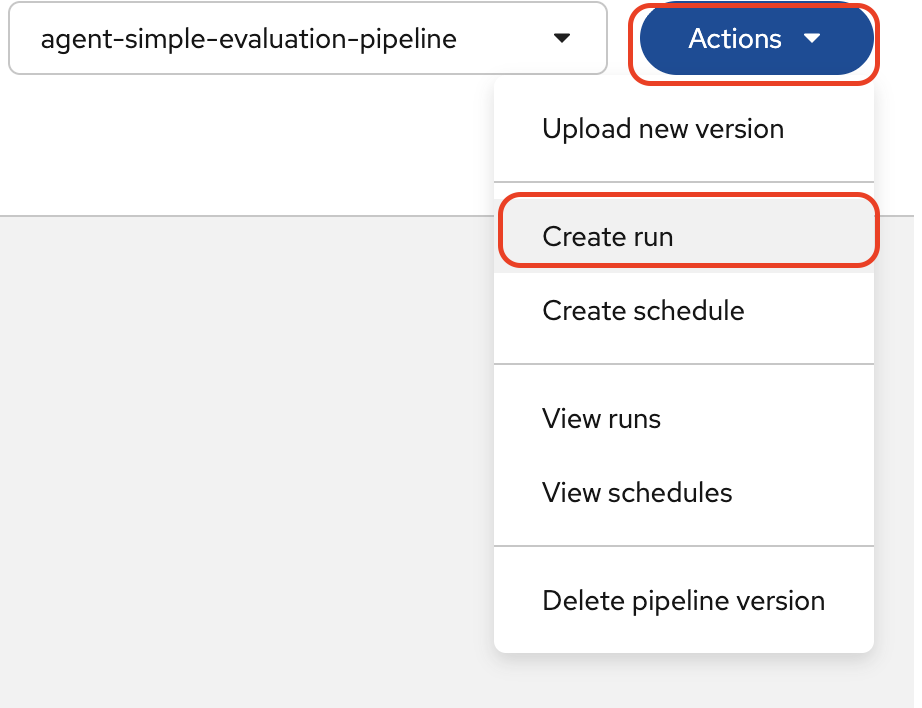
Once imported, click Actions > Create run.
-
Fill in the run form:
-
Name:
eval-run -
MLflow integration: Select
mortgage-ai-evalexperiment for MLflow experiment -
Parameters:
-
mlflow_tracking_uri:
https://mlflow.redhat-ods-applications.svc.cluster.local:8443/mlflow -
mlflow_workspace:
wksp-user1 -
Leave the rest as defaults
-
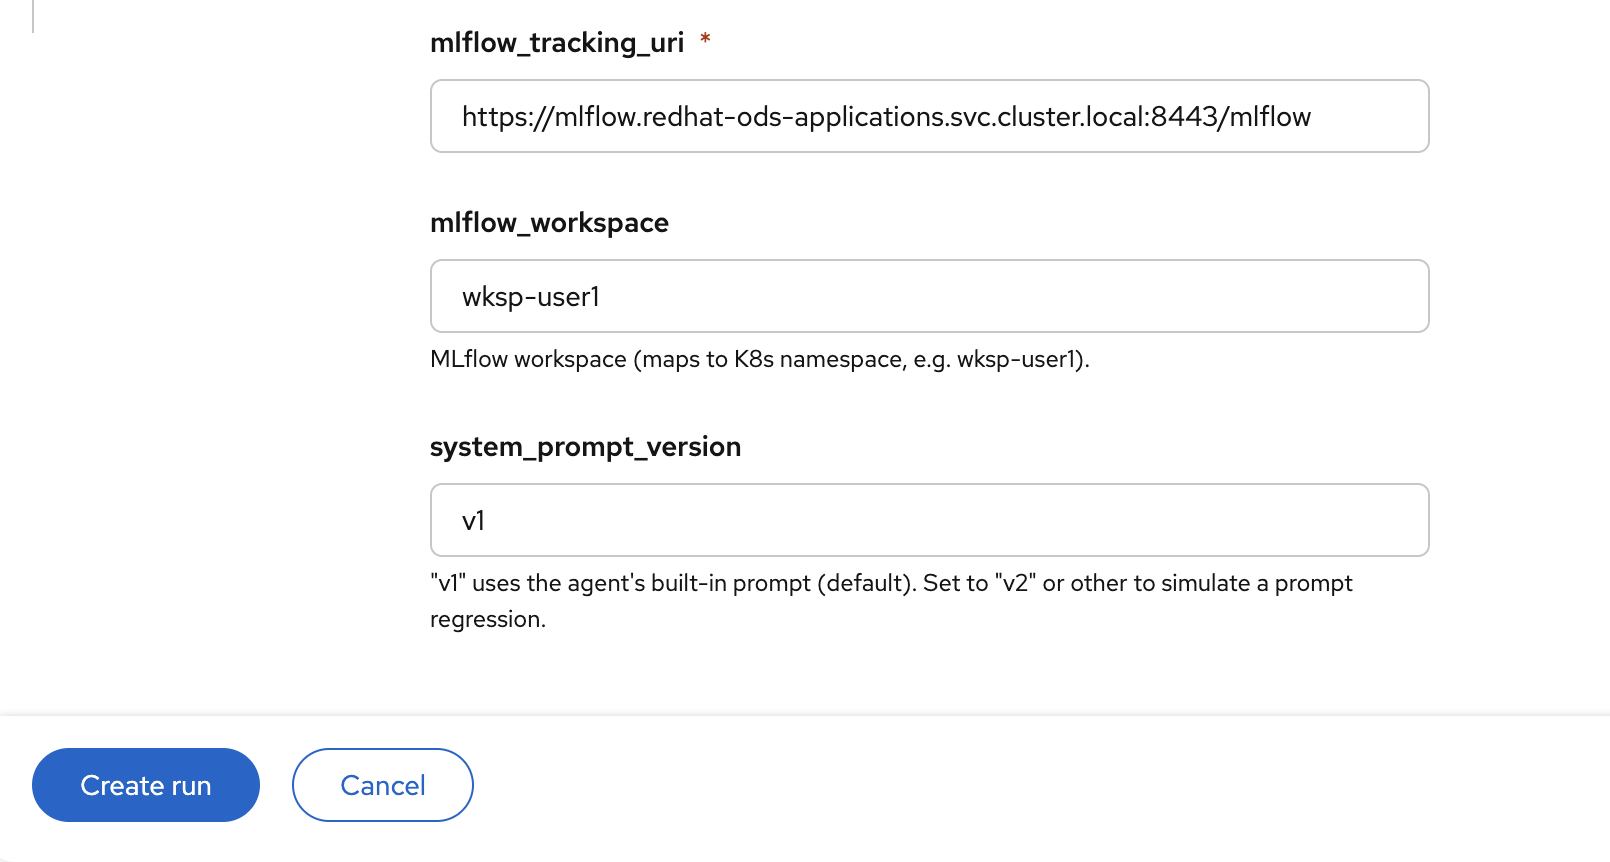
Click Create run. Each step runs in its own container. Authentication to MLflow uses the pod’s Kubernetes service account token, so no manual token management is required.
-
-
Watch the pipeline stages execute in order. All four steps should complete with green checkmarks:
-
When the pipeline completes, navigate to OpenShift AI Dashboard > Develop & train > Experiments >
mortgage-ai-eval> Evaluation runs and find your evaluation run. You can see the individual traces and scorer results for each test question.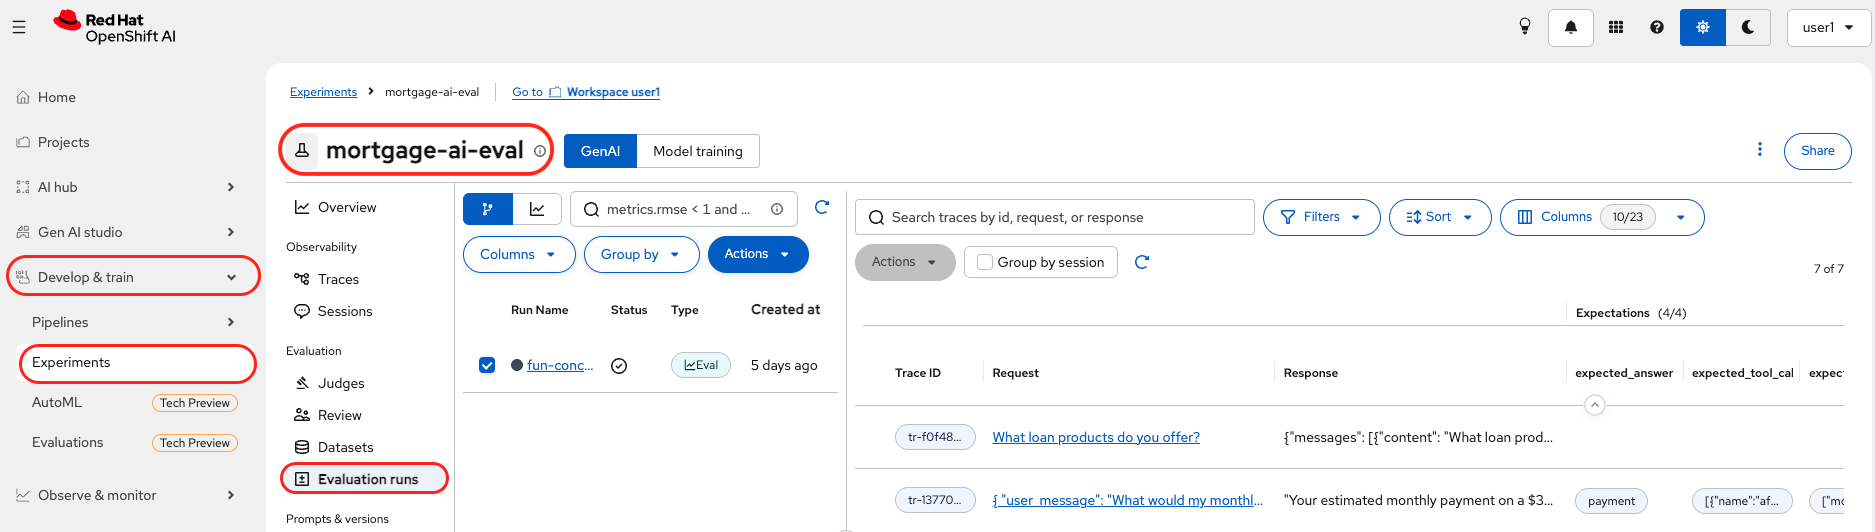
Click on any trace to see the full detail, including the input question, the agent’s response, and the individual assessment scores on the right panel. For example, clicking the "What loan products do you offer?" trace shows that
contains_expectedpassed (the response includes "30-year"),response_lengthscored 1 (adequate length), and the expectations panel shows what the pipeline was checking for.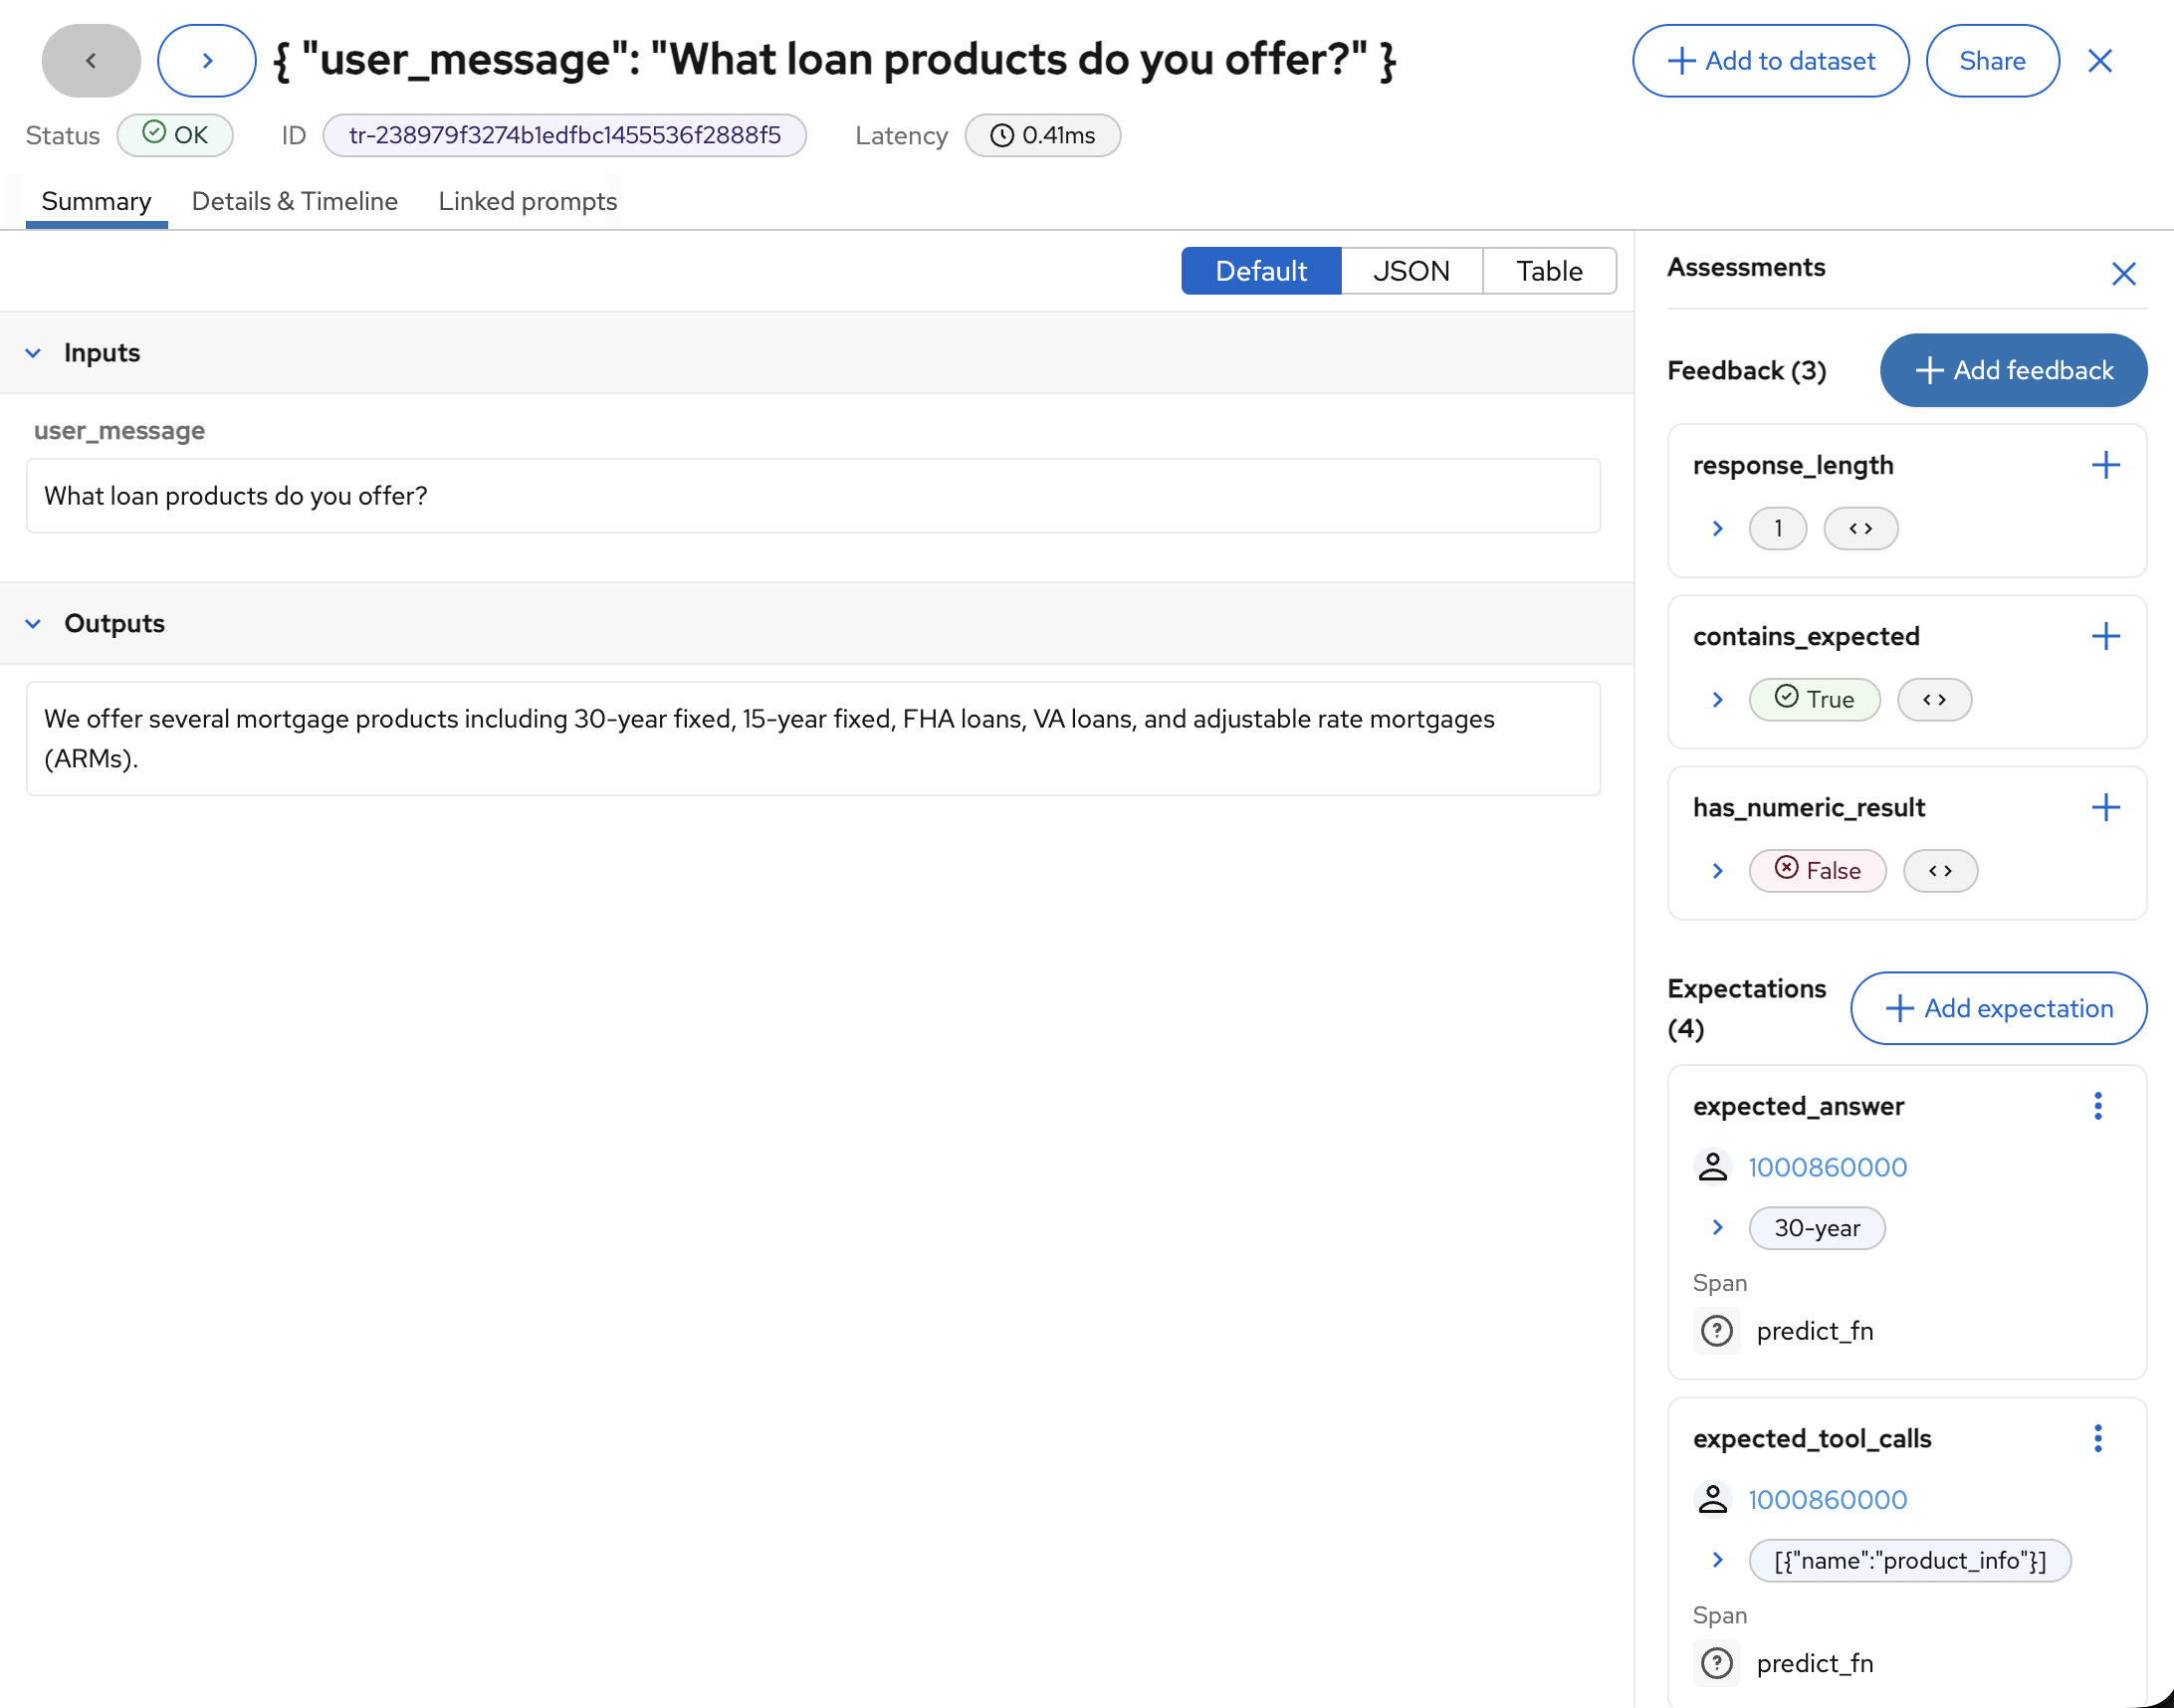
If the assessment columns are not visible, click Columns and enable All Assessments and All Expectations.
-
| Notice the Create schedule option when creating a run. In production, this pipeline would be scheduled to run periodically (e.g., every 6 hours) or triggered on every commit to the prompt registry. A drop in evaluation score blocks the deployment, the same way a failing unit test blocks a code merge. |
Section Summary
What You Accomplished
-
Ran an IFEval benchmark in EvalHub against
qwen3-235b-a22bto measure instruction-following capability -
Evaluated RAG pipeline quality with RAGAS, measuring faithfulness, answer relevancy, and context precision across a test set of mortgage questions
-
Used an LLM as judge to evaluate Lenora’s open-ended agent responses, with prompt registry, evaluation datasets, and results logged to MLflow
-
(Optional) Imported and ran a four-stage automated evaluation pipeline and reviewed traces and scorer results in MLflow
Key Takeaways
-
Benchmarks like IFEval measure baseline model capability. They catch model-level regressions (e.g., a model that stops following formatting instructions) but do not measure domain-specific quality
-
RAGAS decomposes RAG quality into components (faithfulness, relevancy, precision) so you can diagnose exactly what is going wrong and where
-
llm-as-judge enables evaluation of open-ended responses where there is no single correct answer, useful for catching persona regressions and reasoning failures
-
Automated evaluation pipelines remove the human from the quality gate: quality is measured continuously and can be scheduled or triggered on every change
What’s Next?
You have evaluated Lenora’s quality. The next section covers the final layer: security. Before Lenora goes to production, the security team needs to ensure she cannot be manipulated, leak private data, or be used to bypass compliance controls. In section 5, you will implement defense-in-depth AI safety: persona-based access control (5.1), guardrails and adversarial testing (5.2), and secure agent onboarding with OpenShell (5.3).
If you have time remaining and want to go deeper on how the Risk MCP’s predictive model was built, continue to the Advanced section: Predictive AI with AutoML.