Reactive Streams with Quarkus and Kafka
In this exercise, you will use the Quarkus Kafka extension to build a streaming application using MicroProfile Reactive Streams Messaging and Apache Kafka, a distributed streaming platform. You will also use Red Hat AMQ streams, which provides an easy way to run an Apache Kafka cluster on Kubernetes and OpenShift using Operators.
What is Apache Kafka?
Apache Kafka is a distributed streaming platform. A streaming platform has three key capabilities:
-
Publish and subscribe to streams of records, similar to a message queue or enterprise messaging system.
-
Store streams of records in a fault-tolerant durable way.
-
Process streams of records as they occur.
Kafka is generally used for two broad classes of applications:
-
Building real-time streaming data pipelines that reliably get data between systems or applications
-
Building real-time streaming applications that transform or react to the streams of data
What is AMQ Streams?
AMQ Streams simplifies the process of running Apache Kafka in an OpenShift cluster. AMQ Streams provides container images and Operators for running Kafka on OpenShift. AMQ Streams Operators are fundamental to the running of AMQ Streams. The Operators provided with AMQ Streams are purpose-built with specialist operational knowledge to effectively manage Kafka.
Operators simplify the process of:
-
Deploying and running Kafka clusters
-
Deploying and running Kafka components
-
Configuring access to Kafka
-
Securing access to Kafka
-
Upgrading Kafka
-
Managing brokers
-
Creating and managing topics
-
Creating and managing users
The Goal
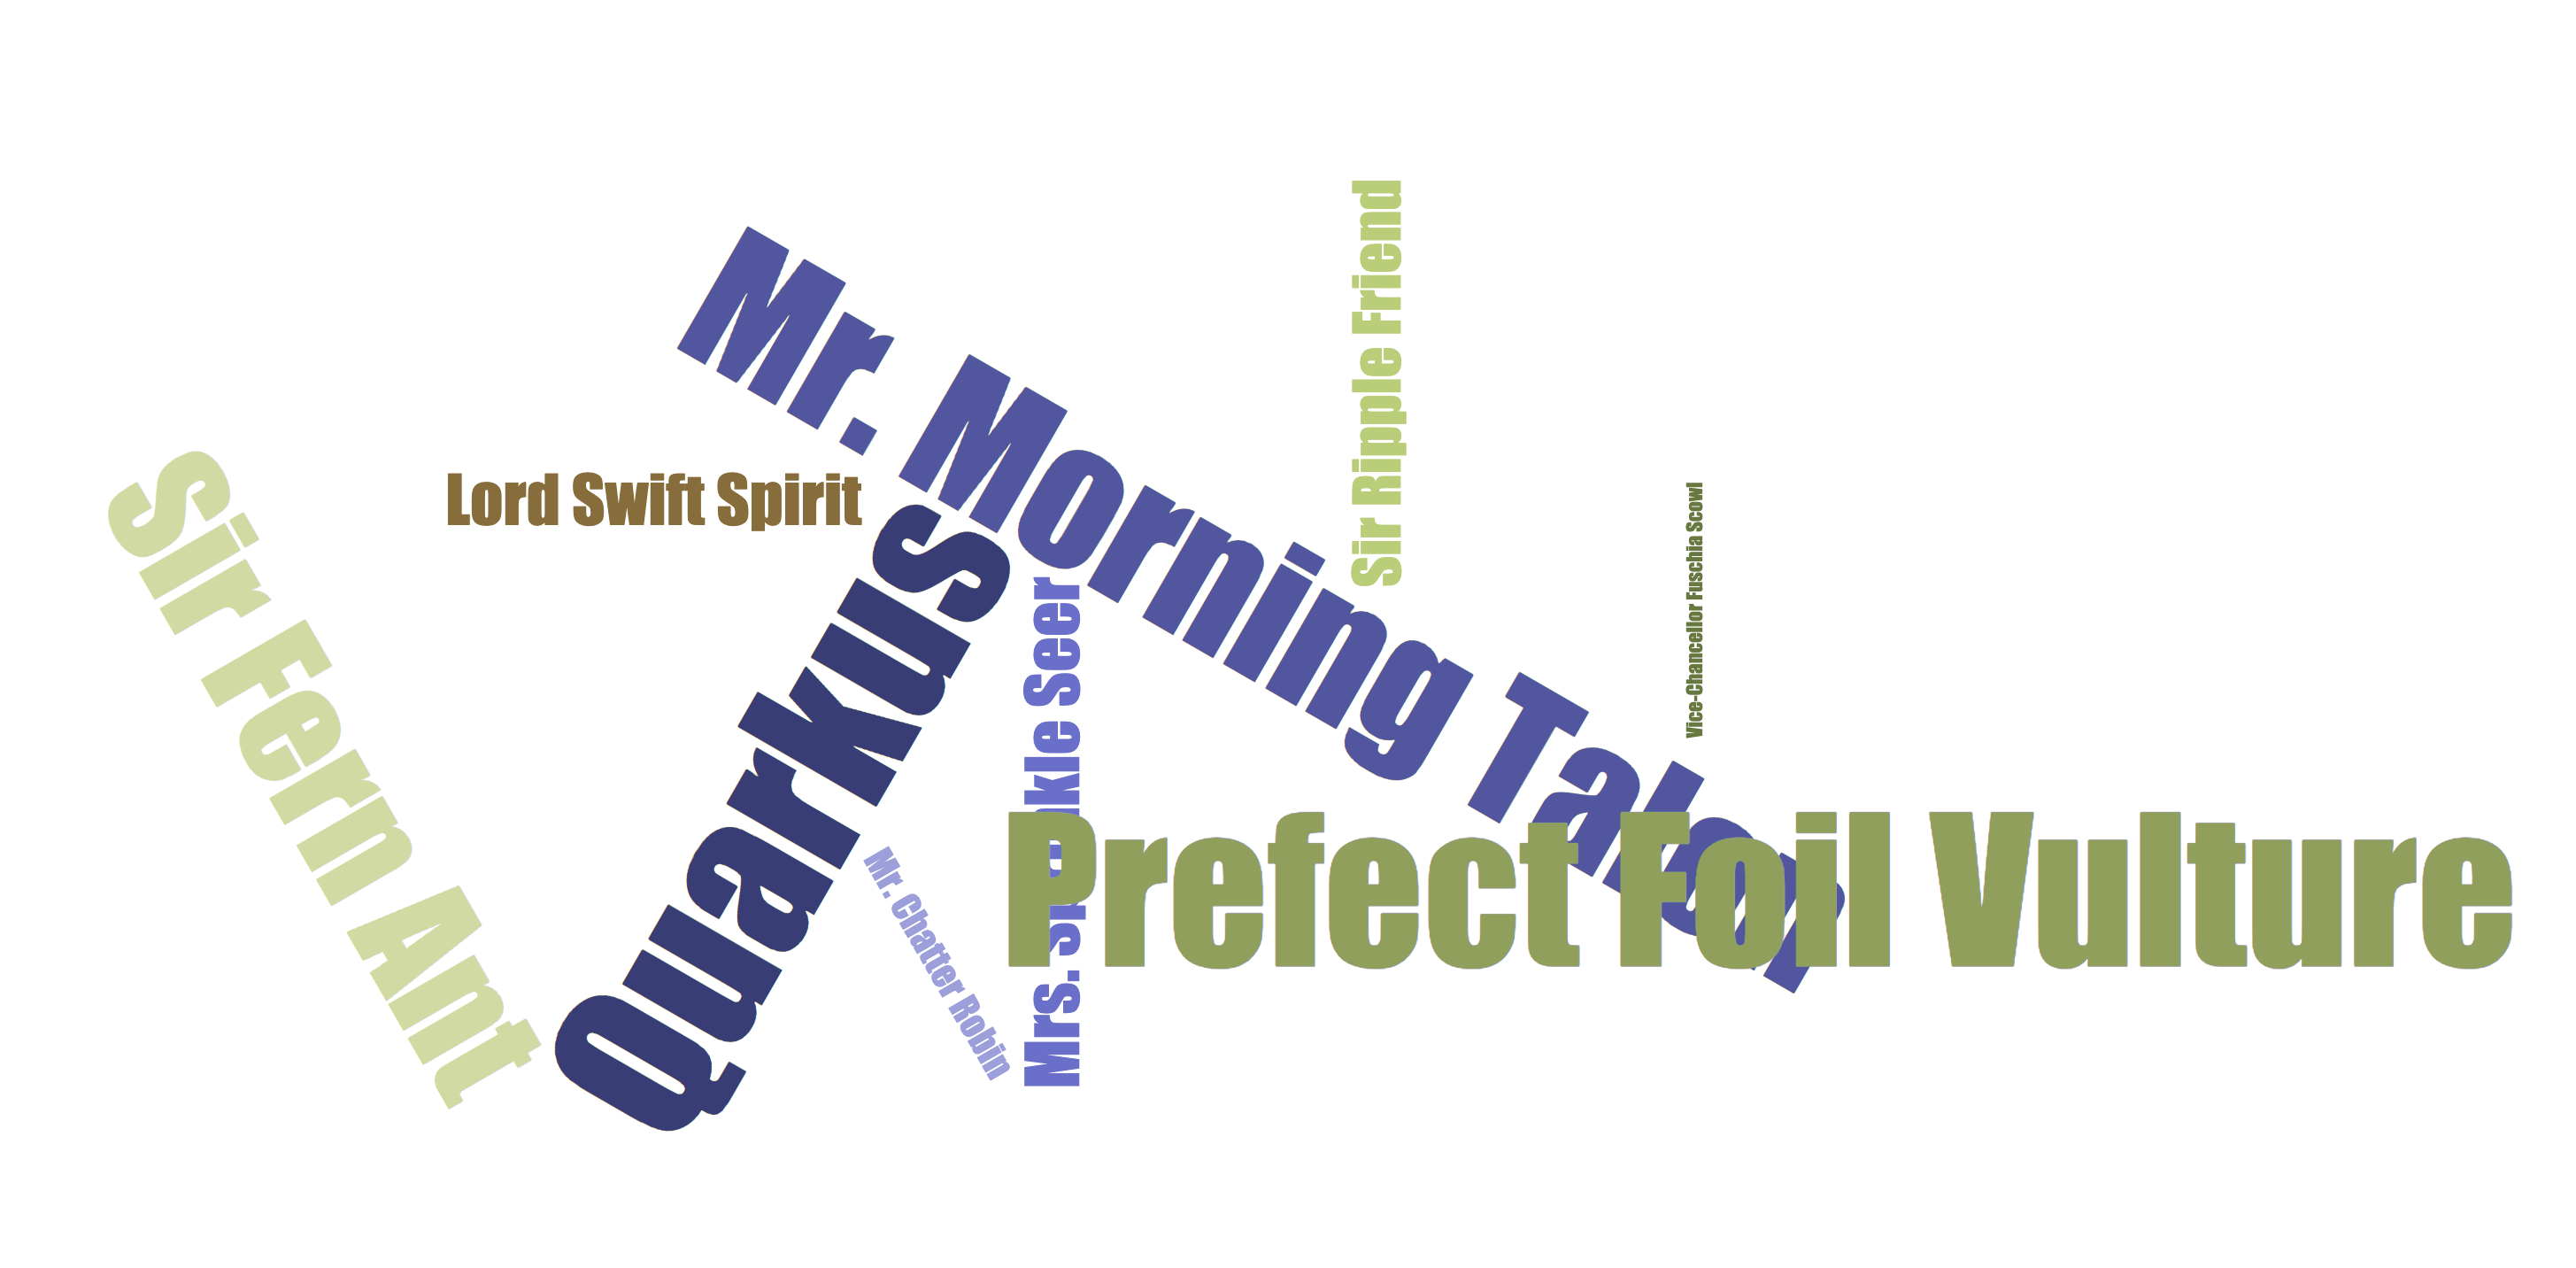
In this exercise, we are going to generate (random) names in one component. These names are written in a Kafka topic (names). A second component reads from the names Kafka topic and applies some magic conversion to the name (adding an honorific). The result is sent to an in-memory stream consumed by a JAX-RS resource. The data is sent to a browser using server-sent events and displayed in the browser. It will look like this:
Create Kafka Cluster
The Strimzi operator installs and manages Kafka clusters on Kubernetes. It’s been pre-installed for you, so all you have to do is create a Kafka custom resource inside your namespace.
Install Kafka and Kafka Topic CRs with:
oc create -f src/main/kubernetes/kafka.yamlThis will cause the Operator to provision a new Kafka cluster. It will take a few minutes to complete.
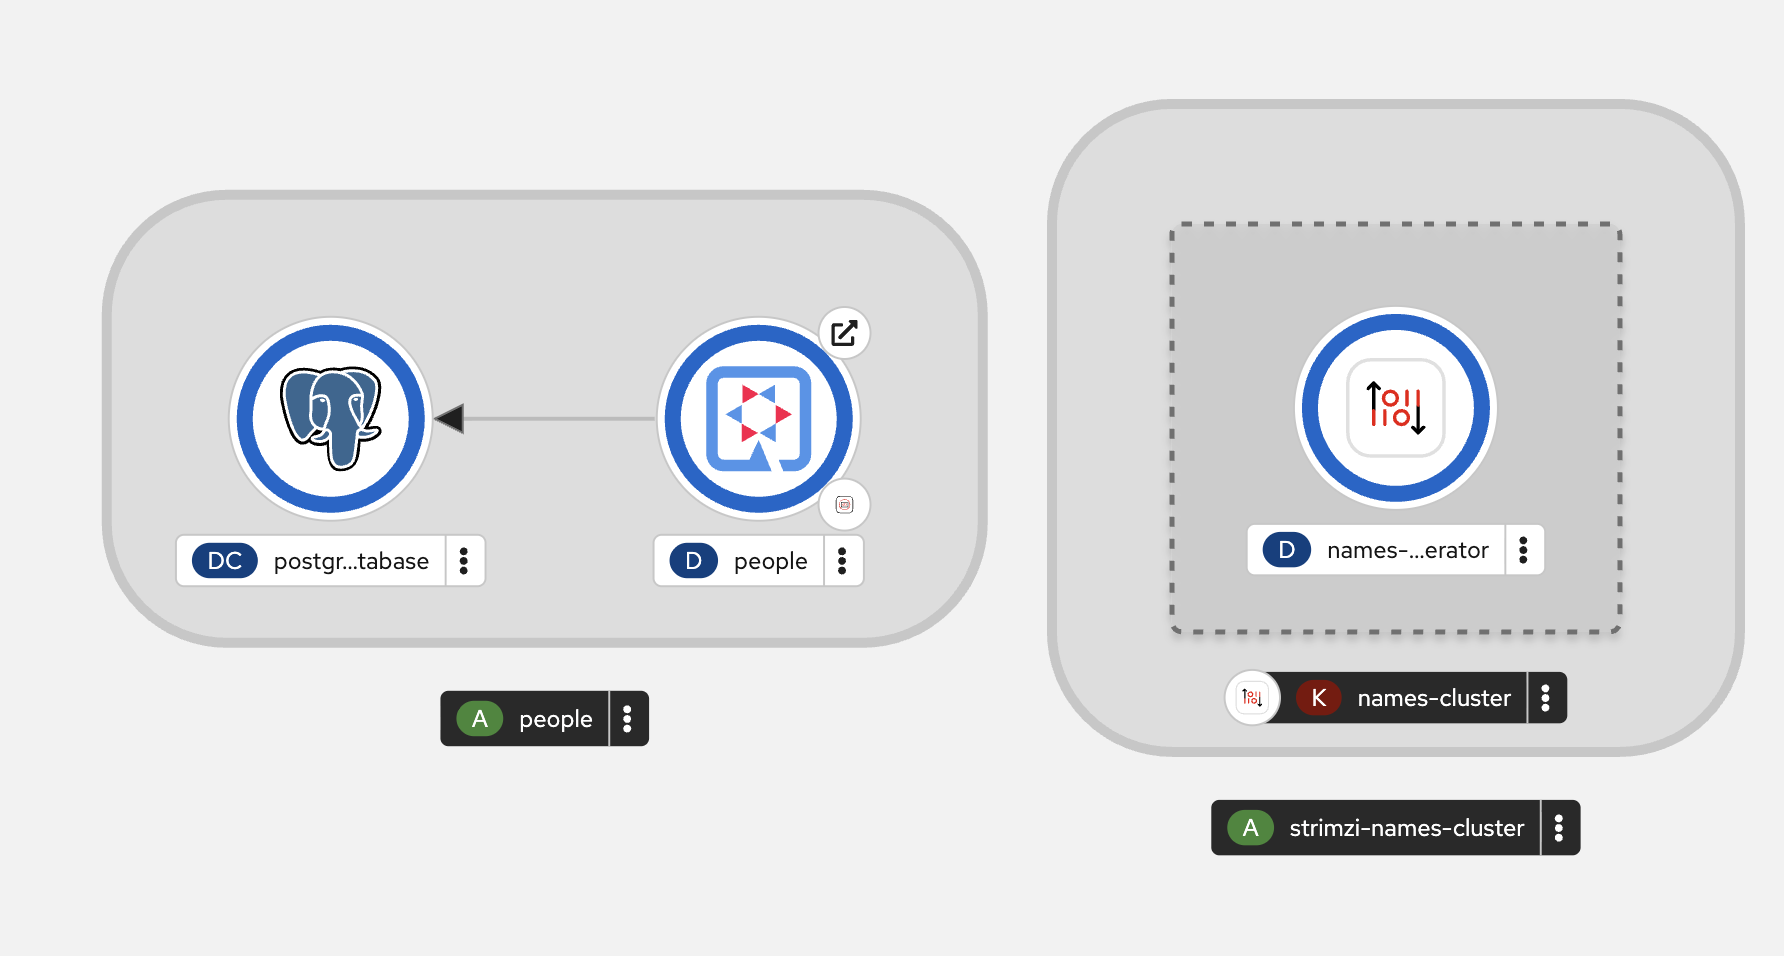
Back on the Topology View, make sure all the Kafka pods are up and running (with dark blue circles):
It may take a few minutes for all of the pods to appear spin up. You can continue to the next step while the Kafka cluster and topics are created.
Add Quarkus Kafka Extension
With Kafka installing, turn your attention back to the app. Like other exercises, we’ll need another extension to integrate with Kafka. Install it with:
mvn quarkus:add-extension -Dextensions="messaging-kafka"You should see:
[INFO] [SUCCESS] ✅ Extension io.quarkus:quarkus-smallrye-reactive-messaging-kafka has been installedThis will add the necessary entries in your pom.xml to bring in the Kafka extension.
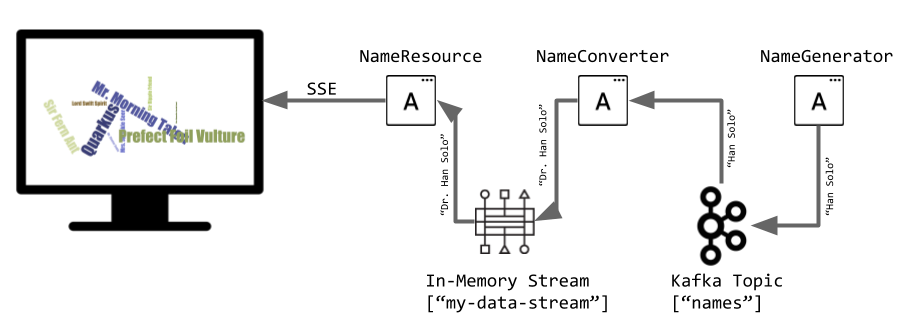
The Application You Will Build
The app consists of 3 components that pass messages via Kafka and an in-memory stream, then uses SSE to push messages to the browser. It looks like:
Create name generator
To start building the app, create a new Java class file in the org.acme.people.stream called NameGenerator.java. This class will generate random names and publish them to our Kafka topic for further processing. Use this code:
package org.acme.people.stream;

import jakarta.enterprise.context.ApplicationScoped;
import org.acme.people.utils.CuteNameGenerator;
import org.eclipse.microprofile.reactive.messaging.Outgoing;

import io.smallrye.mutiny.Multi;

import java.time.Duration;

@ApplicationScoped
public class NameGenerator {

    @Outgoing("generated-name")        // (1)
    public Multi<String> generate() {  // (2)
        return Multi.createFrom().ticks().every(Duration.ofSeconds(5))
                .onOverflow().drop()
                .map(tick -> CuteNameGenerator.generate());
    }

}
(1) Instruct Reactive Messaging to dispatch the items from returned stream to generated-name
(2) The method returns Reactive Stream emitting a random name every 5 seconds
The method returns a Reactive Stream. The generated items are sent to the stream named generated-name. This stream is mapped to Kafka using the application.properties file that we will create soon.
Add honorifics
The name converter reads the names from Kafka, and transforms them, adding a random (English) honorific to the beginning of the name.
Create a new Java class file in the same package called NameConverter.java. Use this code:
package org.acme.people.stream;

import jakarta.enterprise.context.ApplicationScoped;
import org.eclipse.microprofile.reactive.messaging.Incoming;
import org.eclipse.microprofile.reactive.messaging.Outgoing;
import io.smallrye.reactive.messaging.annotations.Broadcast;

@ApplicationScoped
public class NameConverter {

    private static final String[] honorifics = {"Mr.", "Mrs.", "Sir", "Madam", "Lord", "Lady", "Dr.", "Professor", "Vice-Chancellor", "Regent", "Provost", "Prefect"};

    @Incoming("names")               // (1)
    @Outgoing("my-data-stream")      // (2)
    @Broadcast                       // (3)
    public String process(String name) {
        String honorific = honorifics[(int)Math.floor(Math.random() * honorifics.length)];
        return honorific + " " + name;
    }
}
(1) Indicates that the method consumes the items from the names topic
(2) Indicates that the objects returned by the method are sent to the my-data-stream stream
(3) Indicates that the item are dispatched to all subscribers
The process method is called for every Kafka record from the names topic (configured in the application configuration). Every result is sent to the my-data-stream in-memory stream.
Expose to front end
Finally, let’s bind our stream to a JAX-RS resource. Create a new Java class in the same package called NameResource.java. Use this code:
package org.acme.people.stream;

import org.eclipse.microprofile.reactive.messaging.Channel;
import org.reactivestreams.Publisher;
import jakarta.inject.Inject;
import jakarta.ws.rs.GET;
import jakarta.ws.rs.Path;
import jakarta.ws.rs.Produces;
import jakarta.ws.rs.core.MediaType;

/**
 * A simple resource retrieving the in-memory "my-data-stream" and sending the items as server-sent events.
 */
@Path("/names")
public class NameResource {

    @Inject
    @Channel("my-data-stream") Publisher<String> names; // (1)

    @GET
    @Path("/stream")
    @Produces(MediaType.SERVER_SENT_EVENTS)// (2)
    public Publisher<String> stream() { // (3)
        return names;
    }
}
(1) Injects the my-data-stream stream using the @Channel qualifier
(2) Indicates that the content is sent using Server Sent Events
(3) Returns the stream (Reactive Stream)
|
There is a pre-created
|
Configure application
We need to configure the Kafka connector. This is done in the application.properties file (in the src/main/resources directory). The keys are structured as follows:
mp.messaging.[outgoing|incoming].{channel-name}.property=value
The channel-name segment must match the value set in the @Incoming and @Outgoing annotation:
-
generated-name→ sink to which we write the names -
names→ source from which we read the names
Add the following values to the app’s src/main/resources/application.properties:
# Configure the Kafka sink (we write to it)
%prod.mp.messaging.outgoing.generated-name.bootstrap.servers=names-cluster-kafka-bootstrap:9092(1)
%prod.mp.messaging.outgoing.generated-name.connector=smallrye-kafka
%prod.mp.messaging.outgoing.generated-name.topic=names
%prod.mp.messaging.outgoing.generated-name.value.serializer=org.apache.kafka.common.serialization.StringSerializer

# Configure the Kafka source (we read from it)
%prod.mp.messaging.incoming.names.bootstrap.servers=names-cluster-kafka-bootstrap:9092(1)
%prod.mp.messaging.incoming.names.connector=smallrye-kafka
%prod.mp.messaging.incoming.names.value.deserializer=org.apache.kafka.common.serialization.StringDeserializer

%prod.quarkus.openshift.route.tls.insecure-edge-termination-policy=Redirect
%prod.quarkus.openshift.route.tls.termination=edge| 1 | The hostnames you see here will only make sense (be resolvable via DNS) when this app is run in the same Kubernetes namespace as the Kafka cluster you created earlier. So you’ll see this and other config values above prefixed with %prod which will not try to initialize Kafka when in dev mode. |
More details about this configuration is available on the Producer configuration and Consumer configuration section from the Kafka documentation.
|
What about |
Rebuild and redeploy app to OpenShift
Run the following command which will build and deploy using the OpenShift extension:
mvn clean package -DskipTests && \
oc label deployment/people app.kubernetes.io/part-of=people --overwrite && \
oc label dc/postgres-database app.kubernetes.io/part-of=people --overwrite && \
oc annotate deployment/people app.openshift.io/connects-to=postgres-database --overwrite && \
oc rollout status -w deployment/people
The build should take a minute or two to complete.
Test
Our application should be up and running in a few seconds after the build completes and generating names. To see if it’s working, click the here to access the graphical name cloud powered by Quarkus, MicroProfile and Kafka. You should see a cloud of names updating every 5 seconds (it may take a few seconds for it to start!):
|
It takes a few seconds to establish the connection to Kafka. If you don’t see new names generated every 5 seconds, reload the browser page to re-initialize the SSE stream. |
These are the original names streamed through Kafka, altered to add a random honorific like Sir or Madam, and displayed in a word cloud for you to enjoy!
Congratulations!
This guide has shown how you can interact with Kafka using Quarkus. It utilizes MicroProfile Reactive Messaging to build data streaming applications.
If you want to go further check the documentation of SmallRye Reactive Messaging, the implementation used in Quarkus.