Securing Quarkus APIs
Bearer Token Authorization is the process of authorizing HTTP requests based on the existence and validity of a bearer token representing a subject and its access context, where the token provides valuable information to determine the subject of the call as well whether or not a HTTP resource can be accessed. This is commonly used in OAuth-based identity and access management systems like Keycloak, a popular open source project. In this exercise we’ll show you how to use Microprofile JSON Web Token (JWT) RBAC, Red Hat build of Keycloak and OAuth to secure your Quarkus applications.
Red Hat build of Keycloak is well suited for securing web-based and other modern applications, mobile apps, APIs and services, by leveraging popular standards and security protocols such as OpenID Connect, OAuth and SAML with the following features:
-
Seamless User Experience, Login, Logout, Self-registration, User Account Management
-
Strong Authentication, MFA, Passwordless authentication
-
Single-Sign-On, Login once to multiple applications
-
Identity Federation, connect to existing LDAP, Active Directory servers, or users in other stores
-
Identity Brokering, authenticating with external OpenID Connect or SAML Identity Providers
-
Social Login, enable login with Google, GitHub, Facebook, Twitter/X, and other social networks
-
Role-based access control, fine-grained Authorization services
-
FIPS Compliance (FIPS 140-2)
Find more information here.
Deploy Keycloak instance
You can install Keycloak in many ways, including just downloading and extracting a zip file, downloading the source and building it, or manually constructing a container and deploying it. Kubernetes Operators make both the installation and management of Keycloak (and many other software packages) much easier, and we have installed the Keycloak operator for you to use.
Deploy Keycloak Database
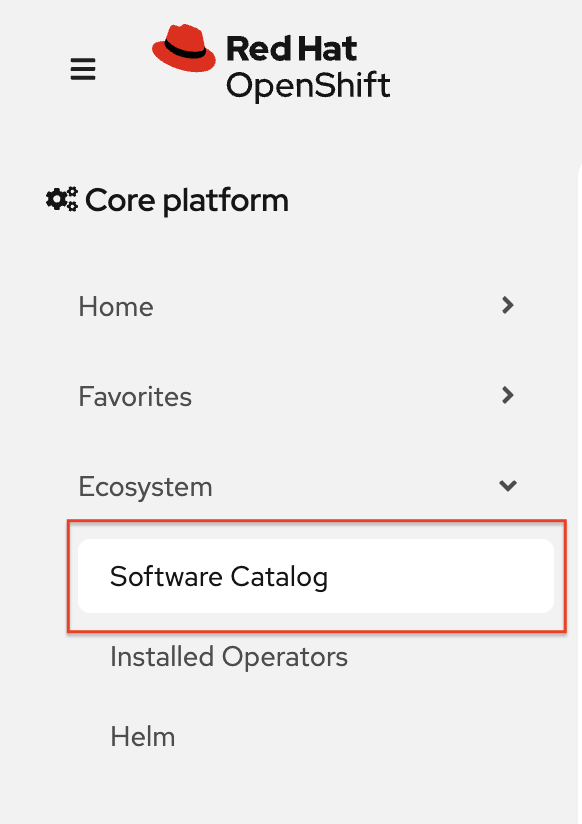
Keycloak needs a database to store its data. We’ll use Postgres. Back on the OpenShift web console, select Software Catalog, under Home on the left.
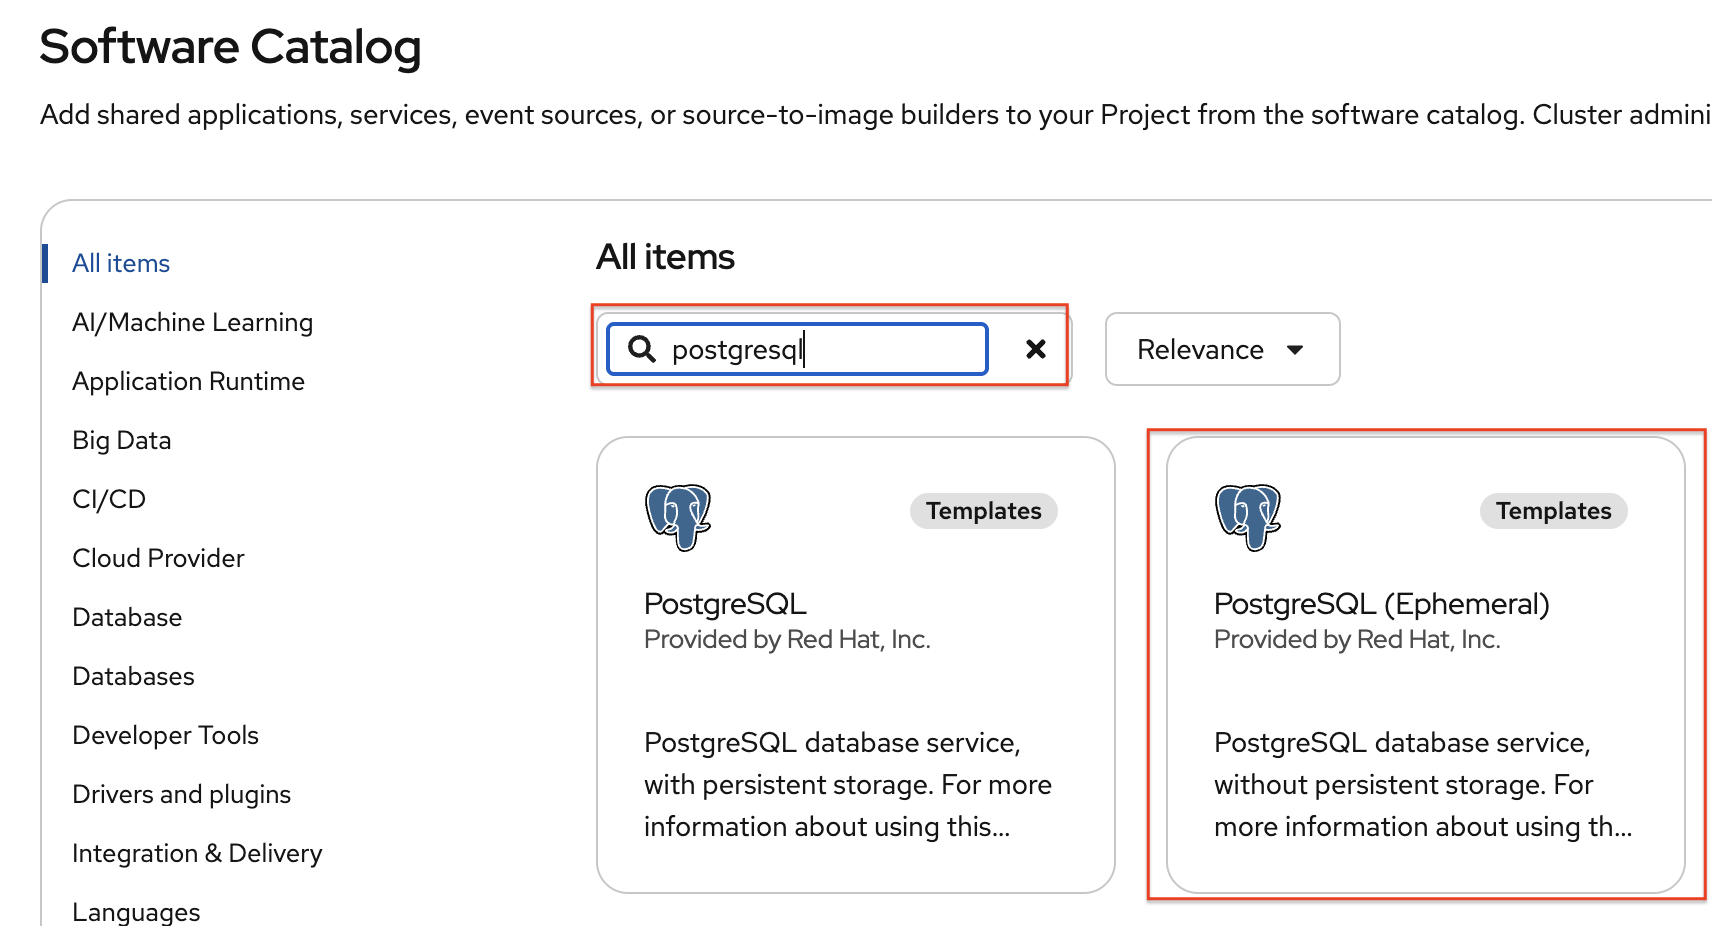
Then, Type in PostgreSQL (Ephemeral) in the search box, and select the PostgreSQL (ephemeral):
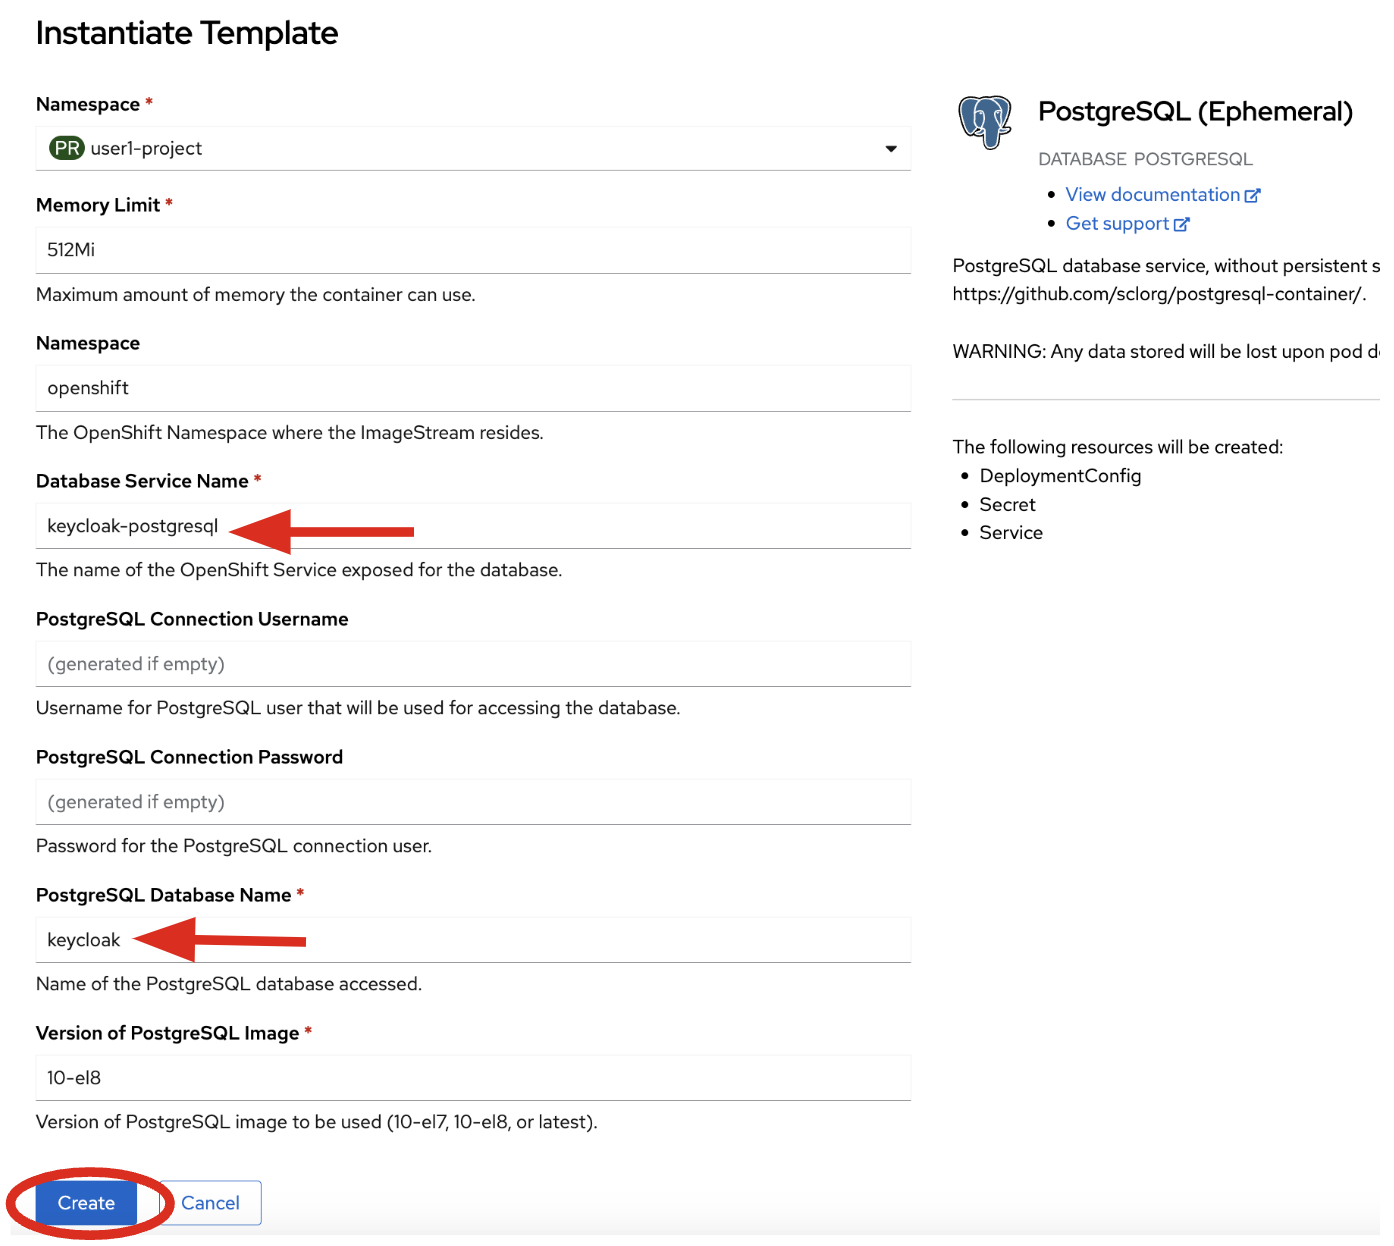
Select Instantiate Template, then override the following values (leaving the rest as their defaults):
-
Database Service Name:
keycloak-postgresql -
PostgreSQL Database Name:
keycloak
Leave the rest as-is, including the username and password, which will be auto-generated for you and you’ll refer to them later. Finally, click Create:
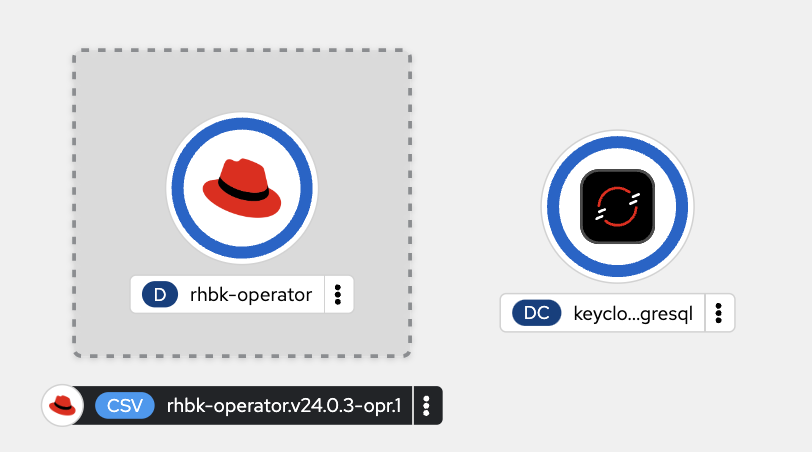
You should see a postgres database begin spinning up:
Create self-signed certificate
Let’s make the postgresql database icon show its proper logo by running the following oc command in the terminal:
oc -n {user}-quarkus label dc keycloak-postgresql "app.openshift.io/runtime=postgresql" --overwriteKeycloak needs a certificate pair to use for TLS communication. We will use OpenSSL to generate the key pair, and put the public key in the application so that we can refer to it at runtime. Run this command to create it and then create an OpenShift Secret that holds the resulting key pair:
mkdir -p $PROJECT_SOURCE/src/main/resources/certs/ && \
openssl req -subj '/CN={openshift_cluster_ingress_domain}/O=Test Keycloak/C=US' -newkey rsa:2048 -nodes -keyout key.pem -x509 -days 365 -out $PROJECT_SOURCE/src/main/resources/certs/certificate.pem && \
oc -n {user}-quarkus create secret tls keycloak-cert-secret --cert $PROJECT_SOURCE/src/main/resources/certs/certificate.pem --key key.pem
This secret will be used in the next step.
Create Keycloak instance
By creating an instance of a Keycloak object, the Keycloak operator will process it and instantiate a new Keycloak server.
-
In the OpenShift web console, click on Ecosystem > Installed Operators in the sidebar menu.
-
Then type
keycloakinto the search box, click on the "Keycloak" item, and click Create: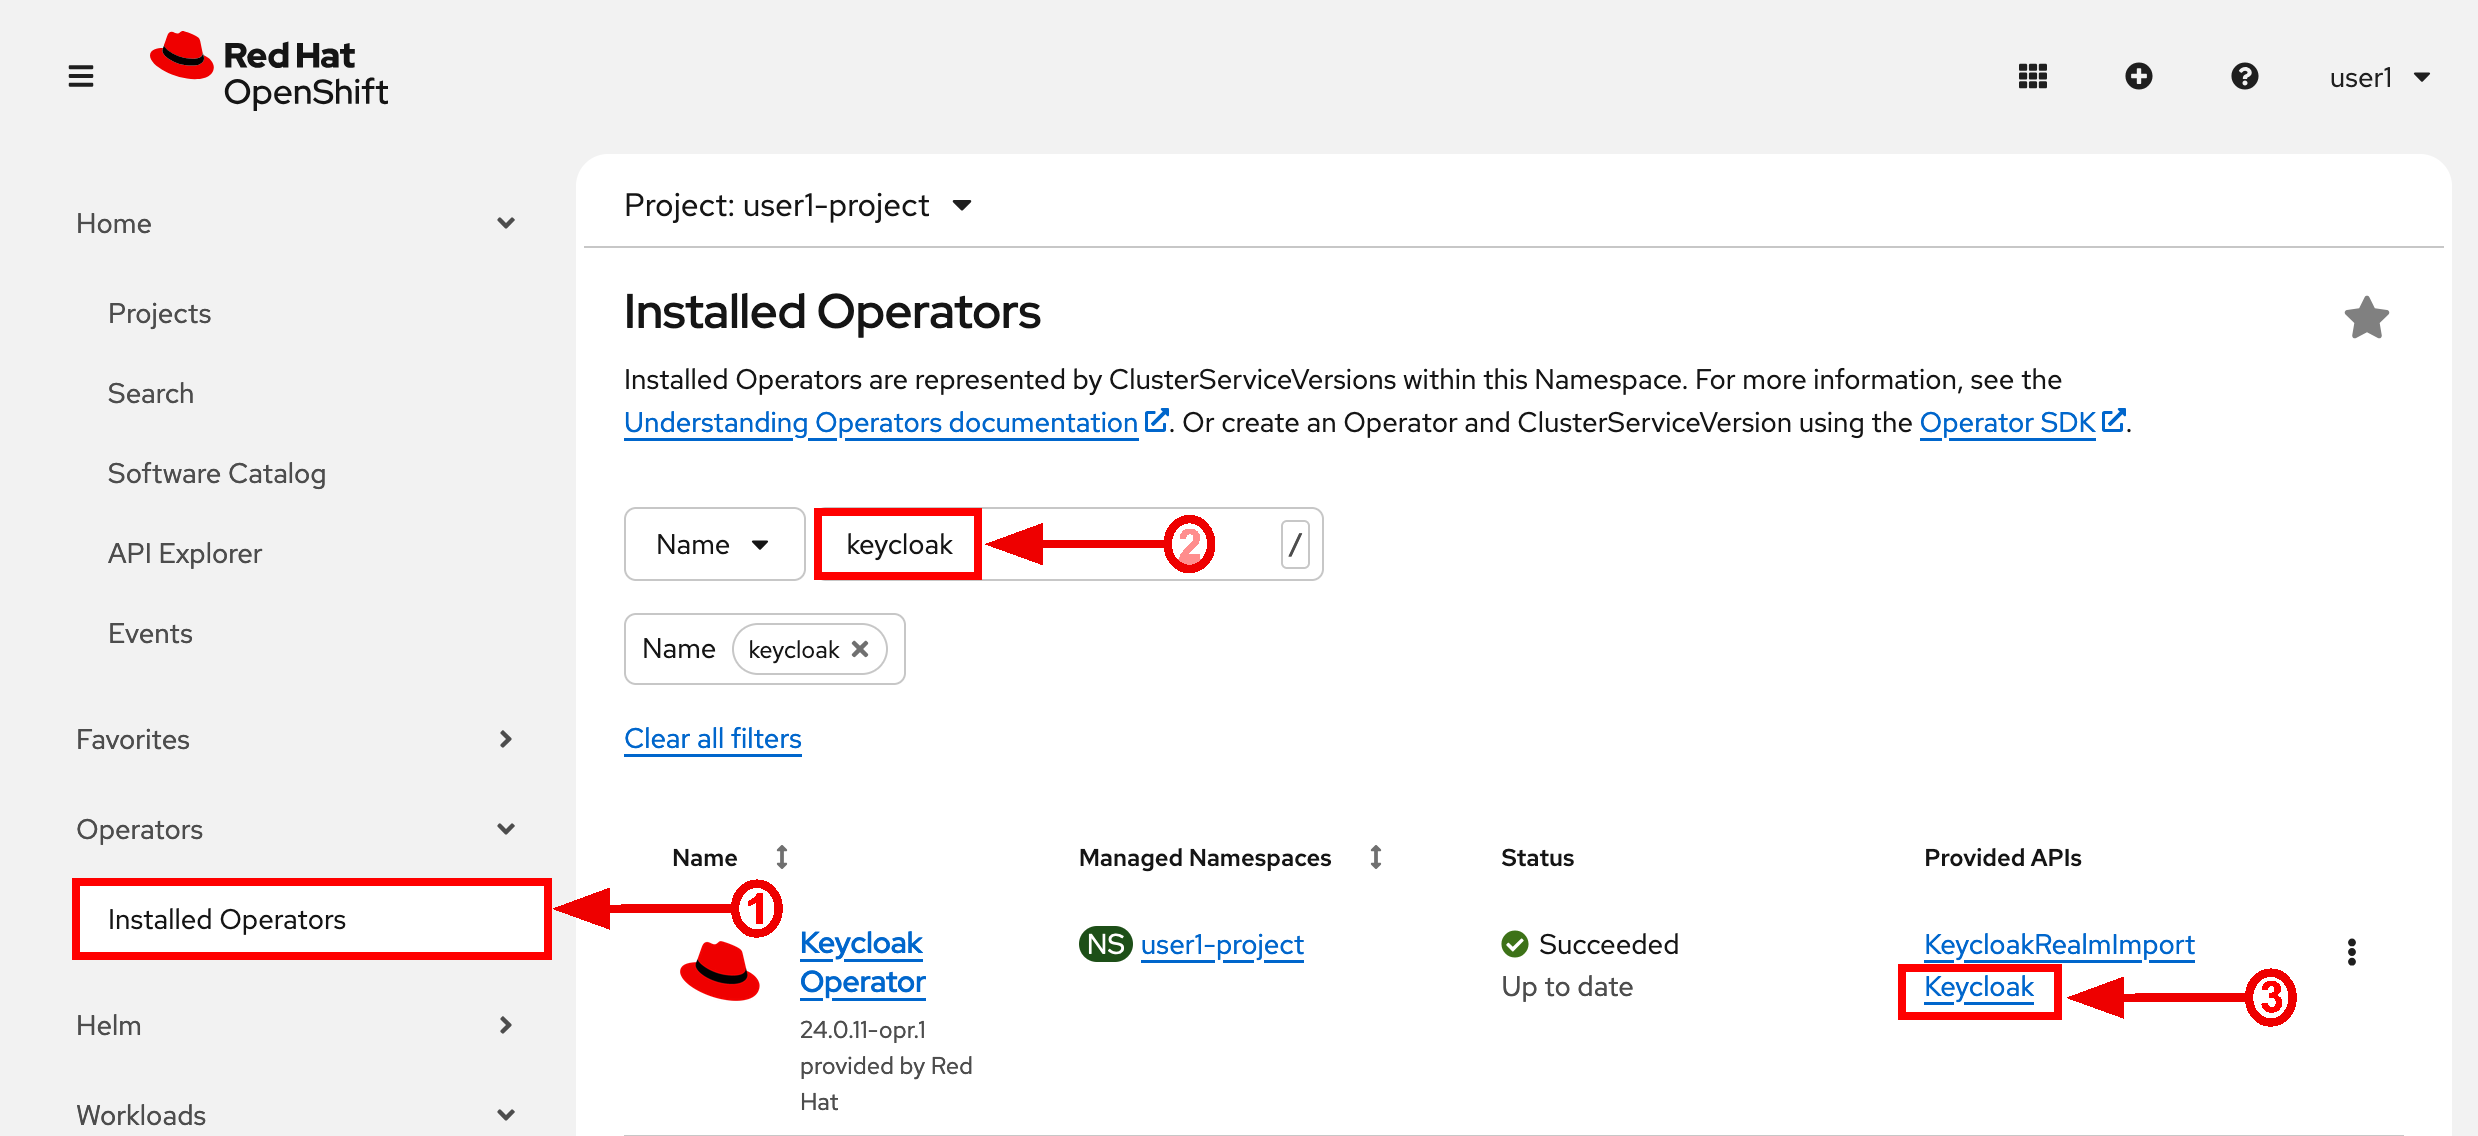
-
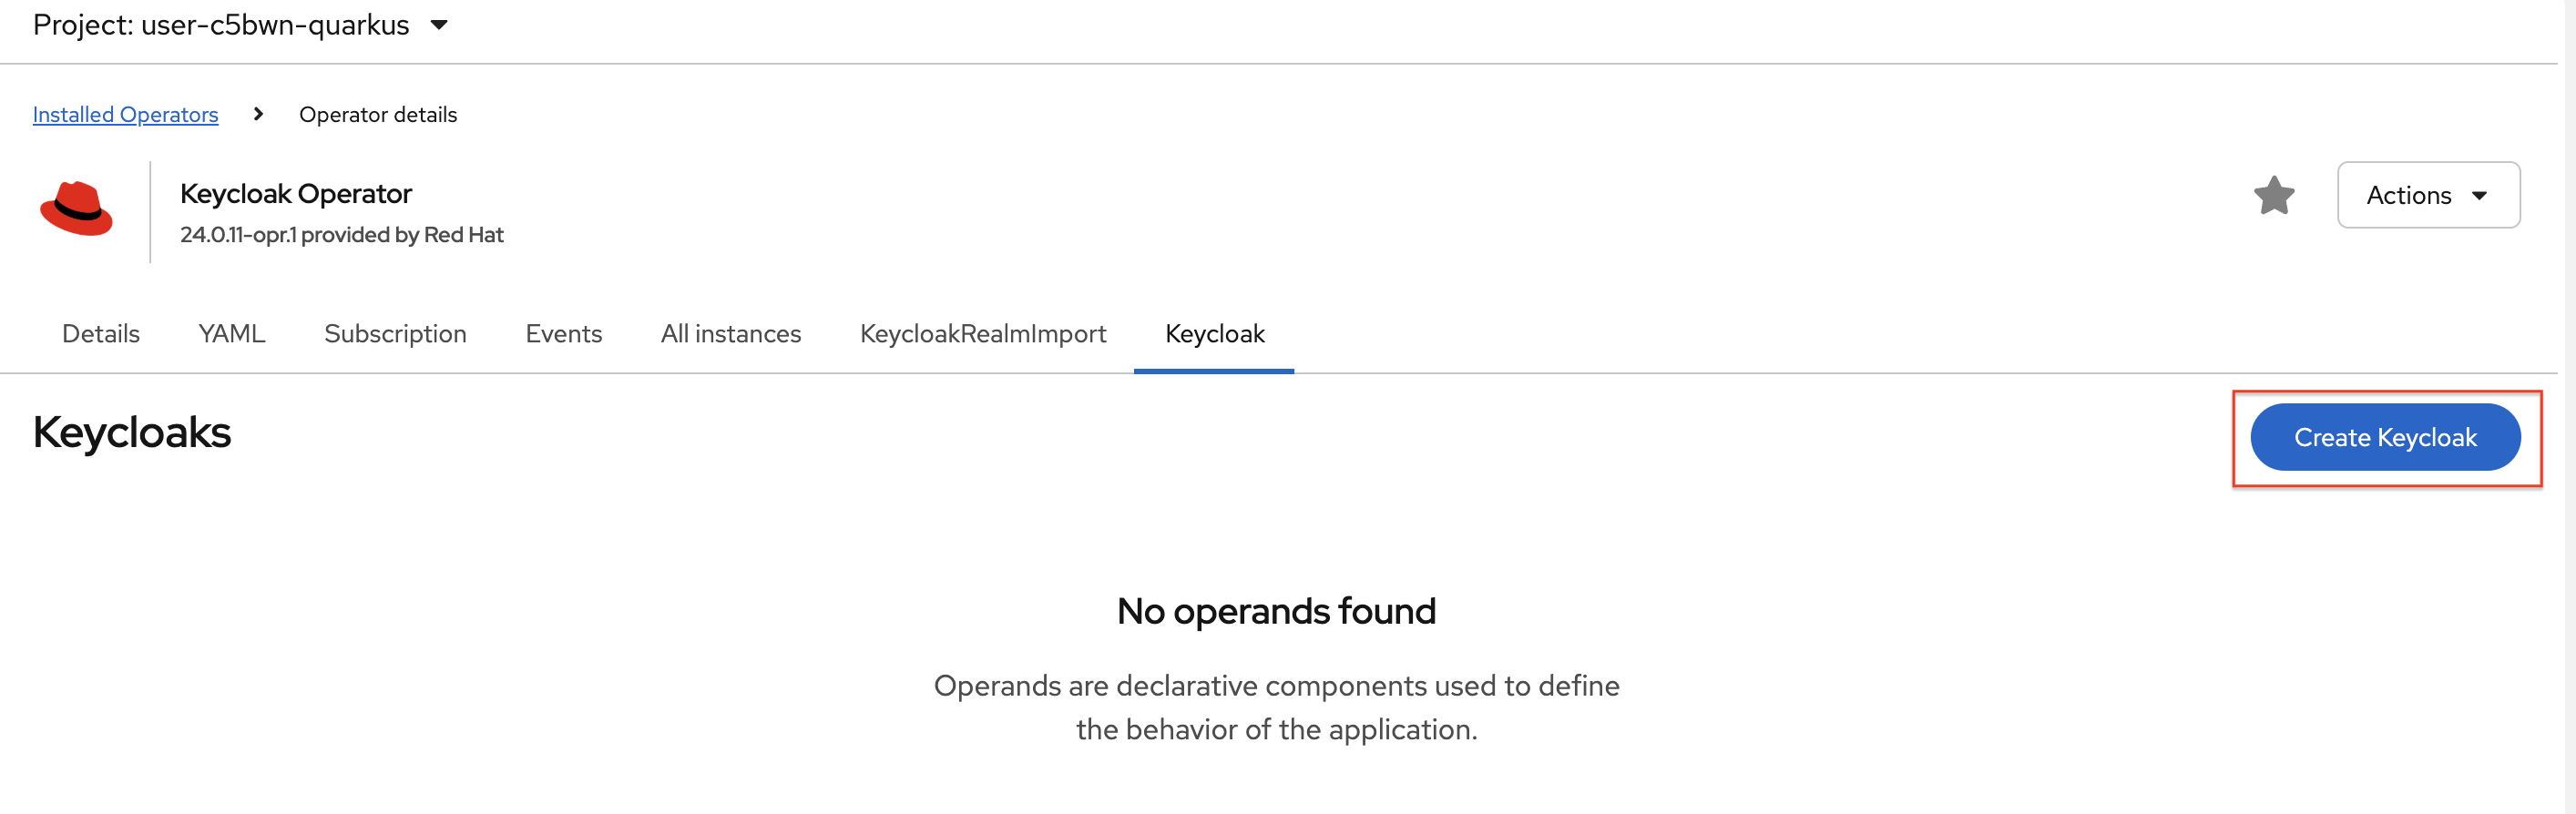
Choose the Create Keycloak button
-
On the next screen, make sure you’re in the YAML view, and replace the YAML with the following definition:
apiVersion: k8s.keycloak.org/v2alpha1 kind: Keycloak metadata: name: keycloak spec: instances: 1 http: tlsSecret: keycloak-cert-secret hostname: hostname: keycloak-{user}-quarkus.{openshift_cluster_ingress_domain} db: vendor: postgres host: keycloak-postgresql usernameSecret: name: keycloak-postgresql key: database-user passwordSecret: name: keycloak-postgresql key: database-password -
Click Create to establish this custom resource.
-
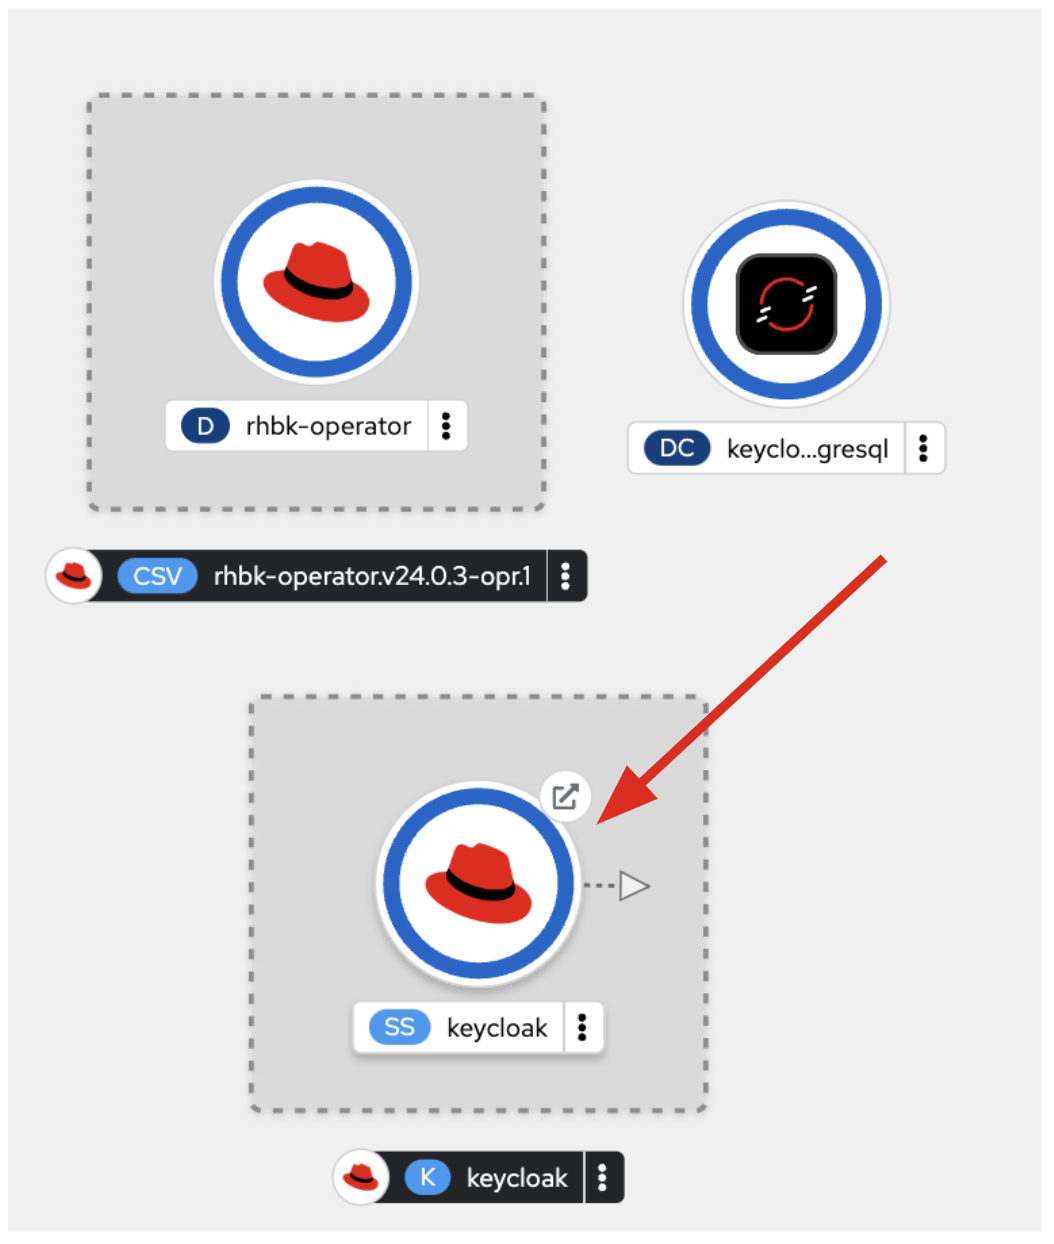
This references the certificate+key pair created earlier, as well as our Postgres database credentials, which are stored in a secret. Click Create, and you will see your new keycloak server starting up:
-
Wait for it to complete (and get a dark blue circle). This should only take a few seconds if everything is working! If it does not after a minute or so, double-check that you entered the right values, and the database secret and certificate secret both exist under the names given.
-
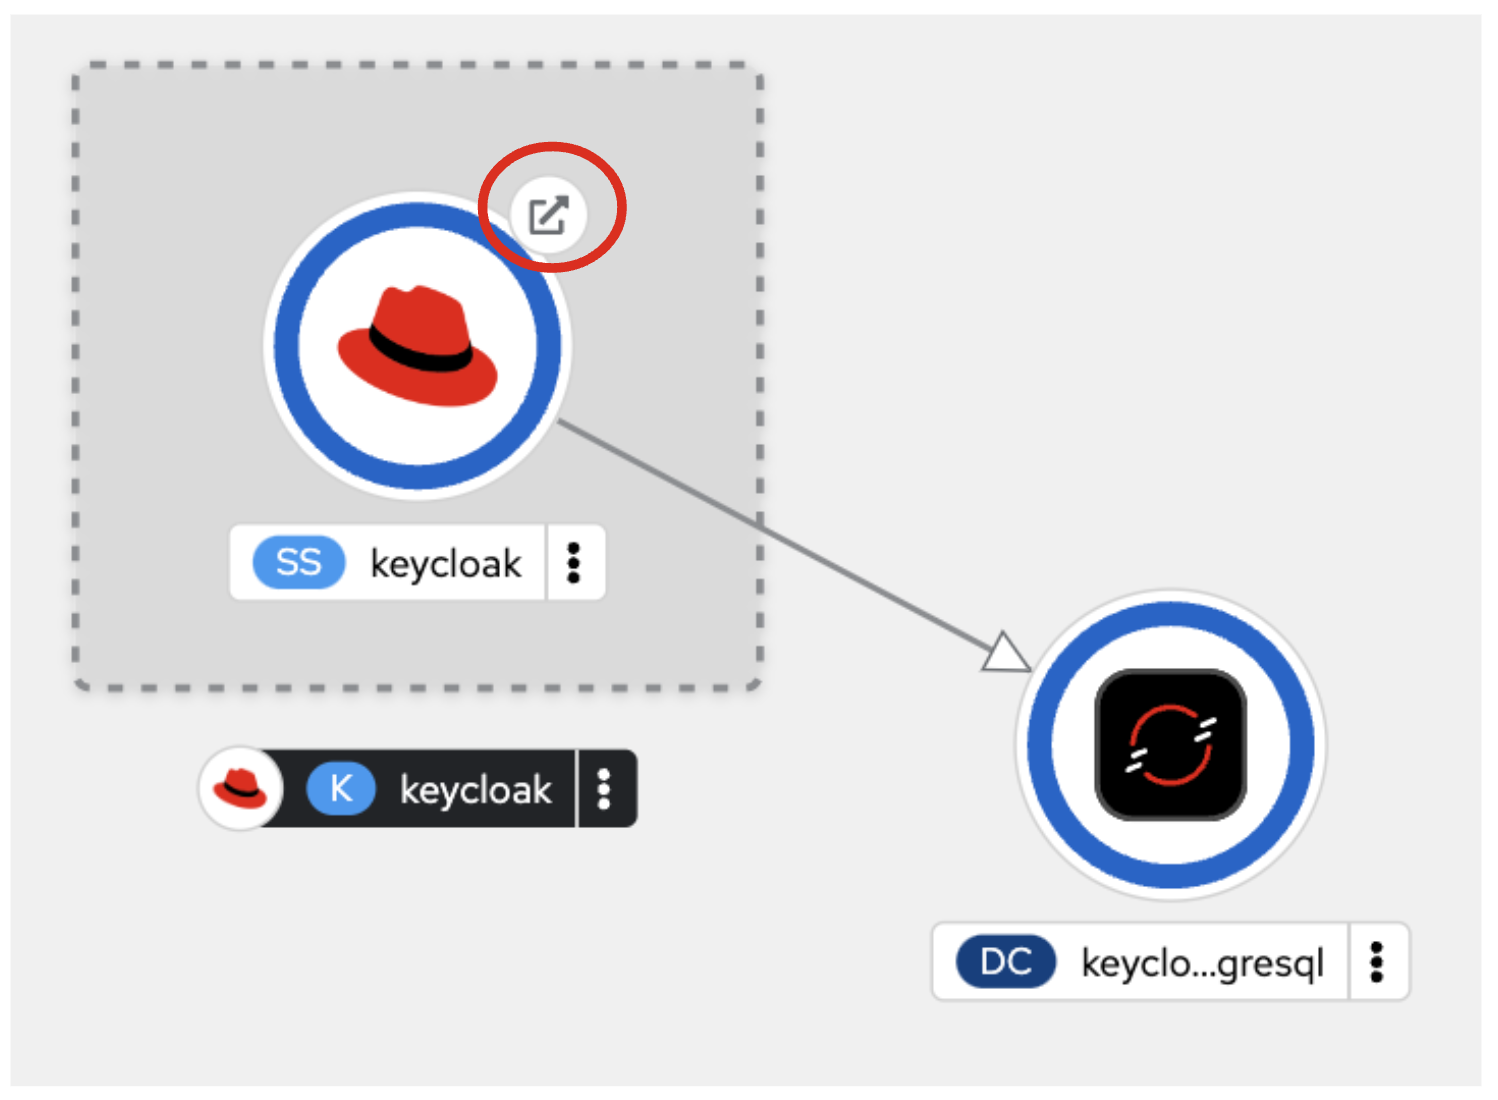
Let’s also visually link Keycloak to its database:
oc -n {user}-quarkus annotate statefulset keycloak "app.openshift.io/connects-to=keycloak-postgresql" --overwrite
Log into Keycloak
When you use the keycloak operator, it will generate an initial administrator username/password in a Secret. Access the secret by clicking on Secrets, and find the keycloak-initial-admin secret, and click on it:
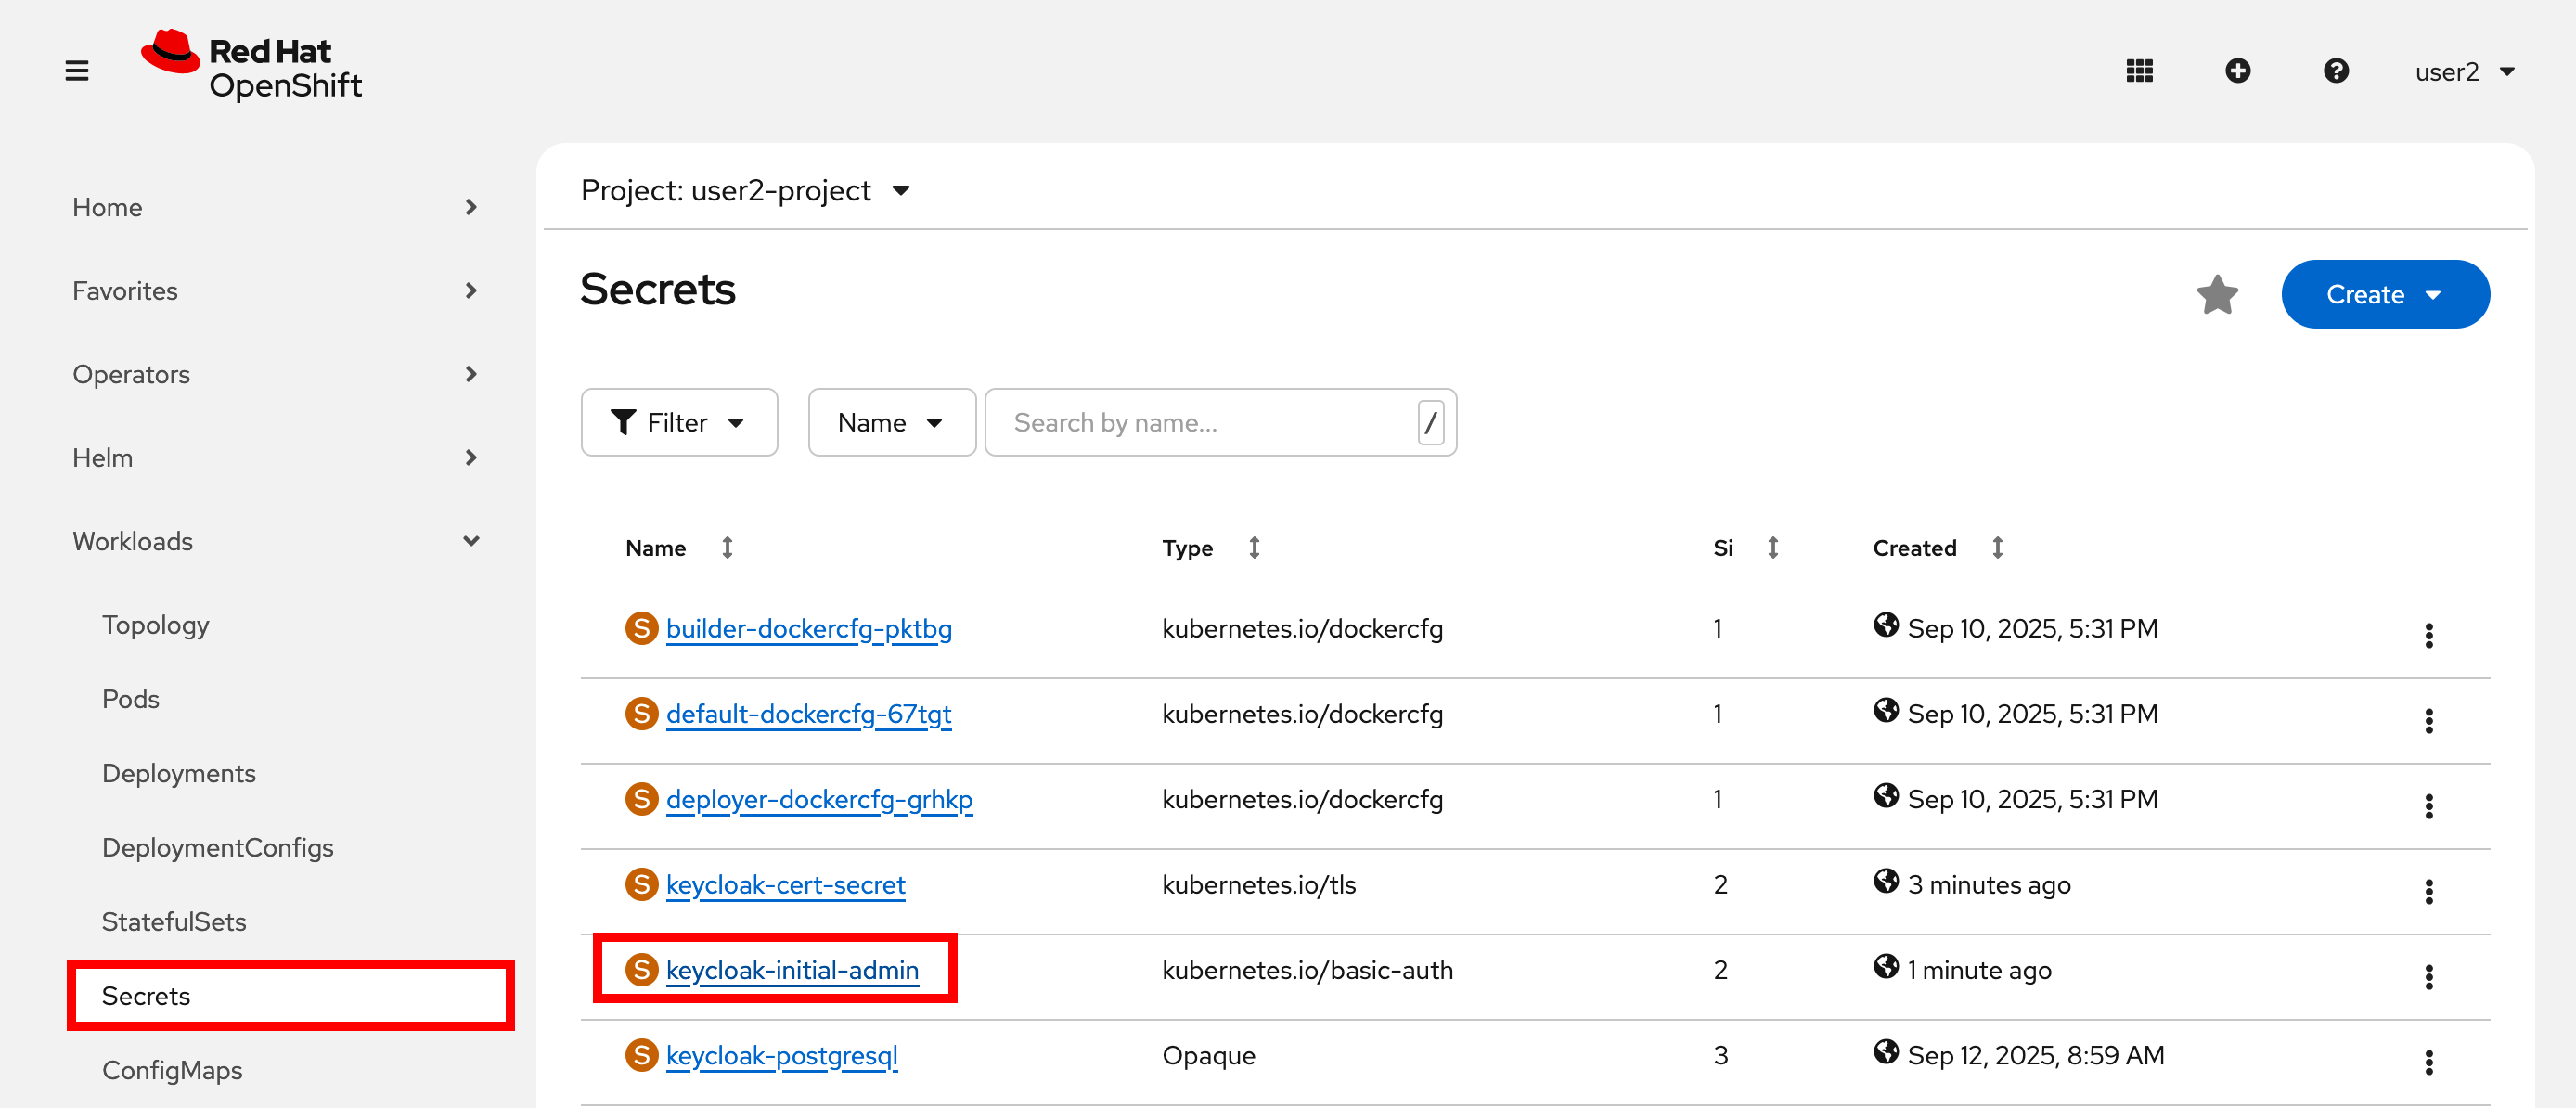
Finally, click on Reveal Values to see the username (which should be admin), and the password:
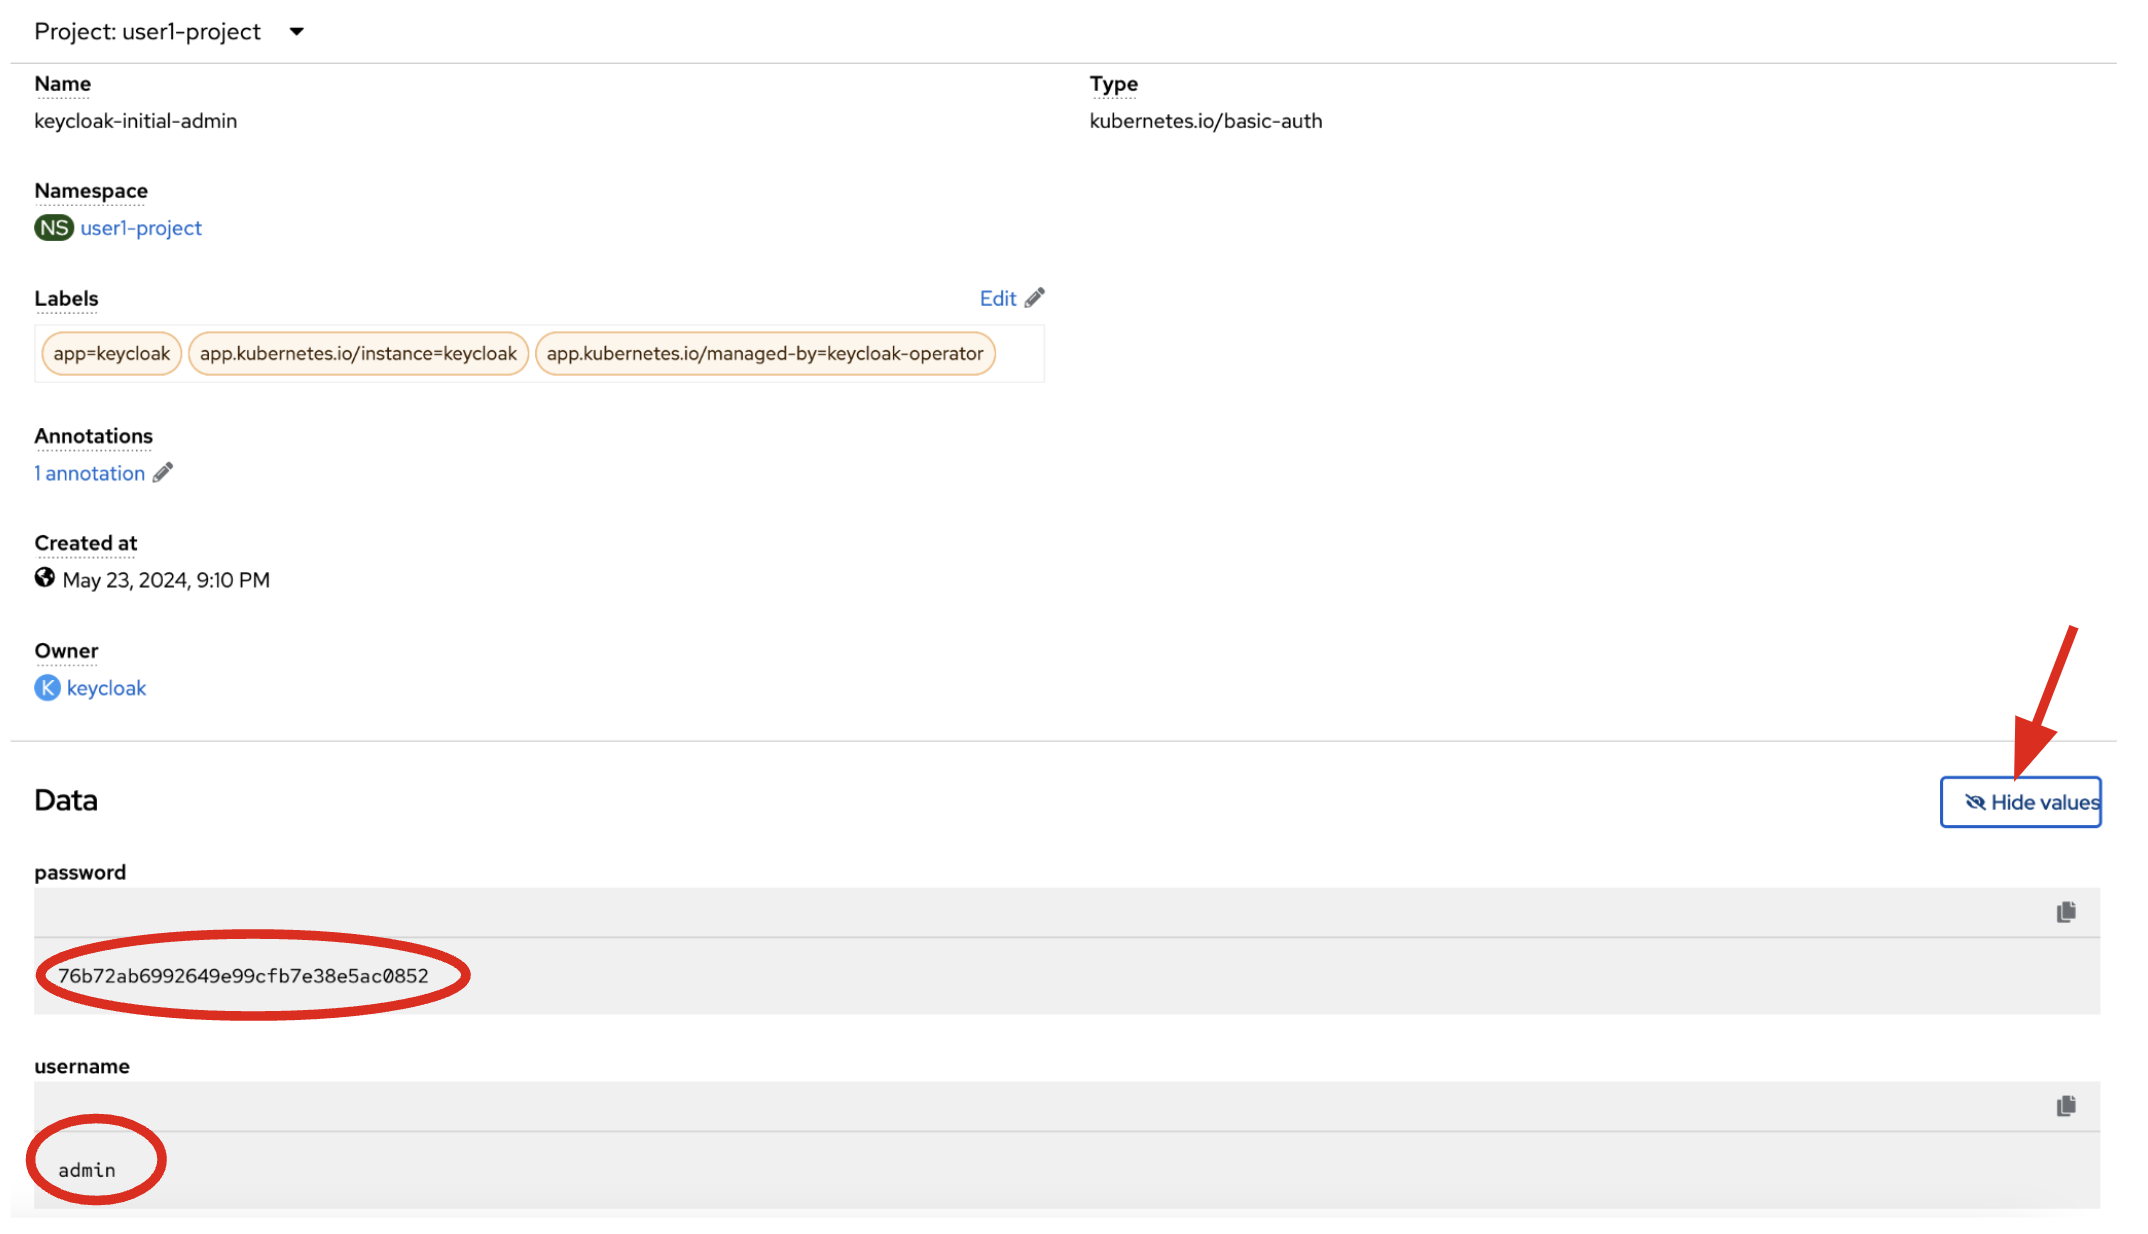
admin is pretty easy to remember, but you’ll probably want to copy the password to your clipboard (using the copy-to-clipboard icon at the far right, or CTRL-C (CMD-C on a Mac)) to use in a moment.
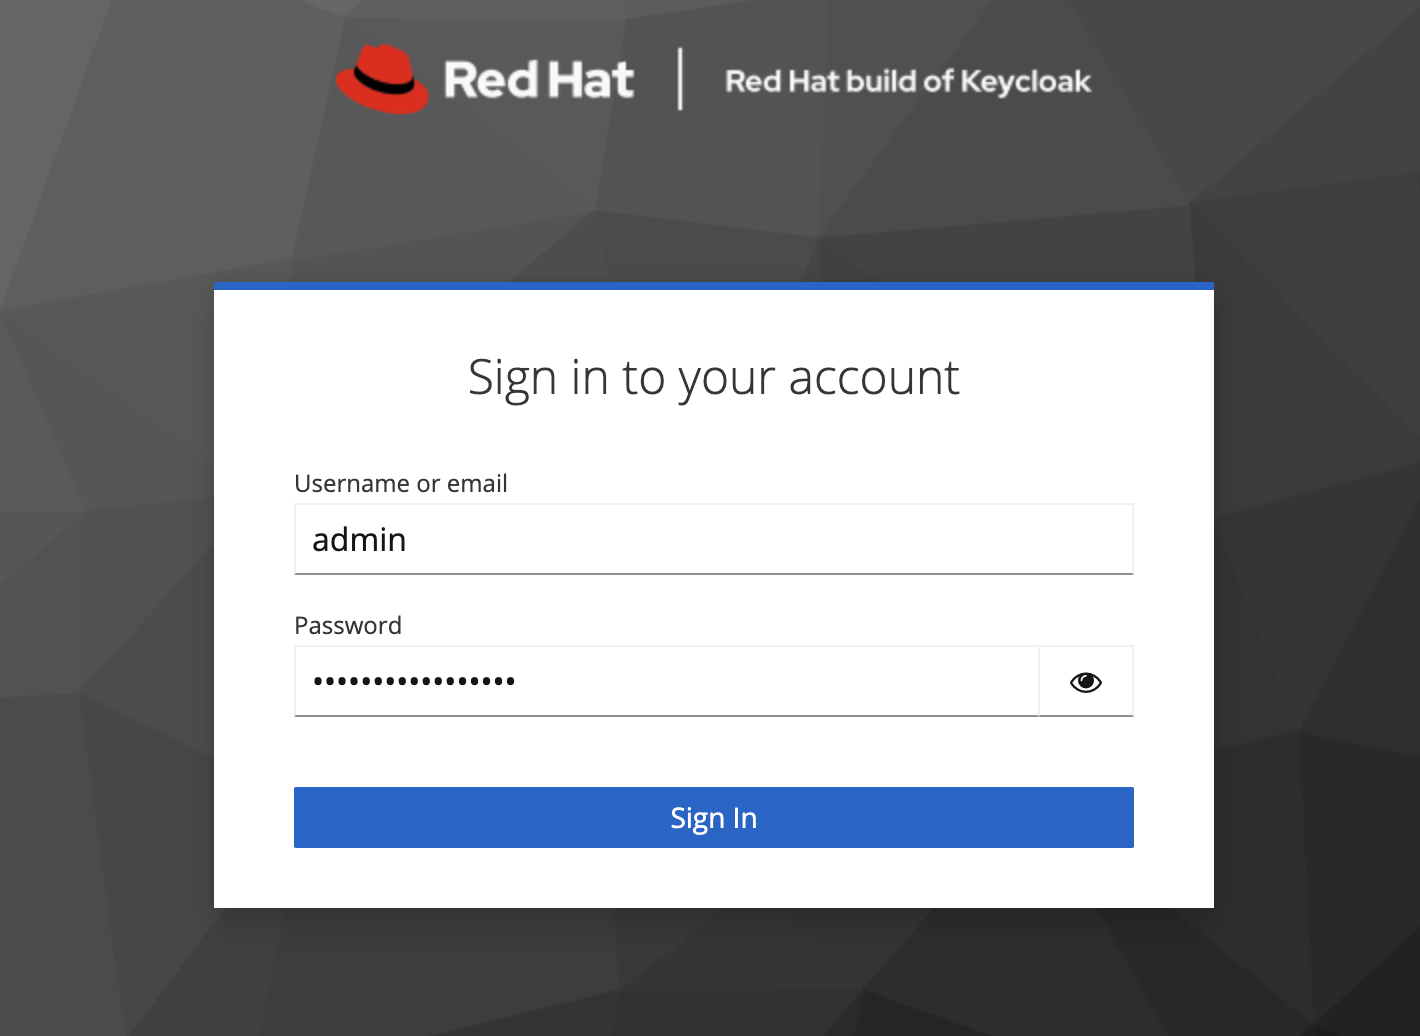
Back on the OpenShift web console topology page, click the small "open" icon at the upper right of the Keycloak deployment:
Log in with the following:
-
Username or email:
admin -
Password: The password you retrieved from the secret earlier.
Once logged in, you should be at the Admin home screen:

Import Realm
A Keycloak realm is a space where you manage objects, including users, applications, roles, and groups. A user belongs to and logs into a realm. One Keycloak deployment can define, store, and manage as many realms as there is space for in the database. Keycloak comes with a master realm but that’s designed to be used for managing Keycloak itself, not for applications.
For authentication purposes, we’ll import a new realm called quarkus that has multiple users that we can test our authenticated endpoint code with, as well as a "confidential resource" based on access path, which will enable Keycloak to enforce authorization to this resource without code change.
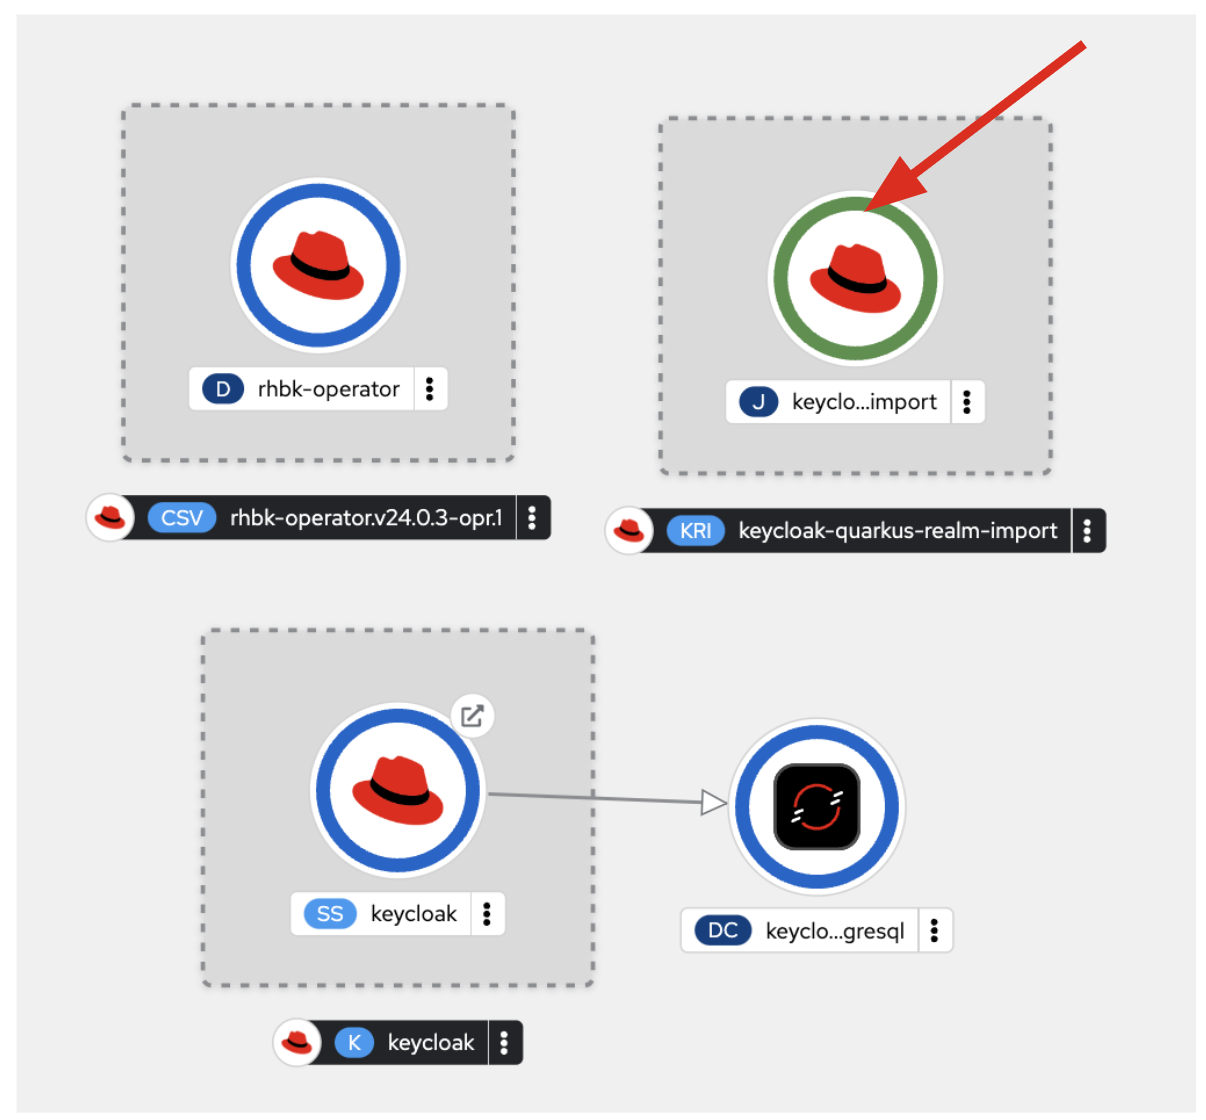
Create a KeycloakRealmImport
The Keycloak operator can import realms you supply by creating an instance of a KeycloakRealmImport object in Kubernetes.
We have pre-defined a new realm for this lab, in the inventory/src/main/resources/kc-realm.yaml file. The file contains a definition of the realm, which you can see by opening the file in DevSpaces:
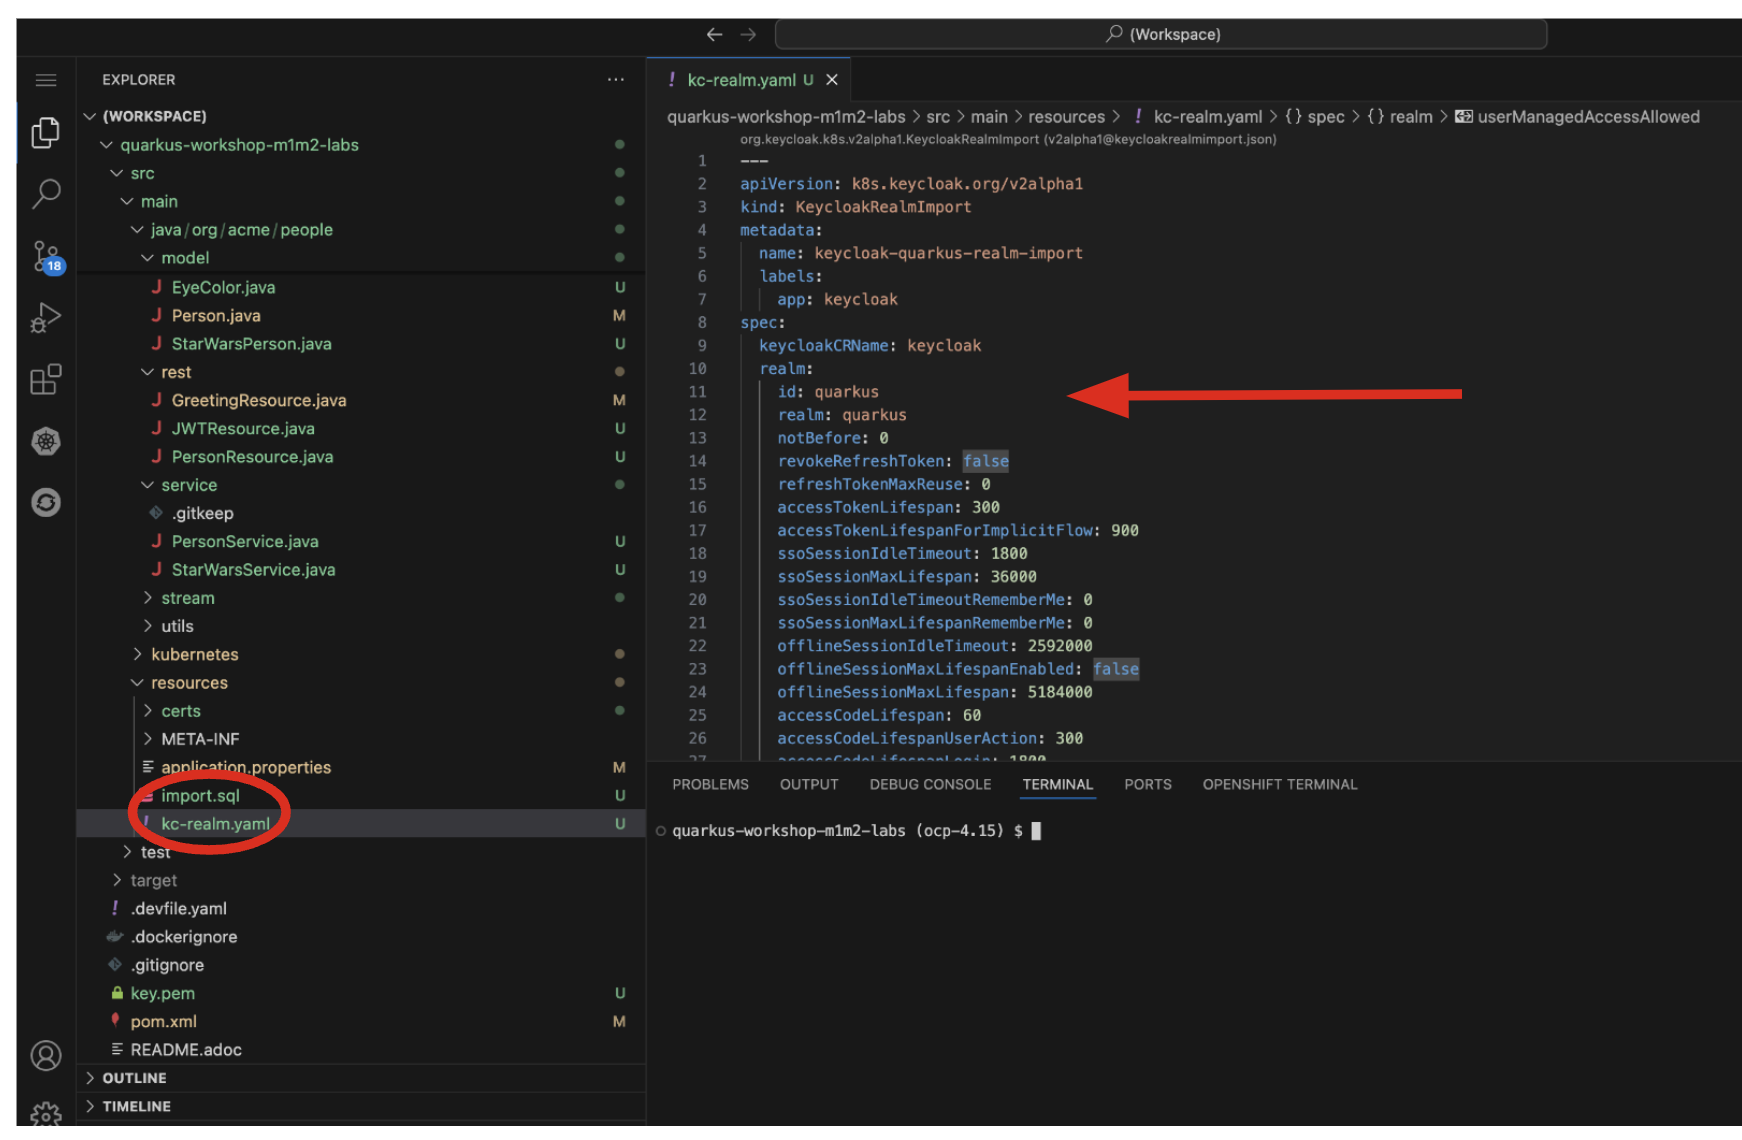
Run the following command to create this object and cause the Keycloak operator to import the realm via a Job:
oc apply -n {user}-quarkus -f $PROJECT_SOURCE/src/main/resources/kc-realm.yamlYou will see a new Job created, wait for it to complete (for the circle to turn green) and for the Keycloak pod to automatically restart:
Explore Realm
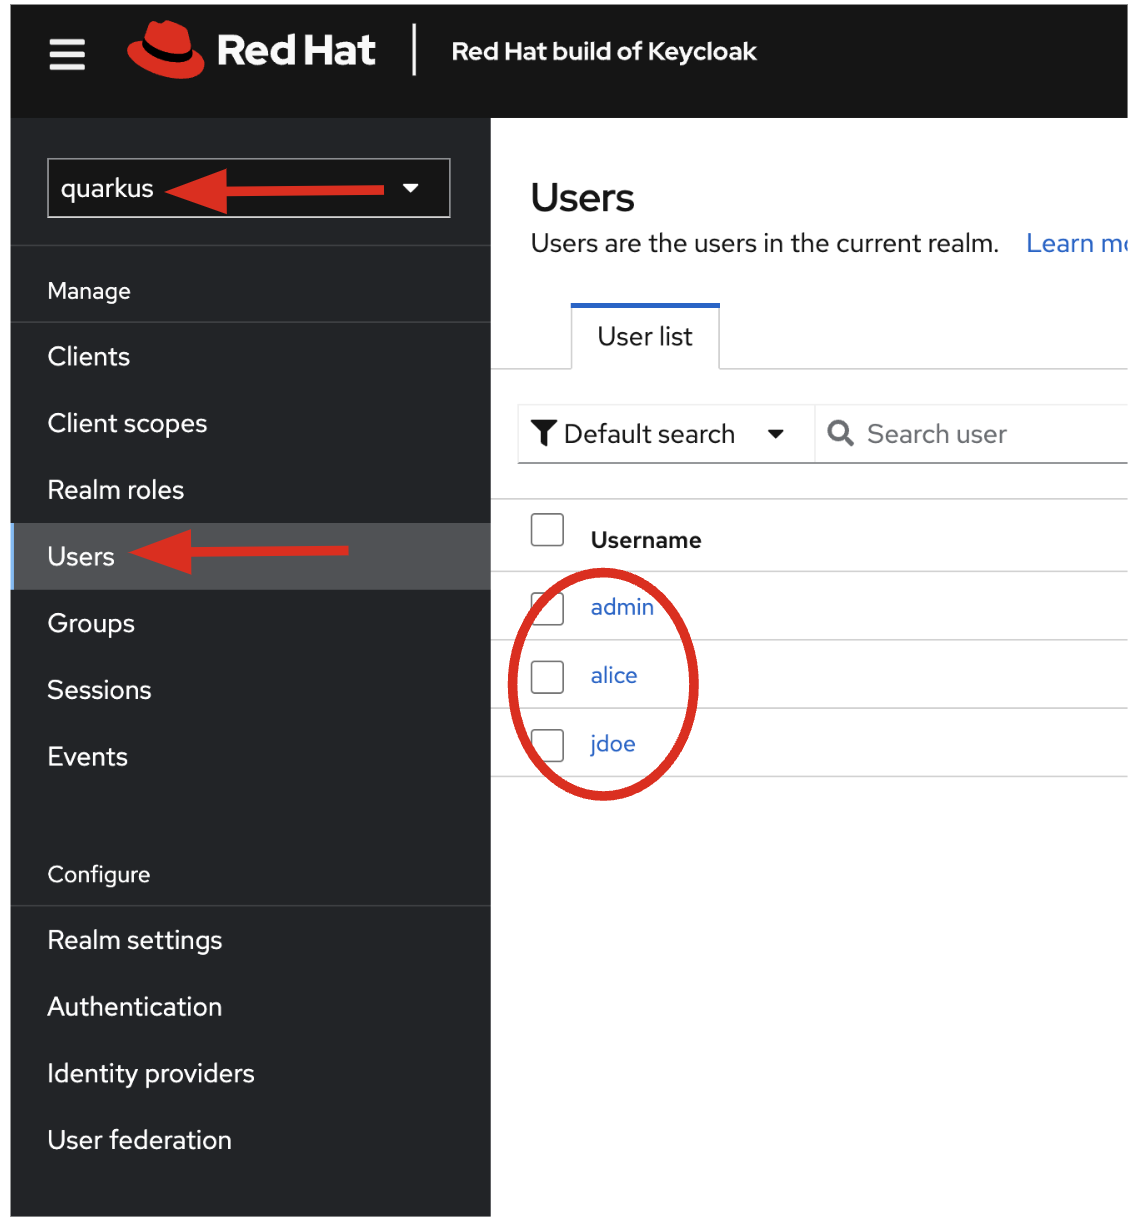
Go back to the Keycloak administration console and login as admin user (using the password from the Secret as before). You should now see a new realm in the Realm dropdown. Select the quarkus realm by clicking on it.
Within the new realm, click on Users to see the pre-created users admin, alice, and jdoe:
-
aliceis an ordinary user (will have theuserrole) whose password isalice -
adminis an Administrator (has theadminanduserrole) and their password isadmin -
jdoeis an ordinary user (has theuserrole) but has also been granted access toconfidentialresources in Keycloak, and their password isjdoe
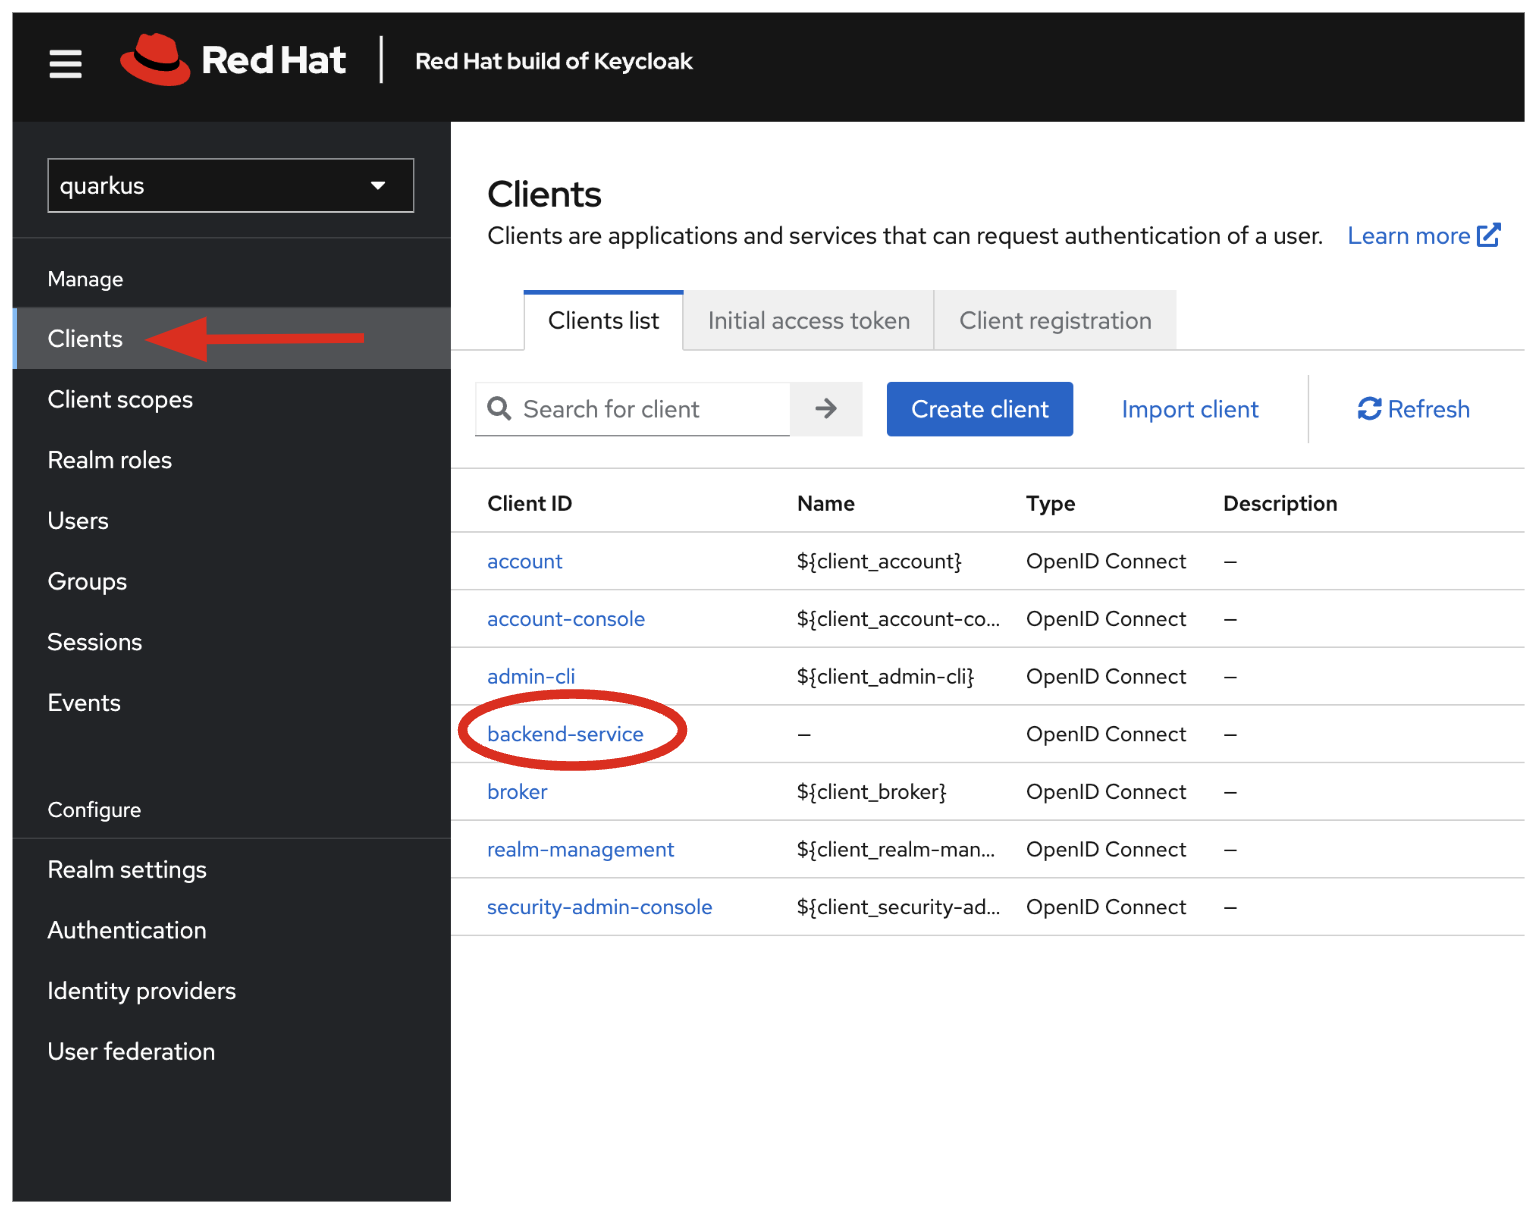
We have also created a Client within the realm that will be used by our backend inventory service called backend-service. This enables the service itself to authenticate with Keycloak to retrieve realm data. Click on Clients to see this client.
Click on Realm Roles to see the roles our users are grouped into, admin, confidential, and user (and a few others). For example, clicking on admin > Users in role you can see only Alex Admin is in this role. In the user role, we have all of our fake users.
We have also defined a Confidential resource mapping that allows us to use Keycloak’s fine-grained authorization policies to restrict access to certain endpoints without having to change our application code. We’ll explore this later!
Add JWT to Quarkus
Like other exercises, we’ll need another extension to enable the use of MicroProfile JWT. Install it with:
mvn quarkus:add-extension -Dextensions="smallrye-jwt"You should see:
[INFO] [SUCCESS] ✅ Extension io.quarkus:quarkus-smallrye-jwt has been installedThis will add the necessary entries in your pom.xml to bring in JWT support.
Configure Quarkus for MicroProfile JWT
Some configuration of the extension is required. Add this to your application.properties:
mp.jwt.verify.publickey.location=https://keycloak-{user}-quarkus.{openshift_cluster_ingress_domain}/realms/quarkus/protocol/openid-connect/certs
mp.jwt.verify.issuer=https://keycloak-{user}-quarkus.{openshift_cluster_ingress_domain}/realms/quarkus
smallrye.jwt.client.tls.certificate.path=classpath:certs/certificate.pem
smallrye.jwt.client.tls.trust-all=true|
1: Sets public key location for JWT authentication. Keycloak exports this for you at the URL. 2: Issuer URL. This must match the incoming JWT 3: Since we are using self-signed certificates, we manually supply the self-signed public key certificate used to for TLS certificate validation. 4: For simplicity we trust all hosts in this example since we’re using self-signed certs. In practice you would not be using self-signed certs, so proper trust chains can be formed. |
Create protected endpoints
We’ll create 2 protected endpoints. Create a new class file JWTResource.java in the org.acme.people.rest package with the following code:
package org.acme.people.rest;

import java.security.Principal;
import java.util.Optional;

import jakarta.annotation.security.RolesAllowed;
import jakarta.enterprise.context.RequestScoped;
import jakarta.inject.Inject;
import jakarta.json.JsonString;
import jakarta.ws.rs.GET;
import jakarta.ws.rs.Path;
import jakarta.ws.rs.Produces;
import jakarta.ws.rs.core.Context;
import jakarta.ws.rs.core.MediaType;
import jakarta.ws.rs.core.SecurityContext;

import org.eclipse.microprofile.jwt.Claim;
import org.eclipse.microprofile.jwt.Claims;
import org.eclipse.microprofile.jwt.JsonWebToken;

@Path("/secured")
@RequestScoped //(1)
public class JWTResource {

    @Inject
    JsonWebToken jwt;  //(2)

    @Inject
    @Claim(standard = Claims.iss)
    Optional<JsonString> issuer; //(3)

    @GET
    @Path("/me")
    @RolesAllowed("user")
    @Produces(MediaType.TEXT_PLAIN)
    public String me(@Context SecurityContext ctx) {  //(4)
        Principal caller = ctx.getUserPrincipal();
        String name = caller == null ? "anonymous" : caller.getName();
        boolean hasJWT = jwt != null;
        return String.format("hello %s, isSecure: %s, authScheme: %s, hasJWT: %s\n", name, ctx.isSecure(), ctx.getAuthenticationScheme(), hasJWT);
    }

    @GET
    @Path("/me/admin")
    @RolesAllowed("admin")
    @Produces(MediaType.TEXT_PLAIN)
    public String meJwt(@Context SecurityContext ctx) {   //(4)
        Principal caller = ctx.getUserPrincipal();
        String name = caller == null ? "anonymous" : caller.getName();
        boolean hasJWT = jwt != null;

        final StringBuilder helloReply = new StringBuilder(String.format("hello %s, isSecure: %s, authScheme: %s, hasJWT: %s\n", name, ctx.isSecure(), ctx.getAuthenticationScheme(), hasJWT));
        if (hasJWT && (jwt.getClaimNames() != null)) {
            helloReply.append("Injected issuer: [" + issuer.get() + "]\n"); //(5)
            jwt.getClaimNames().forEach(n -> {
                helloReply.append("\nClaim Name: [" + n + "] Claim Value: [" + jwt.getClaim(n) + "]");
            });
        }
        return helloReply.toString();
    }
}| 1 | Adds a @RequestScoped as Quarkus uses a default scoping of ApplicationScoped and this will produce undesirable behavior since JWT claims are naturally request scoped. |
| 2 | JsonWebToken provides access to the claims associated with the incoming authenticated JWT token. |
| 3 | When using JWT Authentication, claims encoded in tokens can be @Inject ed into your class for convenient access. |
| 4 | The /me and /me/admin endpoints demonstrate how to access the security context for Quarkus apps secured with JWT. Here we are using a @RolesAllowed annotation to make sure that only users granted a specific role can access the endpoint. |
| 5 | Use of injected JWT Claim to print the all the claims |
Rebuild and redeploy app
Let’s re-build and re-deploy the application:
oc delete deployment people &&
mvn clean package -DskipTests && \
oc label deployment/people app.kubernetes.io/part-of=people --overwrite && \
oc annotate deployment/people app.openshift.io/connects-to=postgres-database --overwrite
Confirm deployment
Run and wait for the app to complete its rollout:
oc rollout status -w deployment/peopleTest endpoints
|
In this exercise we are short-circuiting typical web authentication flows to illustrate the ease of protecting APIs with Quarkus. In a typical web authentication, users are redirected (via their browser) to a login page, after which a negotiation is performed to retrieve access tokens used on behalf of the user to access protected resources. Here we are doing this manually with |
The first thing to do to test any endpoint is obtain an access token from your authentication server in order to access the application resources. We’ve pre-created a few users in Keycloak for you to use:
-
aliceis an ordinary user (will have theuserrole) whose password isalice -
adminis an Administrator (has theadminanduserrole) and their password isadmin -
jdoeis an ordinary user (has theuserrole) but has also been granted access toconfidentialendpoints in Keycloak, and their password isjdoe
Try to access the endpoint as an anonymous unauthenticated user:
curl -i https://$(oc get route people -o=go-template --template='{{ .spec.host }}')/secured/meIt should fail with:
HTTP/1.1 401 Unauthorized
www-authenticate: Bearer {token}
Content-Length: 0
Set-Cookie: 2a1b392100b8b2cb3705c68f4ecbaf66=1b3560b80b9fad566e105aff1f31f880; path=/; HttpOnly
Let’s try with an authenticated user next.
Test Alice
Get a token for user alice with this command:
export ALICE_TOKEN=$(\
    curl -ks -X POST https://keycloak-{user}-quarkus.{openshift_cluster_ingress_domain}/realms/quarkus/protocol/openid-connect/token \
    --user backend-service:secret \
    -H 'content-type: application/x-www-form-urlencoded' \
    -d 'username=alice&password=alice&grant_type=password' | jq --raw-output '.access_token' \
 ) && echo $ALICE_TOKEN
This issues a curl command to Keycloak (using backend-service credentials which is a special user that is allowed acess to the Keycloak REST API), and fetches a token for Alice using their credentials.
Try out the JWT-secured API as Alice:
curl -i https://$(oc get route people -o=go-template --template='{{ .spec.host }}')/secured/me \
  -H "Authorization: Bearer $ALICE_TOKEN"
You should see:
HTTP/1.1 200 OK
Content-Length: 63
Content-Type: text/plain;charset=UTF-8
Set-Cookie: 2a1b392100b8b2cb3705c68f4ecbaf66=1b3560b80b9fad566e105aff1f31f880; path=/; HttpOnly
Cache-control: private

hello alice, isSecure: false, authScheme: Bearer, hasJWT: true
Now try to access the /me/admin endpoint as alice:
curl -i https://$(oc get route people -o=go-template --template='{{ .spec.host }}')/secured/me/admin \
  -H "Authorization: Bearer $ALICE_TOKEN"
You’ll get:
HTTP/1.1 403 Forbidden
Content-Length: 9
Content-Type: text/plain;charset=UTF-8
Set-Cookie: 2a1b392100b8b2cb3705c68f4ecbaf66=1b3560b80b9fad566e105aff1f31f880; path=/; HttpOnly

Forbidden
Alice is not an admin. Let’s try with admin!
|
Access Tokens have a defined lifespan that’s typically short (e.g. 5 minutes), so if you wait too long, the token will expire and you’ll get denied access. In this case, just re-fetch a new token using the same |
Test Admin
Obtain an Admin token:
export ADMIN_TOKEN=$(\
    curl -ks -X POST https://keycloak-{user}-quarkus.{openshift_cluster_ingress_domain}/realms/quarkus/protocol/openid-connect/token \
    --user backend-service:secret \
    -H 'content-type: application/x-www-form-urlencoded' \
    -d 'username=admin&password=admin&grant_type=password' | jq --raw-output '.access_token' \
 ) && echo $ADMIN_TOKEN
And try again with your new token:
curl -i https://$(oc get route people -o=go-template --template='{{ .spec.host }}')/secured/me/admin \
  -H "Authorization: Bearer $ADMIN_TOKEN"
You should see:
HTTP/1.1 200 OK
Content-Length: 2256
Content-Type: text/plain;charset=UTF-8
Set-Cookie: 2a1b392100b8b2cb3705c68f4ecbaf66=1b3560b80b9fad566e105aff1f31f880; path=/; HttpOnly
Cache-control: private

hello admin, isSecure: false, authScheme: Bearer, hasJWT: true
Injected issuer: ["https://keycloak-{user}-quarkus.{openshift_cluster_ingress_domain}/realms/quarkus"]

Claim Name: [sub] Claim Value: [af134cab-f41c-4675-b141-205f975db679]
Claim Name: [groups] Claim Value: [[admin, user]]
Claim Name: [typ] Claim Value: [Bearer]
Claim Name: [preferred_username] Claim Value: [admin]
...
Success! We dump all of the claims from the JWT token for inspection.
Using Keycloak Authentication
Frequently, resource servers only perform authorization decisions based on role-based access control (RBAC), where the roles granted to the user trying to access protected resources are checked against the roles mapped to these same resources. While roles are very useful and used by applications, they also have a few limitations:
-
Resources and roles are tightly coupled and changes to roles (such as adding, removing, or changing an access context) can impact multiple resources
-
Changes to your security requirements can imply deep changes to application code to reflect these changes
-
Depending on your application size, role management might become difficult and error-prone
Keycloak’s Authorization Services provides fine-grained authorization policies that decouples the authorization policy from your code, so when your policies change, your code doesn’t have to. In this exercise we’ll use Keycloak’s Authorization Services to protect our Quarkus APIs.
Enable Quarkus Keycloak and OpenID Connect Extensions
First, you’ll need to enable the Keycloak extension by running this command in a Terminal:
mvn quarkus:add-extension -Dextensions="oidc, keycloak-authorization"You should see:
[INFO] [SUCCESS] ✅  Extension io.quarkus:quarkus-oidc has been installed
[INFO] [SUCCESS] ✅  Extension io.quarkus:quarkus-keycloak-authorization has been installed
Disable MicroProfile JWT Extension
Since we will use Keycloak authentication rather than JWT, we’ll need to disable the JWT extension. To remove the extension, run this command in a Terminal:
mvn quarkus:remove-extension -Dextensions="smallrye-jwt"You should see:
[INFO] [SUCCESS] ✅ Extension io.quarkus:quarkus-smallrye-jwt has been uninstalledConfiguring Keycloak
Next, add these to your application.properties for Keycloak:
# OIDC config
quarkus.oidc.auth-server-url=https://keycloak-{user}-quarkus.{openshift_cluster_ingress_domain}/realms/quarkus
quarkus.oidc.client-id=backend-service
quarkus.oidc.credentials.secret=secret
quarkus.http.cors=true
quarkus.tls.trust-all=true

# Enable Policy Enforcement
quarkus.keycloak.policy-enforcer.enable=true
quarkus.keycloak.policy-enforcer.paths.ready.name=Readiness
quarkus.keycloak.policy-enforcer.paths.ready.path=/q/health/ready
quarkus.keycloak.policy-enforcer.paths.ready.enforcement-mode=DISABLED
quarkus.keycloak.policy-enforcer.paths.live.name=Liveness
quarkus.keycloak.policy-enforcer.paths.live.path=/q/health/live
quarkus.keycloak.policy-enforcer.paths.live.enforcement-mode=DISABLED
This configures the extension with the necessary configuration ( read more about what these do).
|
We explicitly disable authorization checks for the |
Create Keycloak endpoints
Create a new class file called KeycloakResource.java in the org.acme.people.rest package with the following code:
package org.acme.people.rest;

import jakarta.inject.Inject;
import jakarta.ws.rs.GET;
import jakarta.ws.rs.Path;
import jakarta.ws.rs.Produces;
import jakarta.ws.rs.core.MediaType;

import io.quarkus.security.identity.SecurityIdentity;

@Path("/secured") //(1)
public class KeycloakResource {

    @Inject
    SecurityIdentity identity; //(2)


    @GET
    @Path("/confidential") //(1)
    @Produces(MediaType.TEXT_PLAIN)
    public String confidential() {
        return ("confidential access for: " + identity.getPrincipal().getName() +
          " with attributes:" + identity.getAttributes());
    }
}| 1 | Note that we do not use any @RolesAllowed or any other instrumentation on the endpoint to specify access policy. It looks like an ordinary endpoint. Keycloak (the server) is the one enforcing access here, not Quarkus directly. |
| 2 | The SecurityIdentity is a generic object produced by the Keycloak extension that you can use to obtain information about the security principals and attributes embedded in the request. |
Rebuild and redeploy app
Let’s re-build and re-deploy the application:
mvn clean package -DskipTests && \
oc label deployment/people app.kubernetes.io/part-of=people --overwrite && \
oc annotate deployment/people app.openshift.io/connects-to=postgres-database --overwrite
Confirm deployment
Run and wait for the app to complete its rollout:
oc rollout status -w deployment/peopleTest confidential
The /secured/confidential endpoint is protected with a policy defined in the Keycloak Server. The policy only grants access to the resource if the user is granted with a confidential role. The difference here is that the application is delegating the access decision to Keycloak, so no explicit source code instrumentation is required.
|
Keycloak caches the resource paths that it is protecting, so that every access doesn’t cause a roundtrip back to the server to check whether the user is authorized to access the resource. The lifespan of these cached entries can be controlled through Policy Enforcer Configuration. |
First make sure even admin can’t access the endpoint:
Refresh the admin token (it may have expired):
export ADMIN_TOKEN=$(\
    curl -ks -X POST https://keycloak-{user}-quarkus.{openshift_cluster_ingress_domain}/realms/quarkus/protocol/openid-connect/token \
    --user backend-service:secret \
    -H 'content-type: application/x-www-form-urlencoded' \
    -d 'username=admin&password=admin&grant_type=password' | jq --raw-output '.access_token' \
 ) && echo $ADMIN_TOKEN
And then try to access with it:
curl -i -X GET \
  https://$(oc get route people -o=go-template --template='{{ .spec.host }}')/secured/confidential \
  -H "Authorization: Bearer $ADMIN_TOKEN"
You should see in the returned HTTP headers:
HTTP/1.1 403 Forbidden
content-length: 0
set-cookie: xxxxxxxxxxxx; path=/; HttpOnly
Failed as expected!
To access the confidential endpoint, you should obtain an access token for user jdoe:
export JDOE_TOKEN=$(\
    curl -ks -X POST https://keycloak-{user}-quarkus.{openshift_cluster_ingress_domain}/realms/quarkus/protocol/openid-connect/token \
    --user backend-service:secret \
    -H 'content-type: application/x-www-form-urlencoded' \
    -d 'username=jdoe&password=jdoe&grant_type=password' | jq --raw-output '.access_token' \
 ) && echo $JDOE_TOKEN
And access the confidential endpoint with your new token:
curl -i -X GET \
  https://$(oc get route people -o=go-template --template='{{ .spec.host }}')/secured/confidential \
  -H "Authorization: Bearer $JDOE_TOKEN"
You should see:
HTTP/1.1 200 OK
content-length: 504
content-type: text/plain;charset=UTF-8
set-cookie: 2a1b392100b8b2cb3705c68f4ecbaf66=2570e701764877eb5f5887a61384aad4; path=/; HttpOnly; Secure; SameSite=None

confidential access for: jdoe with attributes:{configuration-metadata=io.quarkus.oidc.OidcConfigurationMetadata@693a8ad7, io.quarkus.security.identity.AuthenticationRequestContext=io.quarkus.security.runtime.QuarkusIdentityProviderManagerImpl$1@72855e40, io.vertx.ext.web.RoutingContext=io.vertx.ext.web.impl.RoutingContextImpl@4a3f7978, quarkus.identity.expire-time=1717656840, tenant-id=Default, permissions=[Permission {id=99856673-24fa-431b-9e26-93e2113f69db, name=Confidential Resource, scopes=[]}]}
Success! Even though our code did not explicitly protect the /secured/confidential endpoint, we can protect arbitrary URLs in Quarkus apps when using Keycloak.