Kafka to Rocket.Chat
Bridging Matrix and Rocket.Chat bidirectionally requires four flows (as covered in the introduction). The path that carries customer messages to the support agent alone needs two:
-
Flow 1 — Matrix to Kafka (pre-configured)
-
Flow 2 — Kafka to Rocket.Chat ✏️ (you’ll build this one)
| All four flows follow the same pattern — once you’ve built one, the others are nearly identical. To keep the lab short, you’ll only build flow 2 by hand; the remaining three will be made available and enabled at the end. |
flowchart LR
    MX -->|"flow 1"| K --> F2 --> RC

    MX@{ img: "../../_images/module-03/common/element-icon.svg", label: "Matrix", pos: "b", h: 100, w: 80, constraint: "on" }
    K@{ img: "../../_images/module-03/common/kafka-icon.svg", label: "Kafka", pos: "b", h: 100, w: 80, constraint: "on" }
    RC@{ img: "../../_images/module-03/m4/rocketchat-icon.svg", label: "Rocket.Chat", pos: "b", h: 100, w: 100, constraint: "on" }

    F2["✏️ flow 2"]

    style MX fill:none,stroke:none
    style K fill:none,stroke:none
    style RC fill:none,stroke:none
    style F2 fill:#fff3e0,stroke:#fb8c00,stroke-width:2px,color:#e65100,font-size:14px

    linkStyle 0 stroke:#ccc,stroke-width:1px
    linkStyle 1 stroke:#d32f2f,stroke-width:2px
    linkStyle 2 stroke:#d32f2f,stroke-width:2px
You’ll build the listener side — the flow that picks up events from Kafka and delivers them to Rocket.Chat. Once it’s in place, any message that lands in the Kafka topic will reach the support agent automatically.
Open the Camel route
Find in your directory tree the following resource:
-
k2r.camel.yamlClick to open it in Kaoto.
New to Kaoto?
Most of the processing flows you’ll edit during this workshop use Kaoto, the visual integration designer for Apache Camel. Kaoto is a VS Code extension that renders Camel definitions graphically so you can design and configure routes without editing YAML by hand.

Among other tasks, Kaoto helps you to:
-
Create Camel routes (the primary way to define processing flows)
-
Create Kamelets (reusable building blocks for your routes)
-
Create data transformations
-
Apply EIPs (Enterprise Integration Patterns)
Here’s what the Kaoto canvas looks like — each step in the route is rendered as a visual node that you can click to configure:
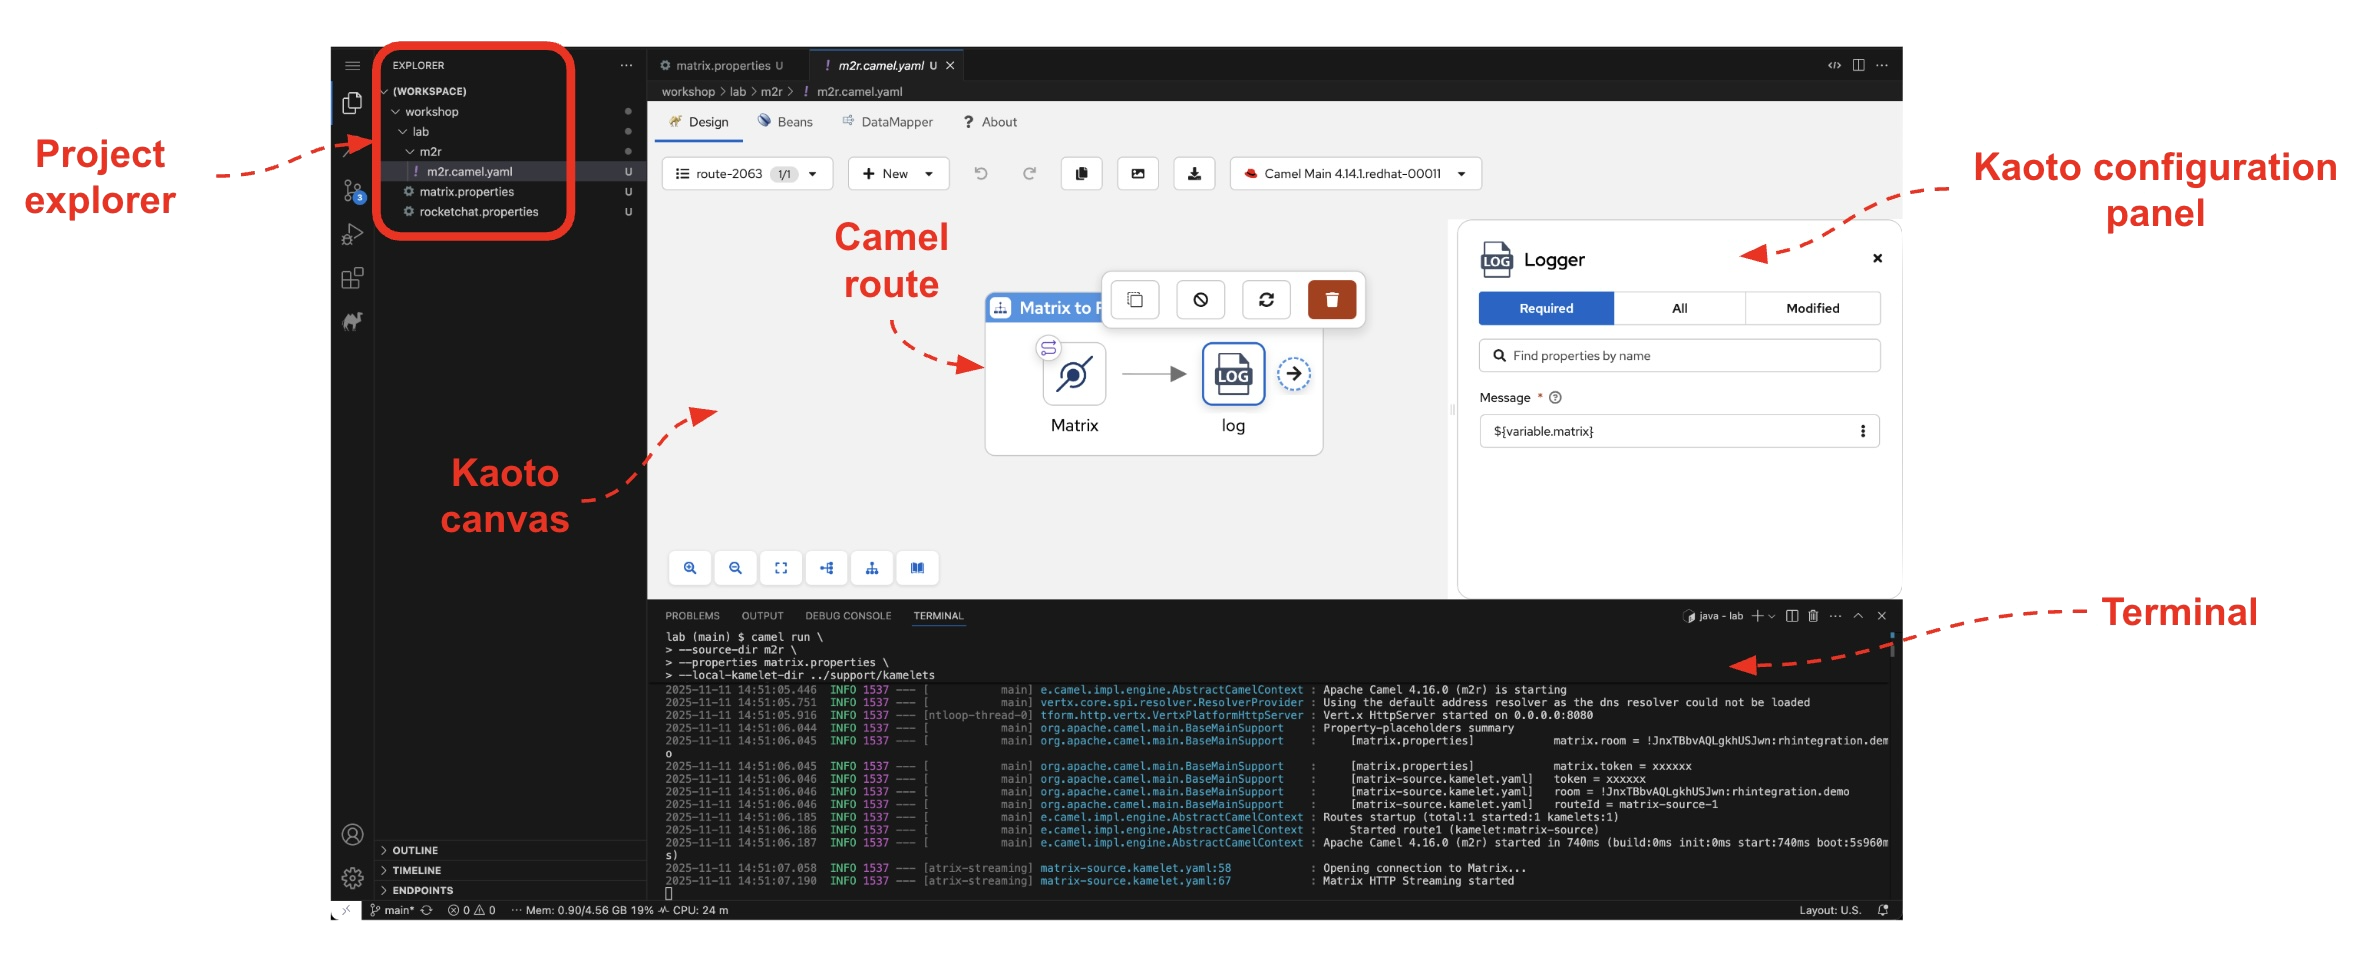
The Kaoto extension is already pre-installed in your Dev Spaces environment. -
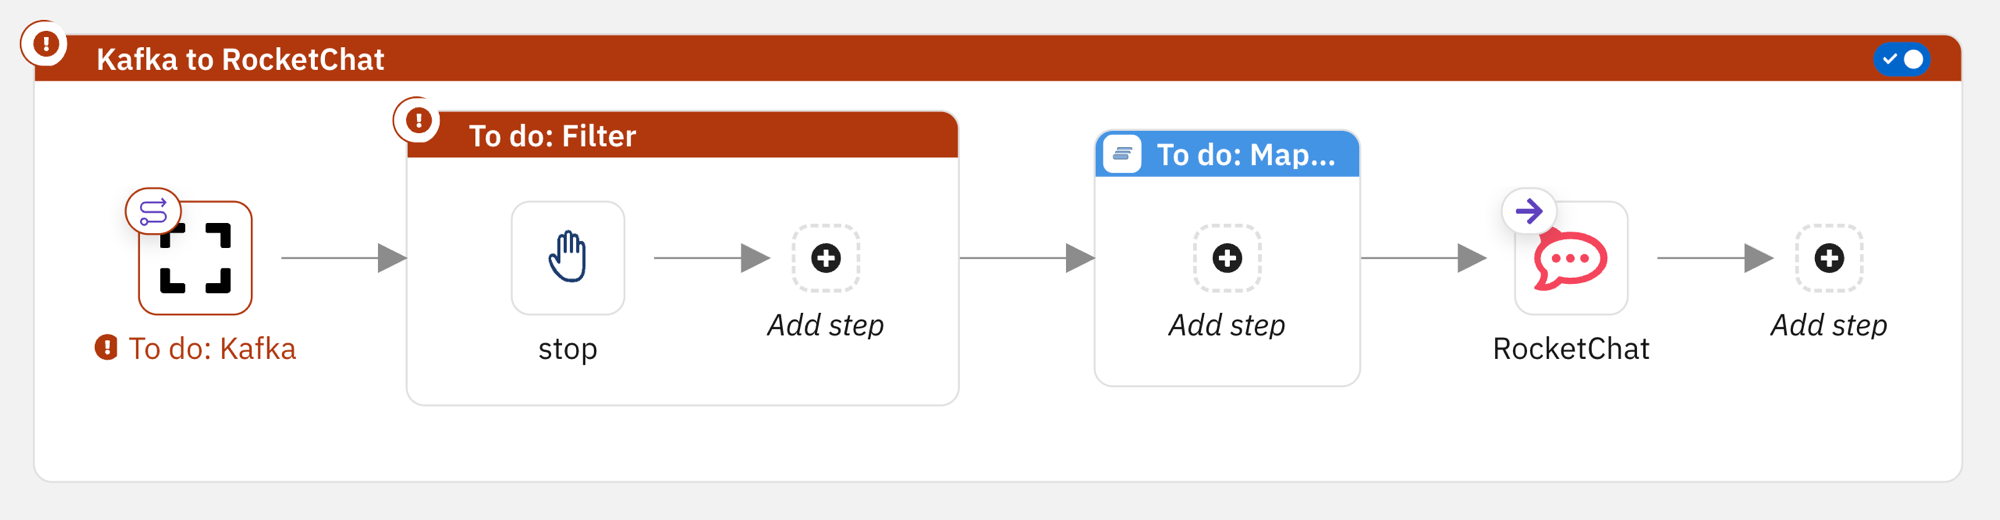
The flow is already prepared — you just need to fill in three areas:
-
Define Kafka as the source system
-
Define a filter to prevent loopback events
-
Define the data mapping to transform Kafka events for Rocket.Chat
The picture below highlights the focus areas:
|
What is a loopback event? All systems publish to and listen from a single Kafka topic. This means a message sent from Rocket.Chat ends up in the same topic this flow is consuming — and could circle right back: flowchart LR
RC -->|"message"| K -->|"❌ same event"| RC
RC@{ img: "../../_images/module-03/m4/rocketchat-icon.svg", label: "Rocket.Chat", pos: "b", h: 100, w: 100, constraint: "on" }
K@{ img: "../../_images/module-03/common/kafka-icon.svg", label: "Kafka topic", pos: "b", h: 100, w: 80, constraint: "on" }
style RC fill:none,stroke:none
style K fill:none,stroke:none
linkStyle 0 stroke:#66bb6a,stroke-width:2px
linkStyle 1 stroke:#d32f2f,stroke-width:2px,stroke-dasharray:5
The filter you’ll define prevents this by checking the |
Define Kafka as the source system
The first step of the flow is where you define Kafka as the source from where events arrive.
| Your OpenShift namespace already contains an Streams for Apache Kafka cluster (Kafka) ready for you to use. |
-
Hover the ❗ To do: Kafka step and click the floating button (replace step).
-
Type
Kafkain the 🔍 Filter to find it, then select the Kafka component. -
Click the Kafka step to open the configuration panel.
-
Select the
Allconfiguration tab. -
Configure the following 2 properties:
(Use the 🔍 Filter at the top to quickly find each one)
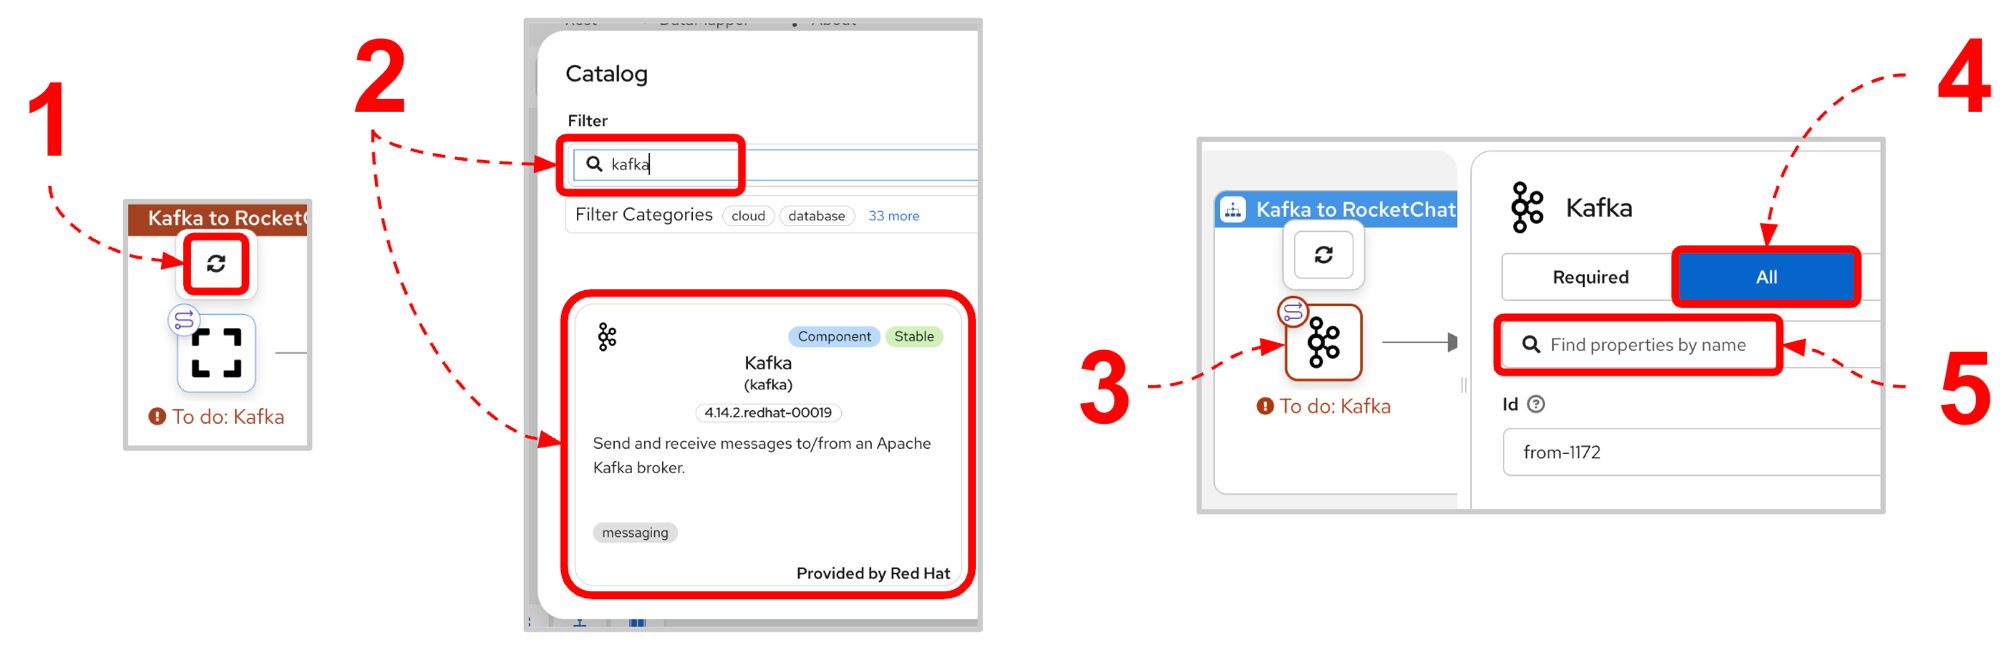
Topic:Brokers:Click anywhere outside the configuration panel to close it.
Define the filter
Events arriving from Kafka can originate from any source system. Without a filter, a message originally sent from Rocket.Chat would flow through Kafka and be pushed back to Rocket.Chat — creating a loop:
-
Rocket.Chat → Kafka → Rocket.Chat ⟵ loopback!
The filter prevents this by checking where the event came from.
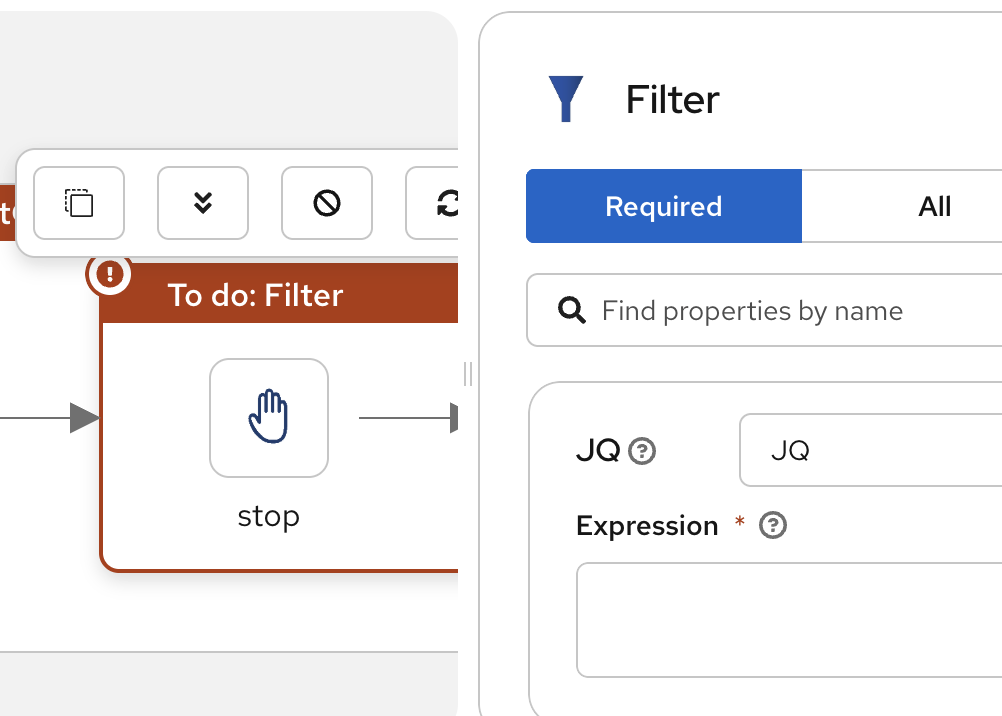
|
|
Define the data transformation
The data arriving from Kafka uses a common schema. You need to map it to the format Rocket.Chat expects.
-
Include in your Camel route a Kaoto data transformation step
From Kaoto:
-
Click the + button inside the
To do: Map...step -
Type
mapperin the 🔍 Filter to find the Kaoto DataMapper -
Click the Kaoto DataMapper tile
-
Click the mapper to open the configuration panel
-
Click the Configure button
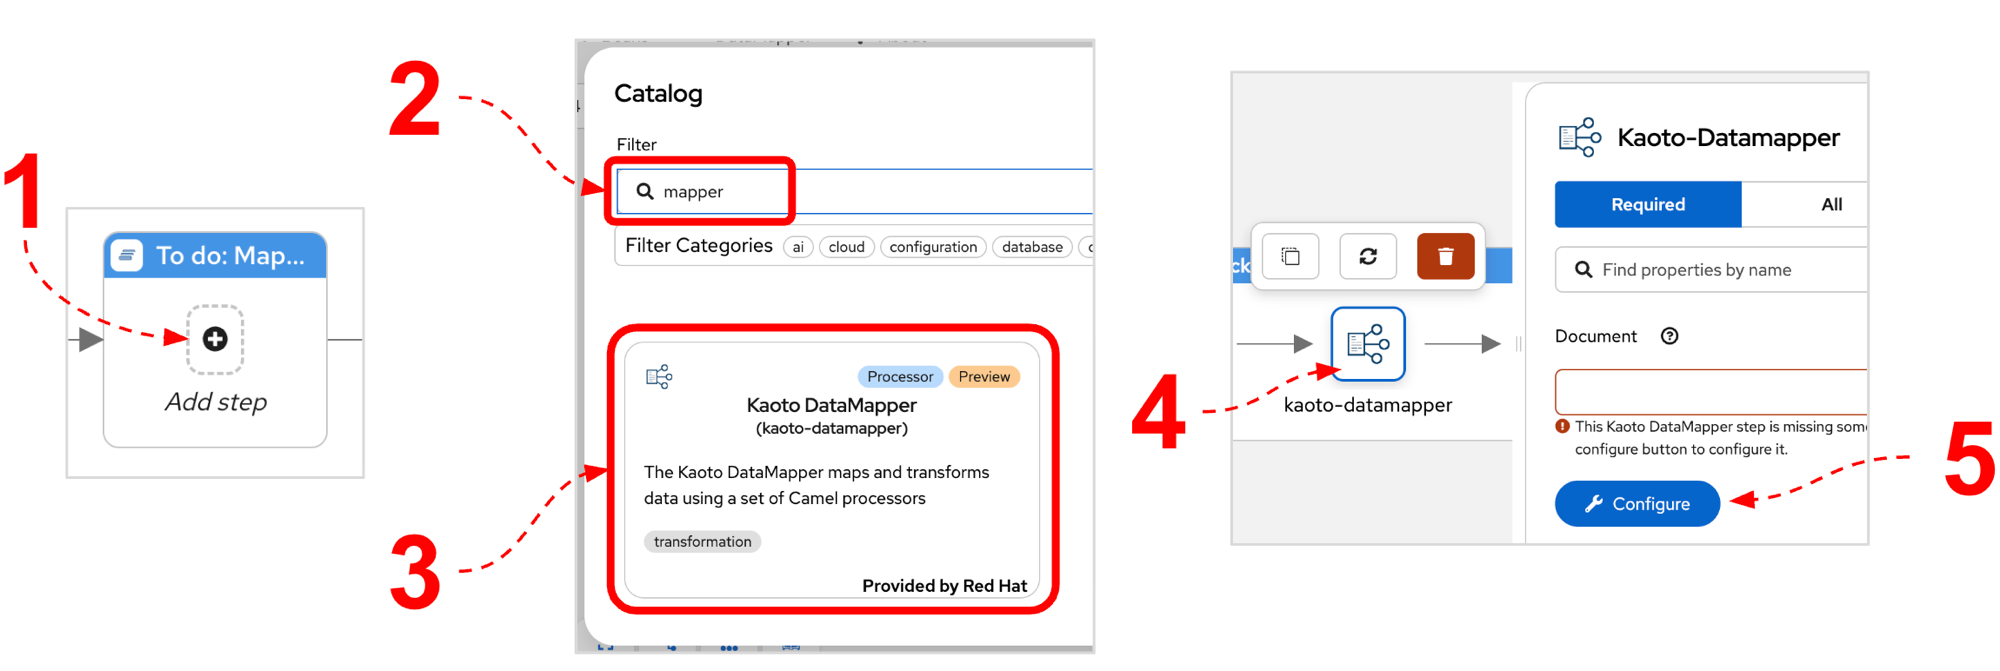
Overview of the data mapper UI.
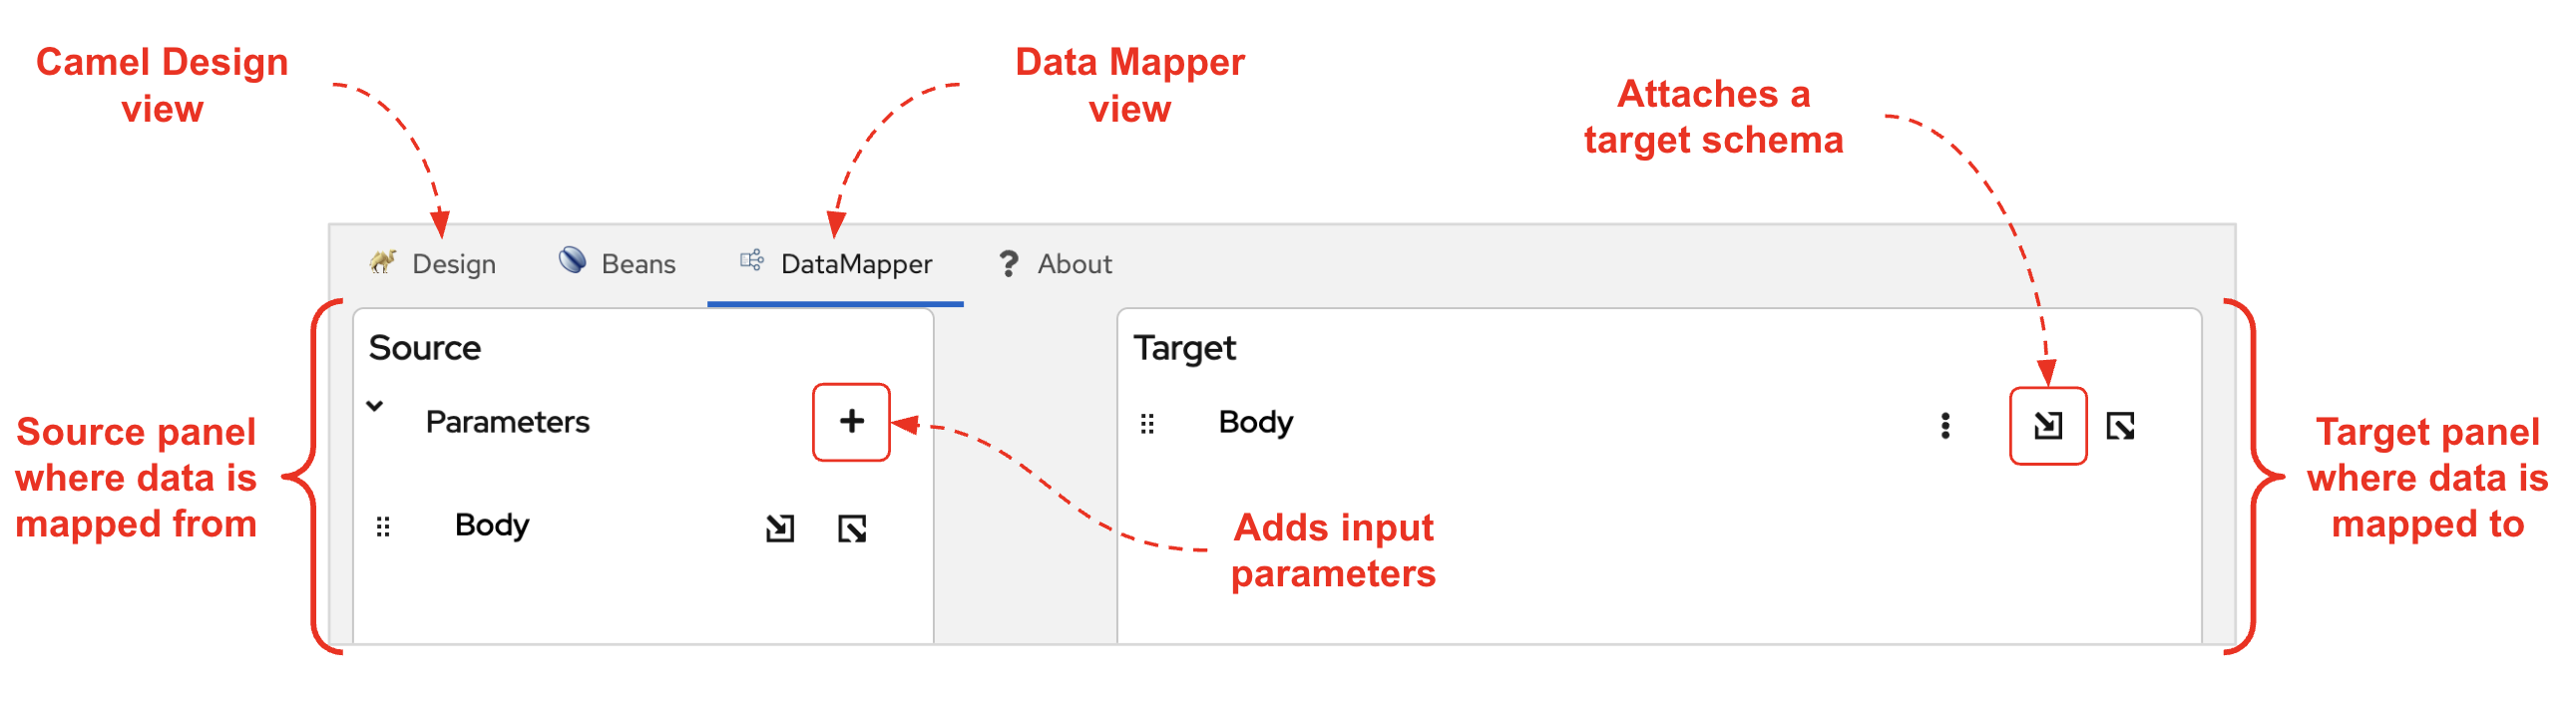
This is what the data mapper looks like — Source on the left (where data comes from) and Target on the right (where data is mapped to):
-
-
Next, define the inputs and outputs
From the DataMapper editor, define the source (left) and target (right):
Source (left panel) Target (right panel) -
On Body click (Attach schema)
-
Click Upload schema file(s)
-
Enter
commonin the 🔍 Filter -
Tick
support/schemas/common.json, clickOK -
Click Attach
-
Click (Attach schema)
-
Click Upload schema file(s)
-
Enter
rocketin the 🔍 Filter -
Tick
support/schemas/rocketchat-out.json, clickOK -
Click Attach
-
-
Define the data mapping rules
Copy and Paste (in the Target) the values below to define the given field entries:
-
string[@key = channel]:To paste the value:Click ⠇ and select Add value selector (value-of), as shown below:
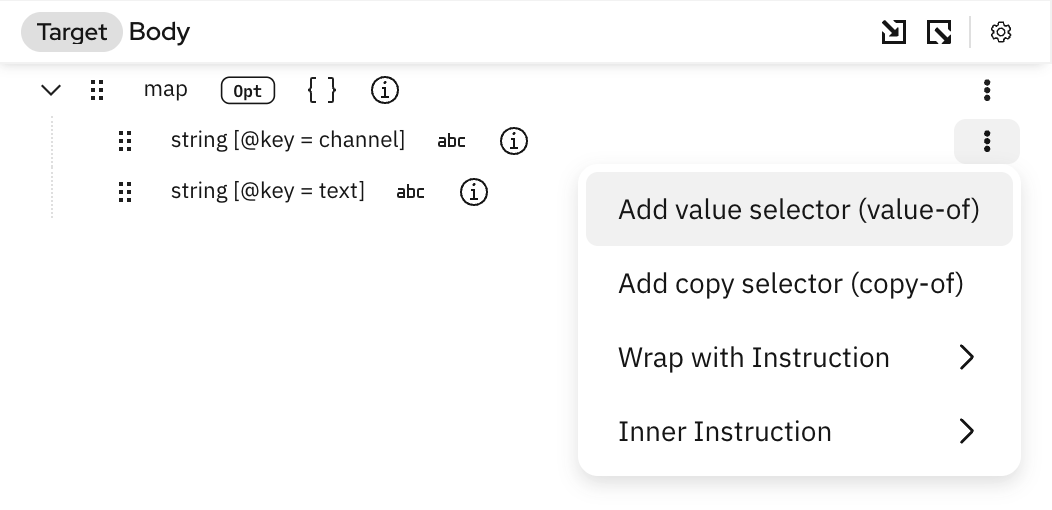
-
string[@key = text]:The mapping rendering should be similar to:
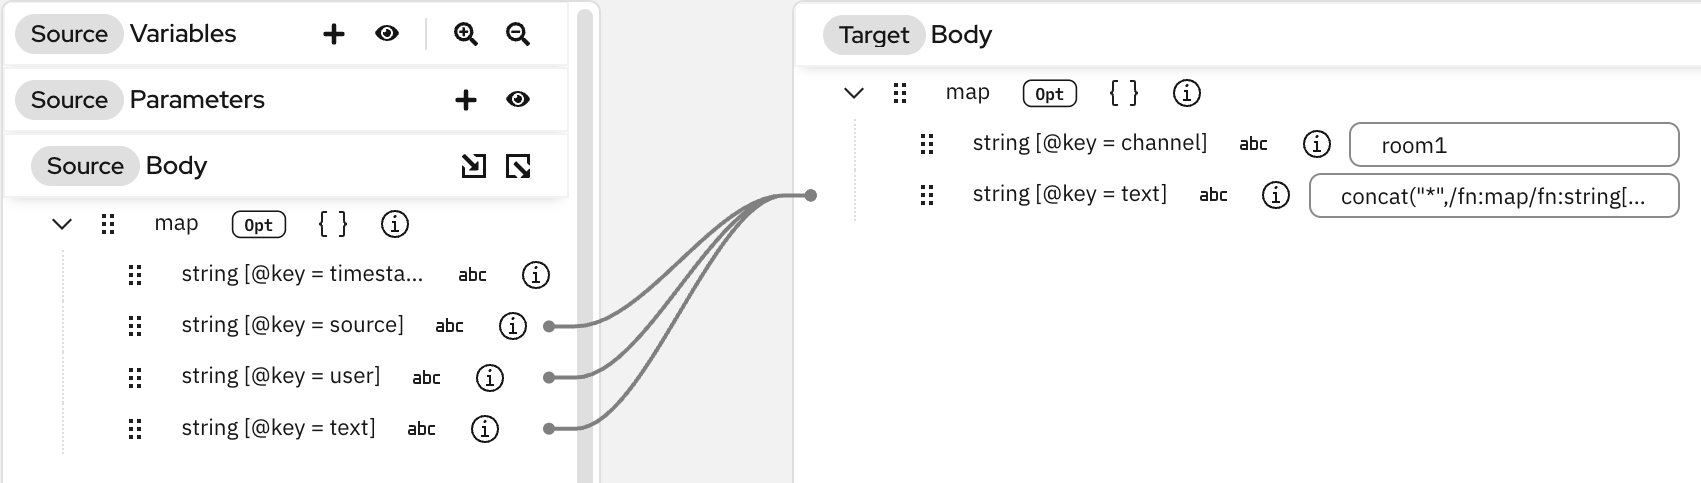
-
To return to the canvas, click the Design tab:

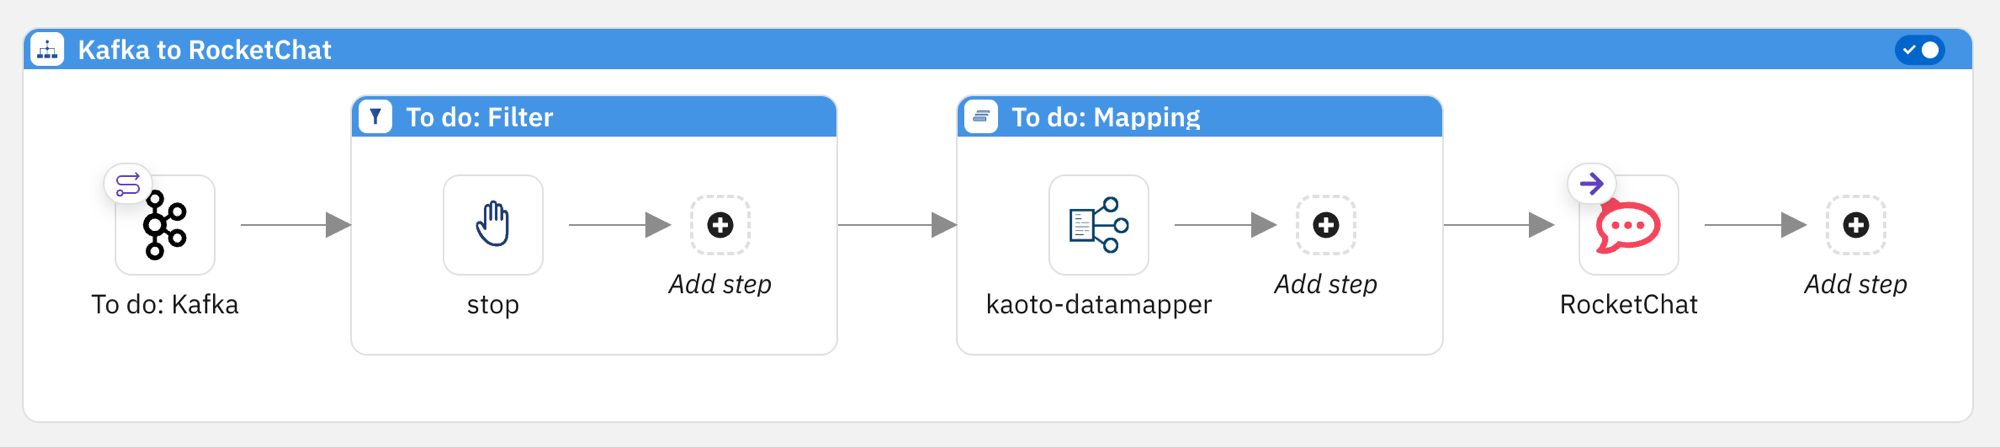
Your completed flow should look like this:
Test the flow locally
Run the process in the background using Camel JBang:
What does this command do?
|
Verify the process is running:
You should see the process in Running status:
  PID   NAME  CAMEL   PLATFORM  PROFILE  READY  STATUS   RELOAD  AGE  ROUTE  MSG/S  TOTAL  FAIL  INFLIGHT  LAST  SINCE-LAST
 16763  k2r   4.18.0  Camel     dev       1/1   Running     0/0  16s    1/1   0.00      0     0         0             -/-/-
Before sending a test message, make sure Rocket.Chat is open and you’re in your designated room. If you haven’t logged in yet, follow the instructions in Rocket.Chat platform onboarding.
Once ready, send a test message to Kafka:
What does this command do?
|
Open your Rocket.Chat room and check for the incoming message. You should see something like:
Once you’ve confirmed the message, stop the background process:
What does this command do?
|