Section 3: Access Dev Spaces and configure the MTA extension
|
In this lab, we will use the Migration Toolkit for Applications Visual Studio Code extension—the MTA extension in a Red Hat Dev Spaces environment that provides a VS Code-based GUI. Developer Lightspeed is not a separate extension. It is MTA’s AI-powered code refactoring feature. The MTA extension is what is installed in the IDE; it includes both MTA static code analysis and Developer Lightspeed (generative AI). |
Goal
Prepare the OpenShift Dev Spaces workspace (mta-lab) and the MTA extension for the rest of the lab:
-
Open the
parasol-insurance-eapproject (cloned from your GitLab account) -
Create a migration profile (source and target technologies)
-
Confirm Developer Lightspeed can reach the lab LLM via GenAI /
provider-settings.yaml
We will start by opening the pre-provisioned development environment and configuring the MTA extension, including Developer Lightspeed (AI) settings, to modernize Parasol Insurance’s parasol-insurance-eap application.
Exercise 1: Open Dev Spaces and log in
-
Switch to Red Hat OpenShift Dev Spaces by clicking the OpenShift Dev Spaces tab in the workshop interface.
-
Log in to Dev Spaces using the OpenShift credentials:
The initial page is the Keycloak SSO login page Username:
{user}Password:
{password} -
After logging in, if prompted to Authorize Access
-
Click Allow selected permissions button
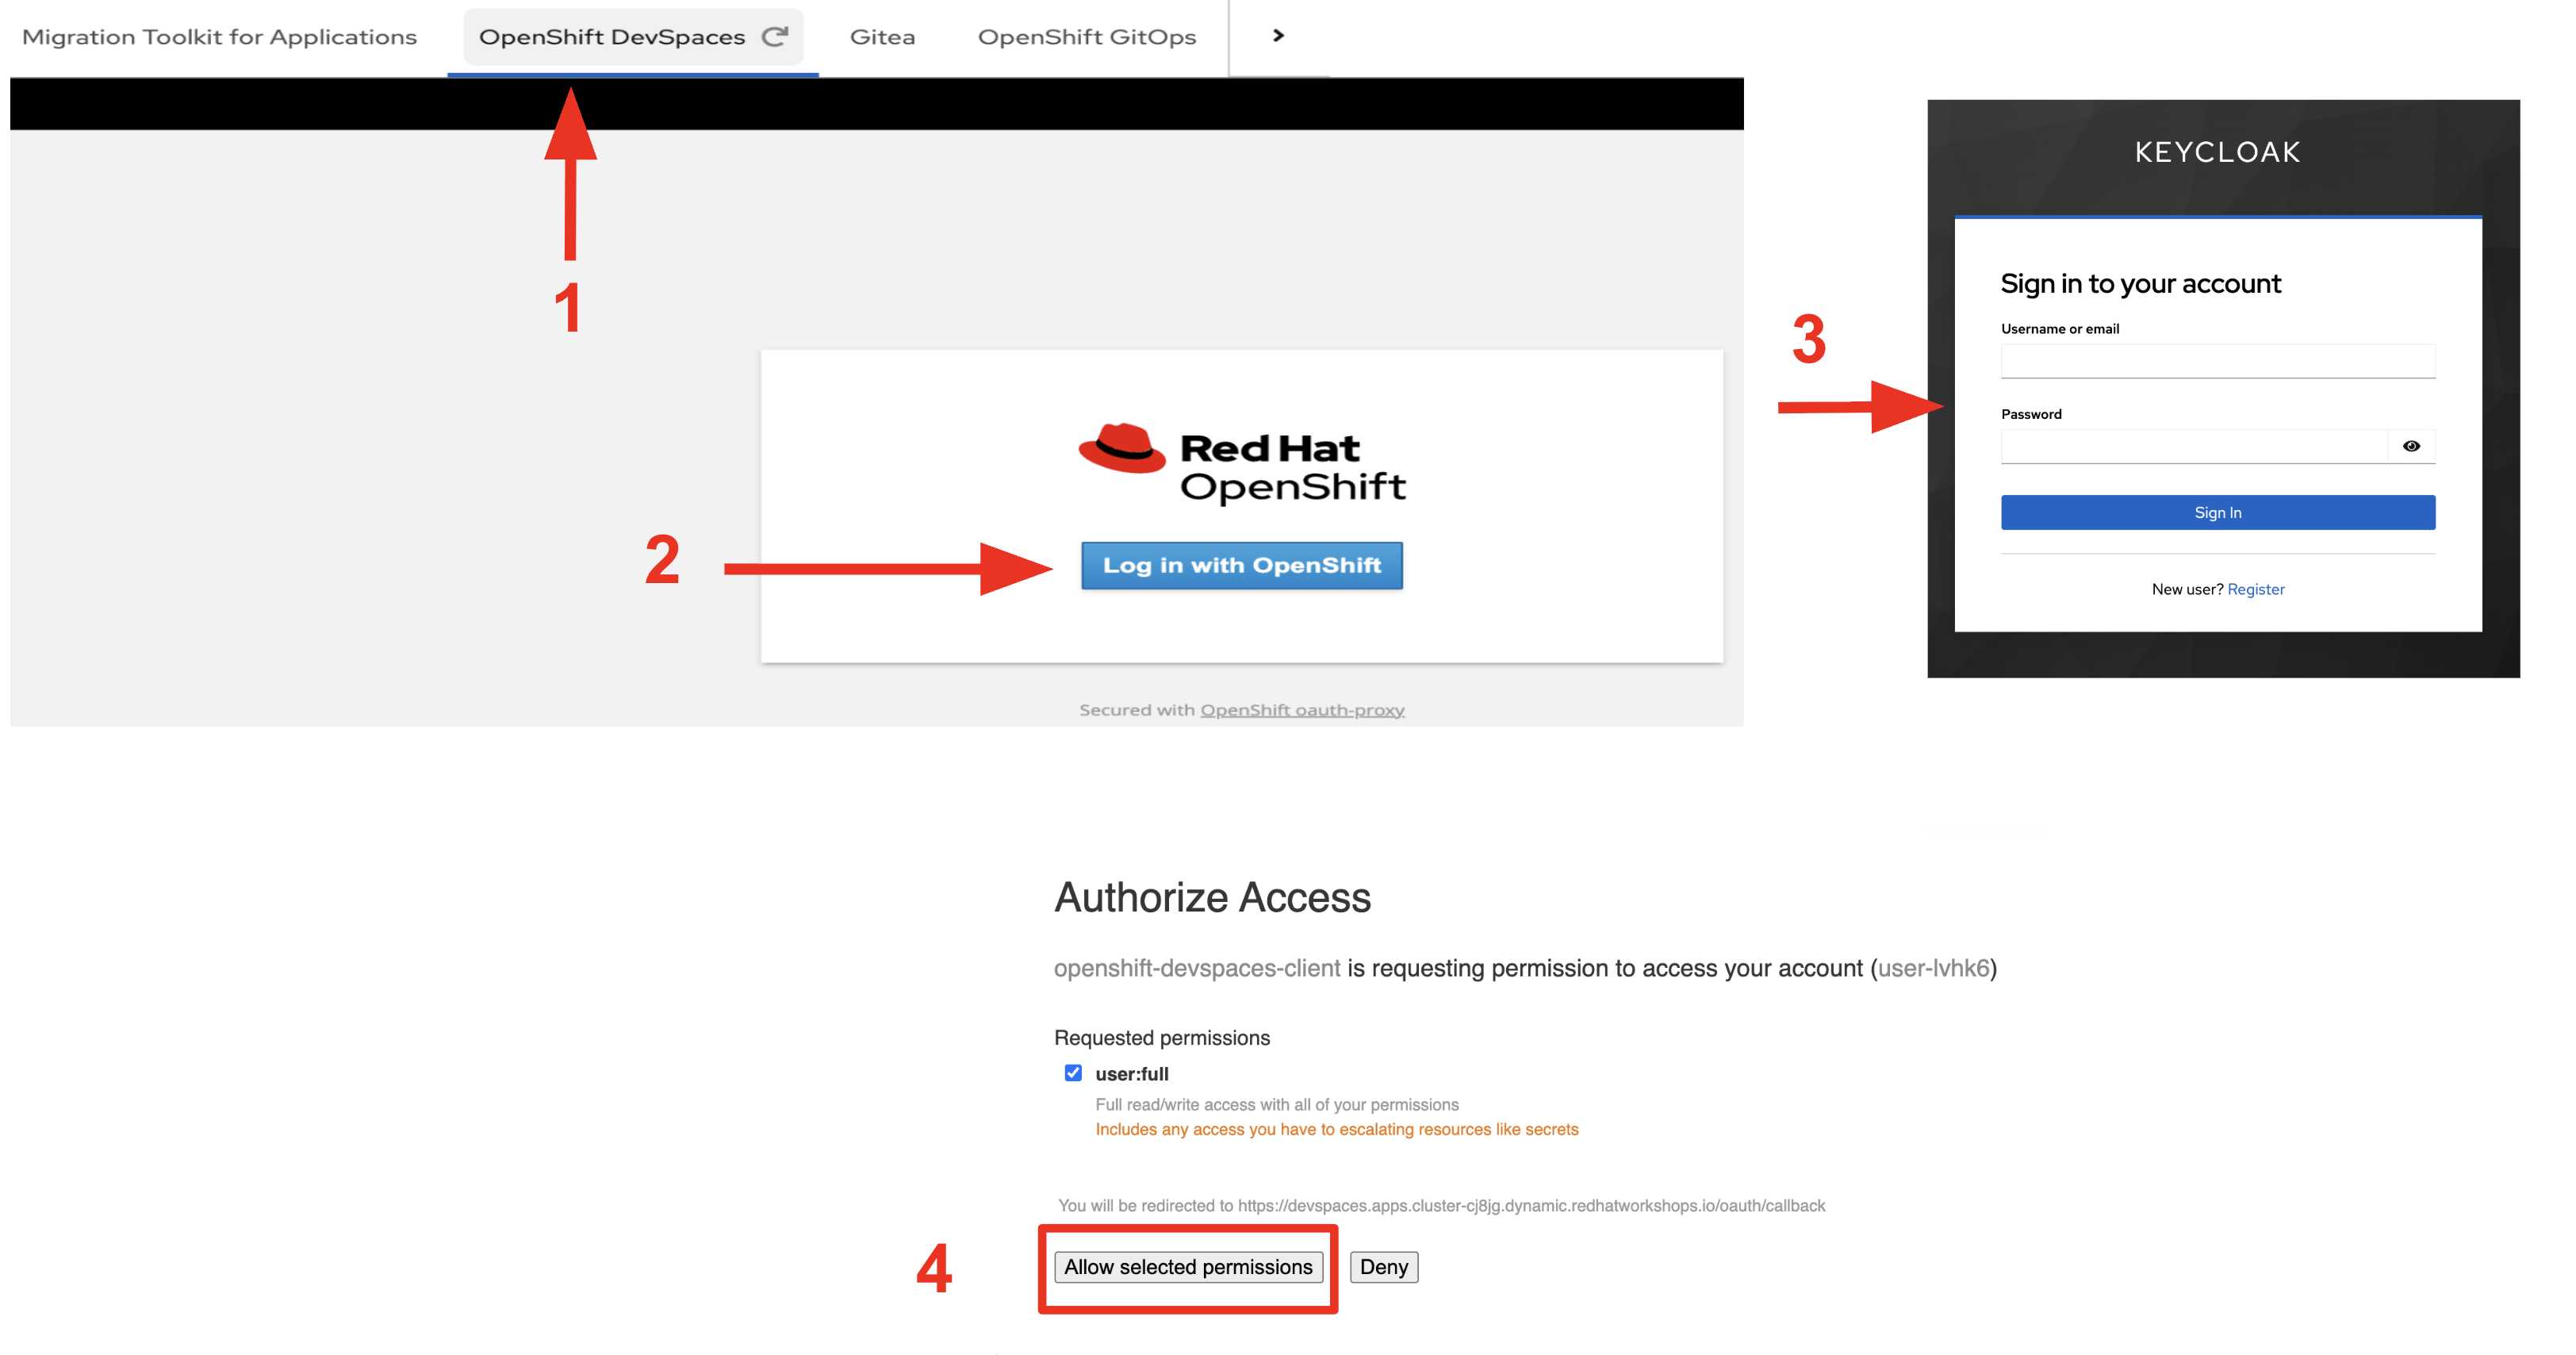 Figure 1. Logging In
If a message indicates authentication is required again, switch back to the OpenShift Dev Spaces tab in the workshop UI (do not click a refresh icon in the browser). That returns you to the workspace listing so you can reopen mta-lab.
-
-
Open the mta-lab workspace
-
After logging in, the workspace listing opens and shows the mta-lab entry (provisioned for your user)
-
Click on the Open link on the right side of the workspace listing
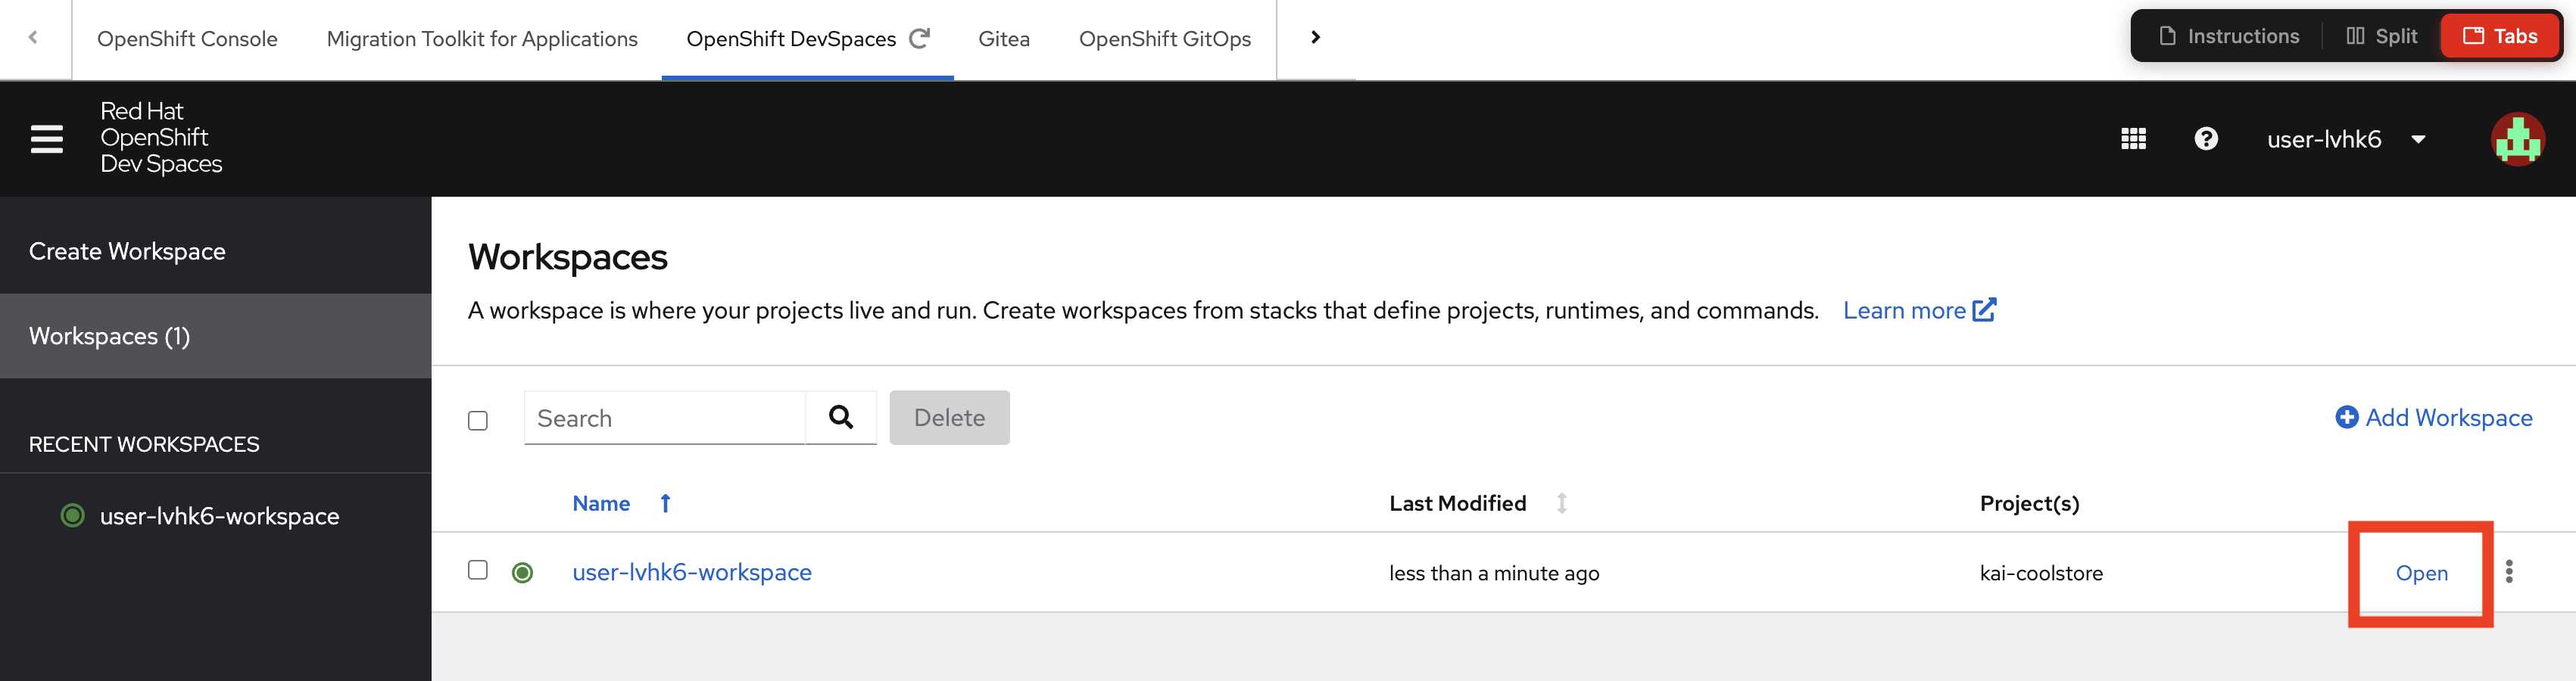 Figure 2. Open Workspace
-
-
If this is your first time opening Dev Spaces, you may be redirected to GitLab to establish OAuth credentials. Log in with your workshop credentials (
{user}/{password}) and click Authorize when prompted. This allows Dev Spaces to clone repositories from GitLab on your behalf. -
Wait for the workspace to initialize and open:
The parasol-insurance-eap repository (from your GitLab project) loads in Dev Spaces and the development environment is ready.
The workspace opens in a new browser tab.
-
If prompted to trust the publishers or the workspace, confirm trust. (Figure 3)
-
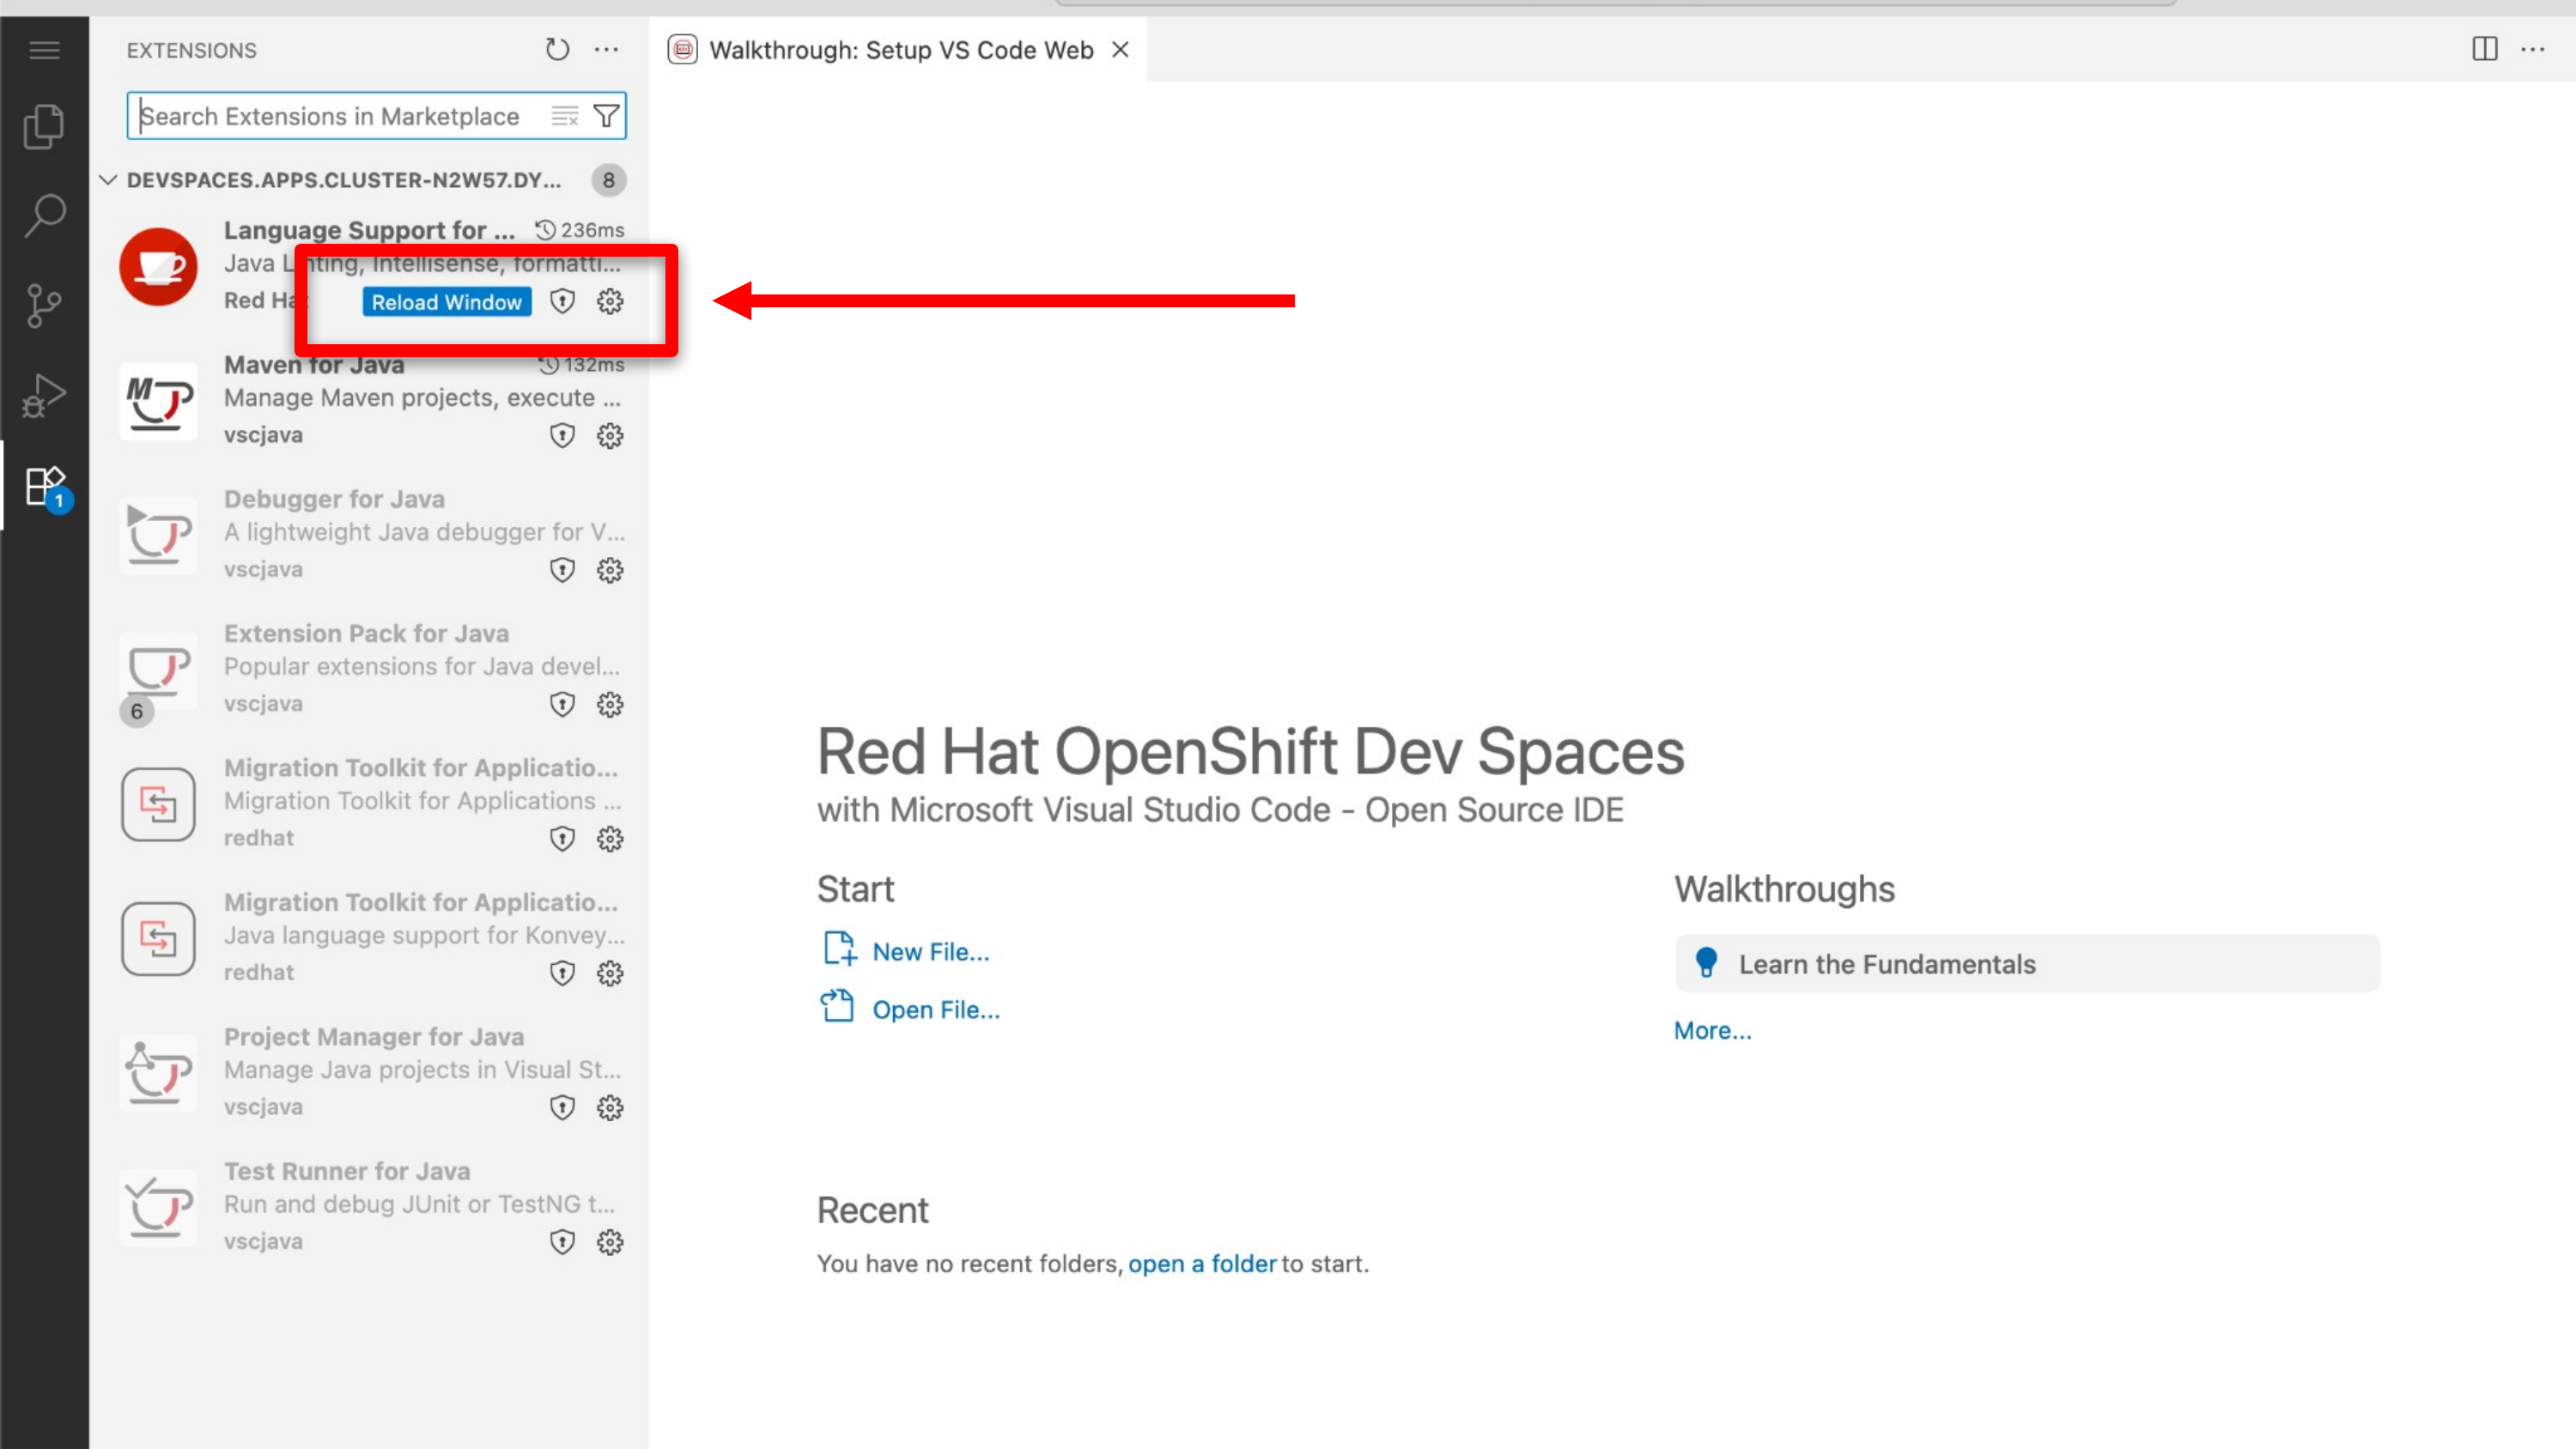
If an introductory layout panel appears, press Mark Done. Mark done will close the introductory panel and open the extensions installed panel by clicking on the extensions icon on the left side of the screen as shown in Step 2 in the image below. (Figure 4)
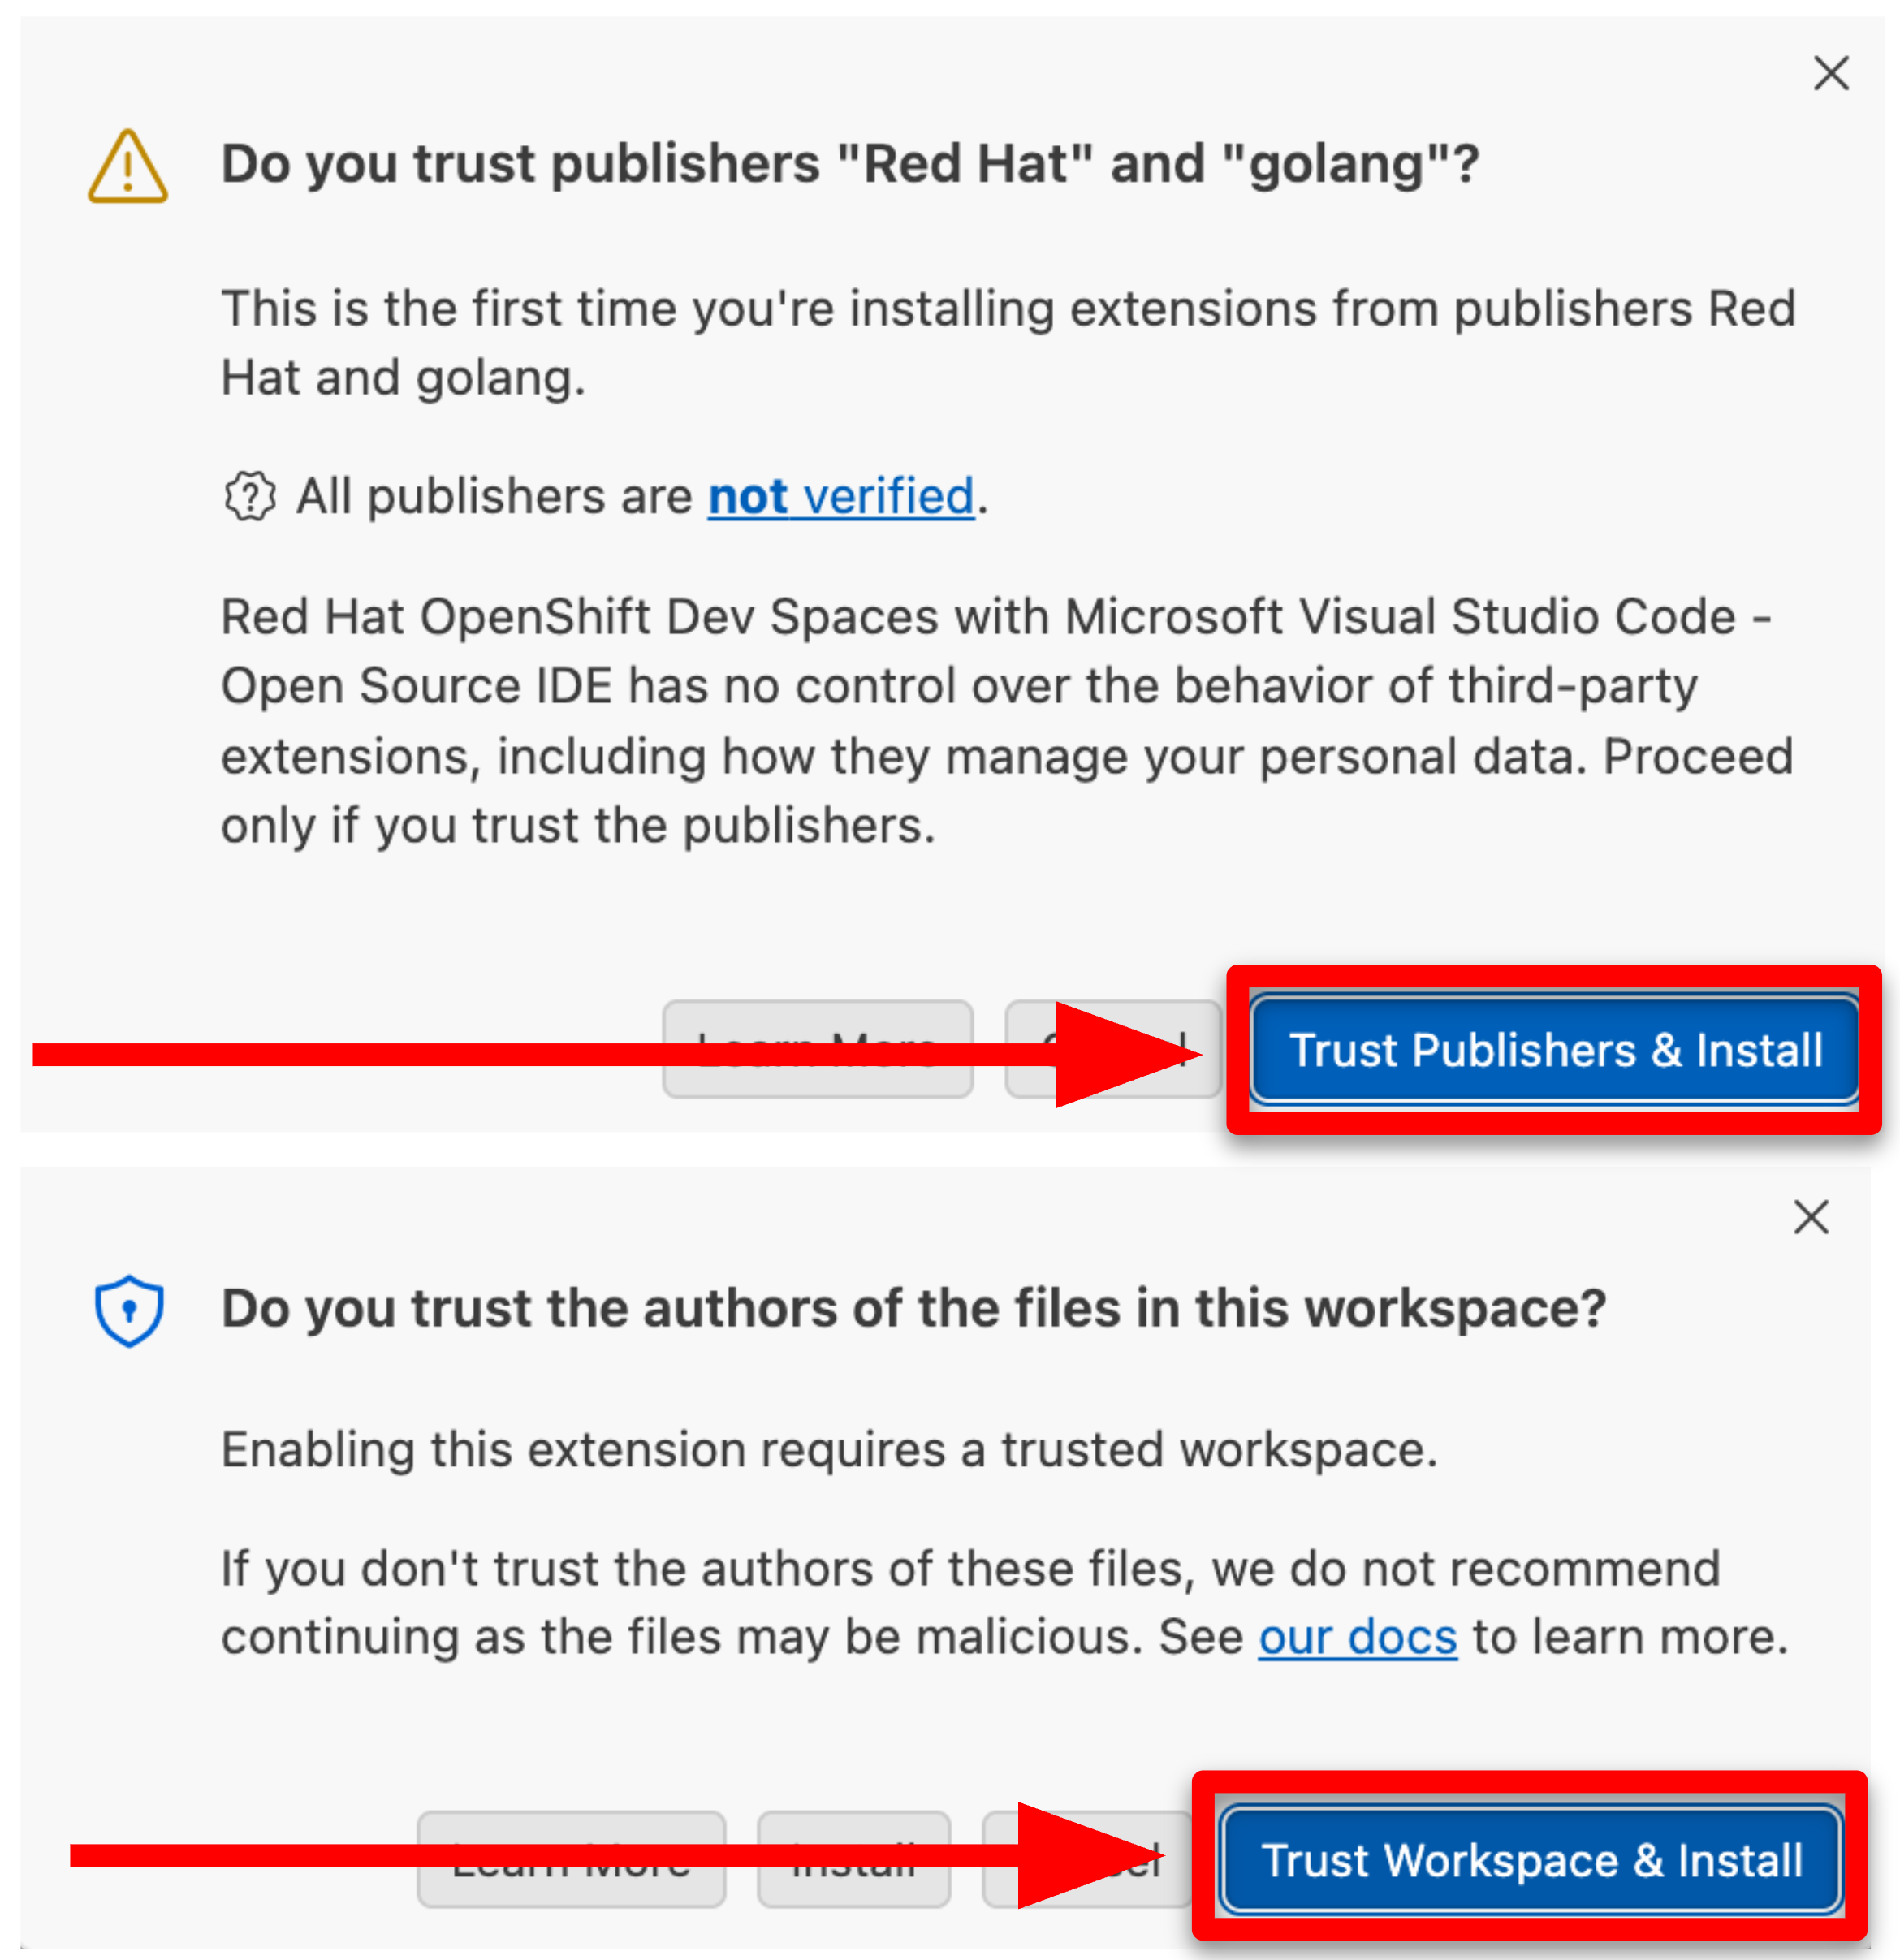 Figure 3. Manage profiles
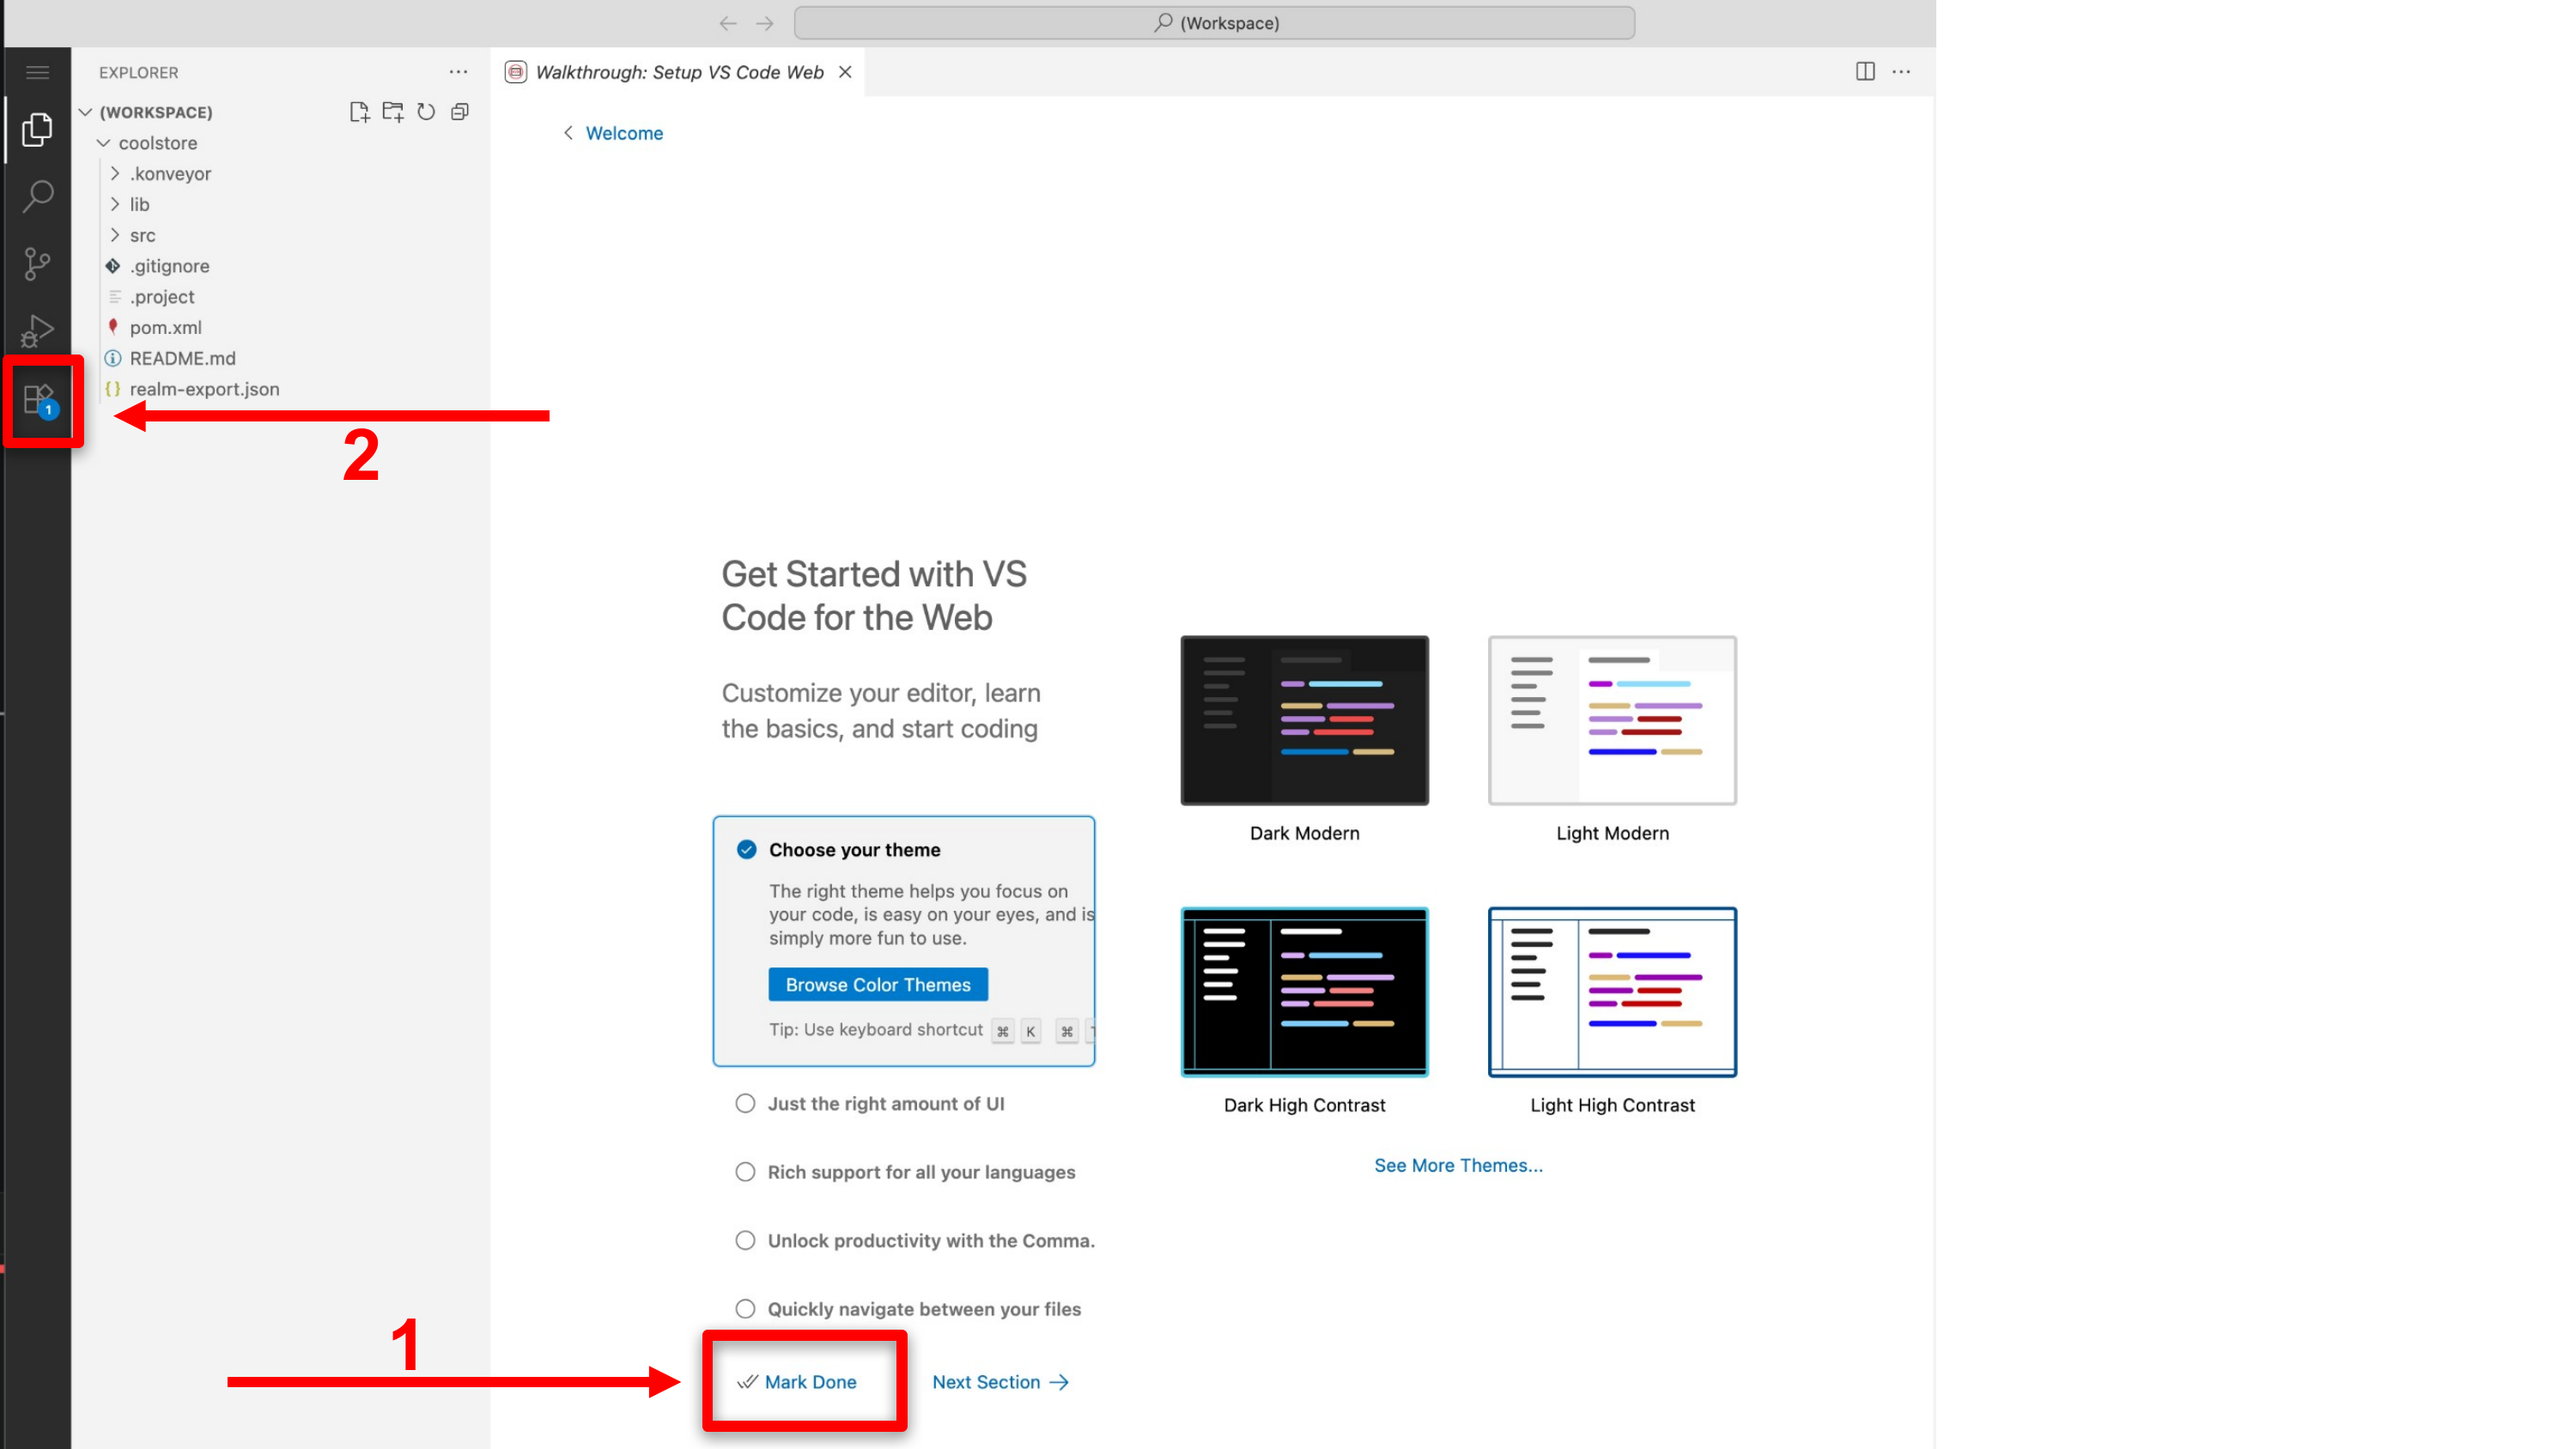 Figure 4. Mark done
-
In some cases the extensions might take some time to install. If you see the reload window button then click on it. It will reload the browser tab automatically.
Exercise 2: Configure MTA profiles and GenAI provider
Excellent! You have made it to Exercise 2, this also means we now have a working environment to configure our Analysis profiles.
Managing multiple profiles is a powerful feature of the MTA extension. It allows you to switch between different analysis profiles easily. You can create a new profile by clicking on the "New Profile" button as shown in Step 3 in the image below.
We shall start with creating our first profile, the quarkus-profile — to migrate our application to Quarkus. In Section 5: Custom rules (audit logging) we will explore the audit-logging custom rules.
Click on the Manage Profiles button to open the profiles management panel.
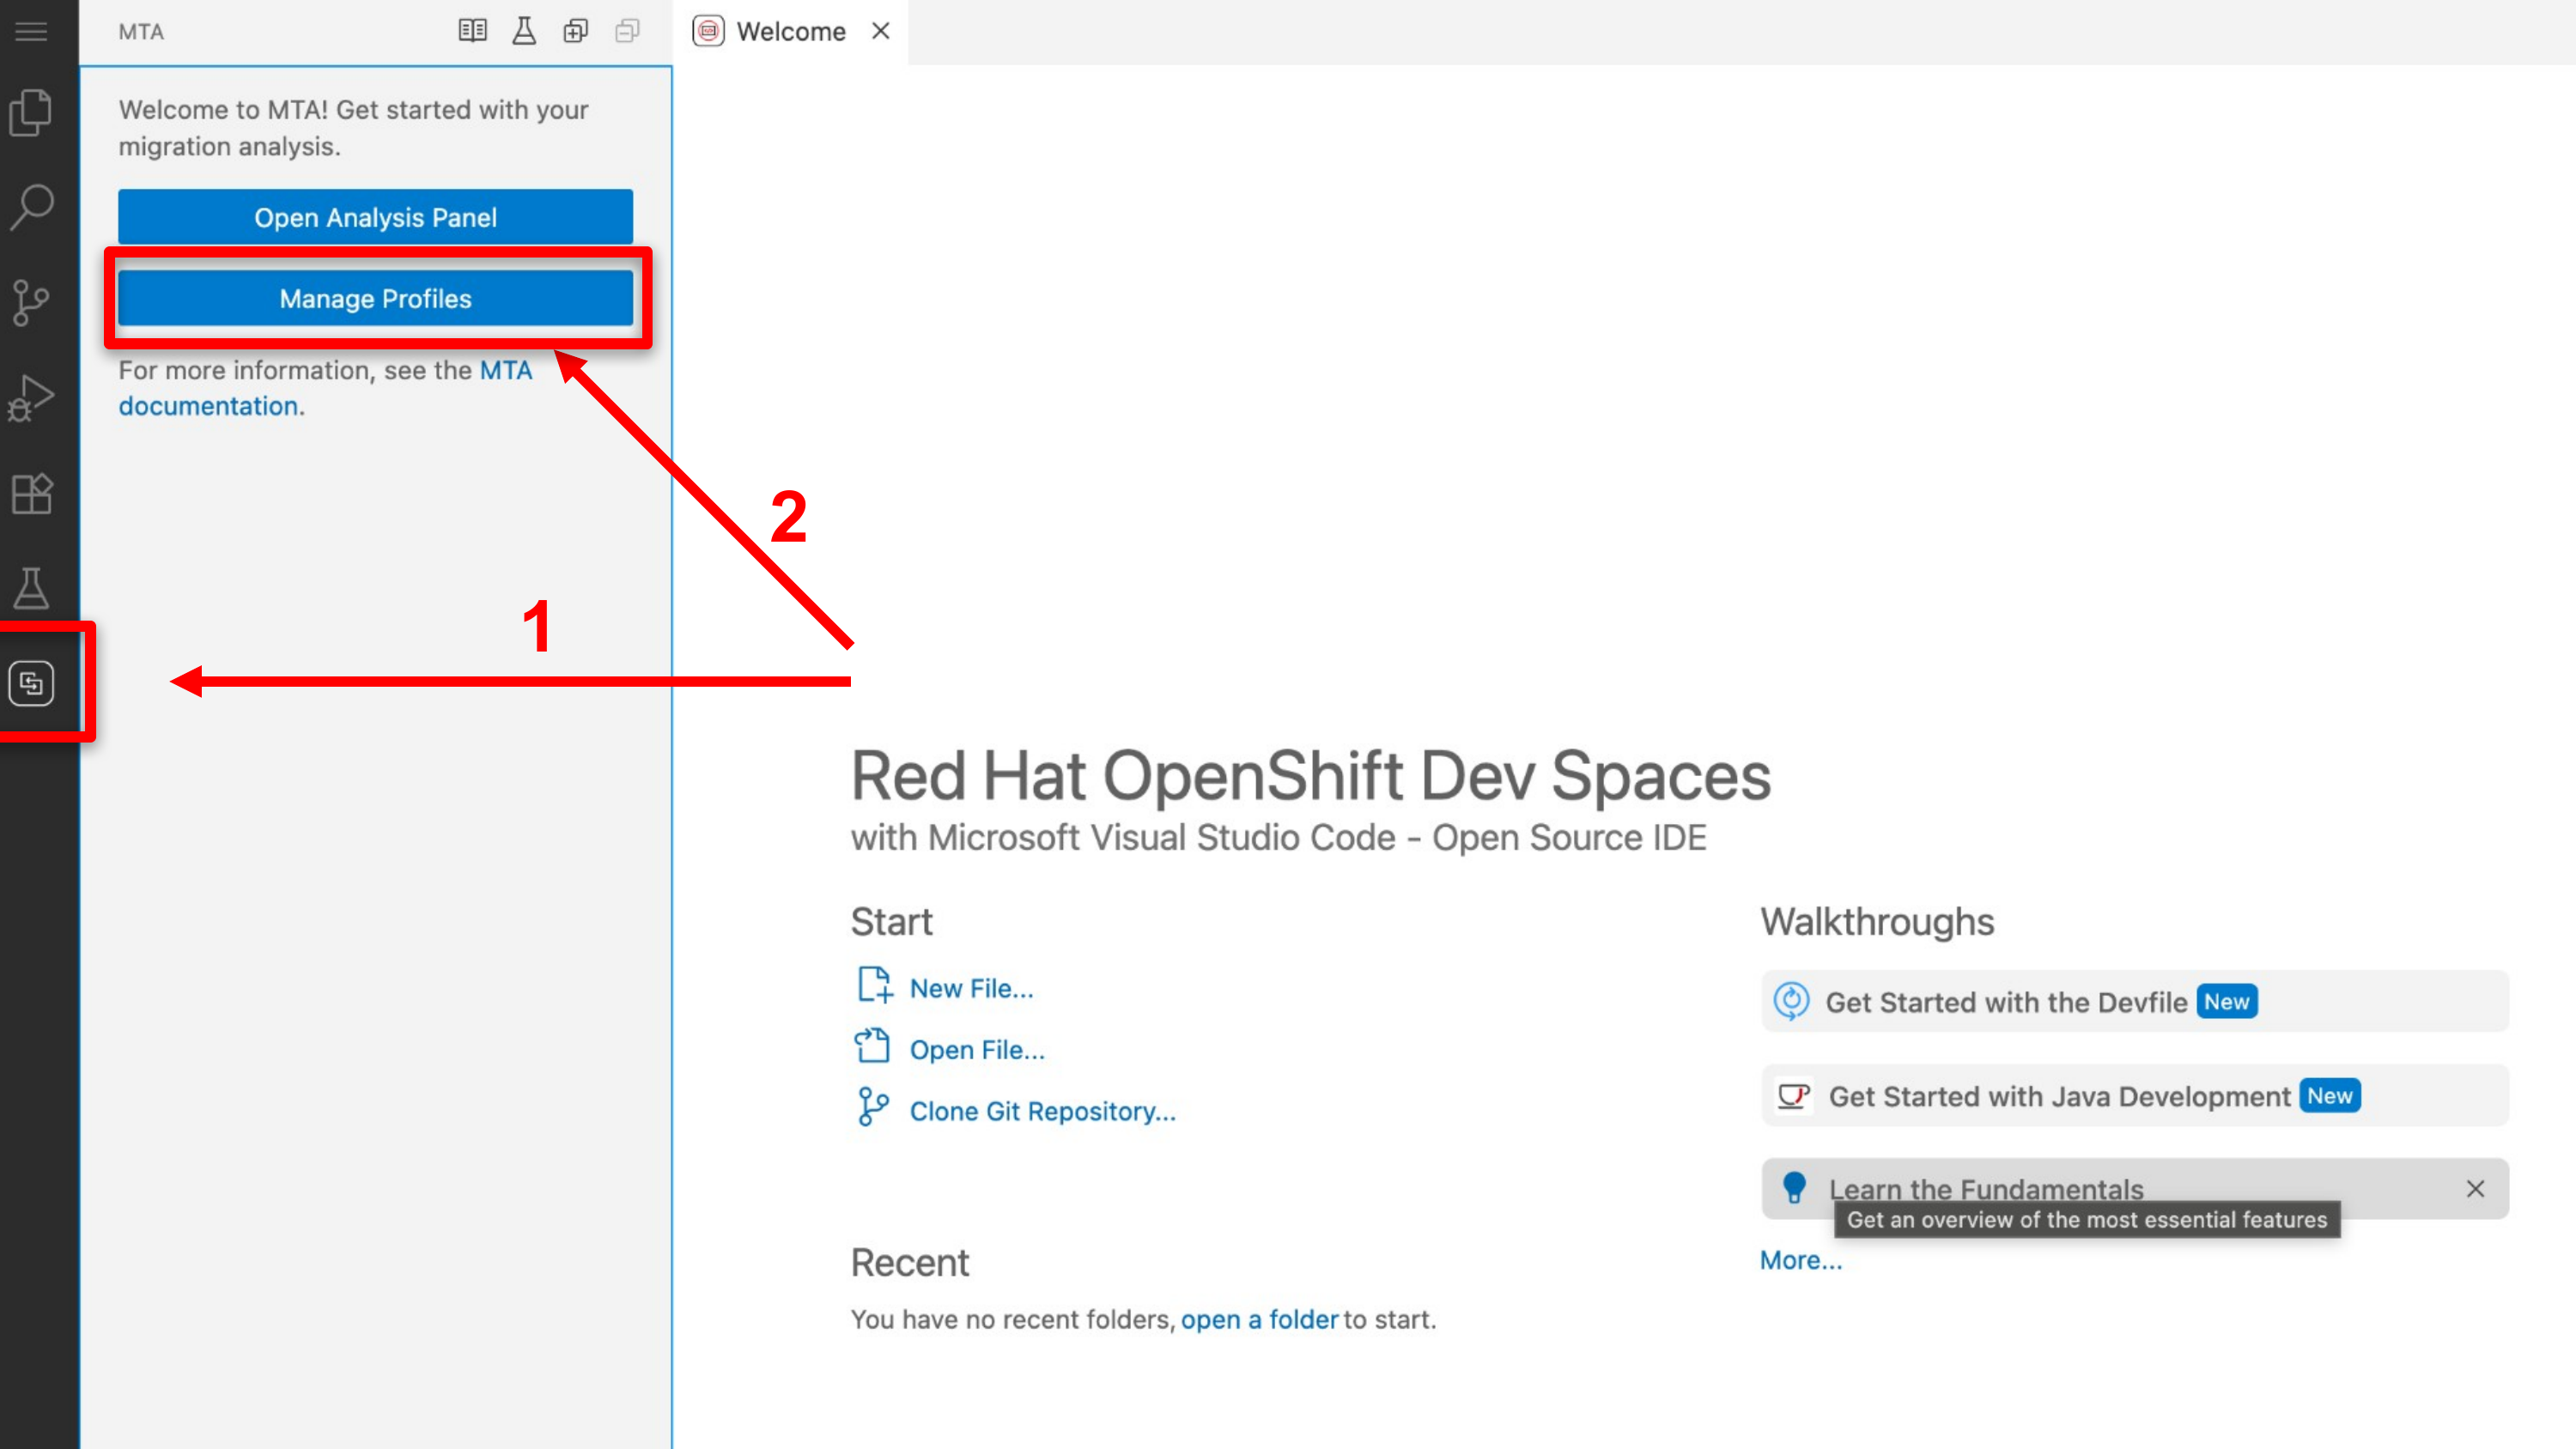
-
Create a new profile
quarkus-profile -
Profile Name:
quarkus-profile -
Target Technologies:
quarkus,quarkus3+,jakarta-ee
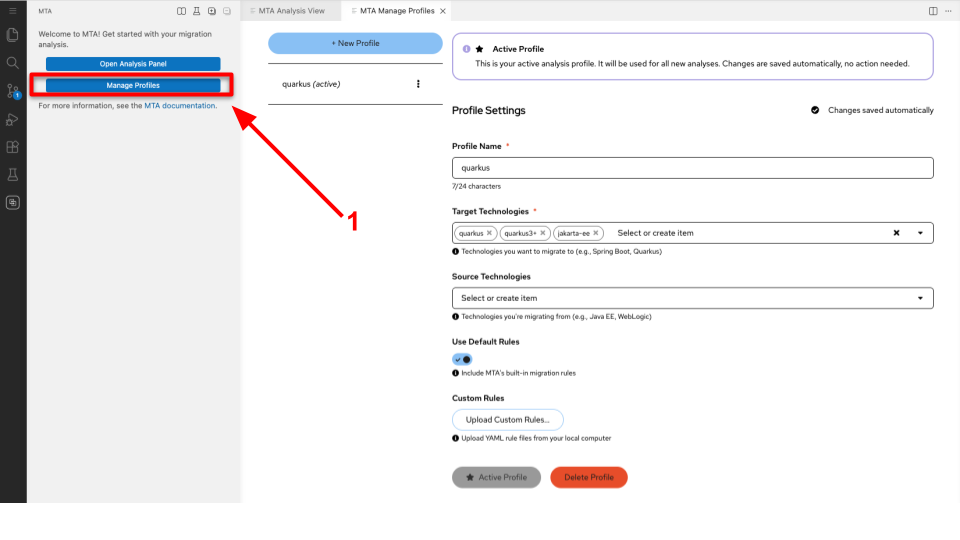
Since this is the first profile it will automatically be made active by the DLS extension.
Review that you have the correct details as listed above and close this tab.
The screenshot above shows that control next to Open Analysis Panel click it and follow the instructions below. Open the GenAI provider settings from the MTA panel as shown in the next image.
-
1 Click the settings
⚙︎icon. -
2 Click
Configure GenAI Settings
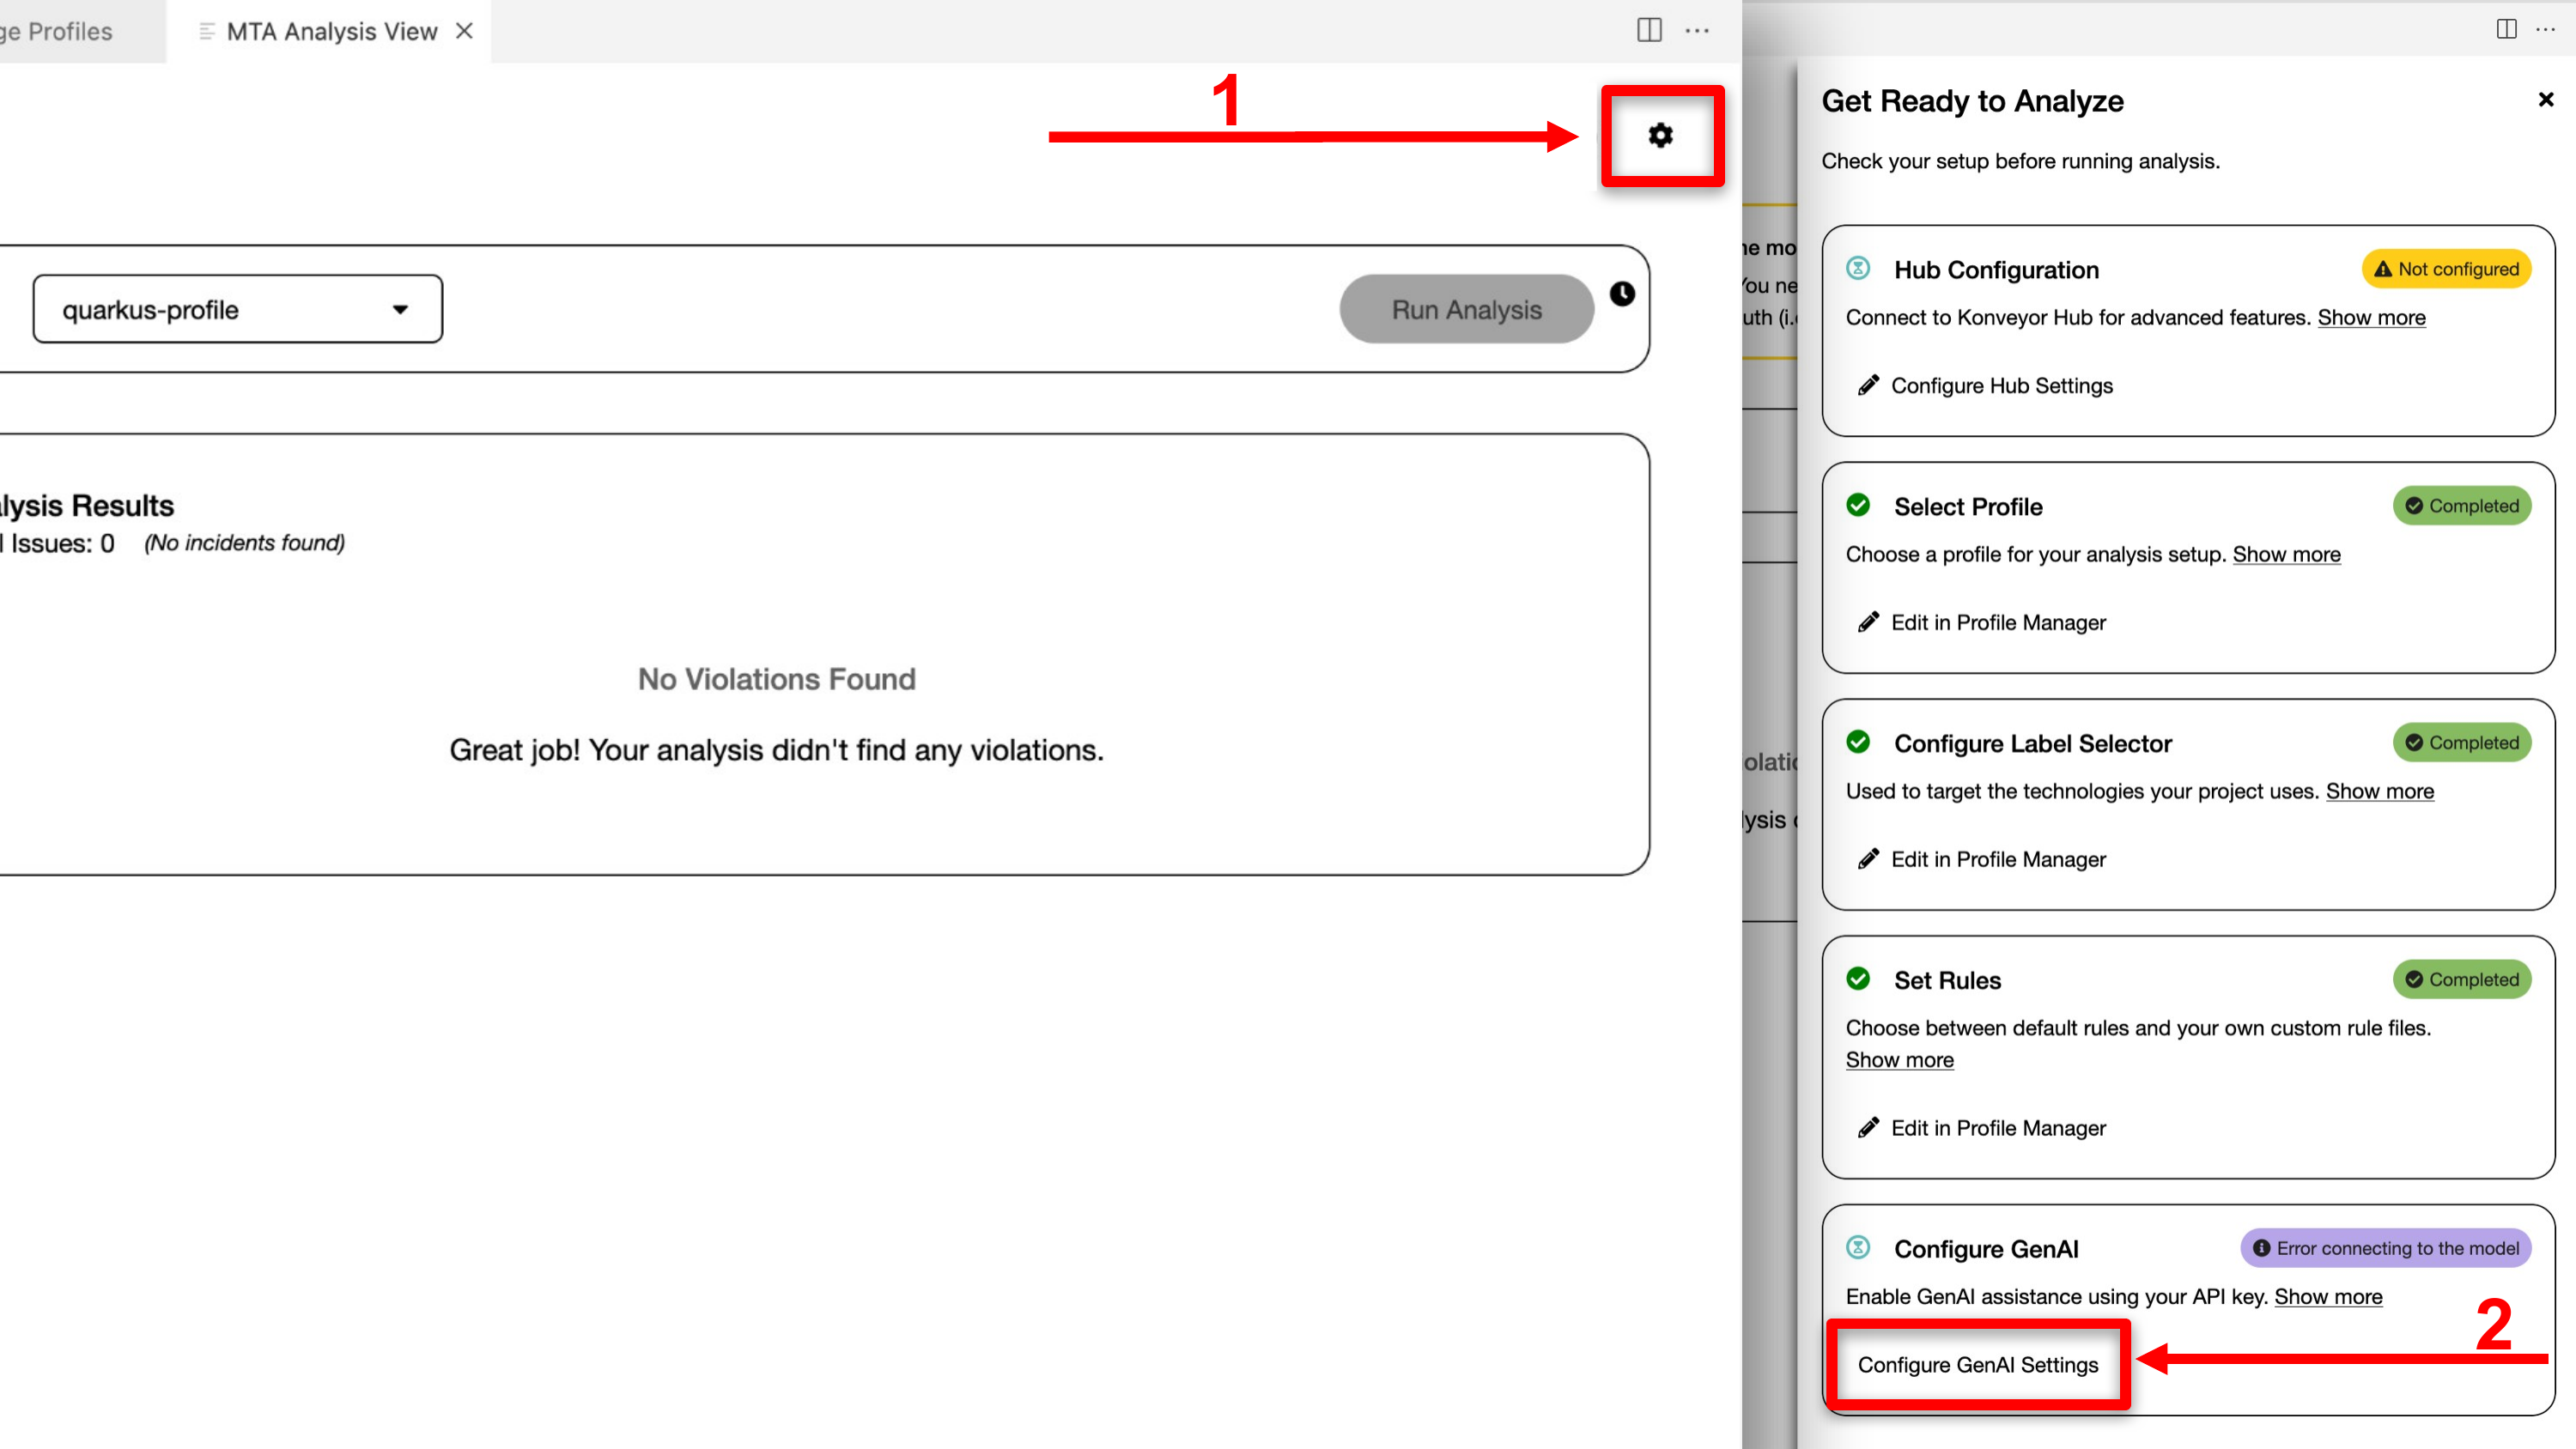
This should open the provider settings configuration. MTA uses provider-settings.yaml to connect to the LLM.
The lab workspace is pre-configured with provider settings and LiteLLM credentials. Confirm the OpenShift model is active and the base URL / API key fields are populated (they should already match your lab environment).
| Provider settings are normally pre-filled for this lab. Use the YAML below only if the file is empty or incomplete (for example after a workspace reset) — this is a recovery step, not an expected bug. |
models:
  OpenShift: &active
    environment:
      OPENAI_API_KEY: "{litellm_virtual_key}"
    provider: ChatOpenAI
    args:
      model: "qwen3-235b"
      configuration:
        baseURL: "{litellm_api_base_url}"
active: *active
Confirm that the settings have the following values in the following fields.
-
OPENAI_API_KEY: this is the LLM key to the model hosted on OpenShift AI -
model: the name of the model we are using -
baseURL: the url/route at which the model is listening to requests via the chat completions API. -
active: Finally we want to ensure that this profile is active. MTA can be configured with multiple LLMs however only one LLM can be active at a time.
Save the provider-settings.yaml file if you edited it (Ctrl+S / Cmd+S), then return to the MTA Analysis View tab.
With GenAI configured and quarkus-profile selected, start the analysis server and run your first analysis. The image below shows both steps:
-
1 Click Start (power icon) in the top-right of the MTA Analysis View. Wait until Server Status changes from a red Stopped badge to a green Running badge. While the server is stopped, Run Analysis stays disabled.
-
2 When the server is Running, click Run Analysis next to the
quarkus-profiledropdown.
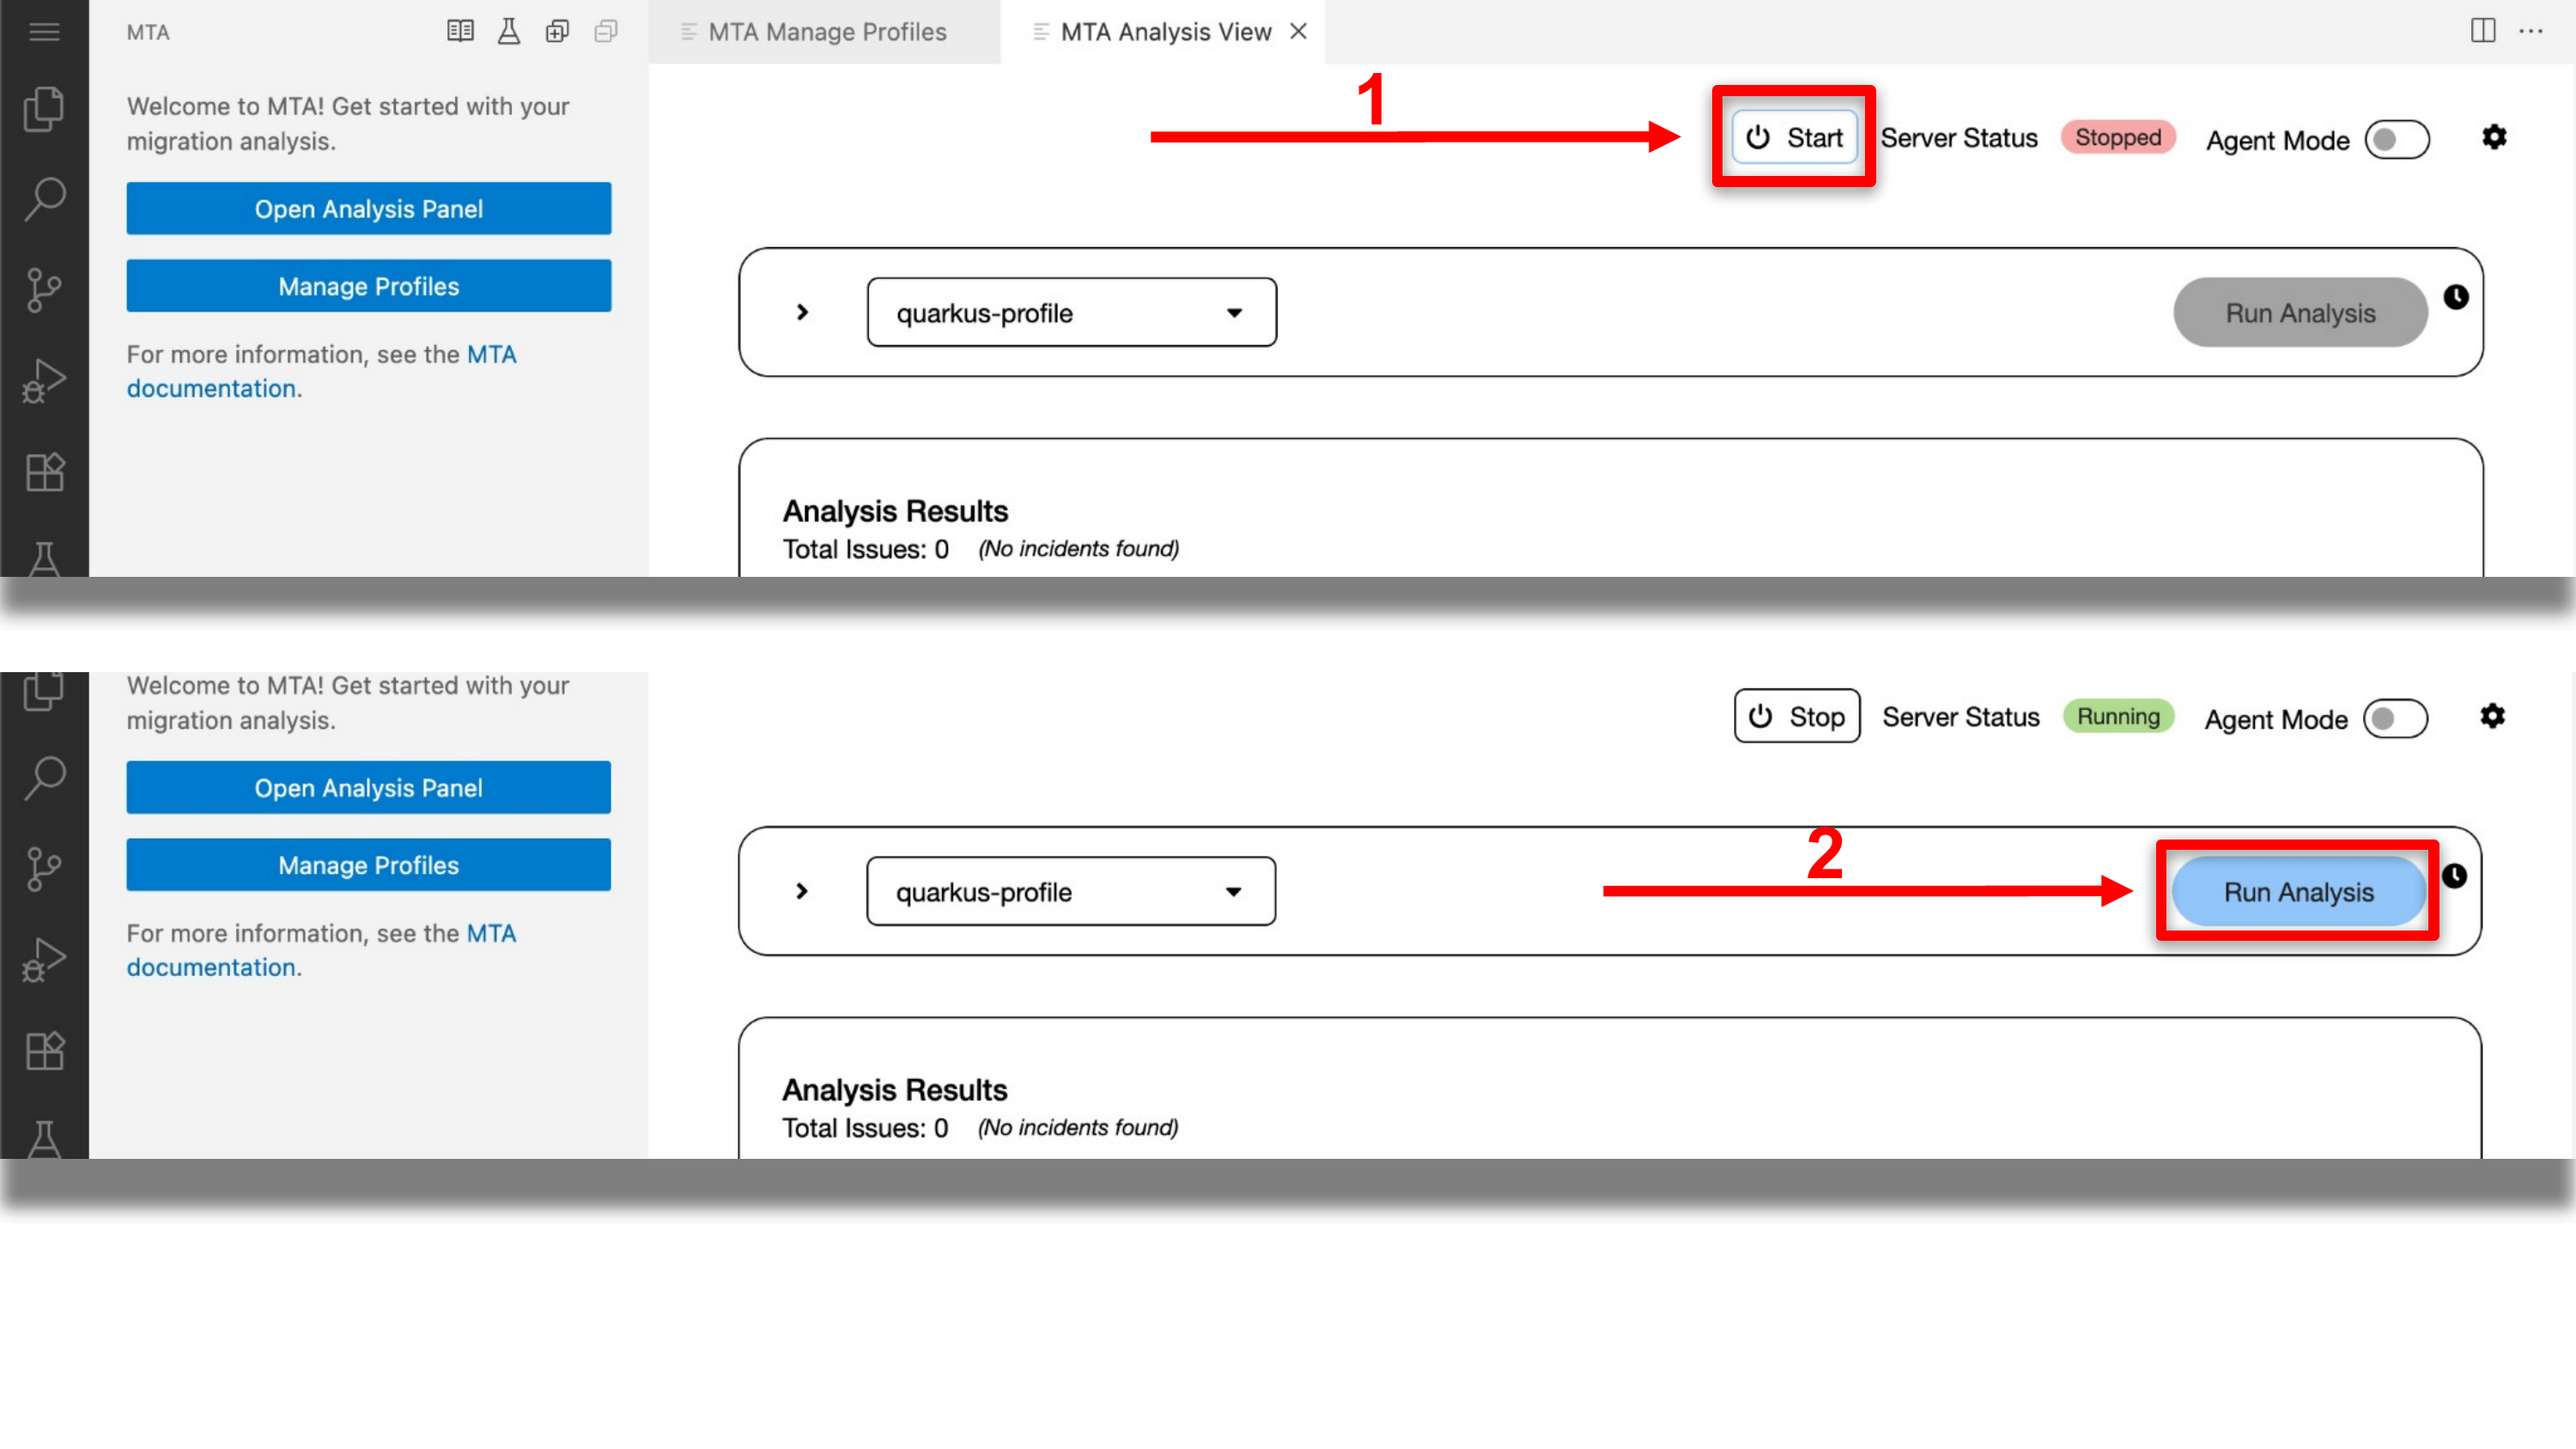
The first analysis can take a minute or two. When it finishes, the MTA Analysis View lists migration issues for parasol-insurance-eap. You will review those findings in the next section.
|
Verify
Confirm the Dev Spaces environment and MTA extension (including Developer Lightspeed) are set up correctly.
-
Confirm the MTA extension is set up correctly
-
With the MTA extension icon selected and the MTA Analysis View tab active:
-
Click on the gear icon on the right side of the screen
-
The Get Ready to Analyze pane will open on the right-hand side of the screen
-
There should be green check marks in four of the message boxes, and each should be listed as completed. The
Hub Configurationshould stay "Not Configured" and yellow. -
Finally, ensure that the analysis ran and you can see multiple entries (we will review them in detail in the next section).
-
-
Confirm the Dev Spaces workspace is pointing to the correct repository
-
Click on the file icon on the left side of the Dev Spaces environment
-
The File EXPLORER lists the parasol-insurance-eap directory (your GitLab copy, not a shared sample)
-
Expand directories (e.g. into
src/main/java/com/parasol) with the file explorer arrows if needed — you should see java packages and classes such ascom.parasol.mdb(EmailIntakeMDB) andcom.parasol.ejb(ClaimService)
-