Resources

OpenShift Credentials

  • username: username
  • password: user-password

Dev Spaces

Developer Console

Matrix

Rocket.Chat

BGCreated with Sketch.

Tasks to complete

Get Started
BGCreated with Sketch.

Congratulations!

Return to the dashboard to continue your journey.

Go to home

Setup the Lab working folder

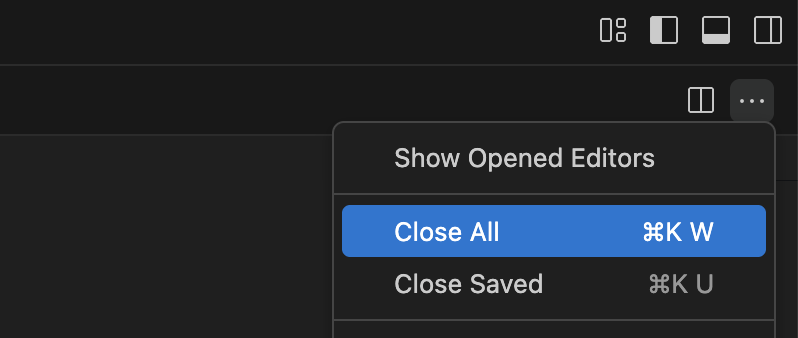
Close tabs to clean your workspace before starting a new exercise.

How to close all tabs

From your workspace in your Red Hat OpenShift Dev Spaces environment, follow the steps below:

Find the menu in the top right corner of the editor and click as follows:
dev close tabs

close-tabs-img

{x: 97, y: 30, rot: 270, size: 2} {x: 97, y: 68, rot: 270, size: 2}

{x: 138, y: 30, size: 3} {x: 138, y: 68, size: 3}

  1. Click the …​ button

  2. Select Close All.


If you skipped earlier chapters, expand the section below to catch up.

Details
  • Enable access to the database

    This chapter requires access to a database, but it’s unreachable by default.

    flowchart LR
        subgraph yoursLabel ["username-devspaces ."]
            subgraph yours [" "]
                Camel[⚙️ Integration]
            end
        end
    
        Camel -.-x|"❌ unreachable"| SVC
    
        subgraph sharedLabel ["shared-database ."]
            subgraph shared [" "]
                %% SI2{{"Service\nInterconnect"}}
                SVC((svc))
                SVC --> DB
            end
        end
    
        DB@{ img: "../../_images/module-03/common/database-icon.svg", label: "Database", pos: "b", h: 80, w: 80, constraint: "on" }
    
        style yoursLabel fill:none,stroke:none,color:#EE0000,font-weight:bold
        style Camel fill:#f8b4b4,stroke:#EE0000,font-weight:bold
        style sharedLabel fill:none,stroke:none,color:#EE0000,font-weight:bold
        style yours fill:#fce4e4,stroke:#EE0000
        style shared fill:#fce4e4,stroke:#EE0000
        style DB fill:none,stroke:none
        style SVC fill:#fce4e4,stroke:#EE0000,color:#333

    To enable access to the database, run the following command in your terminal in Dev Spaces:

    si-setup

    You should see all resources reporting ready OK:

    Namespace: username-devspaces
        ✓ Site                    ready  OK
        ✓ AccessGrant             ready  OK
        ✓ Listener                ready  OK
    
    Namespace: shared-database
        ✓ AccessToken             ready  OK
        ✓ Link                    ready  OK

    The above output indicates a Service Interconnect link has been established between your namespace and the database namespace.

    flowchart LR
        subgraph yoursLabel ["username-devspaces ."]
            subgraph yours [" "]
                Camel[⚙️ Integration]
    
                SI1{{"Service\nInterconnect"}}
            end
        end
    
        Camel --> SI1
    
        SI1 -.-|"🔒 secure link"| SI2
    
        subgraph sharedLabel ["shared-database ."]
            subgraph shared [" "]
                SI2{{"Service\nInterconnect"}}
                SVC((svc))
                SVC --> DB
            end
        end
    
        SI2 --> SVC
    
        DB@{ img: "../../_images/module-03/common/database-icon.svg", label: "Database", pos: "b", h: 80, w: 80, constraint: "on" }
    
        style yoursLabel fill:none,stroke:none,color:#EE0000,font-weight:bold
        style sharedLabel fill:none,stroke:none,color:#EE0000,font-weight:bold
        style yours fill:#fce4e4,stroke:#EE0000
        style shared fill:#fce4e4,stroke:#EE0000
        style Camel fill:#f8b4b4,stroke:#EE0000,font-weight:bold
        style DB fill:none,stroke:none
        style SI1 fill:#f8b4b4,stroke:#EE0000,color:#333
        style SI2 fill:#f8b4b4,stroke:#EE0000,color:#333
        style SVC fill:#fce4e4,stroke:#EE0000,color:#333


  1. From your terminal in Dev Spaces:

    1. If you have any running processes, stop them with Ctrl+C.

    2. Run the following command:

      step 9

      Run the command above anytime to reset the exercise.

      The workshop includes handy helper scripts that let you jump to any step or reset the lab to a known good state:

      • step N — reset the lab to the beginning of step N

      • steps — list all available steps in the lab

      • start or restart — go to the very beginning (equivalent to step 1)

      • ff — fast-forward to the next step

      • rw — rewind to the previous step


  2. Check your lab folder

    After executing the commands above, have a look in your editor’s tree view to confirm it looks healthy. It should be similar to the folder structure you’ve seen in the previous exercise.

    📁 workshop
      📁 lab
        📁 data (mock inputs)
        📁 prompt (model prompts)
     !   agent-main.camel.yaml
     !   agent-tool-profile.camel.yaml
     ⚙   application.properties
     J   PdfRenderer.java
     ≡   template-pdf.xsl

    This version of the exercise does not use MCP servers to simplify execution. All tools are embedded directly in the Camel agentic process — they’re defined as regular Camel routes that the agent can discover and call.


Do you see the expected folder structure and files?

You’re ready to continue.

Make sure the syntax of the commands is compatible with your environment and try again.